デモ
See the Pen TinyMCE PDF File Upload Example by qwe001 (@qwe001) on CodePen.
要件
- WYSIWYGエディタ上で、PDFファイルをアップロードできること
- PDFをアップロードしたら、アンカータグが生成され、PDFへのリンクが付くこと
$\tiny{予算も時間もないので有償ライブラリ(MoxieManagerなど)は使わない。}$
$\tiny{エンジニア工数だけで完結する範囲で実装すること(小声)}$
実装(BASE64エンコード版)
PDFファイルをサーバーにアップロードせずに、文字列として持ちたい場合はコチラ。
サクッと動作確認したい方は、上記のデモを試してみてください
function initTinyMCE()
{
  var options = {
    selector: 'textarea',
    plugins: 'link code',
    toolbar: 'undo redo | link | code',
    automatic_uploads: true,
    file_picker_types: 'file', // e.g. "file,image,media"
    file_picker_callback: function (callback, value, meta) {
      if (meta.filetype === 'file') { // anchor link
        //callback('https://www.google.com/logos/google.jpg', { text: 'My text' });
        uploadFileHandler(callback, value, meta);
      }
      if (meta.filetype === 'image') {
        //callback('https://www.google.com/logos/google.jpg', { alt: 'My alt text' });
      }
      if (meta.filetype === 'media') {
        //callback('movie.mp4', { source2: 'alt.ogg', poster: 'https://www.google.com/logos/google.jpg' });
      }
    }
  };

  tinymce.init(options);
}

function uploadFileHandler(callback, value, meta)
{
   var input = document.createElement('input');
   input.setAttribute('type', 'file');
   input.setAttribute('accept', 'application/pdf');
   input.click();

   input.onchange = function () {
     var file = this.files[0];

     var reader = new FileReader();
     reader.onload = function () {
       var id = 'blobid' + (new Date()).getTime();
       var blobCache =  tinymce.activeEditor.editorUpload.blobCache;
       var base64 = reader.result.split(',')[1];
       var blobInfo = blobCache.create(id, file, base64);
       blobCache.add(blobInfo);

       callback(blobInfo.blobUri(), { title: file.name });
     };
     reader.readAsDataURL(file);
   };
}

initTinyMCE();
実装(サーバーにアップロードする)
多くの人が求めている(求められている)実装はこっちだと思います。
基本的には、画像アップのやり方と同じです。
昔はプラグイン入れてやってたなあ~ってしみじみ思った。
フロントエンド
CSRF対策が不要な場合は、CSRF関係の記述は省いてもらっても構いません
function initTinyMCE()
{
  var options = {
    selector: 'textarea',
    plugins: 'link code',
    toolbar: 'undo redo | link | code',
    //automatic_uploads: true,
    file_picker_types: 'file', // e.g. "file,image,media"
    file_picker_callback: function (callback, value, meta) {
      if (meta.filetype === 'file') { // anchor link
        //callback('https://www.google.com/logos/google.jpg', { text: 'My text' });
        uploadFileHandler(callback, value, meta);
      }
      if (meta.filetype === 'image') {
        //callback('https://www.google.com/logos/google.jpg', { alt: 'My alt text' });
      }
      if (meta.filetype === 'media') {
        //callback('movie.mp4', { source2: 'alt.ogg', poster: 'https://www.google.com/logos/google.jpg' });
      }
    }
  };

  tinymce.init(options);
}

function uploadFileHandler(callback, value, meta)
{
  var allowedFileTypes = 'application/pdf';
  var input = document.createElement('input');

  input.setAttribute('type', 'file');
  input.setAttribute('accept', allowedFileTypes);
  input.click();

  input.onchange = function() {
    var file = this.files[0];

    // API側(CodeIgniter側)に送るデータを準備
    var postData = new FormData();
    // PDFデータを送る
    postData.append('body_pdf', file, file.name); // $_FILES['body_pdf'] => array

    var tokenName = csrfTokenName();
    var currentTokenVal = csrfTokenVal();

    // CSRFトークンを送る(これを送らないとAPI側で処理を受け付けない)
    if(isCsrfTokenFieldExists()){ // if csrf_protection enabled
      postData.append(tokenName, currentTokenVal);
    }

    var xhr = new XMLHttpRequest();
    xhr.withCredentials = false;

    var filesUploadUrl = '/path/to/your/api/upload_pdf';
    xhr.open('POST', filesUploadUrl); // connect ajax

    xhr.onload = function(){
      if (xhr.status < 200 || xhr.status >= 300) {
        callback('HTTP Error: ' + xhr.status); // show error to href
        return;
      }

      var json = JSON.parse(xhr.responseText);

      // API側(CodeIgniter側)のレスポンスJSONにlocationプロパティがない時
      if (!json || typeof json.location != 'string') {
        callback('Invalid JSON: ' + xhr.responseText); // show error to href
        return;
      }

      var fileUrl = json.location;
      var attrs = {
        //"text" : "", // リンク元テキスト
        "title" : file.name // title属性
      };

      // TinyMCEのリンクモーダルにhrefやtitleなどの値を返す
      callback(fileUrl, attrs);

      // CSRFトークンを再生成(これをしないとフォームの送信時にCSRFエラーになるため)
      var newCsrfTokenVal = json[tokenName]; // e.g. json.csrf_token
      if(newCsrfTokenVal){
        csrfTokenRegenerate(newCsrfTokenVal);
      }
    };

    xhr.send(postData);
  };
}

function csrfTokenName()
{
  return "csrf_token";
}

function csrfTokenField()
{
  return $('input[name=' + csrfTokenName() + ']');
}

function isCsrfTokenFieldExists()
{
  return csrfTokenField().length > 0 ? true : false;
}

function csrfTokenVal()
{
  return csrfTokenField().val();
}

function csrfTokenRegenerate(newVal)
{
  return csrfTokenField().val(newVal);
}

initTinyMCE();
サーバーサイド
サーバーサイドの実装はCodeIgniter3を使ってます
class Api_Controller extends CI_Controller
{
    public function __construct()
    {
        parent::__construct();
        $this->config->load('config');
    }

    public function upload_pdf()
    {
        $fileDir = base_url($this->uploadPdfDir());

        $inputName = "body_pdf";
        $file = $this->uploadFile($inputName);
        $filePath = $fileDir . $file['file_name'];

        // フロント(AJAX)に返すデータを準備
        $res = array(
            'location' => $filePath,
            'status' => 'success',
            'response' => 200
        );

        $isCsrfProtectionEnabled = $this->config->item('csrf_protection'); // @see application/config/config.php $config['csrf_protection'];
        if($isCsrfProtectionEnabled){
            $csrfTokenName = $this->security->get_csrf_token_name();
            $csrfTokenValue = $this->security->get_csrf_hash();
            $res[$csrfTokenName] = $csrfTokenValue;
        }

        header("Content-Type: application/json; charset=utf-8");
        echo json_encode($res);
        return TRUE;
    }

    private function uploadPdfDir()
    {
        return "/path/to/upload/dir/pdf/";
    }

    protected function uploadFile($fieldName = "image")
    {
        $ret = array();

        $config = array();
        $defaultConfig = $this->loadDefaultConfigUpload();

        $config = array_merge($defaultConfig, $config);

        switch($fieldName){
            case "image" :
                $config['upload_path'] = $this->uploadImgDir();
                $config['allowed_types'] = 'jpg|jpeg|png|gif';
                break;
            case "body_pdf" : // HTMLエディタからのPDFアップロード
                $config['upload_path'] = $this->uploadPdfDir();
                $config['allowed_types'] = 'pdf';
                break;
            default :
                $config['upload_path'] = $this->uploadImgDir();
        }

        $this->makeDirectioryIfNotExists($config['upload_path']);

        $this->upload->initialize($config);
        if($this->upload->do_upload($fieldName)){
            $info = $this->upload->data();
            $filePath = $info['file_path'];
            $fileName = $info['file_name'];

            $ret = array(
                'info' => $info,
                'file_name' => $fileName,
                'is_success' => TRUE,
                'response' => 200,
                'message' => 'successfully uploaded ' . $filePath . $fileName,
            );
        }
        else {
            $info = $this->upload->display_errors();

            $ret = array(
                'info' => $info,
                'file_name' => NULL,
                'is_success' => FALSE,
                'response' => 500,
                'message' => 'upload failed',
            );
        }

        return $ret;
    }

    private function loadDefaultConfigUpload()
    {
        $props = array('upload_path', 'allowed_types', 'overwrite', 'encrypt_name', 'max_size', 'max_width', 'max_height', 'max_filename');
        $ret = array();

        foreach($props as $key){
            $ret[$key] = $this->config->item($key);
        }

        return $ret;
    }

    protected function makeDirectioryIfNotExists($dirName, $recursive = TRUE)
    {
        if(file_exists($dirName)){
            return FALSE;
        }

        return mkdir($dirName, 0777, $recursive); // bool
    }
}
仕組み
TinyMCEでファイルをアップロードすると、
FormDataにファイルとCSRFトークン値をセットして、
サーバーサイド(/path/to/your/api/upload_pdf)にPOSTします。
PDFファイルは $_FILES['body_pdf'] で取り出せるので、
それをサーバーの所定ディレクトリにアップロードし、
成功したらファイル名とか成功メッセージとかをJSONレスポンスでフロントエンド(JavaScript)に返します。
フロントエンドはレスを受け取ったら、コールバック関数を用いてhrefとかtitle属性とかに値をつめつめして作業終了って感じです。
ファイルアップロードの方法
デモを見ればわかることですが、
万が一CDNがリンク切れした時のために画像でも残します。
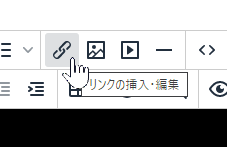
① 本文エディタの「リンク」ボタンをクリックします
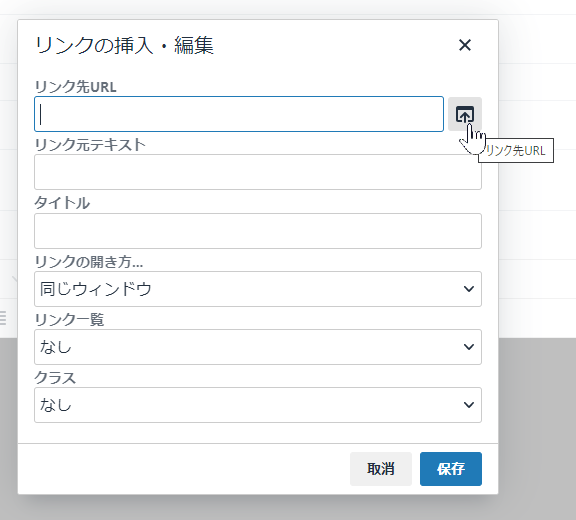
② 「リンク先URL」入力欄の右にあるボタンをクリックします
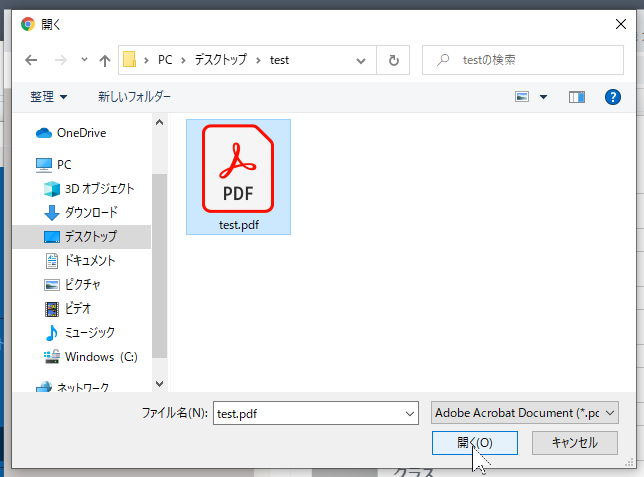
③ アップロードしたいPDFファイルを選択し、「開く」をクリックします
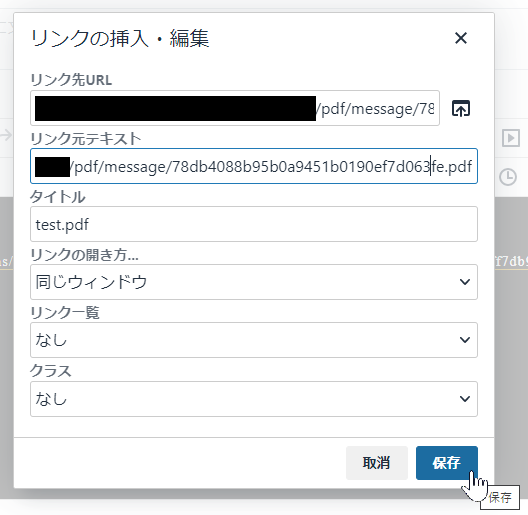
④ リンクの各種値が入ったことを確認し、保存ボタンをクリックします
⑤ サーバー内のPDFファイルへのテキストリンクが生成されます。
参考URL


