利点
良さそうだと思った箇所を引用します。
使いやすい S3 データ
- S3 からのデータ転送を管理しなくてもワークロードを実行できる
- 最新のデータに基づいて、FSx for Lustre でファイルシステムが自動的に更新される
コスト効率が高い
- SSDストレージは、レイテンシーの影響を受けやすいワークロード向けに最適化されている
- HDDストレージは、スループット重視のワークロード向けに最適化されている
あらゆるLinuxワークロードのための設計
- ファイルシステムへは、EC2、EKS、Direct Connect、VPN を使用してオンプレミスからアクセス可能
シンプルでフルマネージド型
- AWS マネジメントコンソール、AWS CLI、AWS SDKでAmazon FSx for Lustre ファイルシステムを作成してスケーリング可能
安全性とコンプライアンス
- 保管中および転送中のデータを自動的に暗号化
- POSIX パーミッションやセキュリティグループを使用して、ネットワークアクセスを制御
- FSx for Lustre のバックアップが可能
ユースケース
- 機械学習
- ハイパフォーマンスコンピューティング
- メディア処理とトランスコーディング
- 自動走行車
- ビッグデータと財務分析
- 電子機器などの設計作業の自動化
触ってみよう
プライベートサブネットに立てたEC2からLustreにアクセスし、エクスポートやインポートをします。インポートではEC2からS3にエンドポイント経由でS3バケットにファイルをアップロードし、Lustreにインポートされるか確認します。
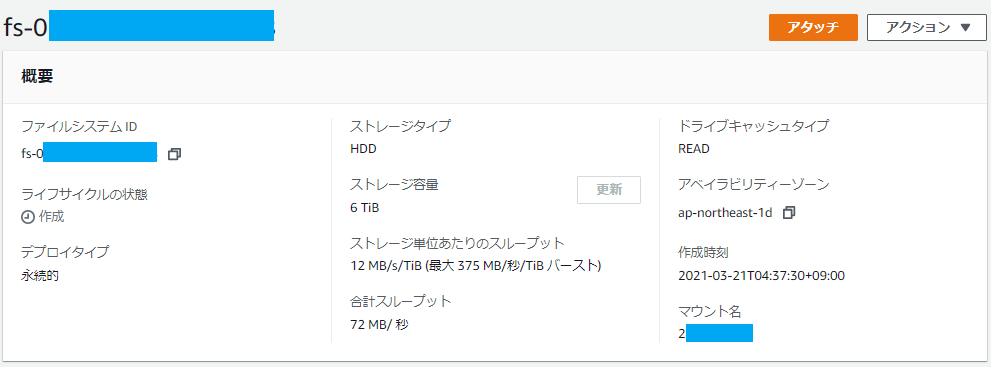
FSx for Lustre 作成
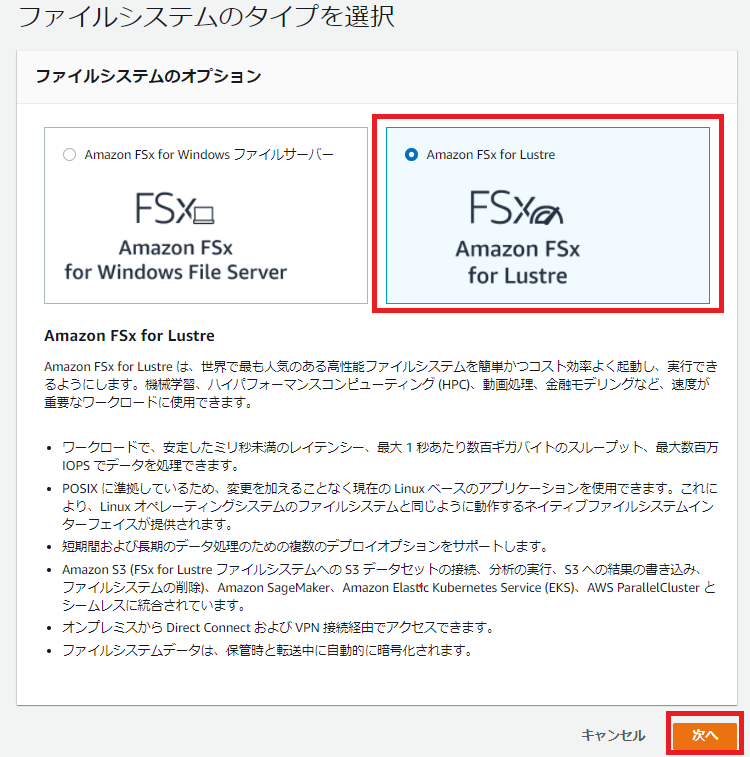
Lustreを選択します。
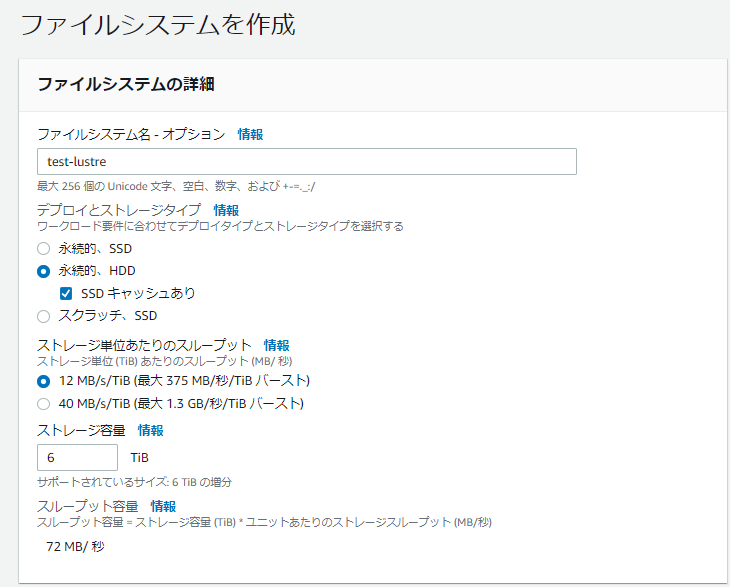
容量の選択をします。
指定したバケットにファイルが新規作成されたとき、または更新されたときにインポートされるようにしたいので、以下の設定にします。
Lustreインストール、マウント
以下を順に実行
file_system_idにLustreのid、mount_nameにLustreのマウント名で書き換えます。
sudo mkdir -p /mnt/fsx
sudo yum update -y
sudo amazon-linux-extras install -y lustre2.10
sudo mount -t lustre -o noatime,flock file_system_id.fsx.ap-northeast-1.amazonaws.com@tcp:/mount_name /mnt/fsx
クライアントVPNエンドポイント作成
相互認証を利用してクライアントVPNエンドポイントを作成します。こちらの記事を参考にしました。
プライベートサブネット
ルートテーブルのルートからインターネットゲートウェイを外します。
エクスポート
ファイルをS3にエクスポートします。マウントポイント/mnt/fsx直下にファイルを作成し、エクスポートコマンドlfs htm_archiveを実行します。
$ sudo vi /mnt/fsx/test1.txt
$ sudo lfs hsm_archive /mnt/fsx/test1.txt
$ sudo lfs hsm_state /mnt/fsx/test1.txt
/mnt/fsx/test1.txt: (0x00000009) exists archived, archive_id:1
$ aws s3 ls s3://test-lustre-202103210434
2021-03-20 20:00:04         14 test1.txt
インポート
S3にファイルをアップロードすれば、Lustreの設定により自動でインポートされます。適当なサンプルファイルtest_upload.txtをバケット直下にアップロードします。
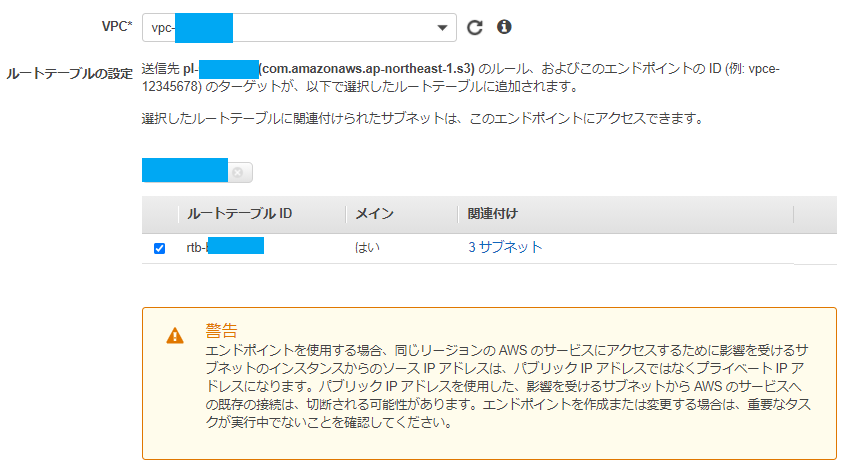
ここでアップロード用にS3エンドポイントを作成します。
作成後、プライベートサブネットからS3にファイルをアップロードできるようになります。
まずは検索でs3と入力します。2つのエンドポイントの内タイプがGatewayの方を選択します。
VPCとルートテーブルを選択します。
ここではフルアクセスにチェックを入れますが、後で変更可能です。
エンドポイントの作成をクリックします。
ファイルをS3にアップロードします。
$ aws s3 cp test_upload.txt s3://test-lustre-202103210434
upload: ./test_upload.txt to s3://test-lustre-202103210434/test_upload.txt
Lustreにロードされたかどうかを lfs hsm_state で確認します。
$ sudo lfs hsm_state /mnt/fsx/*
/mnt/fsx/test1.txt: (0x00000009) exists archived, archive_id:1
/mnt/fsx/test_upload.txt: (0x0000000d) exists archived, archive_id:1
simple AD でユーザー管理
ドメイン登録
ADをLinux環境で使うための準備をします。simpleADで作成したドメインはtest.netであるとします。Amazon Linux2 インスタンスを起動します。
ホームディレクトリにファイルを作成します。
$ sudo vi test.sh
sudo yum update -y
sudo yum -y install sssd realmd krb5-workstation oddjob oddjob-mkhomedir sssd samba-common-tools
sudo realm join -U Administrator@test.net test.net --verbose
sudo sed -i -e 's/#PasswordAuthentication yes/PasswordAuthentication yes/' -e 's/^PasswordAuthentication no//' /etc/ssh/sshd_config
sudo service sssd start
sudo realm list
sudo chmod 460 /etc/sudoers
出力結果
test.net
  type: kerberos
  realm-name: TEST.NET
  domain-name: test.net
  configured: kerberos-member
  server-software: active-directory
  client-software: sssd
  required-package: oddjob
  required-package: oddjob-mkhomedir
  required-package: sssd
  required-package: adcli
  required-package: samba-common-tools
  login-formats: %U@test.net
  login-policy: allow-realm-logins
作成したユーザーでLustreクライアントをインストールできるようにします。そのためにsudoを実行できるようにします。/etc/sudoersに次のように1行追加します。
変更前
## Allow root to run any commands anywhere
root    ALL=(ALL)       ALL
変更後
## Allow root to run any commands anywhere
root    ALL=(ALL)       ALL
Administrator@test.net ALL=(ALL:ALL) ALL
再起動します。
sudo reboot
ADの管理ユーザーでログインします。
$ ssh -l Administrator@test.net 127.0.0.1
Administrator@test.net@127.0.0.1's password:
以下のようにログイン出来たらマウントしてファイルを確認します。
[administrator@test.net@ip-172-31-46-49 ~]$ ls /mnt/fsx/
test1.txt  test_upload.txt
[administrator@test.net@ip-172-31-46-49 ~]$ sudo lfs hsm_state /mnt/fsx/*
[sudo] password for administrator@test.net:
/mnt/fsx/test1.txt: (0x00000009) exists archived, archive_id:1
/mnt/fsx/test_upload.txt: (0x00000009) exists archived, archive_id:1
ユーザー作成
ec2-userに戻ります。パスワードを聞かれたときには、Administratorのパスワードを入力します。
$ sudo net ads user ADD lustre_user Lustre1! -C "lustre_user" -U Administrator@test.net -S test.net
Enter Administrator@test.net's password:
User lustre_user added
ユーザー一覧を表示します。
$ sudo net ads user -S test.net -U Administrator@test.net
Enter Administrator@test.net's password:
AWSAdminD-95671C7C1C
Administrator
lustre_user
krbtgt
Guest
作成したユーザーでログインする
Administratorのときとは異なりログインに失敗します。
$ ssh -l lustre_user@test.net 127.0.0.1
lustre_user@test.net@127.0.0.1's password:
Permission denied, please try again.
serviceコマンドのstatusオプションでログを見ることができます。
$ sudo service sssd status
以下のようなエラーでログインに失敗しています。
Client's credentials have been revoked
調べてみるとこちらの記事に原因が書いてありました。
ADでユーザーパスワードのリセットが必要でした。リセットすればログインできるようになります。マウントできていることも確認できました。
[lustre_user@test.net@ip-172-31-38-93 ~]$ sudo lfs hsm_state /mnt/fsx/*
/mnt/fsx/test1.txt: (0x00000009) exists archived, archive_id:1
/mnt/fsx/test_upload.txt: (0x00000009) exists archived, archive_id:1
参考記事


