最近React+Reduxに入門しました。お仕事とは全く関係ありません。興味本位です。
きっかけは『いまから始めるフロントエンド入門』を読んでいて、サンプルコードの実装がまるで理解できなかったためです。
そこでReactとReduxを個別に勉強しました。が、Reactのチュートリアルは何とかこなせたものの、Reduxの理解に苦しみました。
ということで自分の備忘録も兼ねて、本当のリアルガチ初心者向けにReact+Reduxの全体像を恐ろしいほどザックリとまとめてみます。
なおReactやReduxの設計思想的なものには言及しません。もっときちんと書いてある他の記事を参照してください。また、最低限「React単体のチュートリアルをこなした」程度の人を想定しています。
作ったもの
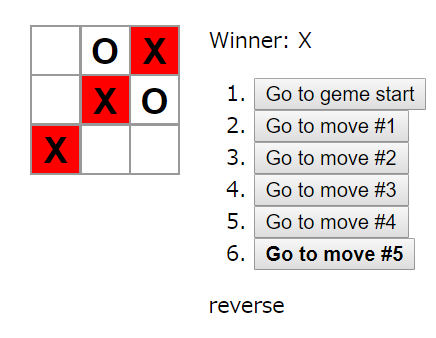
React tutorialの『tictactoe』(いわゆる◯Xゲーム)をReact+Reduxで実装し直しながら、理解していきました。
作成したコードはGitHubにアップロードしています。
tictactoeの仕様
- 「X」と「◯」が交互にマスを埋めていきます。
- 3マスに同じマークを並べると勝利でそのラインを赤色で表示します。
- マスを埋めるごとにインデックス付きのボタンを追加します。このボタンを押すことで、その時点のマス状態に戻ることができます。
- 「reverse」をクリックすると、ボタンの並びを逆順にします。
React+Reduxの全体イメージ
ザックリとこんな感じで理解しています。
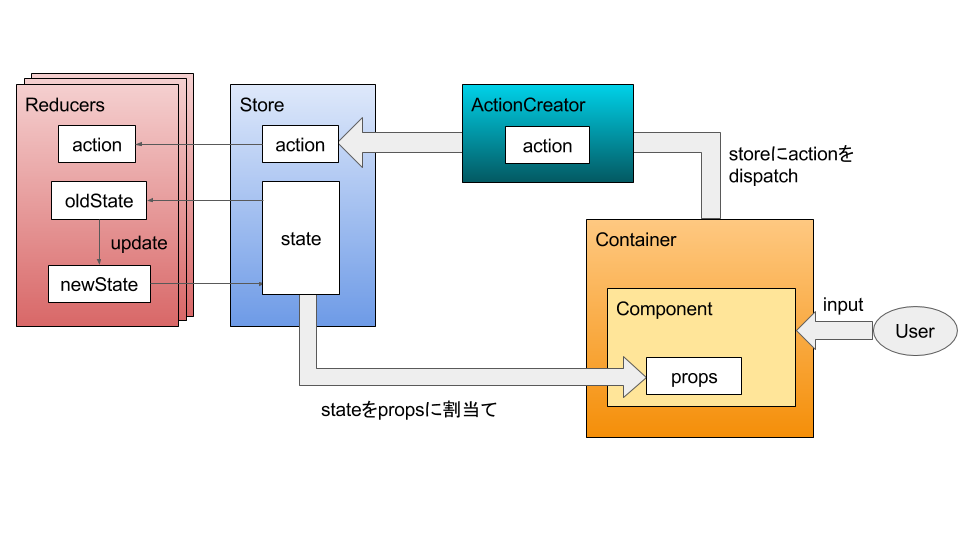
- Component
- Container
- ActionとActionCreator
- Store
- Reducers
の5つの要素で構成されます。
tictactoeに当てはめると
ContainerとComponentの関係はこんな感じになります。
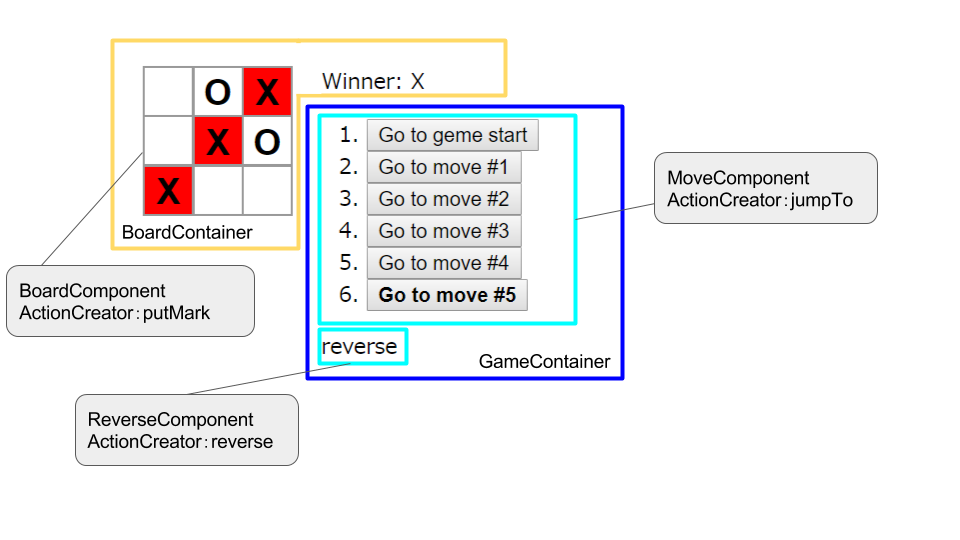
今回は各Componentに一つ、ActionCreatorを割当てています。(dispatch)
各要素の説明
実際のtictactoeのコードを混じえて、React+Reduxの構成要素について記していきます。
Component
React Component、つまりView。ユーザからのインプットとそれを受けてのアウトプットを担当します。
何らかのインプットにより更新されたstateをpropsと言う名前のプロパティで受け取り、画面に反映しています。
class Board extends React.Component {
……
render() {
    return (
      <div>
        {this.props.squares.map((value,i)=>{
          return(
            <div key={"row-"+i} className="board-row">
              {this.props.squares[i].map((value,j)=>{
                return(
                  this.renderSquare(i,j)
                );
              })
              }
            </div>
           );
        })}
      </div>
    );
  }
}
Container
Componentを内包したReactComponent。単独でComponentとContainerの役割を兼ねることもある。
Containerの役割は大きく2つ。
- Component上で発生したイベントと実行されるアクションの結び付け。(
mapDispatchToProps) - 更新されたstateからpropsを定義し、Componentに引き渡す。(
mapStateToProps)
mapDispatchToProps
例えばBoardContainerでは、onClickという名前でActionCreatorputMarkに結び付けている。
function mapDispatchToProps(dispatch) {
    return {
        onClick: (i,j) => {
            dispatch(putMark(i,j))
        }
    }
}
onClickはComponentにpropsとして引き渡され、Component内で実際に呼び出す時の引数を設定している。
class Board extends React.Component {
renderSquare(i,j) {
……
return (
      <Square
        key={"square-"+i+"-"+j}
        value={this.props.squares[i][j]}
        onClick={()=>this.props.onClick(i,j)}
        className={className}
      />
    )
  }
mapStateToProps
Reducersが更新したstate(後述)を受け取り、Componentに渡すプロパティ(props)の値として割り当てる。この時state.に続くプロパティのキーは、各Reducersの名前(後述)になることに注意。
function mapStateToProps(state) {
    return {
        squares: state.mark.history[state.mark.stepNumber].squares,
        winner: state.mark.winner
    }
}
Componentは受け取ったpropsを使ってレンダリングし直すことで、インプットの結果を画面上に反映する。
class Board extends React.Component {
……
render() {
    return (
      <div>
        {this.props.squares.map((value,i)=>{
          return(
            <div key={"row-"+i} className="board-row">
              {this.props.squares[i].map((value,j)=>{
                return(
                  this.renderSquare(i,j)
                );
              })
              }
            </div>
           );
        })}
      </div>
    );
  }
}
connect
最後にmapStateToPropsとmapDispatchToProps引数としてReact-Reduxのconnectを実行し、Containerを生成する。
const BoardContainer = connect(
    mapStateToProps,
    mapDispatchToProps
)(Board)
このように作成した各ContainerをひとつのReactComponentにまとめる。(直接Provider(後述)に渡すこともできる?)
class App extends React.Component {
    render() {
        return (
            <div className="game">
                <div className="game-board">
                    <BoardContainer />
                </div>
                <GameContainer />
            </div>
        );
    }
}
ActionとActionCreator
ActionとActionCreatorは「それがどんなアクションなのか」だけを定義する。アクションの振る舞い自体はReducersで定義する。
- Action:アクションの種類を定義するプロパティ。
- ActionCreator:Componentから引き渡された要素を元にActionを生成する。
tictactoeでは「マスをクリックしたアクション=MARK」、「ボタンをクリックしたアクション=Move」、「reverseリンクをクリックしたアクション=REVERSE」を定義している。
export const actions = {
  MARK: 'MARK',
  MOVE: 'MOVE',
  REVERSE: 'REVERS'
}
例えば前述のComponentBoardで、onClickが実行された場合はマスのインデックスをActionCreatorputMarkに引き渡し、Actionプロパティが生成される。
export const putMark = (i,j) => {
  return {
    type: actions.MARK,
    position: [i,j]
  }
}
Store
StoreはActionCreatorが生成したActionを受け取り(dispatch)、保存されているstateと一緒にReducersに引き渡す。
少なくともサンプルレベルのReact+Reduxでは、Storeを直接いじるようなコーディングはしない。ただしReact+Reduxでは、初期化時に createStore でStoreを作成し、Reactのルートコンポーネント Provider にそのStoreを引き渡す必要がある。
import React from 'react'
import { render } from 'react-dom'
import { Provider } from 'react-redux'
import { createStore } from 'redux'
import App from './components/App'
import gameApp from './reducers'

let store = createStore(gameApp)

render(
    <Provider store={store}>
        <App />
    </Provider>,
    document.getElementById('root')
)
Reducers
StoreからActionとstateを受け取って、stateを更新することが最大の役割。
Actionに設定されたtypeによってstateの処理を振り分けることが基本。そして各Reducerは必ず新しいstateをreturnする必要がある。
const mark = (state = initialMarkState,action) => {
    switch(action.type) {
        case actions.MARK:
            ……
            if(state.winner || newSquares[action.position[0]][action.position[1]]) {
                return state
            }
            newSquares[action.position[0]][action.position[1]] = state.xIsNext ? 'X' : 'O';
            return (
                Object.assign({},state,{
                    history: history.concat([{
                        squares: newSquares,
                    }]),
                    stepNumber: history.length,
                    xIsNext: !state.xIsNext,
                    winner: calculateWinner(newSquares)
                })
            )
        case actions.MOVE:
            return (
                Object.assign({},state,{
                    stepNumber: action.index,
                    xIsNext: (action.index % 2) === 0,
                    winner:  calculateWinner(state.history[action.index].squares)
                })
            );
        default:
            return state
    }
}
定義された各Reducersは combineReducers に引き渡し、そのオブジェクトを前述のcreateStoreに渡すことで、Storeから起動される。
const gameApp = combineReducers({
    mark,
    reverse
})
以上、初心者が四苦八苦で理解できたところまでを、ザックリとまとめてみました。見当ハズレのことがあれば誰か教えてください!