概要
CloudFormation を 使用した Kubernetes セットアップツール kube-aws で AWS 上に Kubernetes 環境を構築する
特徴として以下の機能がある
- ELB integration for Kubernetes Services allows for traffic ingress to selected microservices
- Worker machines are deployed in an Auto Scaling group for effortless scaling
- Full TLS is set up between Kubernetes components and users interacting with kubectl
参考
https://coreos.com/kubernetes/docs/latest/kubernetes-on-aws.html
環境
2016/01/14 時点で構築される内容は以下の通り
- CoreOS-alpha-891.0.0
- Docker version 1.9.1, build 4419fdb-dirty
- kubernetes v1.1.2
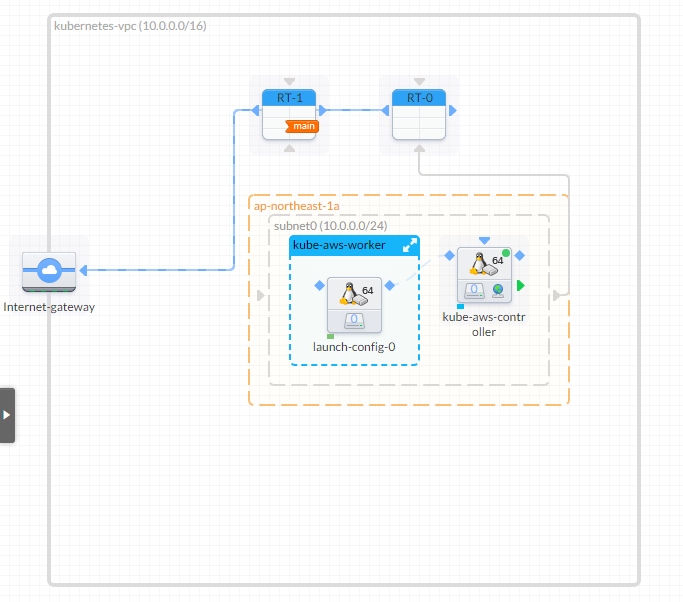
VisualOps で VPC Import した際の構成図

master node 1台、worker node 用 AutoScalingGroup が作成される
手順
kube-aws を適当な場所にダウンロードして解凍
$ wget https://github.com/coreos/coreos-kubernetes/releases/download/v0.3.0/kube-aws-linux-amd64.tar.gz
$ tar zxvf kube-aws-linux-amd64.tar.gz
kube-aws の使い方
$ ./kube-aws --help
Manage Kubernetes clusters on AWS

Usage:
  kube-aws [command]

Available Commands:
  destroy     Destroy an existing Kubernetes cluster
  render      Render a CloudFormation template
  status      Describe an existing Kubernetes cluster
  up          Create a new Kubernetes cluster
  version     Print version information and exit
  help        Help about any command

Flags:
      --aws-debug[=false]: Log debug information from aws-sdk-go library
      --config="cluster.yaml": Location of kube-aws cluster config file


Use "kube-aws [command] --help" for more information about a command.
AWS Credentials を設定
$ export AWS_ACCESS_KEY_ID="AKXXXXXXXXXXXXXXXXXX"
$ export AWS_SECRET_ACCESS_KEY="XXXXXXXXXXXXXXXXXXXXXXXXXXXXXXXXXXX"
サンプルの kubenetes クラスタ設定ファイルをダウンロード
$ curl --silent --location https://raw.githubusercontent.com/coreos/coreos-kubernetes/master/multi-node/aws/cluster.yaml.example > cluster.yaml
クラスタ設定
$ vi cluster.yaml
# Unique name of Kubernetes cluster. In order to deploy
# more than one cluster into the same AWS account, this
# name must not conflict with an existing cluster.
clusterName: "kubernetes"

# Name of the SSH keypair already loaded into the AWS
# account being used to deploy this cluster.
keyName: "{AWSに登録した Key pair name}"

# Region to provision Kubernetes cluster
region: "ap-northeast-1"

# Availability Zone to provision Kubernetes cluster
availabilityZone: "ap-northeast-1a"

# DNS name routable to the Kubernetes controller nodes
# from worker nodes and external clients. The deployer
# is responsible for making this name routable
externalDNSName: "{Kubernetes API にアクセスする際のドメイン名}"

# Instance type for controller node
controllerInstanceType: "t2.micro"

# Disk size (GiB) for controller node
controllerRootVolumeSize: 10

# Number of worker nodes to create
workerCount: 3

# Instance type for worker nodes
workerInstanceType: "t2.micro"

# Disk size (GiB) for worker nodes
workerRootVolumeSize: 10

# Location of kube-aws artifacts used to deploy a new
# Kubernetes cluster. The necessary artifacts are already
# available in a public S3 bucket matching the version
# of the kube-aws tool. This parameter is typically
# overwritten only for development purposes.
# artifactURL: https://coreos-kubernetes.s3.amazonaws.com/<VERSION>

# CIDR for Kubernetes VPC
vpcCIDR: "10.0.0.0/16"

# CIDR for Kubernetes subnet
instanceCIDR: "10.0.0.0/24"

# IP Address for controller in Kubernetes subnet
controllerIP: 10.0.0.50

# CIDR for all service IP addresses
serviceCIDR: "10.3.0.0/24"

# CIDR for all pod IP addresses
podCIDR: "10.2.0.0/16"

# IP address of Kubernetes controller service (must be contained by serviceCIDR)
kubernetesServiceIP: "10.3.0.1"

# IP address of Kubernetes dns service (must be contained by serviceCIDR)
dnsServiceIP: "10.3.0.10"
4台でクラスタ構築
- master :1台
- worker node:3台 (AutoScalingGroup)
デプロイ
$ ./kube-aws up
Initialized TLS infrastructure
Wrote kubeconfig to /home/***/kube-aws/clusters/kubernetes/kubeconfig
Waiting for cluster creation...
Successfully created cluster

Cluster Name:   kubernetes
Controller IP:  xxx.xxx.xxx.xxx(EIP が表示される)
kube-aws によって作成される kubernetes 認証用の鍵と証明書は90日間しか使えないので注意。
PRODUCTION NOTE: the TLS keys and certificates generated by kube-aws should not be used to deploy a production Kubernetes cluster. Each component certificate is only valid for 90 days, while the CA is valid for 365 days. If deploying a production Kubernetes cluster, consider establishing PKI independently of this tool first.
ドメインでアクセスできるようにする
$ sudo vi /etc/hosts
以下を追記
{Controller IP} {cluster.yaml に設定した externalDNSName}
kubectl は作成された clusters/{clusterName}/kubeconfig を指定して実行する
$ kubectl --kubeconfig=clusters/kubernetes/kubeconfig cluster-info
Kubernetes master is running at https://{externalDNSName}
KubeDNS is running at https://{externalDNSName}/api/v1/proxy/namespaces/kube-system/services/kube-dns
node 確認
$ kubectl --kubeconfig=clusters/kubernetes/kubeconfig get nodes
NAME                                            LABELS                                                                 STATUS    AGE
ip-10-0-0-171.ap-northeast-1.compute.internal   kubernetes.io/hostname=ip-10-0-0-171.ap-northeast-1.compute.internal   Ready     7m
ip-10-0-0-172.ap-northeast-1.compute.internal   kubernetes.io/hostname=ip-10-0-0-172.ap-northeast-1.compute.internal   Ready     7m
ip-10-0-0-173.ap-northeast-1.compute.internal   kubernetes.io/hostname=ip-10-0-0-173.ap-northeast-1.compute.internal   Ready     7m
以下コマンドで CloudFormation template が表示される
$ ./kube-aws render
{
    "AWSTemplateFormatVersion": "2010-09-09",
    "Conditions": {
        "EmptyAvailabilityZone": {
            "Fn::Equals": [
                {
                    "Ref": "AvailabilityZone"
                },
                ""
            ]
        }
    },
    "Description": "kube-aws Kubernetes cluster",
    "Mappings": {
        "RegionMap": {
            "ap-northeast-1": {

...snip...
Kubernetes で Wordpress を構築してみる
マニフェストは、example をベースに作成
mysql データベース用の EBS Volume 作成
$ aws ec2 create-volume --availability-zone ap-northeast-1a --size 10 --volume-type gp2
表示される VolumeId をメモっておく
MySQL Pod 作成
apiVersion: v1
kind: Pod
metadata:
  name: mysql
  labels:
    name: mysql
spec:
  containers:
    - resources:
        limits :
          cpu: 0.5
      image: mysql:5.6
      name: mysql
      env:
        - name: MYSQL_ROOT_PASSWORD
          value: yourpassword
      ports:
        - containerPort: 3306
          name: mysql
      volumeMounts:
        - name: mysql-persistent-storage
          mountPath: /var/lib/mysql
  volumes:
    - name: mysql-persistent-storage
      awsElasticBlockStore:
        volumeID: aws://ap-northeast-1a/{上で作成した VolumeID}
        fsType: ext4
Pod 作成
$ kubectl --kubeconfig=clusters/kubernetes/kubeconfig create -f mysql.yaml
pod "mysql" created
$ kubectl --kubeconfig=clusters/kubernetes/kubeconfig get pod
NAME        READY     STATUS    RESTARTS   AGE
mysql       1/1       Running   0          5m
MySQL Service 作成
apiVersion: v1
kind: Service
metadata:
  labels:
    name: mysql
  name: mysql
spec:
  ports:
    - port: 3306
  selector:
    name: mysql
Service 作成
$ kubectl --kubeconfig=clusters/kubernetes/kubeconfig create -f mysql-service.yaml
service "mysql" created
$ kubectl --kubeconfig=clusters/kubernetes/kubeconfig get svc
NAME         CLUSTER_IP   EXTERNAL_IP   PORT(S)    SELECTOR         AGE
kubernetes   10.3.0.1     <none>        443/TCP    <none>           1h
mysql        10.3.0.170   <none>        3306/TCP   name=mysql       5m
wordpress データ用の EBS Volume 作成
$ aws ec2 create-volume --availability-zone ap-northeast-1a --size 10 --volume-type gp2
表示される VolumeId をメモっておく
Wordpress Pod 作成
apiVersion: v1
kind: Pod
metadata:
  name: wordpress
  labels:
    name: wordpress
spec:
  containers:
    - image: wordpress
      name: wordpress
      env:
        - name: WORDPRESS_DB_PASSWORD
          value: yourpassword
      ports:
        - containerPort: 80
          name: wordpress
      volumeMounts:
        - name: wordpress-persistent-storage
          mountPath: /var/www/html
  volumes:
    - name: wordpress-persistent-storage
      awsElasticBlockStore:
        volumeID: aws://ap-northeast-1a/{上で作成した VolumeID}
        fsType: ext4
Pod 作成
$ kubectl --kubeconfig=clusters/kubernetes/kubeconfig create -f wordpress.yaml
pod "mysql" wordpress
$ kubectl --kubeconfig=clusters/kubernetes/kubeconfig get pod
NAME        READY     STATUS    RESTARTS   AGE
mysql       1/1       Running   0          8m
wordpress   1/1       Running   0          5m
Wordpress Service 作成
apiVersion: v1
kind: Service
metadata:
  labels:
    name: wpfrontend
  name: wpfrontend
spec:
  ports:
    - port: 80
  selector:
    name: wordpress
  type: LoadBalancer
Service 作成
$ kubectl --kubeconfig=clusters/kubernetes/kubeconfig create -f wordpress-service.yaml
service "mysql" created
$ kubectl --kubeconfig=clusters/kubernetes/kubeconfig get svc
NAME         CLUSTER_IP   EXTERNAL_IP   PORT(S)    SELECTOR         AGE
kubernetes   10.3.0.1     <none>        443/TCP    <none>           55m
mysql        10.3.0.170   <none>        3306/TCP   name=mysql       9m
wpfrontend   10.3.0.130                 80/TCP     name=wordpress   5m
Service 作成の際に type: LoadBalancer を指定すると、自動で ELB が作成されるので確認
$ aws elb describe-load-balancers
{
    "LoadBalancerDescriptions": [
        {
            "Subnets": [
...snip...
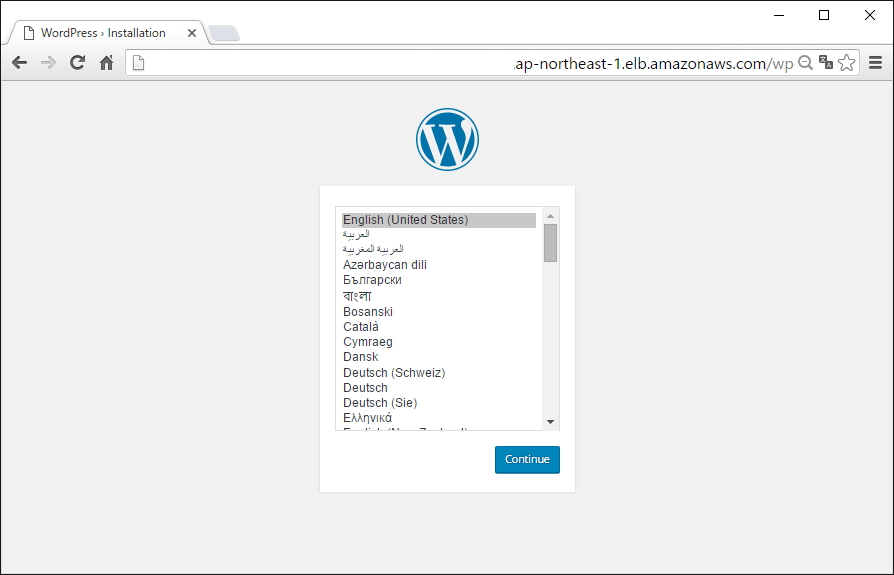
表示された DNSName にブラウザでアクセス
Wordpress のセットアップ画面が表示されたらOK
掃除
kubernetes で作成された LoadBalancer(ELB)、ELB 用 SecurityGroup は CloudFormation 管理外となり、削除されないので手動で実行
$ aws elb delete-load-balancer --load-balancer-name={LoadBalancerName}
Volume も同様に削除
$ aws ec2 delete-volume --volume-id={VolumeID}
destroy
$ ./kube-aws destroy
Destroyed cluster
