いまさらですが、Dockerをはじめたので勉強のために作成しました。
StepByStepで、理解を深めてゆきたいと思います。
1. インストール
1.1 Dockerのインストール
下記よりPlatformにあわせたDockerDesktopをインストールします。
Windowsの場合は、Hyper-Vが必要なためWindows10 Proが必要となります。
https://www.docker.com/products/docker-desktop
(ce - community edition)
1.2 Docker Composeのインストール
Docker compose は、複数のコンテナからなりたっているサービスを構築し、実行する手順を容易にする機能です。
YAML形式で記述したdocker-compose ファイルを準備してコンテナ起動することで、コンテナサービス群が一度に起動できます。
https://docs.docker.com/compose/install/#install-compose
PowerShellの管理者モードによるインストールが必要です。
(macの場合には、Dockerにbundleされているためインストールは不要)
1.3 インストールの確認
Terminalで確認しましょう。
$ docker --version
Docker version 18.06.0-ce, build 0ffa825

$ docker-compose --version
docker-compose version 1.22.0, build f46880fe
2. Dockerの基本アーキテクチャ
Docker(ドッカー)はコンテナ型の仮想化環境を提供するオープンソースソフトウェアです。VMware製品などの完全仮想化を行うハイパーバイザ型製品と比べて、ディスク使用量は少なく、仮想環境作成や起動は速く、性能劣化がほとんどないという利点があります。

A: Docker デーモン(daemon)
Docker デーモンはホストマシン上で動作します。ユーザーはDocker クライアントを経由して、Dockerデーモンを制御します。
B: Docker クライアント(client)
Docker に接続するためのインターフェースです。ユーザーが実行したコマンドに応じて、Docker デーモンとの通信を行います。
C: Docker レジストリ(registries)
イメージを保持するストアです。パブリックまたはプライベートなストアにDockerイメージをアップロードしたり、ダウンロードすることができます。
パブリックな Docker レジストリは、 Docker Hub で膨大なDockerImageのコレクションを提供します。
D: Dockerのオブジェクト
D-1: イメージ(images)
ソフトウエアの実行に必要なファイルと設定情報をパッケージ化したReadonlyなテンプレートです。
自分自身でイメージを作成することもでき、誰かが作成したイメージを利用することも可能です。
D-2: コンテナ(containers)
ソフトウェアの実行に必要なすべてをパッケージ化したDockerの実行コンポーネントです。
各々のコンテナは Docker イメージから作成されます。

3. Hello World的な...
DockerHubから docker/whalesay のイメージを取得して、ローカル環境でコンテナ起動してみましょう。
https://hub.docker.com/r/docker/whalesay/
- DockerHubから
docker/whalesayイメージを取得します。
$ docker image pull docker/whalesay
Using default tag: latest
latest: Pulling from docker/whalesay
e190868d63f8: Pull complete
909cd34c6fd7: Pull complete
0b9bfabab7c1: Pull complete
a3ed95caeb02: Pull complete
00bf65475aba: Pull complete
c57b6bcc83e3: Pull complete
8978f6879e2f: Pull complete
8eed3712d2cf: Pull complete
Digest: sha256:178598e51a26abbc958b8a2e48825c90bc22e641de3d31e18aaf55f3258ba93b
Status: Downloaded newer image for docker/whalesay:latest
2. ローカル環境に取得したイメージがあることを確認します。
$ docker image ls
REPOSITORY                    TAG                 IMAGE ID            CREATED             SIZE
docker/whalesay               latest              6b362a9f73eb        3 years ago         247MB
3. 取得した docker/whalesay イメージのコンテナを起動します。
$ docker container run docker/whalesay cowsay Hello World
 _____________
< Hello World >
 -------------
    \
     \
      \
                    ##        .
              ## ## ##       ==
           ## ## ## ##      ===
       /""""""""""""""""___/ ===
  ~~~ {~~ ~~~~ ~~~ ~~~~ ~~ ~ /  ===- ~~~
       \______ o          __/
        \    \        __/
          \____\______/
4. コンテナ一覧(停止したものも含むため -a オプションを指定)を取得します。
$ docker container ls -a
CONTAINER ID        IMAGE               COMMAND                CREATED             STATUS                     PORTS               NAMES
3523c7a7595c        docker/whalesay     "cowsay Hello World"   4 seconds ago       Exited (0) 4 seconds ago                       trusting_keldysh
5. 停止中のコンテナをすべて削除します。
$ docker container prune
WARNING! This will remove all stopped containers.
Are you sure you want to continue? [y/N] y
Deleted Containers:
3523c7a7595c6d2f3d12a8fb5a24f264ec09927a720d85ce200acb373ae95f87

Total reclaimed space: 0B
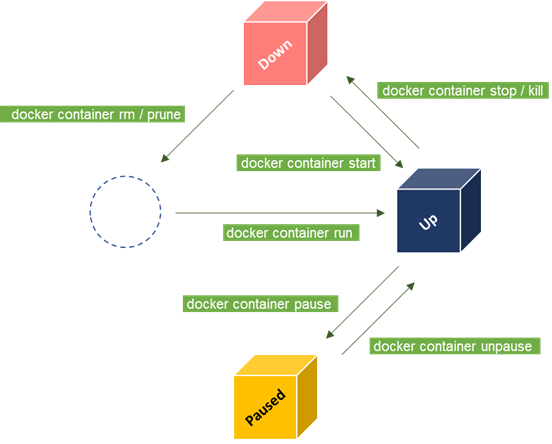
4. Docker Containerの状態遷移と制御
Containerには、いくつかの状態があります。これらを制御するコマンドを試してみましょう。
- 今回は
Amazon Linux2を取得します。
$ docker image pull amazonlinux:2

$ docker image ls
REPOSITORY                             TAG                      IMAGE ID            CREATED             SIZE
amazonlinux                            2                        585cc50169e6        2 months ago        163MB
2. コンテナを起動。ステータスは UP 状態となります。
$ docker container run -d -it amazonlinux:2 bash
f6a093c37a46a6637097a25a201ff1a085b00e660491753204aa08c1b35953f7

$ docker container ls
CONTAINER ID        IMAGE               COMMAND             CREATED             STATUS              PORTS               NAMES
f6a093c37a46        amazonlinux:2       "bash"              11 seconds ago      Up 9 seconds                            jolly_goldwasser
3. 起動したコンテナに入って、Platformの情報を参照します。
カーネルバージョンとディストリビューションが参照できました。
(確かに Amazon Linux 2 です。ベースは alpine ですね)
$ docker container exec -it f6a093c37a46 bash
bash-4.2# cat /proc/version
Linux version 4.9.93-linuxkit-aufs (root@856d34d1168e) (gcc version 6.4.0 (Alpine 6.4.0) ) #1 SMP Wed Jun 6 16:55:56 UTC 2018

bash-4.2# cat /etc/system-release
Amazon Linux 2

bash-4.2# exit
exit
4. コンテナを pause する。状態が Paused になりました。 コンテナのプロセスが停止されているので、 exec ができません。
$  docker container pause f6a093c37a46
f6a093c37a46

$ docker container ls
CONTAINER ID        IMAGE               COMMAND             CREATED             STATUS              PORTS               NAMES
f6a093c37a46        amazonlinux:2       "bash"              2 minutes ago      Up About a minute (Paused)               jolly_goldwasser

$ docker container exec -it f6a093c37a46 bash
Error response from daemon: Container f6a093c37a46 is paused, unpause the container before exec
5. コンテナを unpause します。 再び、 bash で接続できるようになりました。
$ docker container unpause f6a093c37a46
f6a093c37a46

$ docker container ls
CONTAINER ID        IMAGE               COMMAND             CREATED             STATUS              PORTS               NAMES
f6a093c37a46        amazonlinux:2       "bash"              3 minutes ago       Up 3 minutes                            jolly_goldwasser

$ docker container exec -it f6a093c37a46 bash
bash-4.2# exit
exit
6. コンテナを Stop します。
$ docker container ls
CONTAINER ID        IMAGE               COMMAND             CREATED             STATUS              PORTS               NAMES
f6a093c37a46        amazonlinux:2       "bash"              3 minutes ago       Up 3 minutes                            jolly_goldwasser

$ docker container stop f6a093c37a46
f6a093c37a46

$ docker container ls
CONTAINER ID        IMAGE               COMMAND             CREATED             STATUS              PORTS               NAMES

$ docker container ls -a
CONTAINER ID        IMAGE               COMMAND             CREATED             STATUS                       PORTS               NAMES
f6a093c37a46        amazonlinux:2       "bash"              4 minutes ago       Exited (137) 8 seconds ago                       jolly_goldwasser
7. 停止したコンテナを Start します。
$ docker container start f6a093c37a46
f6a093c37a46
$ docker container ls -a
CONTAINER ID        IMAGE               COMMAND             CREATED             STATUS              PORTS               NAMES
f6a093c37a46        amazonlinux:2       "bash"              4 minutes ago       Up 3 seconds                            jolly_goldwasser
8. コンテナを強制終了( Kill )します。
$ docker container kill f6a093c37a46
f6a093c37a46

$ docker container ls -a
CONTAINER ID        IMAGE               COMMAND             CREATED             STATUS                       PORTS               NAMES
f6a093c37a46        amazonlinux:2       "bash"              4 minutes ago       Exited (137) 8 seconds ago                       jolly_goldwasser
9. 停止したコンテナの掃除 prune をします。
$ docker container prune
WARNING! This will remove all stopped containers.
Are you sure you want to continue? [y/N] y
Deleted Containers:
f6a093c37a46a6637097a25a201ff1a085b00e660491753204aa08c1b35953f7
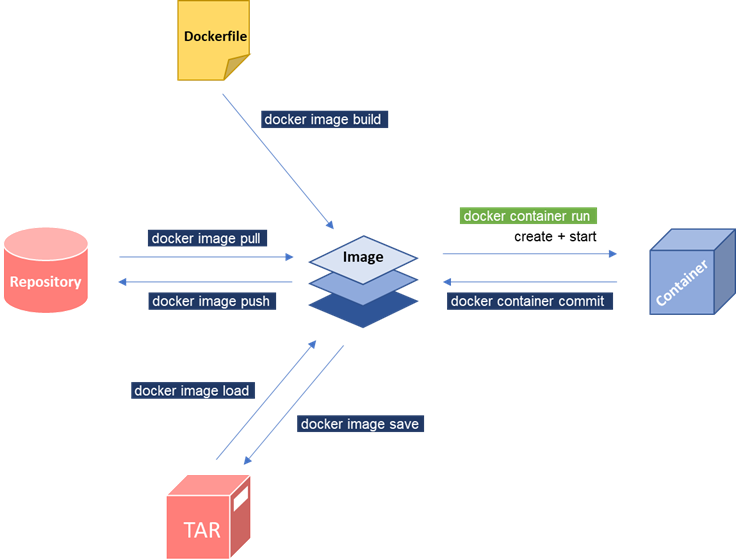
5. Docker Imageの制御
Docker Imageを中心とした一連の制御を Amazon Linux 2 のイメージを利用して実施してみましょう。基本的なコマンドと遷移は下記のようになります。
- 新しく
Amazon Linux 2のコンテナを起動して、内部でPython2とpython3のインストール状況を確認しましょう。
この時点では、python3はインストールされていないようです。
なお、Proxyサーバーの設定が必要な場合には、 docker container run のパラメータに追加して 環境変数 -e http_proxy=xxxxxx などの設定が必要となります。
$ docker container run -d -it amazonlinux:2 bash
f6a093c37a46a6637097a25a201ff1a085b00e660491753204aa08c1b35953f7

$ docker container ls
CONTAINER ID        IMAGE               COMMAND             CREATED             STATUS              PORTS               NAMES
f6a093c37a46        amazonlinux:2       "bash"              11 seconds ago      Up 9 seconds                            jolly_goldwasser

$ docker container exec -it f6a093c37a46 bash

bash-4.2# python --version
Python 2.7.14
bash-4.2# python3 --version
bash: python3: command not found
2. Amazon Linux 2の Extras Library と呼ばれるパッケージ群の導入コマンドを利用して、 python3 をインストールします。
bash-4.2#  amazon-linux-extras
  0  ansible2                 available  [ =2.4.2 ]
  1  emacs                    available  [ =25.3 ]
  2  memcached1.5             available  [ =1.5.1 ]
  3  nginx1.12                available  [ =1.12.2 ]
  4  postgresql9.6            available  [ =9.6.6  =9.6.8 ]
  5  postgresql10             available  [ =10 ]
  6  python3                  available  [ =3.6.2 ]
  7  redis4.0                 available  [ =4.0.5  =4.0.10 ]
  8  R3.4                     available  [ =3.4.3 ]
  9  rust1                    available  \
        [ =1.22.1  =1.26.0  =1.26.1  =1.27.2 ]
 10  vim                      available  [ =8.0 ]
 11  golang1.9                available  [ =1.9.2 ]
 12  ruby2.4                  available  [ =2.4.2  =2.4.4 ]
 13  nano                     available  [ =2.9.1 ]
 14  php7.2                   available  [ =7.2.0  =7.2.4  =7.2.5 ]
 15  lamp-mariadb10.2-php7.2  available  \
        [ =10.2.10_7.2.0  =10.2.10_7.2.4  =10.2.10_7.2.5 ]
 16  libreoffice              available  [ =5.0.6.2_15 ]
 17  gimp                     available  [ =2.8.22 ]
 18  docker                   available  [ =17.12.1  =18.03.1 ]
 19  mate-desktop1.x          available  [ =1.19.0  =1.20.0 ]
 20  GraphicsMagick1.3        available  [ =1.3.29 ]
 21  tomcat8.5                available  [ =8.5.31 ]

bash-4.2#  amazon-linux-extras install python3 -y
Installing python3-3.6.*, python3-pip-9.0.1-9.*, python3-wheel-0.30.0a0-6.*, python3-setuptools-36.*
Loaded plugins: ovl, priorities
amzn2-core                                                                                                                   | 2.4 kB  00:00:00
amzn2extra-python3                                                                                                           | 1.3 kB  00:00:00
(1/4): amzn2-core/2/x86_64/group_gz                                                                                          | 2.4 kB  00:00:00
(2/4): amzn2-core/2/x86_64/updateinfo                                                                                        |  42 kB  00:00:00
(3/4): amzn2extra-python3/2/x86_64/primary_db                                                                                |  15 kB  00:00:00
(4/4): amzn2-core/2/x86_64/primary_db                                                                                        |  15 MB  00:00:06
Resolving Dependencies

~一部省略~

Installed:
  python3.x86_64 0:3.6.2-3.amzn2.0.3               python3-pip.noarch 0:9.0.1-9.amzn2.0.2      python3-setuptools.noarch 0:36.2.0-1.amzn2.0.2
  python3-wheel.noarch 0:0.30.0a0-6.amzn2.0.1

Dependency Installed:
  python3-libs.x86_64 0:3.6.2-3.amzn2.0.3

Complete!
  0  ansible2                 available  [ =2.4.2 ]
  1  emacs                    available  [ =25.3 ]
  2  memcached1.5             available  [ =1.5.1 ]
  3  nginx1.12                available  [ =1.12.2 ]
  4  postgresql9.6            available  [ =9.6.6  =9.6.8 ]
  5  postgresql10             available  [ =10 ]
  6  python3=latest           enabled    [ =3.6.2 ]

~一部省略~

bash-4.2# python --version
Python 2.7.14
bash-4.2# python3 --version
Python 3.6.2
3. python3 をインストールしたコンテナに amazon-linux-extras コマンドを利用してさらに nginx1.12 をインストールしてみましょう。
インストールが完了したことを確認して、コンテナから exit する。
bash-4.2# amazon-linux-extras install nginx1.12 -y
4. コンテナの commit コマンドで変更内容を新しい image として保存します。
さらに、作成したイメージに tag を付与してみましょう。
$ docker container commit f6a093c37a46
sha256:3a193bcfb795b14e01dbb1979e42471d882d9b95eb339bdabe64669c3a81b33a

$  docker image tag 3a193bcfb795b14e01dbb1979e42471d882d9b95eb339bdabe64669c3a81b33a handson123/amazonlinux_with_packages
$  docker image ls
REPOSITORY                             TAG                      IMAGE ID            CREATED             SIZE
handson123/amazonlinux_with_packages   latest                   3a193bcfb795        5 minutes ago       288MB
amazonlinux                            2                        585cc50169e6        2 months ago        163MB
5. 今度は、作成したイメージをtar形式のファイルとして出力してみます。
カレントディレクトリに amazonlinux_with_packages.tar が作成される。
$ docker image save -o amazonlinux_with_packages.tar handson123/amazonlinux_with_packages
6.handson123/amazonlinux_with_packages のイメージを削除してみます。
$ docker image ls
REPOSITORY                             TAG                      IMAGE ID            CREATED             SIZE
handson123/amazonlinux_with_packages   latest                   3a193bcfb795        23 minutes ago      422MB
amazonlinux                            2                        585cc50169e6        2 months ago        163MB

$ docker image rm 3a193bcfb795
Untagged: handson123/amazonlinux_with_packages:latest
Deleted: sha256:3a193bcfb79523a7baff0ed62ab8edb1b57776847e4d4c7968926087d89c28c0
Deleted: sha256:dc77427ab1aadd33fa5541a31c2ca1973923e16efad2ec29f5acbb2c93640d48

$ docker image ls
REPOSITORY          TAG                      IMAGE ID            CREATED             SIZE
amazonlinux         2                        585cc50169e6        2 months ago        163MB
7. 先程、 tar ファイルとして出力したイメージをロードします。
イメージが再度登録されました。
$ docker image load -i amazonlinux_with_packages.tar
9309ed0f2863: Loading layer [==================================================>]  267.3MB/267.3MB
Loaded image: handson123/amazonlinux_with_packages:latest

$ docker image ls
REPOSITORY                             TAG                      IMAGE ID            CREATED             SIZE
handson123/amazonlinux_with_packages   latest                   3a193bcfb795        26 minutes ago      422MB
amazonlinux                            2                        585cc50169e6        2 months ago        163MB
6. DockerfileとイメージのBuild
先程の章ではDocker Imageの一連のコマンドを実行し、パッケージのインストール等を試しました。
これらの個別のコマンドを一連に定義するDocker独自のDSL Dockerfile を利用して、イメージを構築してみましょう。
Buildを実行
- ソースコードのダウンロード
Githubより、利用するソースコードをダウンロードします。
https://github.com/quconomy/hello-world-nginx
$ git clone https://github.com/quconomy/hello-world-nginx.git
2. イメージをBuildしてみます。
--force-rm=true は、buildが途中で失敗した場合に中間イメージを削除するオプションです。
なお、Proxy環境では --build-arg http_proxy=xxxxxx という指定をします。
$ cd hello-world-nginx
$ docker image build -t handson123/amazonlinux_helloworld_nginx --force-rm=true .

Sending build context to Docker daemon  66.05kB
Step 1/7 : FROM amazonlinux:2
 ---> ed7831dfe956
Step 2/7 : LABEL maintainer "hello-world <amazonlinux_helloworld_nginx@example.com>"
 ---> Running in a5aadca2fbb8
Removing intermediate container a5aadca2fbb8
 ---> 63f983f9f0dd
Step 3/7 : RUN amazon-linux-extras install nginx1.12
 ---> Running in d3394fc074ce

〜一部省略〜

Removing intermediate container d3394fc074ce
 ---> c66ef21b5744
Step 4/7 : ADD nginx.conf /etc/nginx/nginx.conf
 ---> 8ce4ec7de5b9
Step 5/7 : ADD ./www-data /www-data
 ---> 66057fd619ff
Step 6/7 : EXPOSE 80
 ---> Running in 0649b7264cab
Removing intermediate container 0649b7264cab
 ---> 76bace8dbaed
Step 7/7 : ENTRYPOINT ["nginx", "-g", "daemon off;"]
 ---> Running in 1d01f265b61a
Removing intermediate container 1d01f265b61a
 ---> 9851e083408a
Successfully built 9851e083408a
Successfully tagged handson123/amazonlinux_helloworld_nginx:latest
3. Buildされたイメージを確認してみます。
tag がついた状態で、イメージが作成されています。
$ docker image ls
REPOSITORY                                TAG                 IMAGE ID            CREATED             SIZE
handson123/amazonlinux_helloworld_nginx   latest              9851e083408a        9 seconds ago       417MB
4. コンテナを起動してみます。
-d オプションでデーモン起動し、コンテナ上の 80 ポート を 8080 にポートフォワーディングします。
$ docker container run -d -p 8080:80 handson123/amazonlinux_helloworld_nginx
6346bbc47247c84541ddf8bd8919da0f2bf9dba4d31c5b9a378263e07f053a08
5. ブラウザ や curl コマンドで確認してみます。
$ curl http://localhost:8080/

<!DOCTYPE html>
<html>
    <head>
        <title>Hello World!</title>
    </head>
    <body>
      Hello World!
    </body>
</html>
Dockerfileを確認
FROM amazonlinux:2
利用するイメージをFROMで指定します。今回は、amazonlinux:2です。
LABEL maintainer "hello-world <amazonlinux_helloworld_nginx@example.com>"
メンテナンス者の情報をLABELとして指定します。
RUN amazon-linux-extras install nginx1.12
追加コンポーネント(nginx1.12)のインストールを実行します。
ADD nginx.conf /etc/nginx/nginx.conf
ADD ./www-data /www-data
ローカルファイルnginx.conf と ディレクトリ ./www-data をコンテナ内にコピーします。
EXPOSE 80
コンテナ側の公開ポートを指定します。
ENTRYPOINT ["nginx", "-g", "daemon off;"]
コンテナ起動時に実行するコマンドを指定します。
参考資料
What is a Container | Docker
Docker overview | Docker Documentation
docker container / image コマンド新旧比較
github | mattes/hello-world-nginx