はじめに
AWS Fargateの東京リュージョンが始まったため、既存システムのEC2をホストとしたECSからFargateへ移行したので、AWS Fargateで環境を作るための手順を書きます。
手順
- VPC、サブネットなどのネットワーク周りの作成
-
ecs-cliの初期設定 - ECSクラスターの作成
-
CloudFormationによるALBの作成 -
ecs-cliによるサービスのデプロイ
ネットワーク周りの作成
VPCの作成
まずはecs-cliで作成できないVPCやセキュリティグループの作成をします。
詳しい説明は省きますが、AWS CloudFormation VPC テンプレートを参考にほぼそのままの内容となっています。
AWSTemplateFormatVersion: '2010-09-09'
Description: Fargate sample vpc

# https://docs.aws.amazon.com/ja_jp/codebuild/latest/userguide/cloudformation-vpc-template.html
Parameters:
  VpcCIDR:
    Description: IP range (CIDR notation) for this VPC
    Type: String
    Default: 172.16.0.0/16
  PublicSubnet1CIDR:
    Description: IP range (CIDR notation) for the public subnet in the first Availability Zone
    Type: String
    Default: 172.16.0.0/20
  PublicSubnet2CIDR:
    Description: IP range (CIDR notation) for the public subnet in the second Availability Zone
    Type: String
    Default: 172.16.16.0/20

Resources:
  VPC:
    Type: AWS::EC2::VPC
    Properties:
      CidrBlock: !Ref VpcCIDR
      EnableDnsSupport: true
      EnableDnsHostnames: true
      Tags:
        - Key: Name
          Value: test-vpc
  InternetGateway:
    Type: AWS::EC2::InternetGateway
    Properties:
      Tags:
        - Key: Name
          Value: test-gateway
  InternetGatewayAttachment:
    Type: AWS::EC2::VPCGatewayAttachment
    Properties:
      InternetGatewayId: !Ref InternetGateway
      VpcId: !Ref VPC
  PublicRouteTable:
    Type: AWS::EC2::RouteTable
    Properties:
      VpcId: !Ref VPC
      Tags:
        - Key: Name
          Value: Public Routes
  DefaultPublicRoute:
    Type: AWS::EC2::Route
    DependsOn: InternetGatewayAttachment
    Properties:
      RouteTableId: !Ref PublicRouteTable
      DestinationCidrBlock: 0.0.0.0/0
      GatewayId: !Ref InternetGateway
  # subnets
  PublicSubnet1:
    Type: AWS::EC2::Subnet
    Properties:
      VpcId: !Ref VPC
      AvailabilityZone: !Select [ 0, !GetAZs '' ]
      CidrBlock: !Ref PublicSubnet1CIDR
      MapPublicIpOnLaunch: true
      Tags:
        - Key: Name
          Value: Public Subnet (AZ1)
  PublicSubnet2:
    Type: AWS::EC2::Subnet
    Properties:
      VpcId: !Ref VPC
      AvailabilityZone: !Select [ 1, !GetAZs '' ]
      CidrBlock: !Ref PublicSubnet2CIDR
      MapPublicIpOnLaunch: true
      Tags:
        - Key: Name
          Value: Public Subnet (AZ2)
  PublicSubnet1RouteTableAssociation:
    Type: AWS::EC2::SubnetRouteTableAssociation
    Properties:
      RouteTableId: !Ref PublicRouteTable
      SubnetId: !Ref PublicSubnet1
  PublicSubnet2RouteTableAssociation:
    Type: AWS::EC2::SubnetRouteTableAssociation
    Properties:
      RouteTableId: !Ref PublicRouteTable
      SubnetId: !Ref PublicSubnet2

Outputs:
  VPC:
    Description: A reference to the created VPC
    Value: !Ref VPC
    Export:
      Name: !Join ['-', ['Fn::Sub':'${AWS::AccountId}', 'Fn::Sub':'${AWS::Region}', 'test-vpc']]
  PublicSubnets:
    Description: A list of the public subnets
    Value: !Join [ ',', [ !Ref PublicSubnet1, !Ref PublicSubnet2 ]]
    Export:
      Name: !Join ['-', ['Fn::Sub':'${AWS::AccountId}', 'Fn::Sub':'${AWS::Region}', 'test-subnets']]
このテンプレートを実行します。
$ aws cloudformation create-stack --stack-name fargate-sample-vpc --template-body file://cloudformation/network/vpc.yml
cloudformationのスタックがこのように完了していれば正常にできているはずです。

セキュリティグループの作成
httpとして公開したいのでセキュリティグループを作成します。
80番ポートと443番ポートを許可します。
AWSTemplateFormatVersion: '2010-09-09'
Description: Fargate sample security group

# https://docs.aws.amazon.com/ja_jp/AWSCloudFormation/latest/UserGuide/aws-properties-ec2-security-group.html
Resources:
  DefaultSecurityGroup:
    Type: AWS::EC2::SecurityGroup
    Properties:
      GroupName: fargate-sample-sg
      GroupDescription: fargate sample
      VpcId: {'Fn::ImportValue': !Join ['-', ['Fn::Sub':'${AWS::AccountId}', 'Fn::Sub':'${AWS::Region}', 'test-vpc']]}
      SecurityGroupIngress:
        - IpProtocol: tcp
          FromPort: 80
          ToPort: 80
          CidrIp: 0.0.0.0/0
        - IpProtocol: tcp
          FromPort: 443
          ToPort: 443
          CidrIp: 0.0.0.0/0
      Tags:
        - Key: Name
          Value: fargate-sample-sg

Outputs:
  DefaultSecurityGroup:
    Description: default security group
    Value: !Ref DefaultSecurityGroup
    Export:
      Name: !Join ['-', ['Fn::Sub':'${AWS::AccountId}', 'Fn::Sub':'${AWS::Region}', 'test-default-sg']]
特記すべきことは特にありませんが、先ほど作成したvpcをFn::ImportValueで参照させています。
そしてこちらのテンプレートも実行して作成します。
$ aws cloudformation create-stack --stack-name fargate-sample-sg --template-body file://cloudformation/network/securitygroup.yml
ecs-cliの初期設定
ecs-cliの初期設定を行います。
クレデンシャルの設定
設定した内容はデフォルトで ~/.ecs/credentials に保存されます。
$ ecs-cli configure profile --profile-name fargate-sample --access-key $AWS_ACCESS_KEY_ID --secret-key $AWS_SECRET_ACCESS_KEY
configの設定
設定した内容はデフォルトで~/.ecs/configに保存されます。
$ ecs-cli configure --cluster fargate-sample-cluster --region ap-northeast-1 --default-launch-type FARGATE --config-name fargate-sample
デフォルトプロファイルの設定
標準で使用されるプロファイルを設定します。さきほど保存したものをデフォルトで使用するように設定します。
$ ecs-cli configure profile default --profile-name fargate-sample
ECS Clusterの作成
次にECSクラスターを作成します。
vpcやサブネットは先ほど作成したものを指定してください。
$ ecs-cli up --cluster fargate-sample-cluster --vpc vpc-11111111 --subnets subnet-aaaaaaaa,subnet-bbbbbbbb --security-group fargate-sample-sg --launch-type FARGATE --region ap-northeast-1 --ecs-profile fargate-sample
e-sg --launch-type FARGATE --region ap-northeast-1 --ecs-profile fargate-sample
INFO[0000] Created cluster                               cluster=fargate-sample-cluster region=ap-northeast-1
INFO[0001] Waiting for your cluster resources to be created...
INFO[0001] Cloudformation stack status                   stackStatus=CREATE_IN_PROGRESS
Cluster creation succeeded.
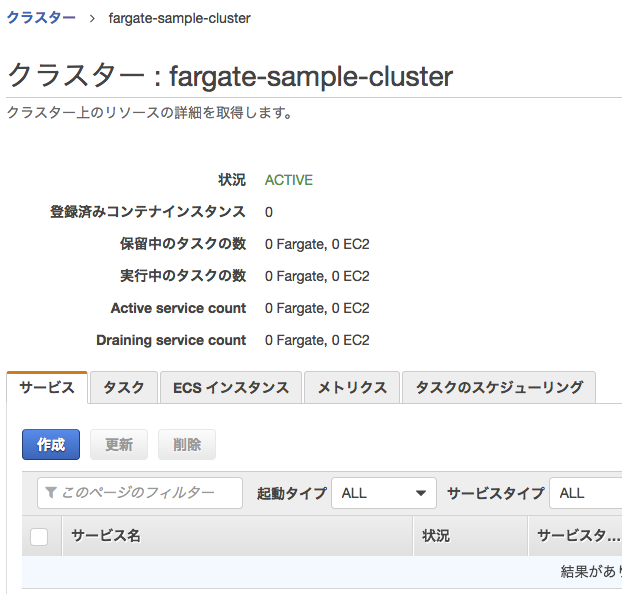
このような形で、空のクラスターが作成できていると思います。
CloudFormation によるALBの作成
ecs-cli単体ではまだ手の届きにくい部分があるので、このあたりはcloudformationを使用して作成してきます。
fargateではターゲットグループでインスタンスではなく、ip指定になっているのでそこだけ注意です。
下記テンプレートを実行します。
AWSTemplateFormatVersion: '2010-09-09'
Description: Fargate ALB

Parameters:
  EnvType:
    Description: Environment type.
    Default: dev
    Type: String
    AllowedValues:
      - dev
      - stg
      - prod
  ACMArn:
    Description: SSL server certificate
    Default: arn:aws:acm:ap-northeast-1:000000000000:certificate/11111111-0000-1111-2222-aaaaaaaaaaaa
    Type: String

Resources:
  TargetGroup:
    Type: AWS::ElasticLoadBalancingV2::TargetGroup
    Properties:
      Name: !Join ['-', ['fargate-sample', !Ref EnvType, 'tg']]
      VpcId: {'Fn::ImportValue': !Join ['-', ['Fn::Sub':'${AWS::AccountId}', 'Fn::Sub':'${AWS::Region}', 'test-vpc']]}
      # HealthCheck
      HealthCheckIntervalSeconds: 30
      HealthCheckPath: '/'
      HealthCheckPort: 80
      HealthCheckProtocol: HTTP
      HealthCheckTimeoutSeconds: 5
      HealthyThresholdCount: 5
      UnhealthyThresholdCount: 2
      Matcher:
        HttpCode: 200
      # Routing
      Port: 80
      Protocol: HTTP
      TargetType: ip
      TargetGroupAttributes:
        # ターゲットの登録解除までの待機時間
        - Key: deregistration_delay.timeout_seconds
          Value: 60
      Tags:
        - Key: Name
          Value: !Join ['-', ['fargate-sample', !Ref EnvType, 'tg']]
        - Key: Env
          Value: !Ref EnvType
  ALB:
    Type: AWS::ElasticLoadBalancingV2::LoadBalancer
    Properties:
      Type: application
      Name: !Join ['-', ['fargate-sample', !Ref EnvType, 'alb']]
      SecurityGroups: !Split [',', {'Fn::ImportValue': !Join ['-', ['Fn::Sub':'${AWS::AccountId}', 'Fn::Sub':'${AWS::Region}', 'test-default-sg']]}]
      IpAddressType: ipv4
      Scheme: internet-facing
      Subnets: !Split [',', {'Fn::ImportValue': !Join ['-', ['Fn::Sub':'${AWS::AccountId}', 'Fn::Sub':'${AWS::Region}', 'test-subnets']]}]
      # MEMO
      # https://docs.aws.amazon.com/ja_jp/elasticloadbalancing/latest/APIReference/API_LoadBalancerAttribute.html
      # https://docs.aws.amazon.com/ja_jp/elasticloadbalancing/latest/application/application-load-balancers.html#load-balancer-attributes
      LoadBalancerAttributes:
        - Key: access_logs.s3.enabled
          Value: true
        - Key: access_logs.s3.bucket
          Value: !Ref AccessLogBucket
        - Key: access_logs.s3.prefix
          Value: !Ref EnvType
        - Key: idle_timeout.timeout_seconds
          Value: 60
        - Key: routing.http2.enabled
          Value: true
      Tags:
        - Key: Name
          Value: !Join ['-', ['fargate-sample', !Ref EnvType, 'alb']]
        - Key: Env
          Value: !Ref EnvType
  HTTPListener:
    Type: AWS::ElasticLoadBalancingV2::Listener
    Properties:
      # TODO http -> https のリダイレクト。現時点ではcloudformationで対応してない。
      # https://aws.amazon.com/jp/about-aws/whats-new/2018/07/elastic-load-balancing-announces-support-for-redirects-and-fixed-responses-for-application-load-balancer/
      DefaultActions:
        - Type: forward
          TargetGroupArn: !Ref TargetGroup
      LoadBalancerArn: !Ref ALB
      Port: 80
      Protocol: HTTP
  HTTPSListener:
    Type: AWS::ElasticLoadBalancingV2::Listener
    Properties:
      Certificates:
        - CertificateArn: !Ref ACMArn
      DefaultActions:
        - Type: forward
          TargetGroupArn: !Ref TargetGroup
      LoadBalancerArn: !Ref ALB
      Port: 443
      Protocol: HTTPS
      # http://docs.aws.amazon.com/ja_jp/elasticloadbalancing/latest/application/create-https-listener.html
      SslPolicy: 'ELBSecurityPolicy-2016-08'
  # アクセスログ格納用S3バケット
  # https://docs.aws.amazon.com/ja_jp/elasticloadbalancing/latest/classic/enable-access-logs.html
  AccessLogBucket:
    Type: AWS::S3::Bucket
    Properties:
      BucketName: !Join ['-', ['Fn::Sub':'${AWS::AccountId}', 'fargate-sample-alb', !Ref EnvType, 'logs']]
  AccessLogBucketPolicy:
    Type: AWS::S3::BucketPolicy
    Properties:
      Bucket: !Ref AccessLogBucket
      PolicyDocument:
        Statement:
          - Effect: Allow
            Principal:
              AWS: 582318560864
            Action:
              - s3:PutObject
            Resource:
              - !Join ['', ['arn:aws:s3:::', !Ref AccessLogBucket, '/', !Ref EnvType, '/AWSLogs/', 'Fn::Sub':'${AWS::AccountId}', '/*']]
$ aws cloudformation create-stack --stack-name fargate-sample-alb --template-body file://cloudformation/alb.yml
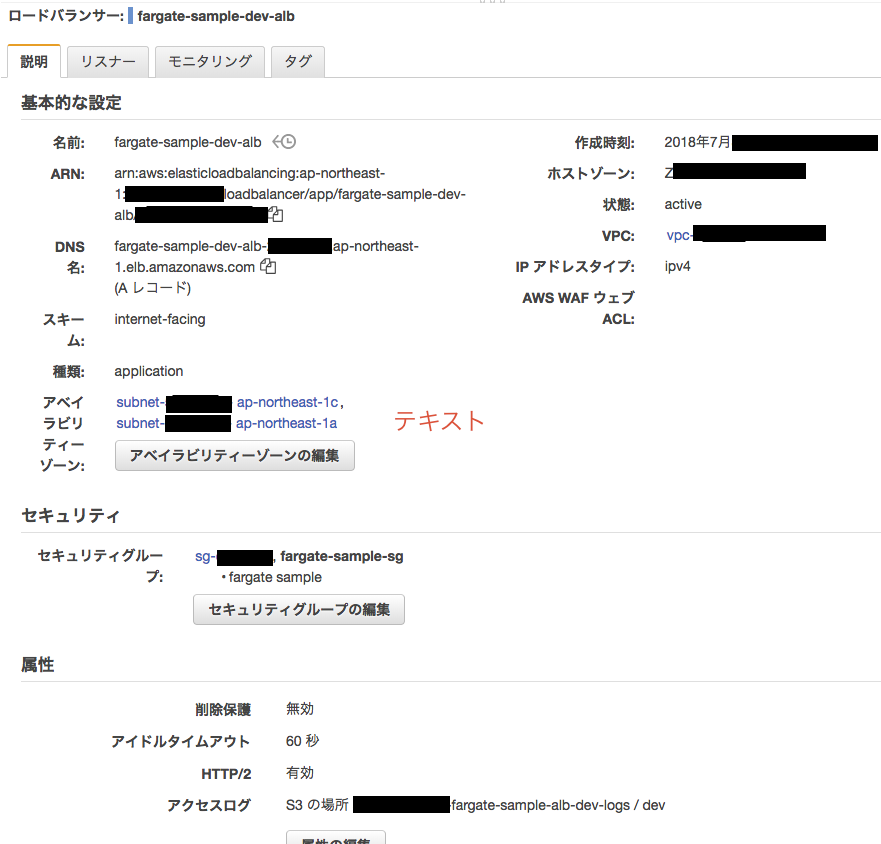
実行後、albとターゲットグループが作成できているか確認します。
まずはALBの確認。ALB自体は問題なくできていそうです。
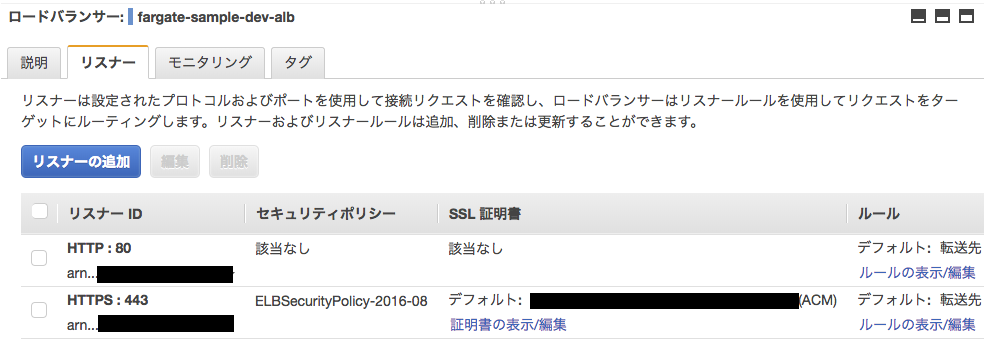
リスナーで設定したターゲットグループ先も問題なさそうです。
ecs-cli によるサービスのデプロイ
次にアプリケーションをデプロイしてみます。
今回は一旦、nginxのデフォルトのものを動かしてみます。
$ ecs-cli compose --project-name fargate-sample -f compose/docker-compose.common.yml -f compose/docker-compose.dev.yml --ecs-params compose/ecs-params.dev.yml --cluster fargate-sample-cluster service up --deployment-max-percent 200 --deployment-min-healthy-percent 50 --target-group-arn [target group arn] --container-name frontend --container-port 80 --launch-type FARGATE --health-check-grace-period 120 --create-log-groups --timeout 10
INFO[0000] Using ECS task definition                     TaskDefinition="fargate-sample:1"
INFO[0000] Created Log Group frontend in ap-northeast-1
INFO[0001] Created an ECS service                        deployment-max-percent=200 deployment-min-healthy-percent=50 health-check-grace-period=120 service=fargate-sample taskDefinition="fargate-sample:1"
WARN[0001] Failed to create log group frontend in ap-northeast-1: The specified log group already exists
INFO[0001] Updated ECS service successfully              deployment-max-percent=200 deployment-min-healthy-percent=50 desiredCount=1 health-check-grace-period=120 serviceName=fargate-sample
INFO[0016] (service fargate-sample) has started 1 tasks: (task 11111111-0000-2222-4444-555555555555).  timestamp="2018-07-30 13:43:57 +0000 UTC"
INFO[0031] Service status                                desiredCount=1 runningCount=1 serviceName=fargate-sample
INFO[0031] ECS Service has reached a stable state        desiredCount=1 runningCount=1 serviceName=fargate-sample
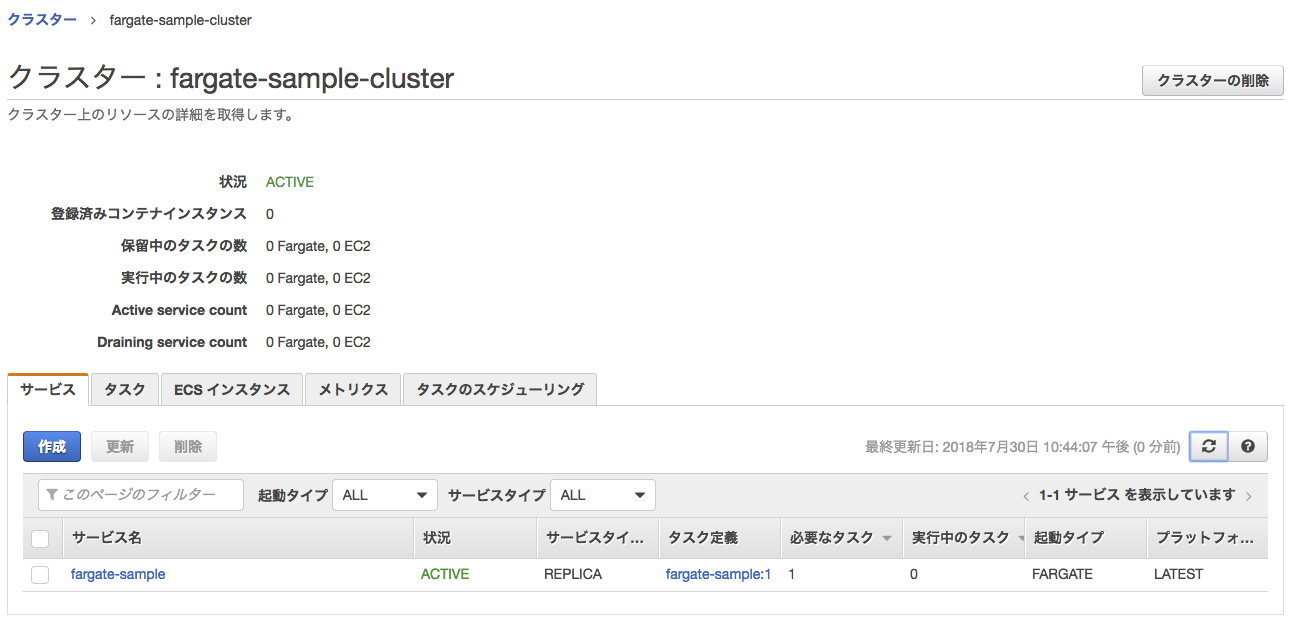
実行後にはサービスが作成され
タスクが保留中のステータスになっていると思います。
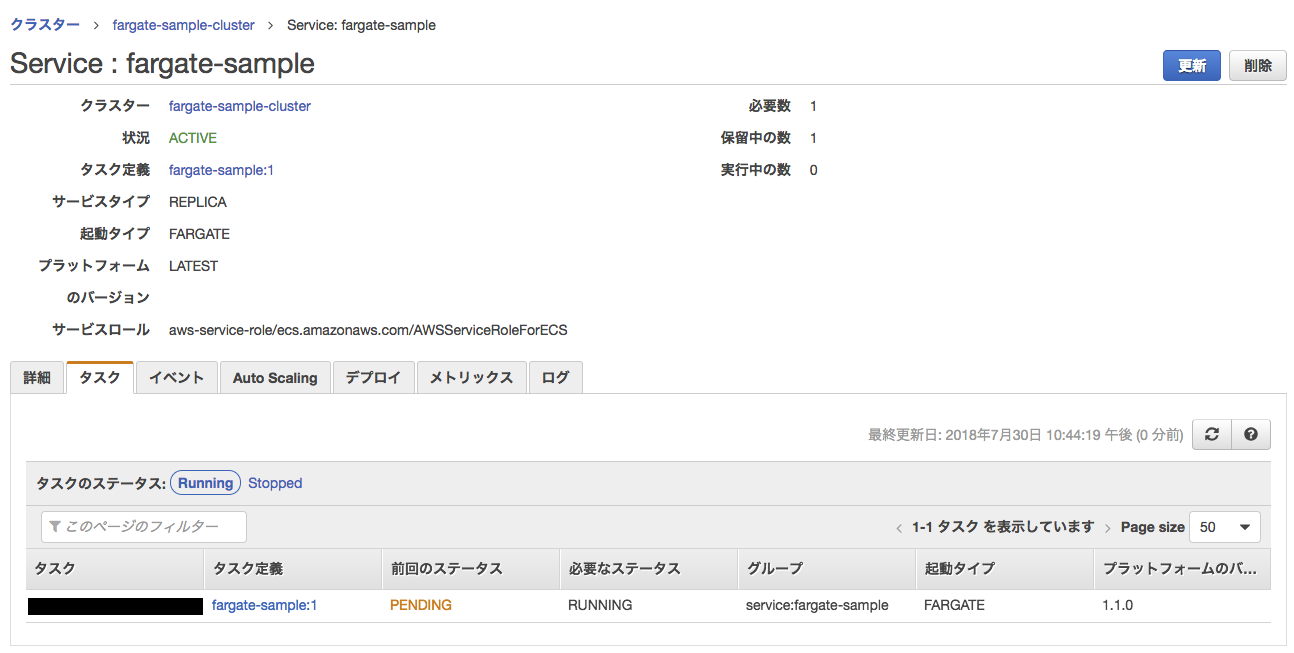
このタスクのステータスがRUNNINGに更新されればデプロイ完了です。
ALBのDNSにアクセスして画面を確認してみます。
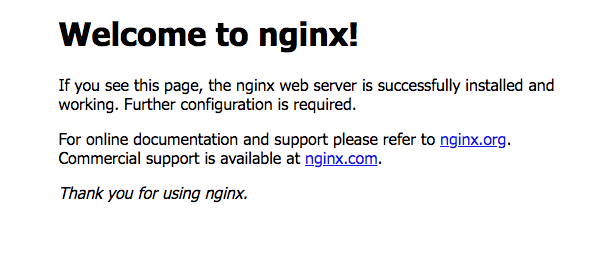
このように表示されていればデプロイ完了となります。
タスク数のスケール
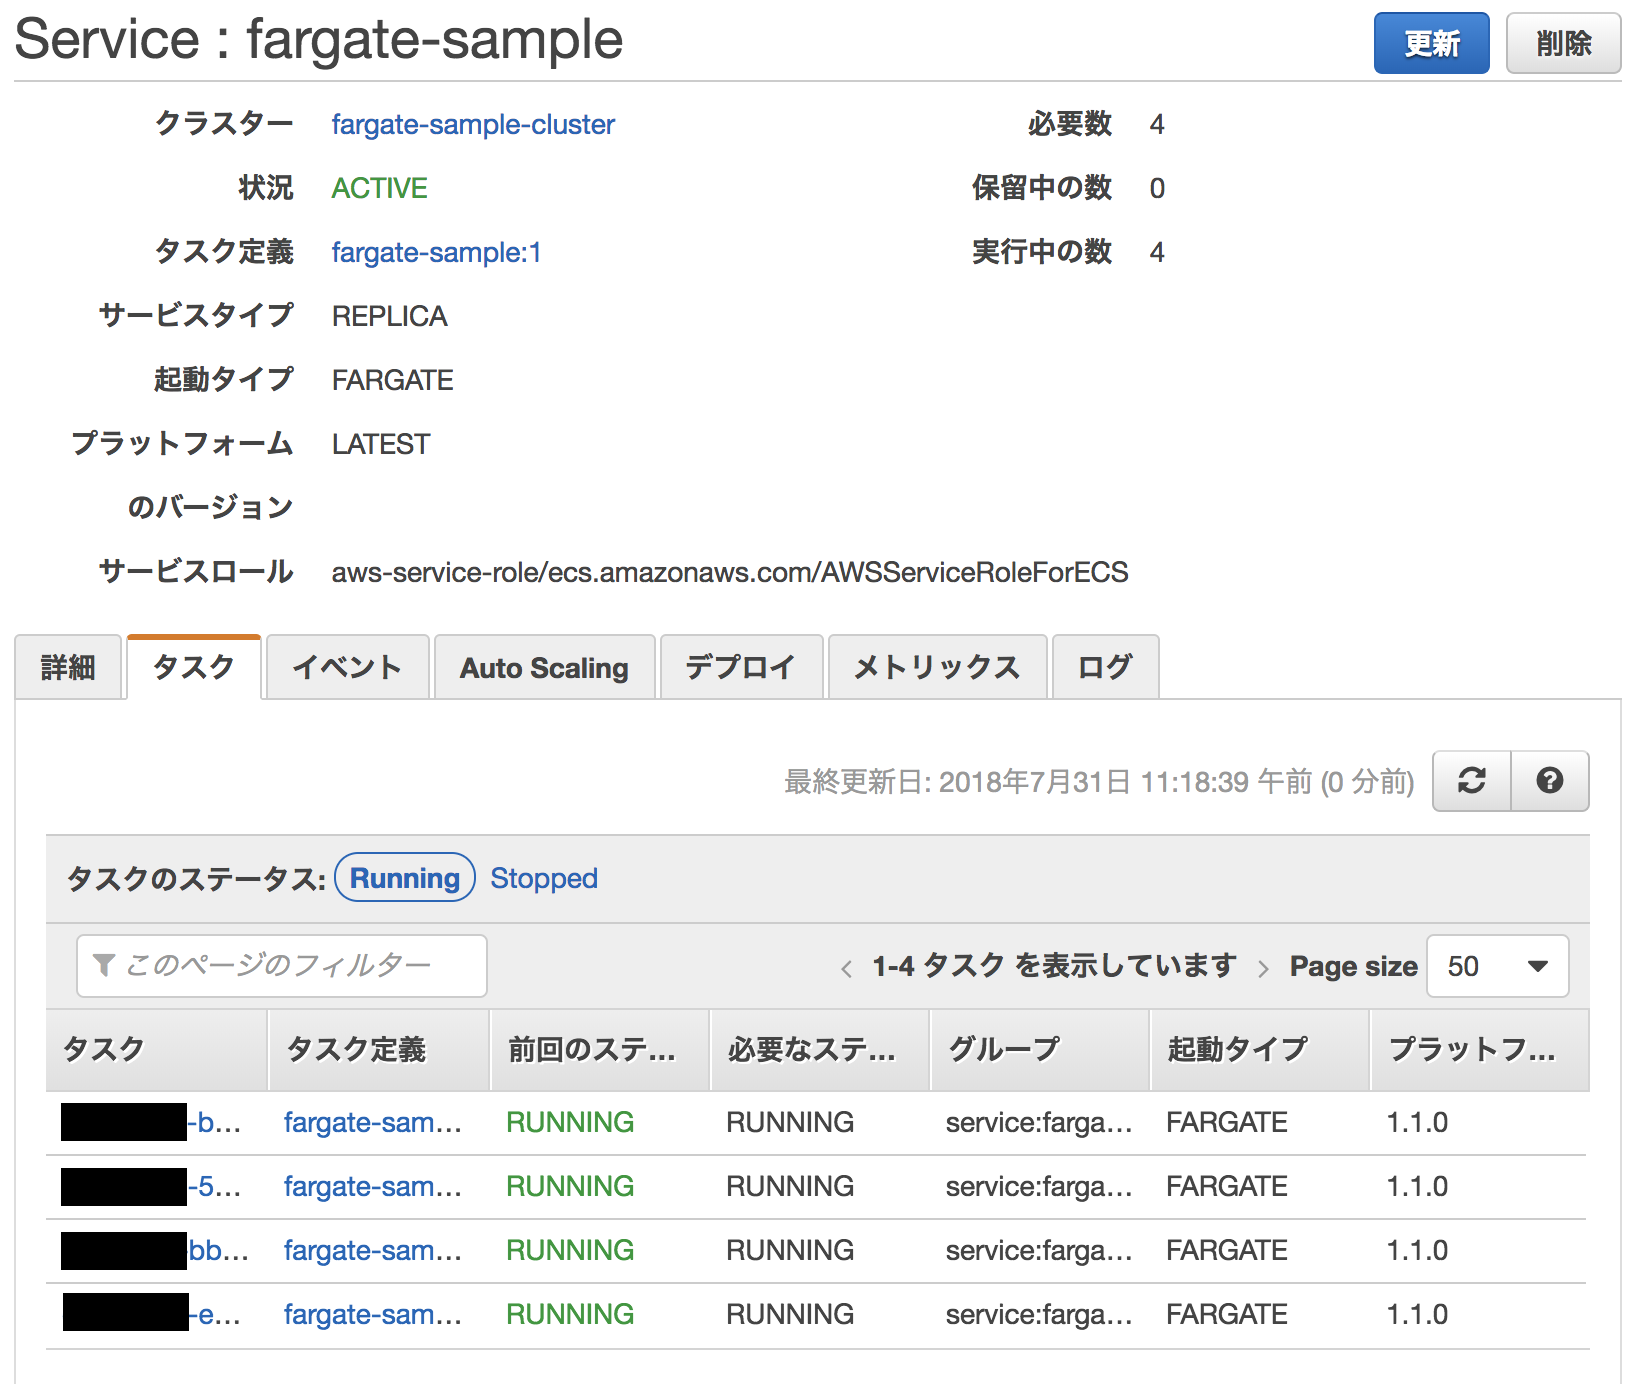
ecs-cli でタスク数を4にスケールさせてみます。
$ ecs-cli compose --verbose --project-name fargate-sample -f compose/docker-compose.common.yml -f compose/docker-compose.dev.yml --ecs-params compose/ecs-params.dev.yml --cluster fargate-sample-cluster service scale 4
DEBU[0000] Parsing the compose yaml...
DEBU[0000] Docker Compose version found: 3
DEBU[0000] Docker Compose version found: 3
DEBU[0000] Parsing v3 project...
DEBU[0000] Parsing the ecs-params yaml...
DEBU[0000] Transforming yaml to task definition...
DEBU[0002] Updated ECS service                           count=4 service=fargate-sample
INFO[0002] Updated ECS service successfully              desiredCount=4 serviceName=fargate-sample
INFO[0017] (service fargate-sample) has started 3 tasks: (task 00000000-0000-0000-aaaa-bbbbbbbbbbbb) (task 11111111-1111-1111-aaaa-bbbbbbbbbbbb) (task 22222222-2222-2222-aaaa-bbbbbbbbbbbb).  timestamp="2018-07-31 02:02:13 +0000 UTC"
INFO[0032] Service status                                desiredCount=4 runningCount=3 serviceName=fargate-sample
INFO[0032] (service fargate-sample) registered 1 targets in (target-group arn:aws:elasticloadbalancing:ap-northeast-1:380950227297:targetgroup/fargate-sample-dev-tg/222222222222222)  timestamp="2018-07-31 02:02:34 +0000 UTC"
INFO[0048] Service status                                desiredCount=4 runningCount=4 serviceName=fargate-sample
INFO[0048] (service fargate-sample) registered 3 targets in (target-group arn:aws:elasticloadbalancing:ap-northeast-1:000000000000:targetgroup/fargate-sample-dev-tg/222222222222222)  timestamp="2018-07-31 02:02:45 +0000 UTC"
INFO[0048] ECS Service has reached a stable state        desiredCount=4 runningCount=4 serviceName=fargate-sample
マネジメントコンソール上でも増えているのが分かります。
現状の課題
- 監視ツールの問題
- 今までのECSはMackerelを使って監視していましたが、まだFargate未対応のため内部で動作しているjava等のアプリケーションのリソース取得が厳しいです。
最後に
今まで、ECSでのサイト運営をしてきていましたが、オートスケール周りでうまくいかず障害を起こしてしまうことが何度かありました。
Fargateではスケーリング周りをtarget trakkingでできるようになったため、オートスケール周りで苦しんで来た私にはとてもうれしいです。
サーバー(ホスト)の管理は難しいですし、管理をする人のスケールはさらに難しいのでこういったサービスの登場は非常に喜ばしいですね。
今回のソースはgithubでも公開しているので、fargateを利用したWebサイトの構築に役立つかもしれません。
よければソースも見ていただけるとdockerやfargate周りの理解にも
github