本コンテンツはクイック・ネットワークでエンジニアとして開発のお仕事する人が、ベーシックであるPHPとフレームワークのLaravelを容易に学べるよう作成いたしました。外でも使ってもらえるように公開しております。学生インターンとか新卒とか中途で他の言語経験がある方とかを対象にしている感じです。
Part1はこちらから。
Part3はこちらからご覧になれます。よろしければぜひご確認ください。
Artisan Tinker
Laravelアプリケーションで任意のPHPコードを実行できるREPL(Read-eval-print loop)、Artisan Tinkerについて学ぶ絶好の機会です。
コンソールで、新しいTinkerセッションを開始します。
$ php artisan tinker
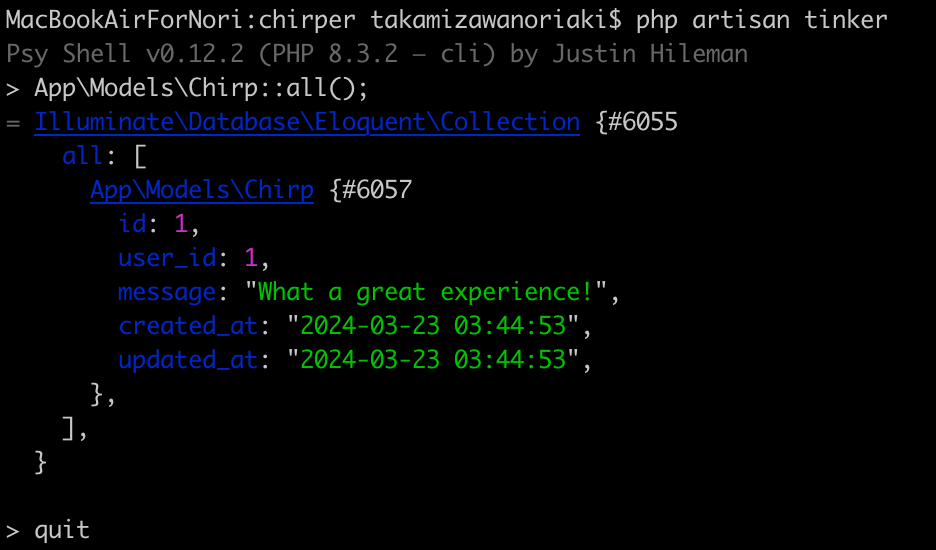
次にデータベースのChirpを見るための次のコードを実行しましょう。先ほどフォームから入力したメッセージが追加されているはずです。
App\Models\Chirp::all();
exitコマンドもしくはquitコマンド、Ctrl+CでTinkerを抜けることができます。
Chirpsを表示
前のステップでは、Chirpを作成する機能を追加しました!
Chirpを取得する
ChirpController クラスの index メソッドを更新して、すべてのユーザのChirpをインデックスページに渡すようにしましょう
<?php
 ...
class ChirpController extends Controller
{
    /**
     * Display a listing of the resource.
     */
    public function index(): View
    {
-        return view('chirps.index');
+        return view('chirps.index', [
+            'chirps' => Chirp::with('user')->latest()->get(),
+        ]);
    }
 ...
}
ここでは、Eloquentのwithメソッドを使ってChirpの関連ユーザをeager-loadしています。また、latestスコープを使って、レコードを逆時系列で返しています。
すべてのChirpを一度に表示することは、本番環境ではパフォーマンスに影響します。パフォーマンスを向上させるLaravelの強力なページネーションを見てみましょう。
usersからChirpへの接続
Chirpの作者名を表示できるように、Laravelにユーザーリレーションを返すように説明しました。しかし、Chirpのユーザーリレーションはまだ定義されていません。これを解決するために、Chirpモデルに新しい "belongs to "リレーションシップを追加しましょう
<?php
 ...
+use Illuminate\Database\Eloquent\Relations\BelongsTo;
class Chirp extends Model
{
 ...
+    public function user(): BelongsTo
+    {
+        return $this->belongsTo(User::class);
+    }
}
このリレーションシップは、先ほどUserモデルで作成した "has many "リレーションシップの逆です。
Viewの更新
次に、chirps.indexコンポーネントを更新して、フォームの下にChirpsを表示させましょう
<x-app-layout>
    <div class="max-w-2xl mx-auto p-4 sm:p-6 lg:p-8">
        <form method="POST" action="{{ route('chirps.store') }}">
            @csrf
            <textarea
                name="message"
                placeholder="{{ __('What\'s on your mind?') }}"
                class="block w-full border-gray-300 focus:border-indigo-300 focus:ring focus:ring-indigo-200 focus:ring-opacity-50 rounded-md shadow-sm"
            >{{ old('message') }}</textarea>
            <x-input-error :messages="$errors->store->get('message')" class="mt-2" />
            <x-primary-button class="mt-4">{{ __('Chirp') }}</x-primary-button>
        </form>
+        <div class="mt-6 bg-white shadow-sm rounded-lg divide-y">
+            @foreach ($chirps as $chirp)
+                <div class="p-6 flex space-x-2">
+                    <svg xmlns="http://www.w3.org/2000/svg" class="h-6 w-6 text-gray-600 -scale-x-100" fill="none" viewBox="0 0 24 24" stroke="currentColor" stroke-width="2">
+                        <path stroke-linecap="round" stroke-linejoin="round" d="M8 12h.01M12 12h.01M16 12h.01M21 12c0 4.418-4.03 8-9 8a9.863 9.863 0 01-4.255-.949L3 20l1.395-3.72C3.512 15.042 3 13.574 3 12c0-4.418 4.03-8 9-8s9 3.582 9 8z" />
+                    </svg>
+                    <div class="flex-1">
+                        <div class="flex justify-between items-center">
+                            <div>
+                                <span class="text-gray-800">{{ $chirp->user->name }}</span>
+                                <small class="ml-2 text-sm text-gray-600">{{ $chirp->created_at->format('j M Y, g:i a') }}</small>
+                            </div>
+                        </div>
+                        <p class="mt-4 text-lg text-gray-900">{{ $chirp->message }}</p>
+                    </div>
+                </div>
+            @endforeach
+        </div>
    </div>
</x-app-layout>
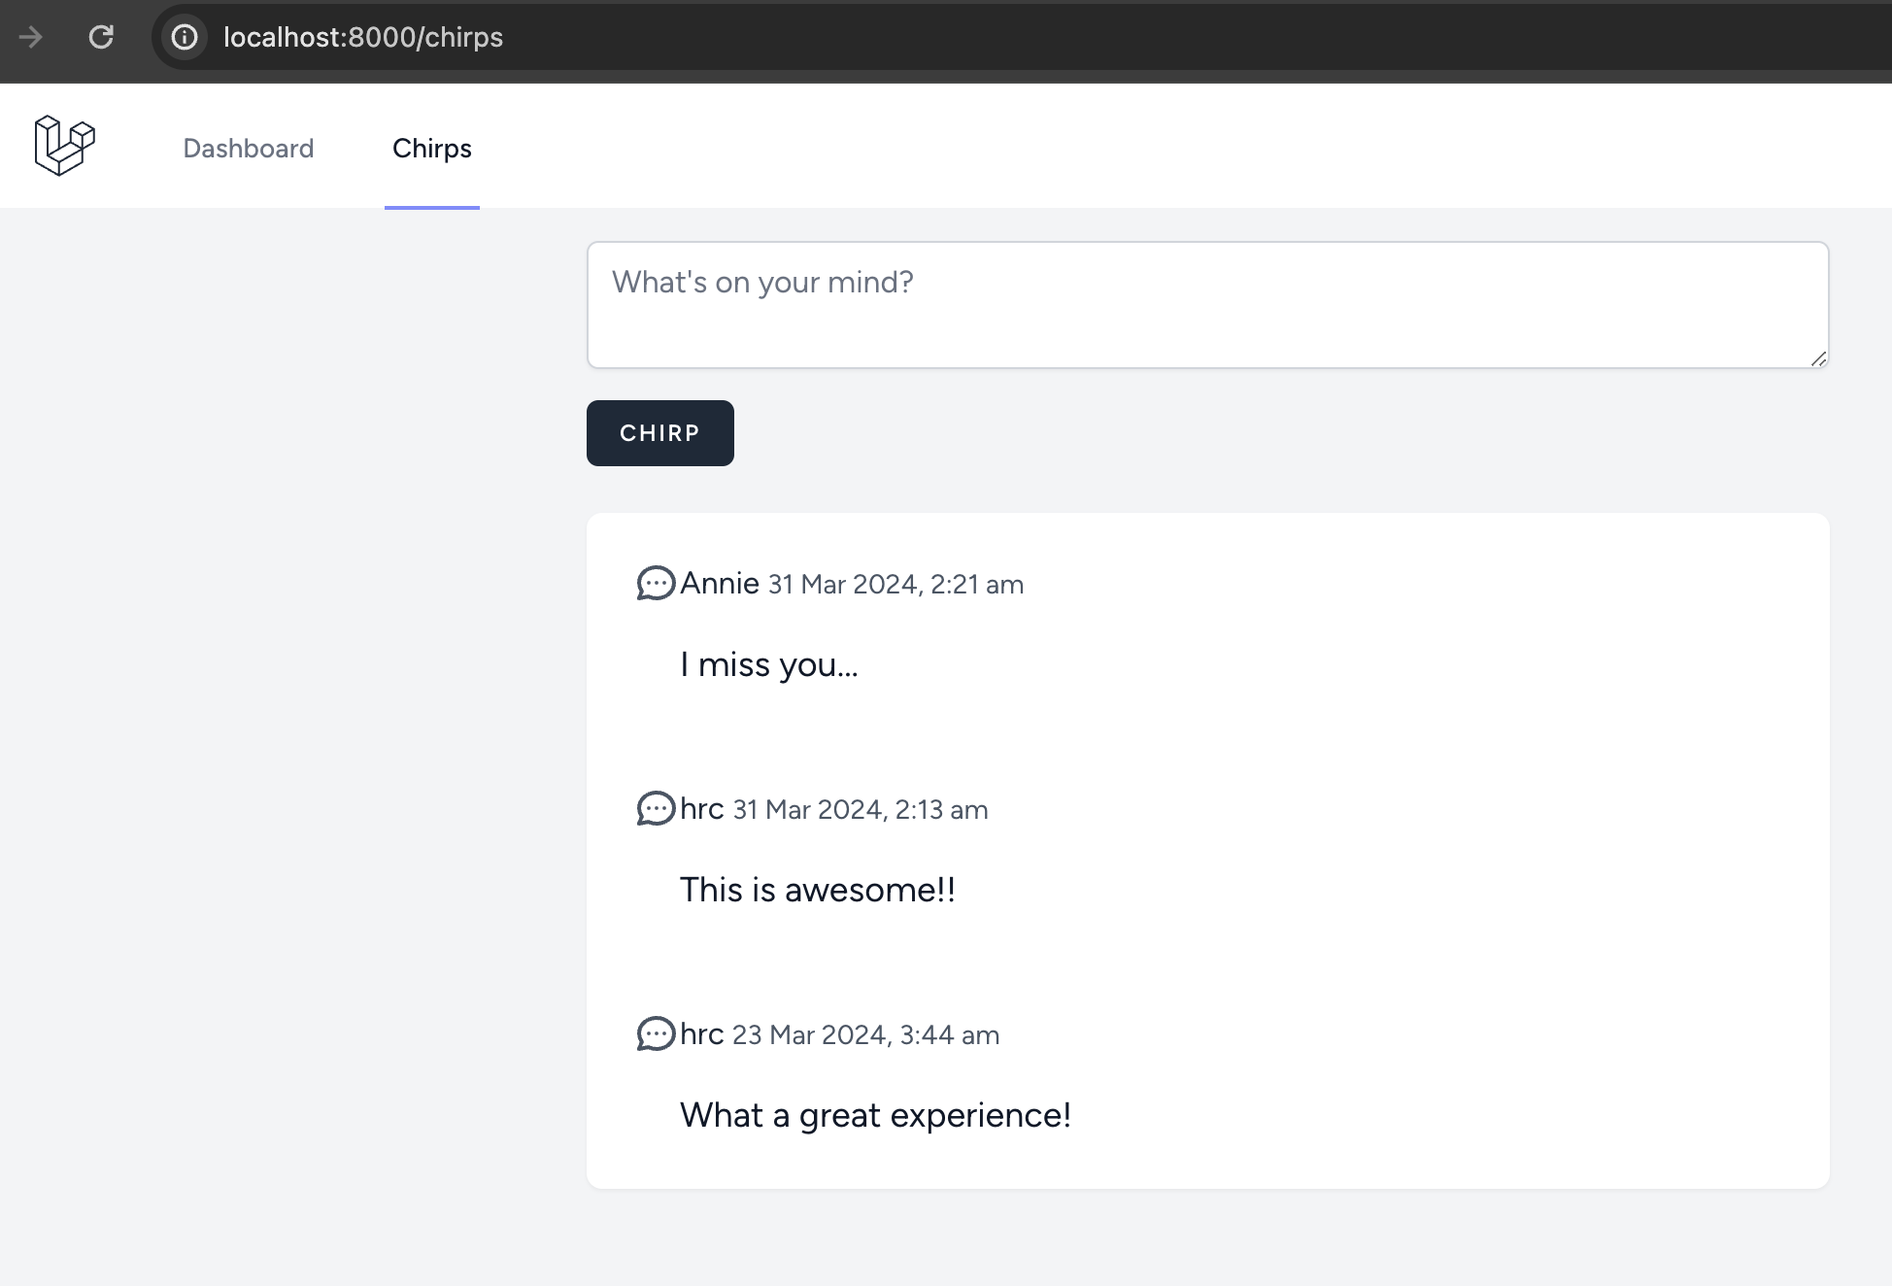
ブラウザで、先ほどChirpしたメッセージを見てみましょう!
好きなだけChirpすることもできますし、別のアカウントを登録して会話を始めることもできるのでやってみましょう。
Chirpsの編集
鳥をテーマにした他の人気マイクロブログ・プラットフォームにはない機能、Chirpを編集する機能を追加してみましょう。
ルーティング(Routing)
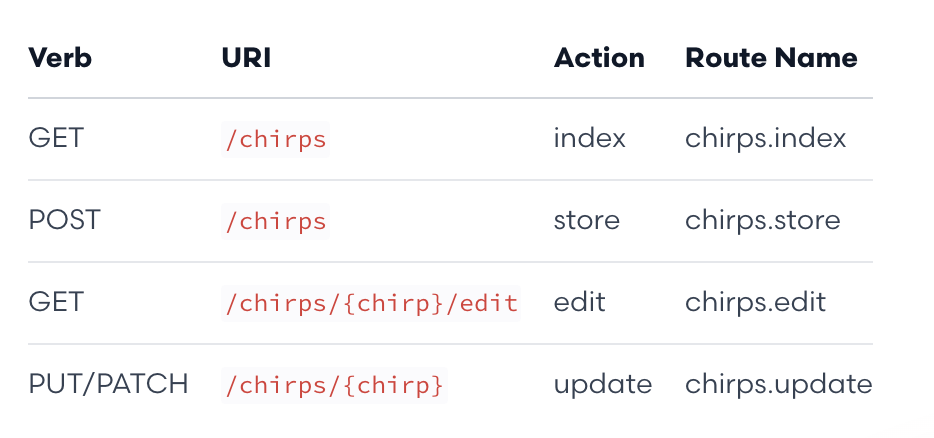
まず、リソースコントローラのchirps.editルートとchirps.updateルートを有効にするために、routesファイルを更新します。chirps.editルートはChirpを編集するためのフォームを表示し、chirps.updateルートはフォームからのデータを受け取ってモデルを更新します。
<?php
 ...
Route::resource('chirps', ChirpController::class)
-    ->only(['index', 'store'])
+    ->only(['index', 'store', 'edit', 'update'])
    ->middleware(['auth', 'verified']);
コントローラーのルーティングテーブルは以下のようになります。
編集ページへのリンク
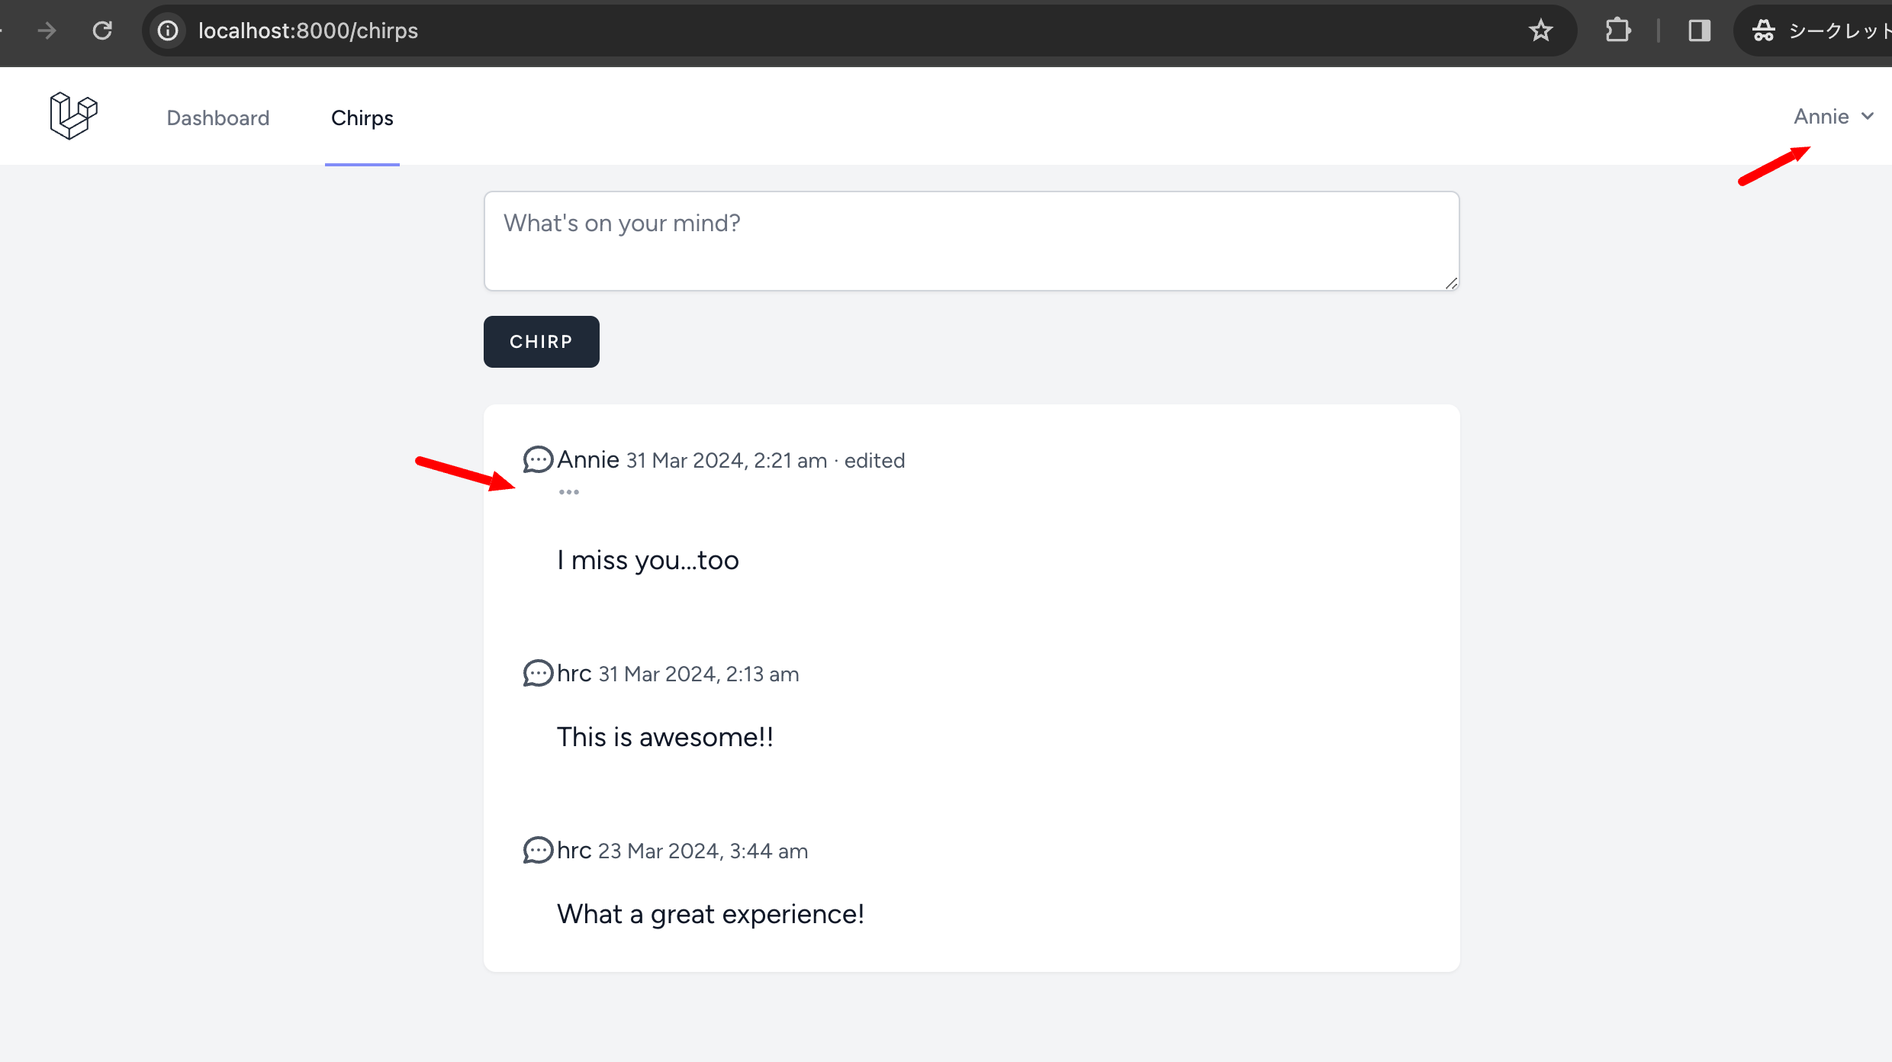
次に、新しいchirps.editルートをリンクしましょう。Breezeに付属しているx-dropdownコンポーネントを使用し、Chirp作成者のみに表示します。また、Chirpのcreated_atの日付とupdated_atの日付を比較して、Chirpが編集されたかどうかを表示します。
<x-app-layout>
<div class="max-w-2xl mx-auto p-4 sm:p-6 lg:p-8">
<form method="POST" action="{{ route('chirps.store') }}">
@csrf
<textarea
name="message"
placeholder="{{ __('What\'s on your mind?') }}"
class="block w-full border-gray-300 focus:border-indigo-300 focus:ring focus:ring-indigo-200 focus:ring-opacity-50 rounded-md shadow-sm"
>{{ old('message') }}</textarea>
<x-input-error :messages="$errors->get('message')" class="mt-2" />
<x-primary-button class="mt-4">{{ __('Chirp') }}</x-primary-button>
</form>
<div class="mt-6 bg-white shadow-sm rounded-lg divide-y">
@foreach ($chirps as $chirp)
<div class="p-6 flex space-x-2">
<svg xmlns="http://www.w3.org/2000/svg" class="h-6 w-6 text-gray-600 -scale-x-100" fill="none" viewBox="0 0 24 24" stroke="currentColor" stroke-width="2">
<path stroke-linecap="round" stroke-linejoin="round" d="M8 12h.01M12 12h.01M16 12h.01M21 12c0 4.418-4.03 8-9 8a9.863 9.863 0 01-4.255-.949L3 20l1.395-3.72C3.512 15.042 3 13.574 3 12c0-4.418 4.03-8 9-8s9 3.582 9 8z" />
</svg>
<div class="flex-1">
<div class="flex justify-between items-center">
<div>
<span class="text-gray-800">{{ $chirp->user->name }}</span>
<small class="ml-2 text-sm text-gray-600">{{ $chirp->created_at->format('j M Y, g:i a') }}</small>
+ @unless ($chirp->created_at->eq($chirp->updated_at))
+ <small class="text-sm text-gray-600"> · {{ __('edited') }}</small>
+ @endunless
</div>
+ @if ($chirp->user->is(auth()->user()))
+ <x-dropdown>
+ <x-slot name="trigger">
+ <button>
+ <svg xmlns="http://www.w3.org/2000/svg" class="h-4 w-4 text-gray-400" viewBox="0 0 20 20" fill="currentColor">
+ <path d="M6 10a2 2 0 11-4 0 2 2 0 014 0zM12 10a2 2 0 11-4 0 2 2 0 014 0zM16 12a2 2 0 100-4 2 2 0 000 4z" />
+ </svg>
+ </button>
+ </x-slot>
+ <x-slot name="content">
+ <x-dropdown-link :href="route('chirps.edit', $chirp)">
+ {{ __('Edit') }}
+ </x-dropdown-link>
+ </x-slot>
+ </x-dropdown>
+ @endif
</div>
<p class="mt-4 text-lg text-gray-900">{{ $chirp->message }}</p>
</div>
</div>
@endforeach
</div>
</div>
</x-app-layout>
編集フォームの作成
Chirpを編集するためのフォームを持つ新しいBladeビューを作成してみましょう。chirps.updateルートに投稿し、@methodディレクティブを使って "PATCH "リクエストを行うことを指定する以外は、Chirpを作成するフォームと似ています。また、既に投稿されているChirpメッセージをあらかじめフィールドに入力しておきます。
<x-app-layout>
    <div class="max-w-2xl mx-auto p-4 sm:p-6 lg:p-8">
        <form method="POST" action="{{ route('chirps.update', $chirp) }}">
            @csrf
            @method('patch')
            <textarea
                name="message"
                class="block w-full border-gray-300 focus:border-indigo-300 focus:ring focus:ring-indigo-200 focus:ring-opacity-50 rounded-md shadow-sm"
            >{{ old('message', $chirp->message) }}</textarea>
            <x-input-error :messages="$errors->get('message')" class="mt-2" />
            <div class="mt-4 space-x-2">
                <x-primary-button>{{ __('Save') }}</x-primary-button>
                <a href="{{ route('chirps.index') }}">{{ __('Cancel') }}</a>
            </div>
        </form>
    </div>
</x-app-layout>
Controllerの修正
ChirpControllerのeditメソッドを更新してフォームを表示しましょう。Laravelはルートモデルバインディングを使用して、Chirpモデルをデータベースから自動的に読み込みます。
そして、リクエストを検証し、updateメソッドを更新してデータベースを更新します。
Chirpの作者にだけ編集ボタンを表示するとして、これらのルートにアクセスするユーザでログインされていることを確認する必要があります。そのためにGateファサードを追加しています。Gateは特定のアクションを行う認可があるかを確認する機能になります。
<?php
 ...
use App\Models\Chirp;
use Illuminate\Http\RedirectResponse;
use Illuminate\Http\Request;
use Illuminate\Http\Response;
+use Illuminate\Support\Facades\Gate;
use Illuminate\View\View;
class ChirpController extends Controller
{
 ...
    /**
     * Show the form for editing the specified resource.
     */
-    public function edit(Chirp $chirp)
+    public function edit(Chirp $chirp): View
    {
-        //
+        Gate::authorize('update', $chirp);
+        return view('chirps.edit', [
+            'chirp' => $chirp,
+        ]);
    }
    /**
     * Update the specified resource in storage.
     */
-    public function update(Request $request, Chirp $chirp)
+    public function update(Request $request, Chirp $chirp): RedirectResponse
    {
-        //
+        Gate::authorize('update', $chirp);
+        $validated = $request->validate([
+            'message' => 'required|string|max:255',
+        ]);
+        $chirp->update($validated);
+        return redirect(route('chirps.index'));
    }
 ...
}
バリデーションルールがstoreメソッドと重複していることに気づいたかもしれません。Laravelのフォームリクエストバリデーション(Form Request Validation)を使えば、簡単にバリデーションルールを再利用でき、コントローラーを軽量に保つことができます。
デフォルトでは、authorizeメソッドはすべての人がChirpを更新できないようにします。以下のコマンドでModel Policyを作成することで、更新を許可するユーザを指定できます。
php artisan make:policy ChirpPolicy --model=Chirp
これにより、app/Policies/ChirpPolicy.phpにポリシークラスが作成され、Chirpを更新する権限が作者にのみあることを指定するように更新することができます。
<?php
 ...
class ChirpPolicy
{
 ...
    /**
     * Determine whether the user can update the model.
     */
    public function update(User $user, Chirp $chirp): bool
    {
-        //
+        return $chirp->user()->is($user);
    }
 ...
}
動作テスト
さあ試してみましょう!ドロップダウンメニューを使って、いくつかのChirpを編集してみましょう。他のユーザーアカウントを登録すると、Chirpの作者だけが編集できることがわかります。
Chirpsの削除
どんなに編集しても直らないこともあるので、Chirpを削除できるようにしましょう。
これで、みなさんがLaravelの使い方について理解していただけたと思います。この機能をいかに早く追加できるかを学べばきっと驚かれることでしょう。
ルーティング(Routing)
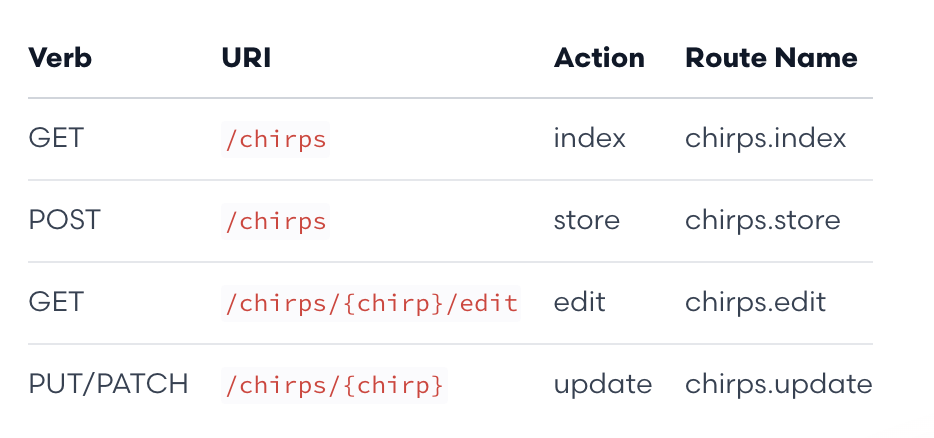
chirps.destroyルートを有効にするために、ルートを更新することから始めましょう。
<?php
 ...
Route::resource('chirps', ChirpController::class)
-    ->only(['index', 'store'])
+    ->only(['index', 'store', 'edit', 'update'])
    ->middleware(['auth', 'verified']);
このコントローラのルートテーブルは次のようになります。
Controllerの修正
ChirpControllerクラスのdestroyメソッドを更新して、削除を実行し、Chirpインデックスに戻ります。
<?php
 ...
class ChirpController extends Controller
{
 ...
    /**
     * Remove the specified resource from storage.
     */
-    public function destroy(Chirp $chirp)
+    public function destroy(Chirp $chirp): RedirectResponse
    {
-        //
+        Gate::authorize('delete', $chirp);
+        $chirp->delete();
+        return redirect(route('chirps.index'));
    }
}
権限付与(Authorization)
Chirpの編集時と同様に、Chirpの発信者のみが削除できるようにChirpPolicyクラスのdeleteメソッドを更新しましょう。
<?php
 ...
class ChirpPolicy
{
 ...
    /**
     * Determine whether the user can delete the model.
     */
    public function delete(User $user, Chirp $chirp): bool
    {
-        //
+        return $this->update($user, $chirp);
    }
 ...
}
updateメソッドのロジックを繰り返すのではなく、destroyメソッドからupdateメソッドを呼び出すことで同じロジックを定義できます。Chirpを更新する権限を持つ人は、Chirpを削除する権限も持つことになります。
Viewの修正
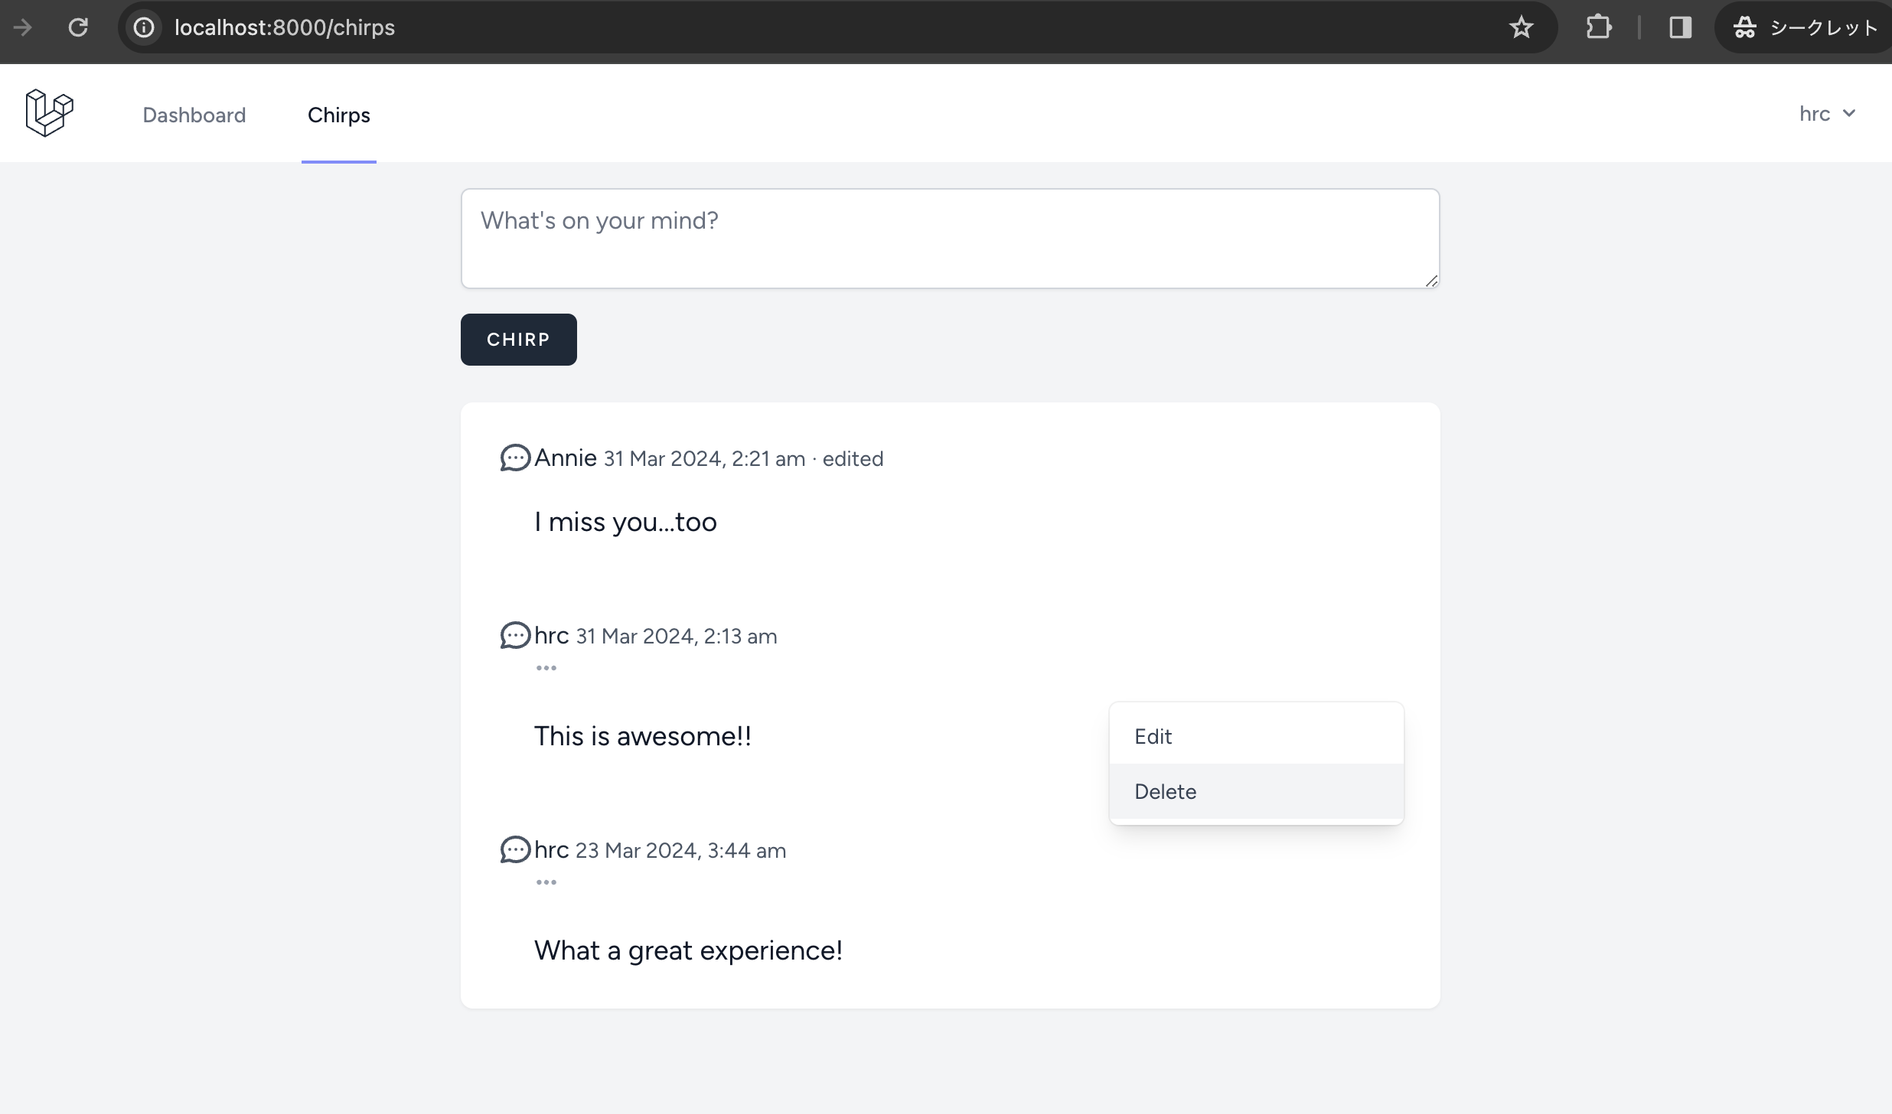
最後に、chirps.indexビューで作成したドロップダウンメニューに削除ボタンを追加します。
<x-app-layout>
<div class="max-w-2xl mx-auto p-4 sm:p-6 lg:p-8">
<form method="POST" action="{{ route('chirps.store') }}">
@csrf
<textarea
name="message"
placeholder="{{ __('What\'s on your mind?') }}"
class="block w-full border-gray-300 focus:border-indigo-300 focus:ring focus:ring-indigo-200 focus:ring-opacity-50 rounded-md shadow-sm"
>{{ old('message') }}</textarea>
<x-input-error :messages="$errors->get('message')" class="mt-2" />
<x-primary-button class="mt-4">{{ __('Chirp') }}</x-primary-button>
</form>
<div class="mt-6 bg-white shadow-sm rounded-lg divide-y">
@foreach ($chirps as $chirp)
<div class="p-6 flex space-x-2">
<svg xmlns="http://www.w3.org/2000/svg" class="h-6 w-6 text-gray-600 -scale-x-100" fill="none" viewBox="0 0 24 24" stroke="currentColor" stroke-width="2">
<path stroke-linecap="round" stroke-linejoin="round" d="M8 12h.01M12 12h.01M16 12h.01M21 12c0 4.418-4.03 8-9 8a9.863 9.863 0 01-4.255-.949L3 20l1.395-3.72C3.512 15.042 3 13.574 3 12c0-4.418 4.03-8 9-8s9 3.582 9 8z" />
</svg>
<div class="flex-1">
<div class="flex justify-between items-center">
<div>
<span class="text-gray-800">{{ $chirp->user->name }}</span>
<small class="ml-2 text-sm text-gray-600">{{ $chirp->created_at->format('j M Y, g:i a') }}</small>
@unless ($chirp->created_at->eq($chirp->updated_at))
<small class="text-sm text-gray-600"> · {{ __('edited') }}</small>
@endunless
</div>
@if ($chirp->user->is(auth()->user()))
<x-dropdown>
<x-slot name="trigger">
<button>
<svg xmlns="http://www.w3.org/2000/svg" class="h-4 w-4 text-gray-400" viewBox="0 0 20 20" fill="currentColor">
<path d="M6 10a2 2 0 11-4 0 2 2 0 014 0zM12 10a2 2 0 11-4 0 2 2 0 014 0zM16 12a2 2 0 100-4 2 2 0 000 4z" />
</svg>
</button>
</x-slot>
<x-slot name="content">
<x-dropdown-link :href="route('chirps.edit', $chirp)">
{{ __('Edit') }}
</x-dropdown-link>
+ <form method="POST" action="{{ route('chirps.destroy', $chirp) }}">
+ @csrf
+ @method('delete')
+ <x-dropdown-link :href="route('chirps.destroy', $chirp)" onclick="event.preventDefault(); this.closest('form').submit();">
+ {{ __('Delete') }}
+ </x-dropdown-link>
+ </form>
</x-slot>
</x-dropdown>
@endif
</div>
<p class="mt-4 text-lg text-gray-900">{{ $chirp->message }}</p>
</div>
</div>
@endforeach
</div>
</div>
</x-app-layout>
テスト
もし何か気に入らないChirpがあれば、それを削除してみましょう!
