OpenShift Virtualization
Red Hat® OpenShift® Virtualization は Red Hat OpenShift に含まれる機能であり、組織が新規および既存の仮想マシン (VM) ワークロードを実行およびデプロイするための先進的なプラットフォームを提供します。このソリューションにより、従来の仮想マシンを、信頼できる、一貫した包括的なハイブリッドクラウド・アプリケーション・プラットフォームに簡単に移行できます。
OpenShift Virtualization は、VM の移行を単純化するとともに、クラウドネイティブ・アプリケーション・プラットフォームのシンプルさと速度を利用してインフラストラクチャのモダナイゼーションの道筋を提供します。また、先進的な管理の原則を取り入れつつ既存の仮想化への投資を維持することを目指しており、Red Hat の包括的な仮想化ソリューションの基盤となります。
Creating virtual machines from Red Hat images
OCP 4.17 Bare Metal 環境 OpenShift Virtualization (OCP-V) で Virtual Machine (VM) を作成してみます。ここでは以下の手順を参考に、Red Hat Image (Red Hat が提供する Golden Image) から作成してみます。
About golden images
A golden image is a preconfigured snapshot of a virtual machine (VM) that you can use as a resource to deploy new VMs. For example, you can use golden images to provision the same system environment consistently and deploy systems more quickly and efficiently.
なお、今回は触れませんが、独自に作成した Custom Image を使用する事もできます。
Creating VMs from custom images
Creating virtual machines from instance types
ここでは、Instance Type から VM を作成してみます。
Creating virtual machines from instance types
About instance types
An instance type is a reusable object where you can define resources and characteristics to apply to new VMs. You can define custom instance types or use the variety that are included when you install OpenShift Virtualization.
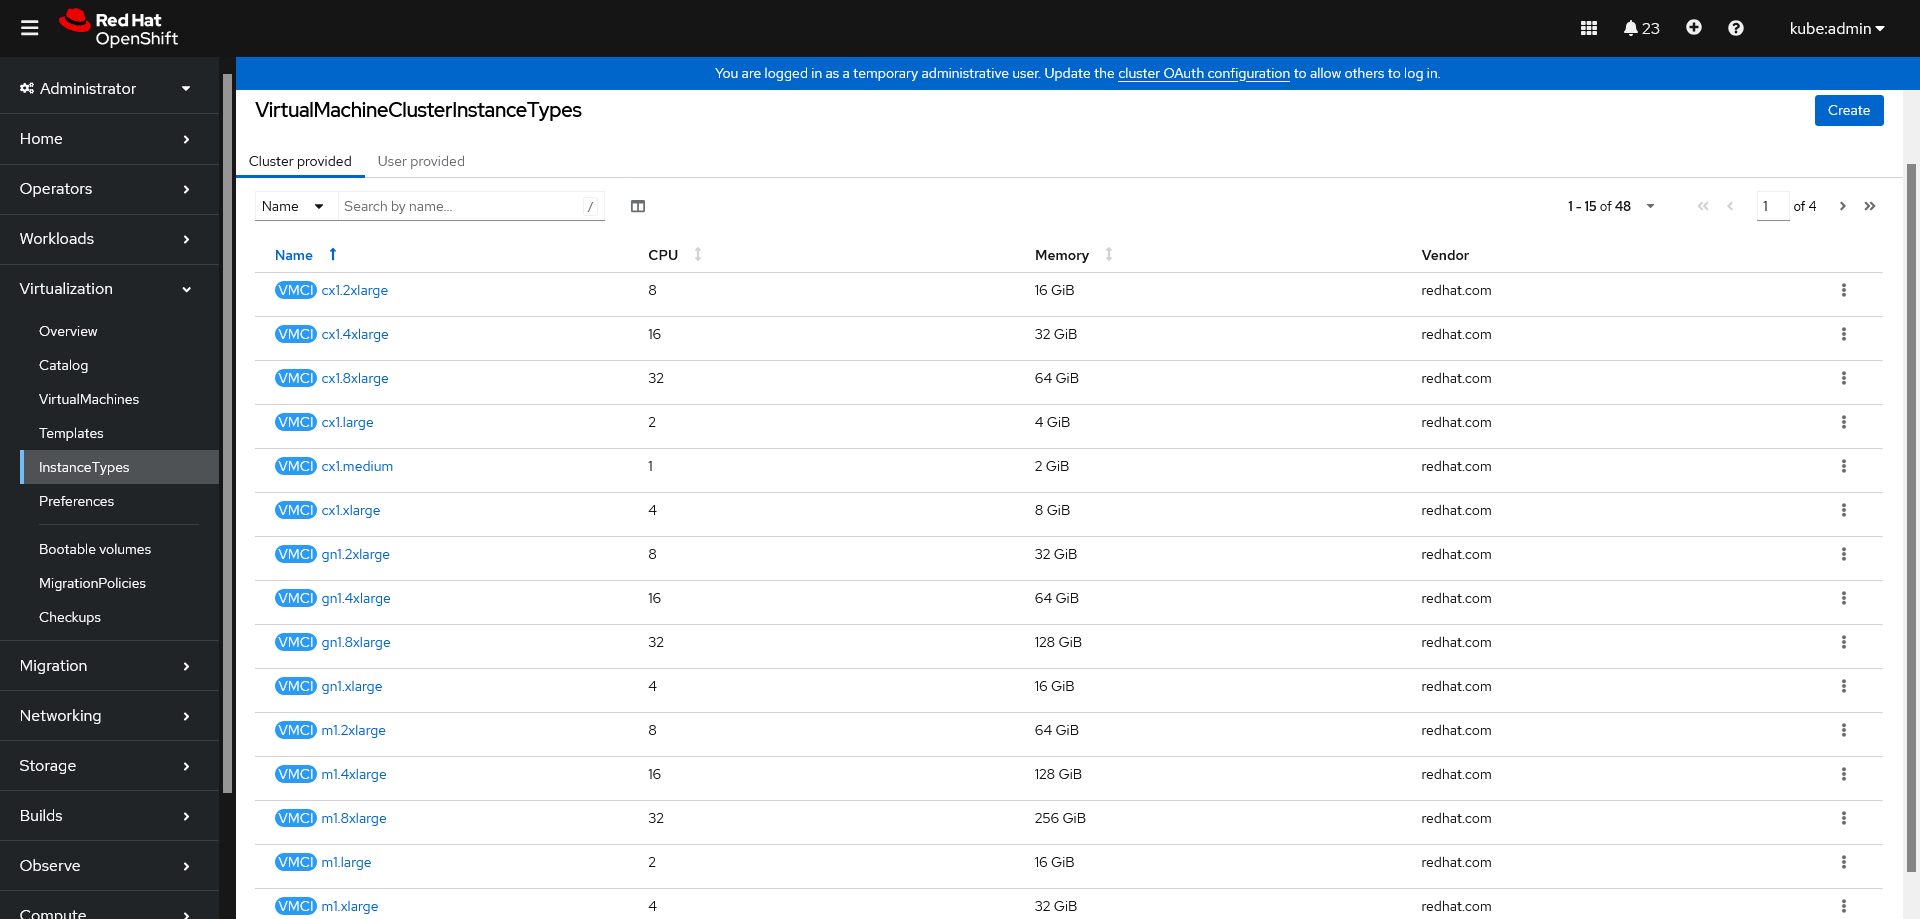
Instance Type を独自に作成する事もできますが、ここでは OCP-V が用意する common-instancetypes (VirtualMachineClusterInstancetype CR) を使用します。以下の OCP Console 画面の Cluster provided Tab で common-instancetypes を確認する事ができます。
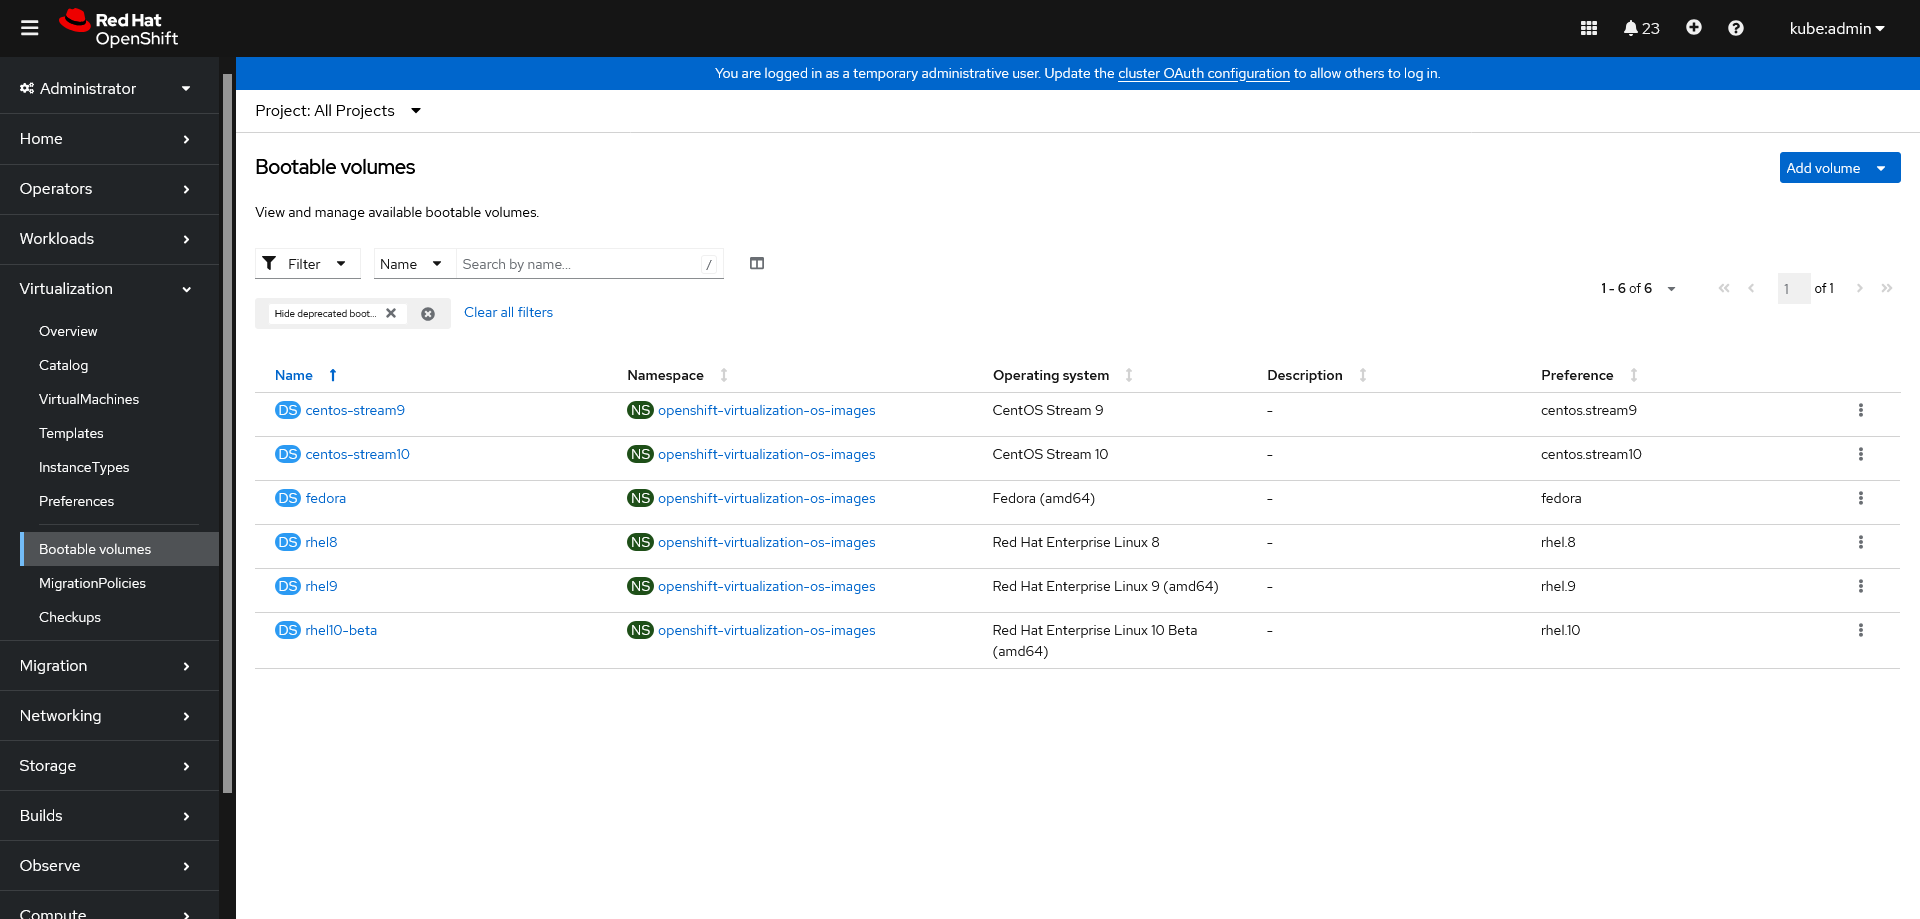
Bootable Volume は以下の OCP Console 画面から確認する事ができます。
Creating a VM from an instance type by using the web console
OCP Console から Virtualization -> Catalog を表示します。画面が Instance Types Tab になっている事を確認します。
左上の Project に VM を作成する Project として z-ocpv-vmtest を指定した上で、1 Select volume to boot from で rhel9 を選択します。
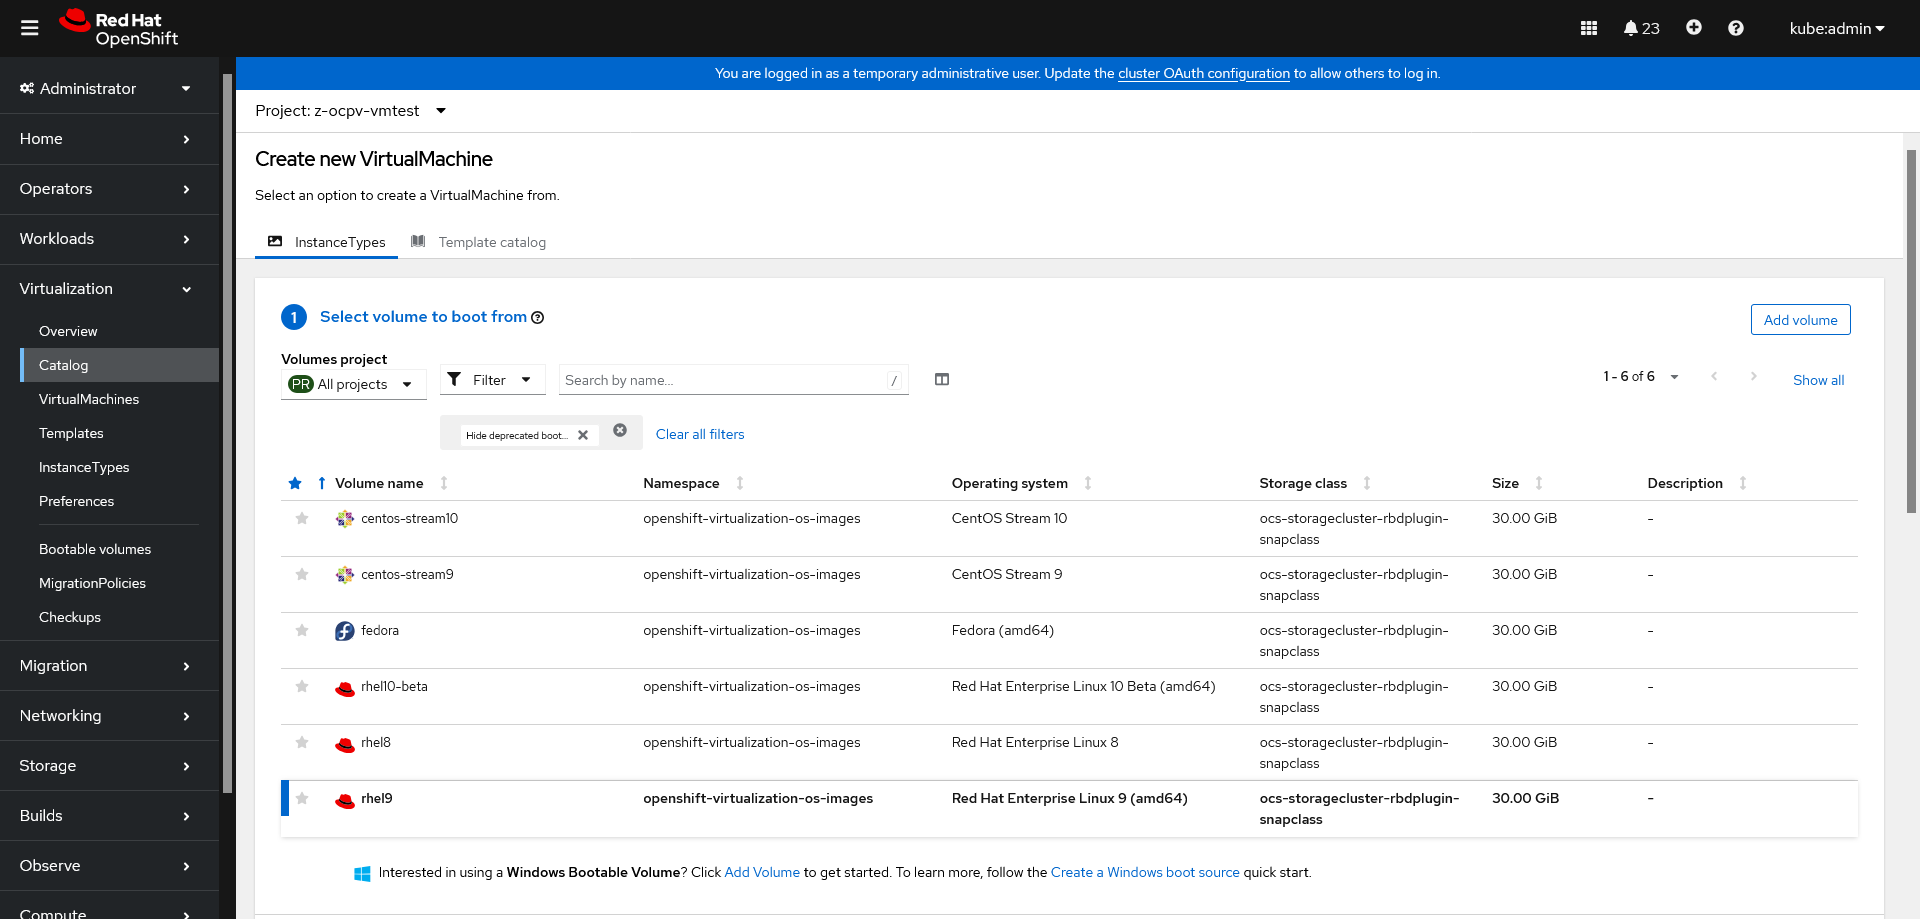
画面下部に移動して、2 Select InstanceType から U series / medium: 1 CPUs, 4GiB Memory を選択します。3 VirtualMachine details で必要に応じて、設定変更を行います。今回は Name のみ rhel9-vm01 に変更しています。
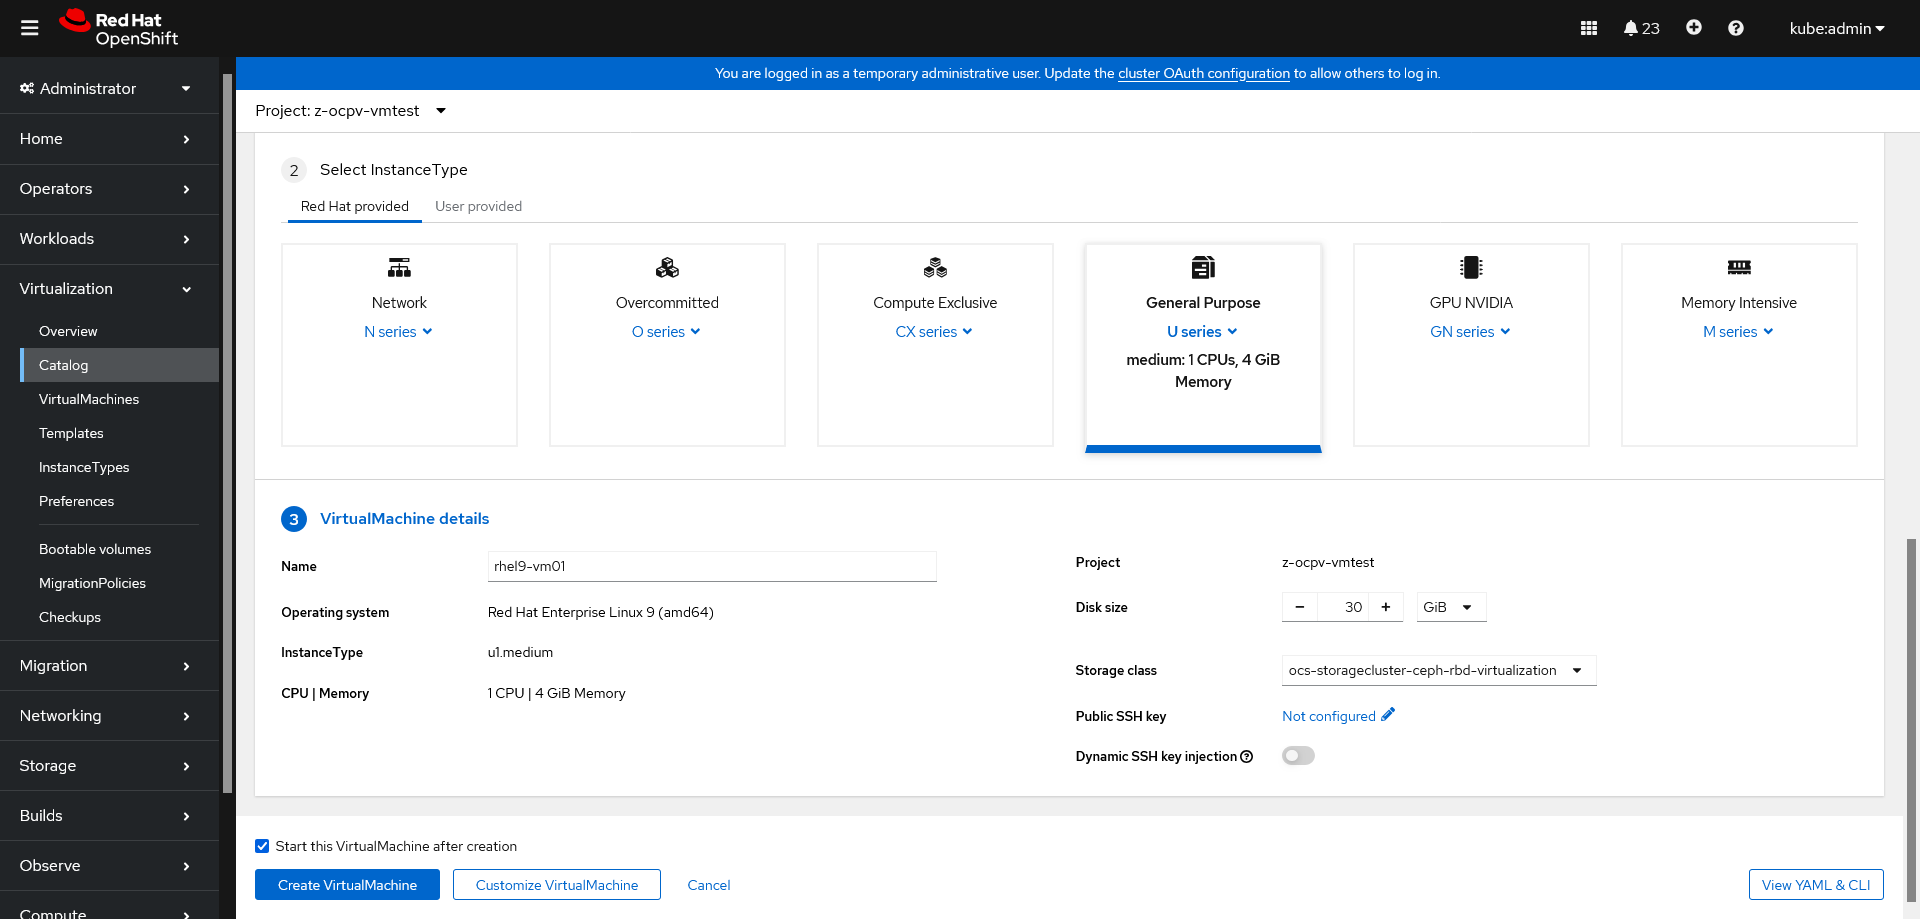
更に詳細な設定変更を行う場合は Customize VirtualMachine ボタンを押して、以下の画面から変更することができます。

SSH Section で SSH PKA (公開鍵認証) 用の SSH Key を設定する事もできます。
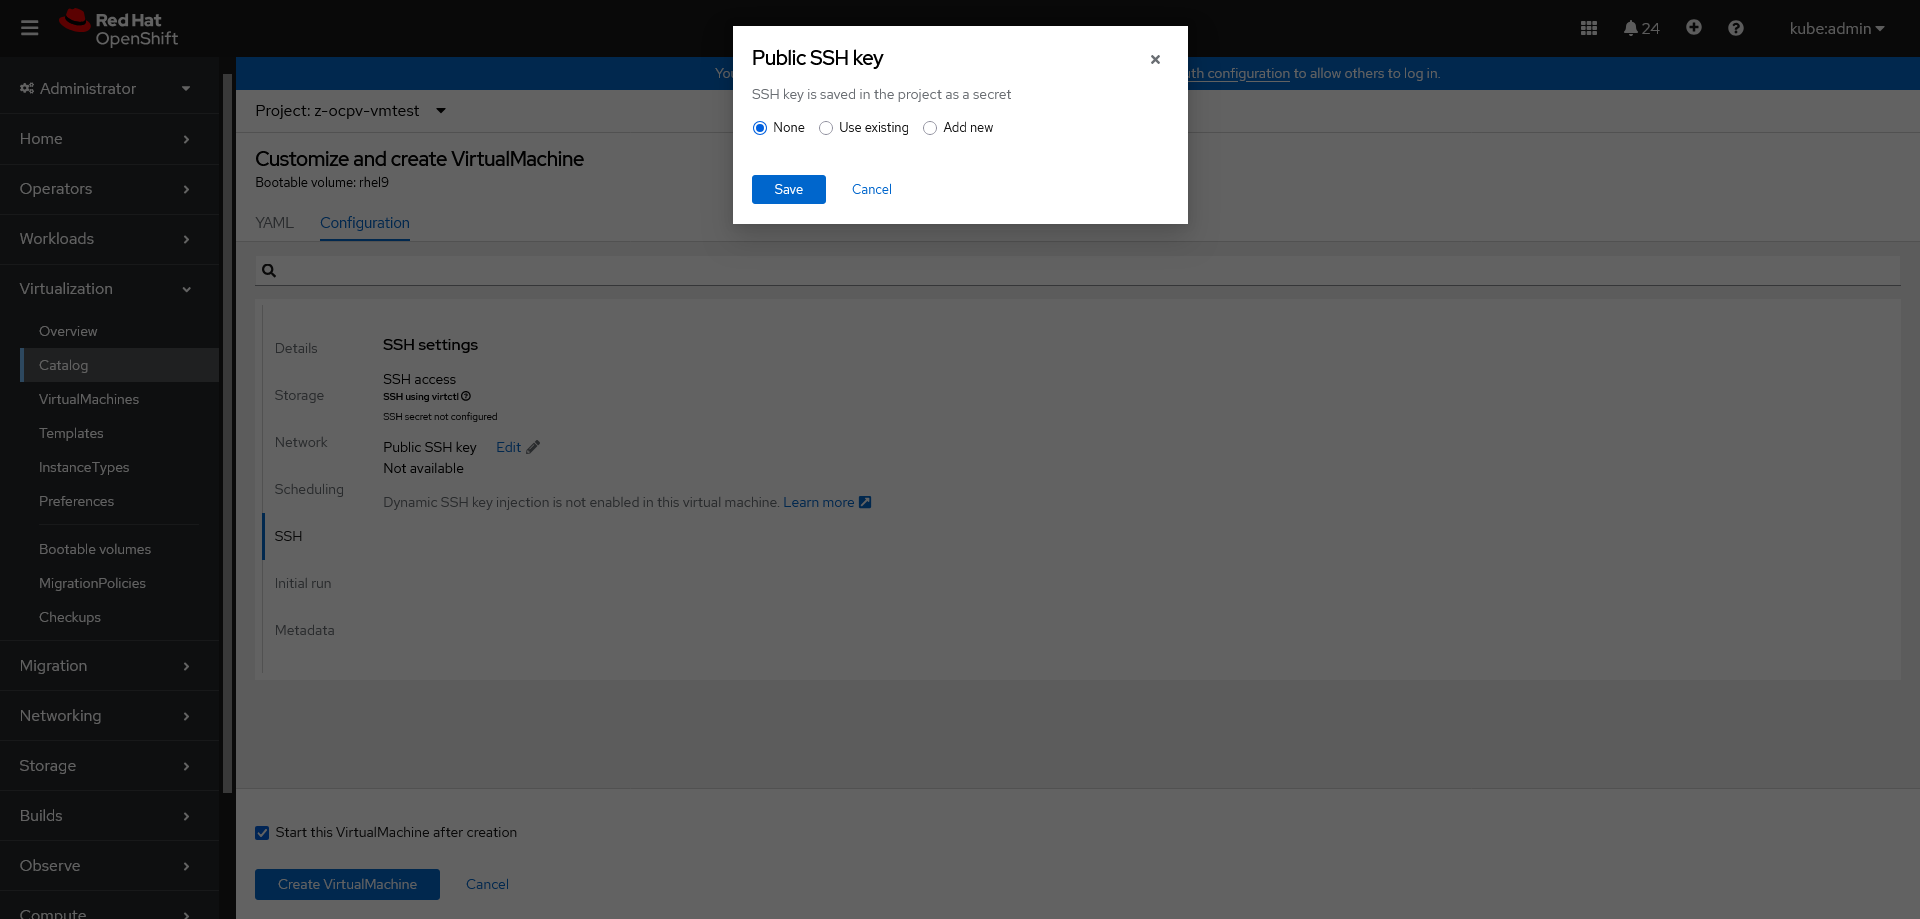
SSH Key の設定方法の詳細は、以下に記載されています。
Configuring SSH access to virtual machines
今回は、これらの画面からの変更は行わずに Create VirtualMachine ボタンを押して VM を作成します。以下のような画面が表示され、Status Running になれば完了です。

指定した Project に以下のようなリソースが作成されます。
$ oc project -q
z-ocpv-vmtest

$ oc get all,pvc
NAME                                 READY   STATUS    RESTARTS   AGE
pod/virt-launcher-rhel9-vm01-n8dbz   1/1     Running   0          88s

NAME               TYPE        CLUSTER-IP   EXTERNAL-IP   PORT(S)    AGE
service/headless   ClusterIP   None         <none>        5434/TCP   89s

NAME                                           PHASE       PROGRESS   RESTARTS   AGE
datavolume.cdi.kubevirt.io/rhel9-vm01-volume   Succeeded   100.0%                89s

NAME                                            AGE   PHASE     IP             NODENAME   READY
virtualmachineinstance.kubevirt.io/rhel9-vm01   88s   Running   10.129.2.143   worker01   True

NAME                                    AGE   STATUS    READY
virtualmachine.kubevirt.io/rhel9-vm01   89s   Running   True

NAME                                      STATUS   VOLUME                                     CAPACITY   ACCESS MODES   STORAGECLASS                                 VOLUMEATTRIBUTESCLASS   AGE
persistentvolumeclaim/rhel9-vm01-volume   Bound    pvc-d31ce785-3aa0-43d9-bb25-5afc9bb048f0   30Gi       RWX            ocs-storagecluster-ceph-rbd-virtualization   <unset>                 89s

$ oc get pv
NAME                                       CAPACITY   ACCESS MODES   RECLAIM POLICY   STATUS   CLAIM                                                              STORAGECLASS                                 VOLUMEATTRIBUTESCLASS   REASON   AGE
pvc-d31ce785-3aa0-43d9-bb25-5afc9bb048f0   30Gi       RWX            Delete           Bound    z-ocpv-vmtest/rhel9-vm01-volume                                    ocs-storagecluster-ceph-rbd-virtualization   <unset>                          2m5s
Creating manifests by using the virtctl tool
前述と同様の VM を virtctl からも作成してみます。
VM manifest creation commands
$ virtctl version
Client Version: version.Info{GitVersion:"v1.3.1-177-gba5bdde115", GitCommit:"ba5bdde1155476fd28d210baf3186872c25a4c37", GitTreeState:"clean", BuildDate:"2025-01-22T22:13:16Z", GoVersion:"go1.22.9 (Red Hat 1.22.9-2.el9_5) X:strictfipsruntime", Compiler:"gc", Platform:"linux/amd64"}
Server Version: version.Info{GitVersion:"v1.3.1-177-gba5bdde115", GitCommit:"ba5bdde1155476fd28d210baf3186872c25a4c37", GitTreeState:"clean", BuildDate:"2025-01-22T22:10:34Z", GoVersion:"go1.22.9 (Red Hat 1.22.9-2.el9_5) X:strictfipsruntime", Compiler:"gc", Platform:"linux/amd64"}
$ virtctl create vm --help
Create a VirtualMachine manifest.

If no boot order was specified volumes have the following fixed boot order:
Containerdisk > DataSource > Clone PVC > PVC

Usage:
  virtctl create vm [flags]

Examples:
  # Create a manifest for a VirtualMachine with a random name:
  virtctl create vm

  # Create a manifest for a VirtualMachine with a specified name and RunStrategy Always
  virtctl create vm --name=my-vm --run-strategy=Always

  # Create a manifest for a VirtualMachine with a specified VirtualMachineClusterInstancetype
  virtctl create vm --instancetype=my-instancetype

  # Create a manifest for a VirtualMachine with a specified VirtualMachineInstancetype (namespaced)
  virtctl create vm --instancetype=virtualmachineinstancetype/my-instancetype

  # Create a manifest for a VirtualMachine with a specified VirtualMachineClusterPreference
  virtctl create vm --preference=my-preference

  # Create a manifest for a VirtualMachine with a specified VirtualMachinePreference (namespaced)
  virtctl create vm --preference=virtualmachinepreference/my-preference

  # Create a manifest for a VirtualMachine with specified memory and an ephemeral containerdisk volume
  virtctl create vm --memory=1Gi --volume-containerdisk=src:my.registry/my-image:my-tag

  # Create a manifest for a VirtualMachine with a cloned DataSource in namespace and specified size
  virtctl create vm --volume-datasource=src:my-ns/my-ds,size:50Gi

  # Create a manifest for a VirtualMachine with a cloned DataSource and inferred instancetype and preference
  virtctl create vm --volume-datasource=src:my-annotated-ds --infer-instancetype --infer-preference

  # Create a manifest for a VirtualMachine with multiple volumes and specified boot order
  virtctl create vm --volume-containerdisk=src:my.registry/my-image:my-tag --volume-datasource=src:my-ds,bootorder:1

  # Create a manifest for a VirtualMachine with multiple volumes and inferred instancetype and preference with specified volumes
  virtctl create vm --volume-datasource=src:my-annotated-ds --volume-pvc=my-annotated-pvc --infer-instancetype=my-annotated-ds --infer-preference=my-annotated-pvc

  # Create a manifest for a VirtualMachine with a specified VirtualMachineCluster{Instancetype,Preference} and cloned PVC
  virtctl create vm --volume-clone-pvc=src:my-ns/my-pvc

  # Create a manifest for a VirtualMachine with a specified VirtualMachineCluster{Instancetype,Preference} and directly used PVC
  virtctl create vm --volume-pvc=src:my-pvc

  # Create a manifest for a VirtualMachine with a clone DataSource and a blank volume
  virtctl create vm --volume-datasource=src:my-ns/my-ds --volume-blank=size:50Gi

  # Create a manifest for a VirtualMachine with a specified VirtualMachineCluster{Instancetype,Preference} and cloned DataSource
  virtctl create vm --instancetype=my-instancetype --preference=my-preference --volume-datasource=src:my-ds

  # Create a manifest for a VirtualMachine with a specified VirtualMachineCluster{Instancetype,Preference} and two cloned DataSources (flag can be provided multiple times)
  virtctl create vm --instancetype=my-instancetype --preference=my-preference --volume-datasource=src:my-ds1 --volume-datasource=src:my-ds2

  # Create a manifest for a VirtualMachine with a specified VirtualMachineCluster{Instancetype,Preference} and directly used PVC
  virtctl create vm --instancetype=my-instancetype --preference=my-preference --volume-pvc=my-pvc

  # Create a manifest for a VirtualMachine with a specified DataVolumeTemplate
  virtctl create vm --volume-import type:pvc,name:my-pvc,namespace:default,size:256Mi

Flags:
      --name string                        Specify the name of the VM.
      --run-strategy string                Specify the RunStrategy of the VM. (default "Always")
      --termination-grace-period int       Specify the termination grace period of the VM. (default 180)
      --memory string                      Specify the memory of the VM. (default "512Mi")
      --instancetype string                Specify the Instance Type of the VM. Mutually exclusive with instancetype inference flags.
      --infer-instancetype                 Specify if the Instance Type of the VM should be inferred from the first boot disk. Mutually exclusive with --infer-instancetype-from. (default true)
      --infer-instancetype-from string     Specify the volume to infer the Instance Type of the VM from. Mutually exclusive with --infer-instancetype.
      --preference string                  Specify the Preference of the VM. Mutually exclusive with preference inference flags.
      --infer-preference                   Specify if the Preference of the VM should be inferred from the first boot disk. Mutually exclusive with --infer-preference-from. (default true)
      --infer-preference-from string       Specify the volume to infer the Preference of the VM from. Mutually exclusive with --infer-preference.
      --volume-containerdisk stringArray   Specify a containerdisk to be used by the VM. Can be provided multiple times.
                                           Supported parameters: name:string,src:string,bootorder:uint
      --volume-datasource stringArray      Specify a DataSource to be cloned by the VM. Can be provided multiple times.
                                           Supported parameters: name:string,src:string,bootorder:uint,size:resource.Quantity
      --volume-clone-pvc stringArray       Specify a PVC to be cloned by the VM. Can be provided multiple times.
                                           Supported parameters: name:string,src:string,bootorder:uint,size:resource.Quantity
      --volume-pvc stringArray             Specify a PVCs to be used by the VM. Can be provided multiple times.
                                           Supported parameters: name:string,src:string,bootorder:uint
      --volume-blank stringArray           Specify a blank volume to be used by the VM. Can be provided multiple times.
                                           Supported parameters: name:string,size:resource.Quantity
      --volume-import stringArray          Specify the source for DataVolume. Can be provided multiple times.
                                           Supported parameters:
                                             type blank - size:resource.Quantity,type:string,name:string
                                             type gcs - secretref:string,url:string,size:resource.Quantity,type:string,name:string
                                             type http - certconfigmap:string,extraheaders:[]string,secretextraheaders:[]string,secretref:string,url:string,size:resource.Quantity,type:string,name:string
                                             type imageio - certconfigmap:string,diskid:string,secretref:string,url:string,size:resource.Quantity,type:string,name:string
                                             type pvc - name:string,src:string,size:resource.Quantity,type:string
                                             type registry - certconfigmap:string,imagestream:string,pullmethod:string,secretref:string,url:string,size:resource.Quantity,type:string,name:string
                                             type s3 - certconfigmap:string,secretref:string,url:string,size:resource.Quantity,type:string,name:string
                                             type vddk - backingfile:string,initimageurl:string,secretref:string,thumbprint:string,url:string,uuid:string,size:resource.Quantity,type:string,name:string
                                             type snapshot - name:string,src:string,size:resource.Quantity,type:string
      --cloud-init-user-data string        Specify the base64 encoded cloud-init user data of the VM.
      --cloud-init-network-data string     Specify the base64 encoded cloud-init network data of the VM.
  -h, --help                               help for vm

Use "virtctl options" for a list of global command-line options (applies to all commands).
virtctl create vm は VirtualMachine Manifest を作成します。今回の例では、以下のようになります。前述の VM と区別するために --name で rhel9-vm01-virtctl としています。
$ virtctl create vm \
--volume-datasource src:openshift-virtualization-os-images/rhel9 \
--instancetype=u1.medium \
--name=rhel9-vm01-virtctl \
--infer-preference \
-n $(oc project -q) \
> rhel9-vm01-virtctl.yaml

$ cat rhel9-vm01-virtctl.yaml
apiVersion: kubevirt.io/v1
kind: VirtualMachine
metadata:
  creationTimestamp: null
  name: rhel9-vm01-virtctl
  namespace: z-ocpv-vmtest
spec:
  dataVolumeTemplates:
  - metadata:
      creationTimestamp: null
      name: rhel9-vm01-virtctl-ds-rhel9
    spec:
      sourceRef:
        kind: DataSource
        name: rhel9
        namespace: openshift-virtualization-os-images
      storage:
        resources: {}
  instancetype:
    name: u1.medium
  preference:
    inferFromVolume: rhel9-vm01-virtctl-ds-rhel9
  runStrategy: Always
  template:
    metadata:
      creationTimestamp: null
    spec:
      domain:
        devices: {}
        resources: {}
      terminationGracePeriodSeconds: 180
      volumes:
      - dataVolume:
          name: rhel9-vm01-virtctl-ds-rhel9
        name: rhel9-vm01-virtctl-ds-rhel9
status: {}
virtctl で作成した VM Manifest を適用します。
$ oc apply -f rhel9-vm01-virtctl.yaml
virtualmachine.kubevirt.io/rhel9-vm01-virtctl created
指定した Project に以下のようなリソースが追加されます。
$ oc project -q
z-ocpv-vmtest

$ oc get all,pvc
NAME                                         READY   STATUS    RESTARTS   AGE
pod/virt-launcher-rhel9-vm01-n8dbz           1/1     Running   0          42m
pod/virt-launcher-rhel9-vm01-virtctl-fl54c   1/1     Running   0          52s

NAME               TYPE        CLUSTER-IP   EXTERNAL-IP   PORT(S)    AGE
service/headless   ClusterIP   None         <none>        5434/TCP   42m

NAME                                                     PHASE       PROGRESS   RESTARTS   AGE
datavolume.cdi.kubevirt.io/rhel9-vm01-virtctl-ds-rhel9   Succeeded   100.0%                53s
datavolume.cdi.kubevirt.io/rhel9-vm01-volume             Succeeded   100.0%                42m

NAME                                                    AGE   PHASE     IP             NODENAME   READY
virtualmachineinstance.kubevirt.io/rhel9-vm01           42m   Running   10.129.2.143   worker01   True
virtualmachineinstance.kubevirt.io/rhel9-vm01-virtctl   52s   Running   10.130.2.103   worker02   True

NAME                                            AGE   STATUS    READY
virtualmachine.kubevirt.io/rhel9-vm01           42m   Running   True
virtualmachine.kubevirt.io/rhel9-vm01-virtctl   53s   Running   True

NAME                                                STATUS   VOLUME                                     CAPACITY   ACCESS MODES   STORAGECLASS                                 VOLUMEATTRIBUTESCLASS   AGE
persistentvolumeclaim/rhel9-vm01-virtctl-ds-rhel9   Bound    pvc-332738b0-6df4-4038-855f-632848d6ae7f   30Gi       RWX            ocs-storagecluster-ceph-rbd-virtualization   <unset>                 53s
persistentvolumeclaim/rhel9-vm01-volume             Bound    pvc-d31ce785-3aa0-43d9-bb25-5afc9bb048f0   30Gi       RWX            ocs-storagecluster-ceph-rbd-virtualization   <unset>                 42m

$ oc get pv
NAME                                       CAPACITY   ACCESS MODES   RECLAIM POLICY   STATUS   CLAIM                                                              STORAGECLASS                                 VOLUMEATTRIBUTESCLASS   REASON   AGE
pvc-332738b0-6df4-4038-855f-632848d6ae7f   30Gi       RWX            Delete           Bound    z-ocpv-vmtest/rhel9-vm01-virtctl-ds-rhel9                          ocs-storagecluster-ceph-rbd-virtualization   <unset>                          2m27s
pvc-d31ce785-3aa0-43d9-bb25-5afc9bb048f0   30Gi       RWX            Delete           Bound    z-ocpv-vmtest/rhel9-vm01-volume                                    ocs-storagecluster-ceph-rbd-virtualization   <unset>                          44m
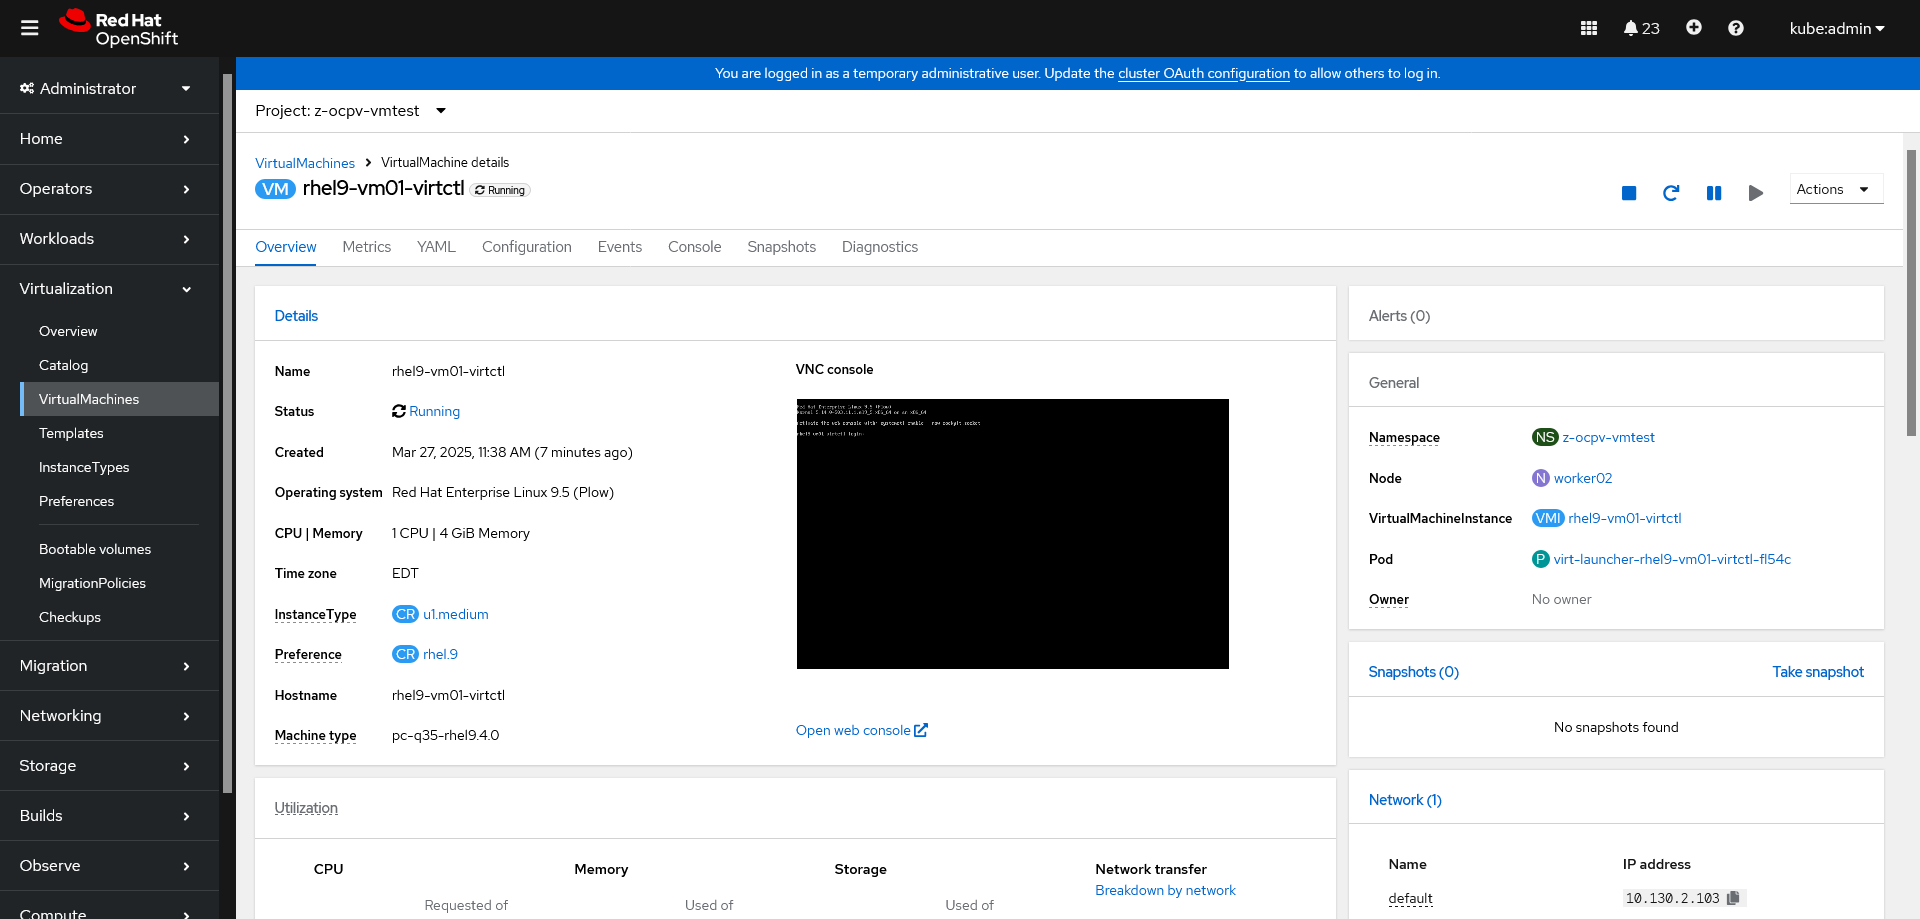
OCP Console からも VM を確認することができます。