はじめに
先日、業務でAWS SAM Go DynamoDB local GitHub Actions を使って環境構築する機会がありました。
しかし、この組み合わせについて紹介した日本語の記事があまりない印象でしたので本記事で紹介したいと思います。
ぜひ本記事を参考にして、マイクロサービス開発の第一歩を踏み出してみてください!
SAMプロジェクト作成
-
プロジェクトを作成するディレクトリに移動
- プロジェクトを作成するディレクトリに移動します。
$ cd develop # develop部分は自身のプロジェクトディレクトリを入力
-
sam initコマンドを実行- コマンドを実行しSAMプロジェクトを作成します。
- コマンドを実行すると対話形式のプロンプトが出力されます。以下、実際のプロンプトにコメントアウトで補足しております。
$ sam init

You can preselect a particular runtime or package type when using the `sam init` experience.
Call `sam init --help` to learn more.

# テンプレートのソースを選択します。
# AWSが提供する標準的なサンプルテンプレートを利用する場合は「1」を選択します。
Which template source would you like to use?
	1 - AWS Quick Start Templates
	2 - Custom Template Location
Choice: 1

# AWS Quick Startアプリケーションテンプレートを選択します。
# 今回はgo (provided.al2023)を選択できる「Hello World Example」を選択します。
Choose an AWS Quick Start application template
	1 - Hello World Example
	2 - Data processing
	3 - Hello World Example with Powertools for AWS Lambda
	4 - Multi-step workflow
	5 - Scheduled task
	6 - Standalone function
	7 - Serverless API
	8 - Infrastructure event management
	9 - Lambda Response Streaming
	10 - Serverless Connector Hello World Example
	11 - Multi-step workflow with Connectors
	12 - GraphQLApi Hello World Example
	13 - Full Stack
	14 - Lambda EFS example
	15 - DynamoDB Example
	16 - Machine Learning
Template: 1

# ランタイムPython + パッケージタイプzip を使用する場合は「y」を選択します。
# 今回はgoを使用したいので「N」を選択します。
Use the most popular runtime and package type? (Python and zip) [y/N]: N

# ランタイムを選択します。
# go (provided.al2023)を選択します。
Which runtime would you like to use?
	1 - aot.dotnet7 (provided.al2)
	2 - dotnet8
	3 - dotnet6
	4 - go (provided.al2)
	5 - go (provided.al2023)
	6 - graalvm.java11 (provided.al2)
	7 - graalvm.java17 (provided.al2)
	8 - java21
	9 - java17
	10 - java11
	11 - java8.al2
	12 - nodejs20.x
	13 - nodejs18.x
	14 - nodejs16.x
	15 - python3.9
	16 - python3.8
	17 - python3.12
	18 - python3.11
	19 - python3.10
	20 - ruby3.3
	21 - ruby3.2
	22 - rust (provided.al2)
	23 - rust (provided.al2023)
Runtime: 5

# パッケージタイプを選択します。
# 今回はサンプルとしてシンプルな構成で紹介したいのでZip形式を選択します。
What package type would you like to use?
	1 - Zip
	2 - Image
Package type: 1

Based on your selections, the only dependency manager available is mod.
We will proceed copying the template using mod.

# アプリケーション内の関数にX-Rayトレースを有効にするか選択します。
# 無効にする場合は「N」を選択します。
Would you like to enable X-Ray tracing on the function(s) in your application?  [y/N]: N

# CloudWatch Application Insightsを使用して監視を有効にするか選択します。
# 無効にする場合は「N」を選択します。
Would you like to enable monitoring using CloudWatch Application Insights?
For more info, please view https://docs.aws.amazon.com/AmazonCloudWatch/latest/monitoring/cloudwatch-application-insights.html [y/N]: N

# Lambda関数でJSON形式の構造化ログを設定するか選択します。
# 無効にする場合は「N」を選択します。
Would you like to set Structured Logging in JSON format on your Lambda functions?  [y/N]: N

# プロジェクトの名前を設定します。
Project name [sam-app]: sam-app

    -----------------------
    Generating application:
    -----------------------
    Name: sam-app
    Runtime: go (provided.al2023)
    Architectures: x86_64
    Dependency Manager: mod
    Application Template: hello-world
    Output Directory: .
    Configuration file: sam-app/samconfig.toml

    Next steps can be found in the README file at sam-app/README.md


Commands you can use next
=========================
[*] Create pipeline: cd sam-app && sam pipeline init --bootstrap
[*] Validate SAM template: cd sam-app && sam validate
[*] Test Function in the Cloud: cd sam-app && sam sync --stack-name {stack-name} --watch
-
プロジェクト作成完了確認
- 設定したプロジェクト名で新しいディレクトリが作成されていることを確認してください。
$ ls

sam-app
GitHub連携
-
リポジトリ作成
- GitHubから新しいリポジトリを作成します。
- 手順はこちらをご参照ください。
-
初期コマンド実行
- 下記コマンドを実行して、ローカルのコードベースを新しく作成したGitHubリポジトリにアップロードします。
$ git init

$ git remote add origin https://github.com/hoge/sam-app.git # 自身のリポジトリを指定してください

$ git add .

$ git commit -m 'Initialize'

$ git push origin main
-
アップロード完了確認
- GitHubの作成したリポジトリを開き、ローカルのコードベースがGitHub上にアップロードされているか確認してください。
CICD構築
-
SSOログイン
- コマンドを実行し、予めSSOを使って指定したプロファイルの認証を行います。
- プロファイルの設定方法についてはこちらをご参照ください。
$ aws sso login --profile profile1
-
sam pipeline init --bootstrapコマンド実行- コマンドを実行しCI/CDを構築します。
- コマンドを実行すると対話形式のプロンプトが出力されます。以下、実際のプロンプトにコメントアウトで補足しております。
$ sam pipeline init --bootstrap

sam pipeline init generates a pipeline configuration file that your CI/CD system
can use to deploy serverless applications using AWS SAM.
We will guide you through the process to bootstrap resources for each stage,
then walk through the details necessary for creating the pipeline config file.

Please ensure you are in the root folder of your SAM application before you begin.

# パイプラインテンプレートを選択します。
# AWSが提供する標準的なサンプルパイプラインテンプレートを利用する場合は[1]を選択します。
Select a pipeline template to get started:
	1 - AWS Quick Start Pipeline Templates
	2 - Custom Pipeline Template Location
Choice: 1

Cloning from https://github.com/aws/aws-sam-cli-pipeline-init-templates.git (process may take a moment)

# CI/CDシステムを選択します。
# GitHub Actionsを選択します。
Select CI/CD system
	1 - Jenkins
	2 - GitLab CI/CD
	3 - GitHub Actions
	4 - Bitbucket Pipelines
	5 - AWS CodePipeline
Choice: 3
You are using the 2-stage pipeline template.
 _________    _________
|         |  |         |
| Stage 1 |->| Stage 2 |
|_________|  |_________|

Checking for existing stages...

[!] None detected in this account.

# 一つ目のステージの設定を今すぐ行うか、後で他のリソースを参照するか選択します。
# 今回は今すぐ設定したいので[Y]を選択します。
Do you want to go through stage setup process now? If you choose no, you can still reference other bootstrapped resources. [Y/n]: Y

For each stage, we will ask for [1] stage definition, [2] account details, and [3]
reference application build resources in order to bootstrap these pipeline
resources.

We recommend using an individual AWS account profiles for each stage in your
pipeline. You can set these profiles up using aws configure or ~/.aws/credentials. See
[https://docs.aws.amazon.com/serverless-application-model/latest/developerguide/serverless-getting-started-set-up-credentials.html].


# 一つ目のステージを設定します。
Stage 1 Setup

[1] Stage definition
# ステージの名前を設定します。
# 今回は一つ目のステージはステージング環境として使用するため[stg]と設定します。
Enter a configuration name for this stage. This will be referenced later when you use the sam pipeline init command:
Stage configuration name: stg

[2] Account details
# パイプラインステージに関連付ける認証情報のソースを選択します。
# 今回はAWS CLIで設定したプロファイルを選択します。
The following AWS credential sources are available to use.
To know more about configuration AWS credentials, visit the link below:
https://docs.aws.amazon.com/cli/latest/userguide/cli-configure-files.html
	1 - Environment variables
	2 - profile1 (named profile)
	3 - profile2 (named profile)
	q - Quit and configure AWS credentials
Select a credential source to associate with this stage: 2
Associated account XXXXXXXXXXXX with configuration stg.

# リソースを作成する際に使用するAWSリージョンを選択します。
# 今回は[ap-northeast-1](東京)を設定します。
Enter the region in which you want these resources to be created [us-east-1]: ap-northeast-1

# ユーザーの権限やアクセス制御を管理するためのプロバイダーを選択します。
# 今回はIAMを使用するので[1]を選択します。
Select a user permissions provider:
	1 - IAM (default)
	2 - OpenID Connect (OIDC)
Choice (1, 2): 1

# すでにCI/CDパイプラインの設定に関連するIAMユーザーを作成している場合はARNを入力します。
# 今回はまだ作成していない前提で進めるので、何も入力せずにEnterを押します。
Enter the pipeline IAM user ARN if you have previously created one, or we will create one for you []:

[3] Reference application build resources
# すでにCI/CDパイプラインの実行ロールを作成している場合はARNを入力します。
# 今回はまだ作成していない前提で進めるので、何も入力せずにEnterを押します。
Enter the pipeline execution role ARN if you have previously created one, or we will create one for you []:

# すでにCloudFormationの実行ロールを作成している場合はARNを入力します。
# 今回はまだ作成していない前提で進めるので、何も入力せずにEnterを押します。
Enter the CloudFormation execution role ARN if you have previously created one, or we will create one for you []:

# すでにLambda関数のデプロイアーティファクト(例えば、Lambda関数のコードや依存関係など)を格納するためのS3バケットを作成している場合はARNを入力します。
# 今回はまだ作成していない前提で進めるので、何も入力せずにEnterを押します。
Please enter the artifact bucket ARN for your Lambda function. If you do not have a bucket, we will create one for you []:

# IMAGE形式のLambda関数が含まれているかどうか選択します。
# 今回はZip形式で作成しているため[N]を選択します。
Does your application contain any IMAGE type Lambda functions? [y/N]: N

[4] Summary
Below is the summary of the answers:
	1 - Account: XXXXXXXXXXXX
	2 - Stage configuration name: stg
	3 - Region: ap-northeast-1
	4 - Pipeline user: [to be created]
	5 - Pipeline execution role: [to be created]
	6 - CloudFormation execution role: [to be created]
	7 - Artifacts bucket: [to be created]
	8 - ECR image repository: [skipped]
# 上記のサマリーに問題がないか確認します。
# 問題がなければ何も入力せずにEnterを押します。
Press enter to confirm the values above, or select an item to edit the value:

This will create the following required resources for the 'stg' configuration:
	- Pipeline IAM user
	- Pipeline execution role
	- CloudFormation execution role
	- Artifact bucket
# 先ほどまだ作成していないと回答した上記のリソースを作成するか選択します。
# リソースを作成してほしいので[y]を選択します。(作成には少々時間がかかります...)
Should we proceed with the creation? [y/N]: y
	Creating the required resources...

    # 各リソースの作成が完了しました。
	Successfully created!
The following resources were created in your account:
	- Pipeline execution role
	- CloudFormation execution role
	- Artifact bucket
	- Pipeline IAM user
# パイプラインIAMユーザのクレデンシャルが発行されれます。
# こちらのIDとKEYは後の工程で使用します。
Pipeline IAM user credential:
	AWS_ACCESS_KEY_ID: XXXXXXXXXXXXXXXXXXXX
	AWS_SECRET_ACCESS_KEY: XXXXXXXXXXXXXXXXXXXXXXXXXXXXXXXXXXXXXXXX
View the definition in .aws-sam/pipeline/pipelineconfig.toml,
run sam pipeline bootstrap to generate another set of resources, or proceed to
sam pipeline init to create your pipeline configuration file.

Before running sam pipeline init, we recommend first setting up AWS credentials
in your CI/CD account. Read more about how to do so with your provider in
https://docs.aws.amazon.com/serverless-application-model/latest/developerguide/serverless-generating-example-ci-cd-others.html.

Checking for existing stages...

Only 1 stage(s) were detected, fewer than what the template requires: 2. If these are incorrect, delete .aws-sam/pipeline/pipelineconfig.toml and rerun

# 二つ目のステージの設定を今すぐ行うか、後で他のリソースを参照するか選択します。
# 今回は今すぐ設定したいので[Y]を選択します。
Do you want to go through stage setup process now? If you choose no, you can still reference other bootstrapped resources. [Y/n]: Y

For each stage, we will ask for [1] stage definition, [2] account details, and [3]
reference application build resources in order to bootstrap these pipeline
resources.

We recommend using an individual AWS account profiles for each stage in your
pipeline. You can set these profiles up using aws configure or ~/.aws/credentials. See
[https://docs.aws.amazon.com/serverless-application-model/latest/developerguide/serverless-getting-started-set-up-credentials.html].


# 二つ目のステージを設定します。
Stage 2 Setup

[1] Stage definition
# ステージの名前を設定します。
# 今回は二つ目のステージは本番環境として使用するため[prod]と設定します。
Enter a configuration name for this stage. This will be referenced later when you use the sam pipeline init command:
Stage configuration name: prod

[2] Account details
# パイプラインステージに関連付ける認証情報のソースを選択します。
# 今回はAWS CLIで設定したプロファイルを選択します。
The following AWS credential sources are available to use.
To know more about configuration AWS credentials, visit the link below:
https://docs.aws.amazon.com/cli/latest/userguide/cli-configure-files.html
	1 - Environment variables
	2 - profile1 (named profile)
	3 - profile2 (named profile)
	q - Quit and configure AWS credentials
Select a credential source to associate with this stage: 2
Associated account XXXXXXXXXXXX with configuration prod.

# リソースを作成する際に使用するAWSリージョンを選択します。
# 今回は[ap-northeast-1](東京)を設定します。
Enter the region in which you want these resources to be created [us-east-1]: ap-northeast-1
Pipeline IAM user ARN: arn:aws:iam::XXXXXXXXXXXX:user/aws-sam-cli-managed-stg-pipeline-resou-PipelineUser-XXXXXXXXXXXX

[3] Reference application build resources
# すでにCI/CDパイプラインの実行ロールを作成している場合はARNを入力します。
# 今回はまだ作成していない前提で進めるので、何も入力せずにEnterを押します。
Enter the pipeline execution role ARN if you have previously created one, or we will create one for you []:

# すでにCloudFormationの実行ロールを作成している場合はARNを入力します。
# 今回はまだ作成していない前提で進めるので、何も入力せずにEnterを押します。
Enter the CloudFormation execution role ARN if you have previously created one, or we will create one for you []:

# すでにLambda関数のデプロイアーティファクト(例えば、Lambda関数のコードや依存関係など)を格納するためのS3バケットを作成している場合はARNを入力します。
# 今回はまだ作成していない前提で進めるので、何も入力せずにEnterを押します。
Please enter the artifact bucket ARN for your Lambda function. If you do not have a bucket, we will create one for you []:

# IMAGE形式のLambda関数が含まれているかどうか選択します。
# 今回はZip形式で作成しているため[N]を選択します。
Does your application contain any IMAGE type Lambda functions? [y/N]: N

[4] Summary
Below is the summary of the answers:
	1 - Account: XXXXXXXXXXXX
	2 - Stage configuration name: prod
	3 - Region: ap-northeast-1
	4 - Pipeline user ARN: arn:aws:iam::XXXXXXXXXXXX:user/aws-sam-cli-managed-stg-pipeline-resou-PipelineUser-XXXXXXXXXXXX
	5 - Pipeline execution role: [to be created]
	6 - CloudFormation execution role: [to be created]
	7 - Artifacts bucket: [to be created]
	8 - ECR image repository: [skipped]
# 上記のサマリーに問題がないか確認します。
# 問題がなければ何も入力せずにEnterを押します。
Press enter to confirm the values above, or select an item to edit the value:

This will create the following required resources for the 'prod' configuration:
	- Pipeline execution role
	- CloudFormation execution role
	- Artifact bucket
# 先ほどまだ作成していないと回答した上記のリソースを作成するか選択します。
# リソースを作成してほしいので[y]を選択します。(作成には少々時間がかかります...)
Should we proceed with the creation? [y/N]: y
	Updating the required resources...

    # 各リソースの作成が完了しました。
	Successfully created!
The following resources were created in your account:
	- Pipeline execution role
	- CloudFormation execution role
	- Artifact bucket
View the definition in .aws-sam/pipeline/pipelineconfig.toml,
run sam pipeline bootstrap to generate another set of resources, or proceed to
sam pipeline init to create your pipeline configuration file.

Checking for existing stages...

2 stage(s) were detected, matching the template requirements. If these are incorrect, delete .aws-sam/pipeline/pipelineconfig.toml and rerun

This template configures a pipeline that deploys a serverless application to a testing and a production stage.

# AWSリソースへのアクセスに使用される「アクセスキーID」を格納するためのGitHubシークレット名を設定します。
# 今回はデフォルトの[AWS_ACCESS_KEY_ID]を使用するため、何も入力せずにEnterを押します。
What is the GitHub secret name for pipeline user account access key ID? [AWS_ACCESS_KEY_ID]:

# AWSリソースへのアクセスに使用される「アクセスキーシークレット」を格納するためのGitHubシークレット名を設定します。
# 今回はデフォルトの[AWS_SECRET_ACCESS_KEY]を使用するため、何も入力せずにEnterを押します。
What is the GitHub Secret name for pipeline user account access key secret? [AWS_SECRET_ACCESS_KEY]:

# 本番環境へのデプロイに使用するGitブランチを設定します。
# 今回はmainブランチを設定します。
What is the git branch used for production deployments? [main]: main

# テンプレートファイルのパスを設定します。
# プロジェクトのルートディレクトリ直下に配置しているので、何も入力せずにEnterを押します。
What is the template file path? [template.yaml]:
We use the stage configuration name to automatically retrieve the bootstrapped resources created when you ran `sam pipeline bootstrap`.

Here are the stage configuration names detected in .aws-sam/pipeline/pipelineconfig.toml:
	1 - stg
	2 - prod
# 上記の中から設定するステージを選択します。
Select an index or enter the stage 1\'s configuration name (as provided during the bootstrapping): stg

# 選択したステージのスタック名を設定します。
What is the sam application stack name for stage 1? [sam-app]: sam-app-stg
Stage 1 configured successfully, configuring stage 2.

Here are the stage configuration names detected in .aws-sam/pipeline/pipelineconfig.toml:
	1 - stg
	2 - prod
 # 上記の中から設定するステージを選択します。
Select an index or enter the stage 2\'s configuration name (as provided during the bootstrapping): prod

# 選択したステージのスタック名を設定します。
What is the sam application stack name for stage 2? [sam-app]: sam-app-prod
Stage 2 configured successfully.

SUMMARY
We will generate a pipeline config file based on the following information:
	Select a user permissions provider.: AWS IAM
	What is the GitHub secret name for pipeline user account access key ID?: AWS_ACCESS_KEY_ID
	What is the GitHub Secret name for pipeline user account access key secret?: AWS_SECRET_ACCESS_KEY
	What is the git branch used for production deployments?: main
	What is the template file path?: template.yaml
	Select an index or enter the stage 1\'s configuration name (as provided during the bootstrapping): stg
	What is the sam application stack name for stage 1?: sam-app-stg
	What is the pipeline execution role ARN for stage 1?: arn:aws:iam::XXXXXXXXXXXX:role/aws-sam-cli-managed-stg-pipel-PipelineExecutionRole-XXXXXXXXXXXX
	What is the CloudFormation execution role ARN for stage 1?: arn:aws:iam::XXXXXXXXXXXX:role/aws-sam-cli-managed-stg-p-CloudFormationExecutionRo-XXXXXXXXXXXXX
	What is the S3 bucket name for artifacts for stage 1?: aws-sam-cli-managed-stg-pipeline-r-artifactsbucket-XXXXXXXXXXXX
	What is the ECR repository URI for stage 1?:
	What is the AWS region for stage 1?: ap-northeast-1
	Select an index or enter the stage 2\'s configuration name (as provided during the bootstrapping): prod
	What is the sam application stack name for stage 2?: sam-app-prod
	What is the pipeline execution role ARN for stage 2?: arn:aws:iam::XXXXXXXXXXXX:role/aws-sam-cli-managed-prod-pipe-PipelineExecutionRole-XXXXXXXXXXXX
	What is the CloudFormation execution role ARN for stage 2?: arn:aws:iam::XXXXXXXXXXXX:role/aws-sam-cli-managed-prod--CloudFormationExecutionRo-XXXXXXXXXXXX
	What is the S3 bucket name for artifacts for stage 2?: aws-sam-cli-managed-prod-pipeline--artifactsbucket-XXXXXXXXXXXX
	What is the ECR repository URI for stage 2?:
	What is the AWS region for stage 2?: ap-northeast-1
Successfully created the pipeline configuration file(s):
	- .github/workflows/pipeline.yaml
-
GitHubシークレット設定
- GitHubのリポジトリを開き、[Settings] > [Secrets and variables] > [Actions] > [New repository secret]ボタン をクリックします。

-
sam pipeline init --bootstrapコマンドで発行されたAWS_ACCESS_KEY_IDとAWS_SECRET_ACCESS_KEYを設定します。
# 下記はsam pipeline init --bootstrap コマンドのプロンプトから抜粋した内容です。
Pipeline IAM user credential:
	AWS_ACCESS_KEY_ID: XXXXXXXXXXXXXXXXXXXX
	AWS_SECRET_ACCESS_KEY: XXXXXXXXXXXXXXXXXXXXXXXXXXXXXXXXXXXXXXXX

- GitHubのリポジトリを開き、[Settings] > [Secrets and variables] > [Actions] > [New repository secret]ボタン をクリックします。
-
エラー回避設定
- このままCI/CDを動かしてみると下記エラーが発生する可能性がございます。
Error: Cannot use both --resolve-s3 and --s3-bucket parameters. Please use only one. - エラー回避のために
samconfig.tomlを編集します。
samconfig.toml[default.deploy.parameters] confirm_changeset = false # trueからflaseに変更 resolve_s3 = false # trueからflaseに変更 [default.package.parameters] resolve_s3 = false # trueからflaseに変更
- このままCI/CDを動かしてみると下記エラーが発生する可能性がございます。
-
動作確認
- デフォルトの設定だと下記動作が確認できます。
mainブランチにpush
処理内容 test 単体テストを実行する(テスト内容は自分で設定する必要がある) build-and-package ビルドを行い、ビルド成果物をテスト用/本番用のS3バケットにアップロードする deploy-testing パッケージ化されたテンプレートを使用して、テスト環境にデプロイする integration-test 統合テストを実行する(テスト内容は自分で設定する必要がある) deploy-prod 本番環境にスタックをデプロイする feature配下ブランチにpush
処理内容 test 単体テストを実行する(テスト内容は自分で設定する必要がある) build-and-deploy-feature featureブランチに対応するスタックをデプロイする feature配下ブランチ削除
処理内容 delete-feature 削除されたfeatureブランチに対応するスタックを削除する 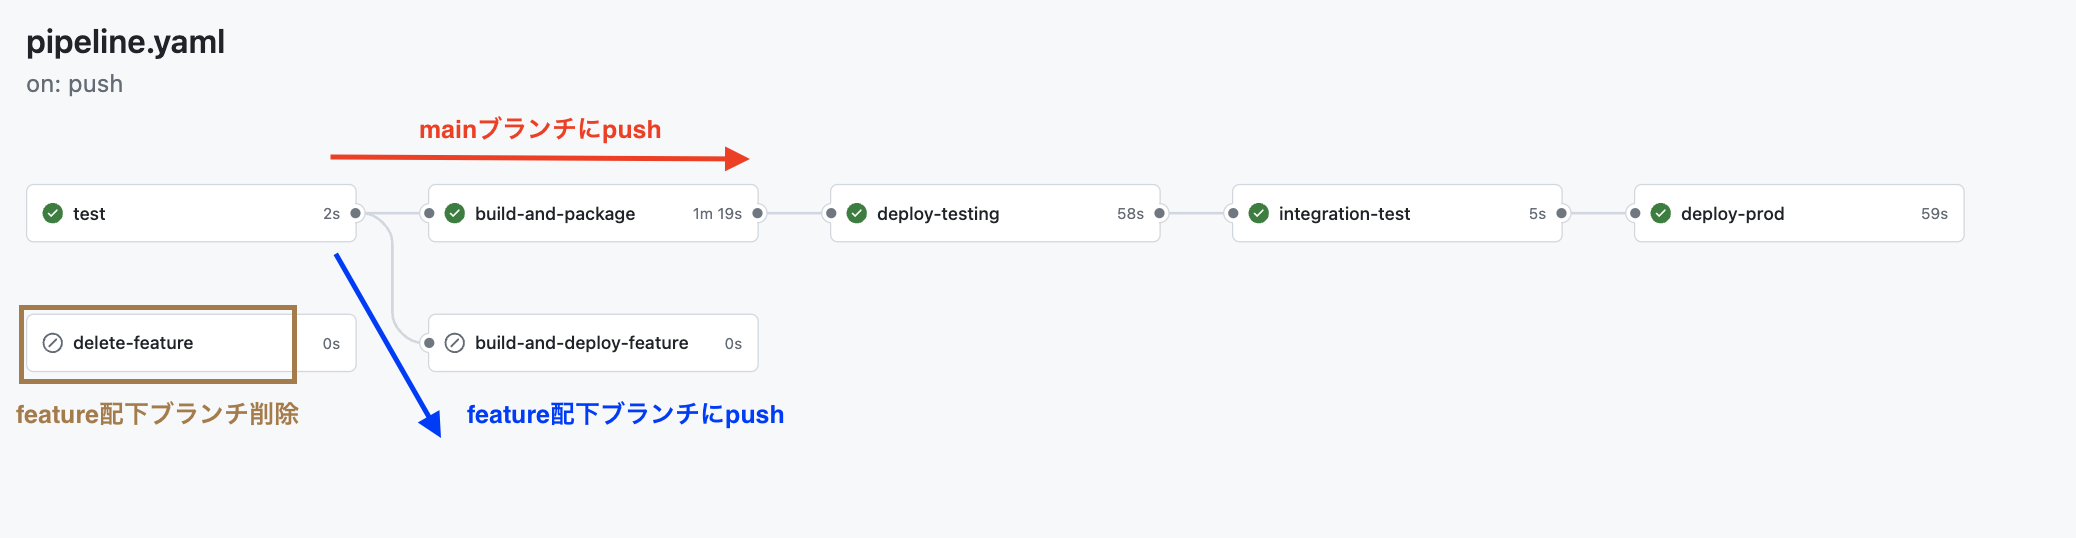
DynamoDB local 設定
-
docker network作成
- 開発環境のDynamoDBとSAMプロジェクトを接続するための、
lambda-localというdocker network を作成します。
$ docker network create lambda-local
- 開発環境のDynamoDBとSAMプロジェクトを接続するための、
-
docker-compose.yaml作成
- Docker上で開発環境のDynamoDBを構築します。
- http://localhost:8000 を使用して、ホストマシンからDynamoDB Localにアクセスします。
- http://localhost:8001 を使用して、ホストマシンからDynamoDB Adminのウェブインターフェースにアクセスします。
docker-compose.yamlversion: '3.8' services: dynamodb-local: command: "-jar DynamoDBLocal.jar -sharedDb -dbPath ./data" image: "amazon/dynamodb-local:latest" container_name: dynamodb-local ports: - "8000:8000" volumes: - "./docker/dynamodb:/home/dynamodblocal/data" working_dir: /home/dynamodblocal networks: - lambda-local dynamodb-admin: image: "aaronshaf/dynamodb-admin:latest" container_name: dynamodb-admin environment: - DYNAMO_ENDPOINT=dynamodb-local:8000 ports: - "8001:8001" depends_on: - dynamodb-local networks: - lambda-local networks: lambda-local: external: true
-
動作確認
- コマンドを実行して、http://localhost:8001 にアクセスできることを確認します。
$ docker compose up
最後に
今回は、AWS SAM Go DynamoDB Local GitHub Actions を使用して、環境構築の一連の手順を紹介しました。これで、強力でスケーラブルなサーバーレスアプリケーションの基盤が整いました。
しかし、せっかく Go を選んで環境を整えたにも関わらず、Go の詳細についてはあまり触れられませんでした。そこで、次回はこの構築した環境を活用し、Go を使ったシンプルなTodoアプリの作成に挑戦したいと思います!
参考