概要
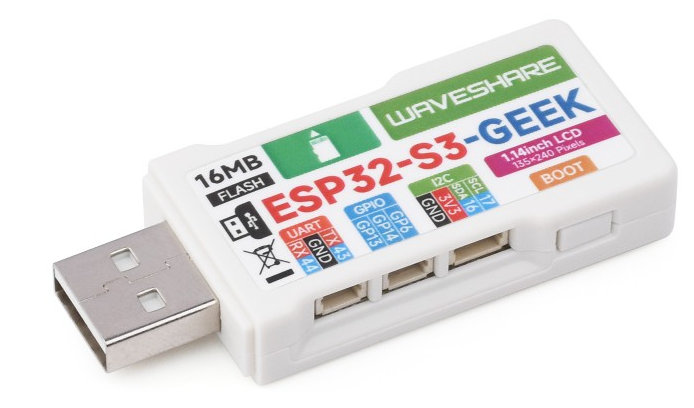
ESP32-S3マイコンでディスプレイとTFカードスロット搭載で面白そうな物が
あったので購入してみました。購入先はAliExpressのため技適がありませんので
無線は利用できません。ラズパイのRP2040、RP2050版は国内販売されています。
ESP32-S3はCANコントローラーが内蔵されているので仕事でも使えるんですよね。
UART、GPIO、I2Cと一通り揃っています。ただ、電源出力が3.3VのためM5Stack社
のUnitは使えませんね。USBから直接5Vを取ろうかな...。
確認用に簡単なプログラムを作成しました。
起動後ボタンを押すとSDカード内のファイルリストを表示します。

環境など
エディタ:VisualStudioCode(PlatformIO IDE)
フレームワーク:Aruduino
ソースコード
#include <Arduino.h>
#include <U8g2_for_Adafruit_GFX.h>
#include <Adafruit_ST7789.h> // Hardware-specific library for ST7789
#include <SPI.h>
#include <SD.h>

// TFTピン設定
#define TFT_DC      8   // DC
#define TFT_CS      10   // CS
#define TFT_RST     9  // Reset

// TFTインスタンス
Adafruit_ST7789 tft = Adafruit_ST7789(TFT_CS, TFT_DC, TFT_RST);

// 日本語フォントライブラリインスタンス
U8G2_FOR_ADAFRUIT_GFX u8g2_for_adafruit_gfx;

// SDカードピン設定(HSPI)
#define HSPI_SCK  36
#define HSPI_MISO 37
#define HSPI_MOSI 35
#define HSPI_CS   34

// SDカードアクセスインスタンス
SPIClass SPI_EXT;

// ボタンピン設定
#define buttonPin 0

// ファイルリスト、サイズ取得
void printDirectory(File dir, int numTabs) {
  while (true) {
    File entry = dir.openNextFile();
    if (!entry) {
      // これ以上ファイルがない場合
      break;
    }
    for (uint8_t i = 0; i < numTabs; i++) {
      Serial.print('\t');
    }
    Serial.print(entry.name());
    Serial.print("/");
    Serial.println(entry.size(), DEC);
    u8g2_for_adafruit_gfx.setForegroundColor(ST77XX_WHITE);
    u8g2_for_adafruit_gfx.setFont(u8g2_font_b12_t_japanese1);
    u8g2_for_adafruit_gfx.print(entry.name());
    u8g2_for_adafruit_gfx.print("/");
    u8g2_for_adafruit_gfx.println(entry.size(), DEC);
  }
}


void setup() {

  // シリアル通信設定
  Serial.begin(115200);

  // ディスプレイ設定
  tft.init(135, 240);           // Init ST7789 240x135
  tft.setRotation(3);
  tft.fillScreen(ST77XX_BLACK);
  u8g2_for_adafruit_gfx.begin(tft);
  u8g2_for_adafruit_gfx.setFontMode(0);
  u8g2_for_adafruit_gfx.setFontDirection(0);
  u8g2_for_adafruit_gfx.setForegroundColor(ST77XX_MAGENTA);
  u8g2_for_adafruit_gfx.setFont(u8g2_font_b16_t_japanese1);
  u8g2_for_adafruit_gfx.setCursor(0, 20);
  u8g2_for_adafruit_gfx.print("ESP32-S3-GEEK動作テスト");
  u8g2_for_adafruit_gfx.println("");

  // SDカードの初期化
  u8g2_for_adafruit_gfx.setCursor(0, 40);
  SPI_EXT.begin(HSPI_SCK,  HSPI_MISO, HSPI_MOSI, HSPI_CS);
  if (!SD.begin(HSPI_CS, SPI_EXT)) {
    u8g2_for_adafruit_gfx.println("SD Mount Failed");
    return;
  }else{
    u8g2_for_adafruit_gfx.println("SD Mounted");
  }

  // 入力ボタン設定
  pinMode(buttonPin,INPUT);// 回路上でプルアップ済み

}


void loop() {
  int buttonState = digitalRead(buttonPin);
  if (buttonState == LOW) {
    // SDカードルートディレクトリのファイルリスト表示
    printDirectory(SD.open("/"), 0);
  }
  delay(200);
}
plathomeio.ini設定
[env:esp32-s3-devkitc-1]
platform = espressif32
board = esp32-s3-devkitc-1
framework = arduino
build_flags =
-DARDUINO_USB_CDC_ON_BOOT
-DARDUINO_USB_MODE
lib_deps =
olikraus/U8g2_for_Adafruit_GFX @ ^1.8.0
adafruit/Adafruit ST7735 and ST7789 Library @ ^1.11.0
参考サイト