概要
AtomS3で温湿度、気圧センサー値を読み取りWiFi(ModbusTCP)を介してPCでデータを取得します。
マスター側ソフト(PC側)はC#で作る予定ですが、取り急ぎデータ確認のたModbusToolをインストールしました。
全体の動作としては
WiFi接続⇒NTPサーバー時刻同期⇒時刻表示⇒
5秒毎更新(センサー値取得、表示&Modbusレジスター更新)
となっています。
レジスターに格納したデータはマスター側から最新データを取得することを想定しています。

環境
エディタ:VisualStudioCode(拡張機能:PlatformIO IDE)
ライブラリはPlatformIOで以下をインストールしています。
1. M5Unified
2. ModbusIP_ESP8266
3. M5Unit-ENV
ハマった事
今回、温湿度センサーとしてM5Stack社の「ENVⅢユニット」を使用したのですがセンサー値が取得
できない(取得した値が0)不具合がありました。色々調べてこちらのサイトに解決策がありました。
ありがとうございます。
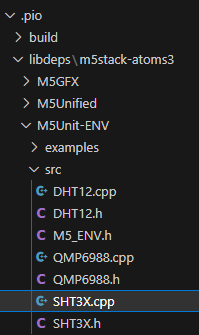
「M5Unit-ENV」ライブラリの不具合らしく、ライブラリの中にある「SHT3X.cpp」の
Wire.begin() ⇒ Wire.begin(2,1,100000UL) とすることで正常に動作しました。
Wire.begin()をコメントアウトし、main.cppのsetup()にWire.begin(2,1,100000UL) とすることで
正常に動作しました。

マスター側読み取り
-
PCにてインストールした「ModbusMaster」ソフトを起動
-
TCPポート欄にスレーブのIPアドレスを記入
-
Start(アドレス):0 Size:9を指定しApplyボタン
-
Connectボタンを押して接続確立
-
Read input registerボタンを押してデータ取得
↓各アドレスに格納したデータを取得することができました。あとはPC側でデータを加工できます。
※温度、湿度データは小数点以下1桁が含まれるため、予めマイコン側で10倍した整数値を格納
しています。温度29.7℃⇒297 湿度37.2%⇒372

コード
#include <Arduino.h>
#include <M5AtomDisplay.h>
#include <M5Unified.h>
#include <WiFi.h>
#include "M5_ENV.h"
#include <ModbusIP_ESP8266.h>

// WiFi定義
const char* WIFI_SSID = "SSID";
const char* WIFI_PASS = "PASS";
const IPAddress IP(192, 168, 10, 50);
const IPAddress GATEWAY(192, 168, 10, 1);
const IPAddress NETMASK(255, 255, 255, 0);
const IPAddress DNS(192, 168, 10, 1);

// Time定義
char ntpServer[] = "ntp.nict.jp";
const long gmtOffset_sec = 9 * 3600;
const int  daylightOffset_sec = 0;
struct tm timeinfo;
String second, minute, hour, dayOfWeek, dayOfMonth, month, year;

// Senser定義
SHT3X sht30;
QMP6988 qmp6988;
float tmp      = 0.0;
float hum      = 0.0;
float pres     = 0.0;

// Modbus定義
ModbusIP mb;

// 割り込み定義
bool INTFLG=0;
int interval=5;//割り込み間隔_秒
hw_timer_t * timer1 = NULL; //timer 初期化

// 割込み
void IRAM_ATTR onTimer() {
  INTFLG=1;
}

// センサー値読み取り
void readENV()
{
  pres = qmp6988.calcPressure();//Pa
  pres=pres/100;//hPa
  if (sht30.get() == 0) {
    tmp = sht30.cTemp;
    hum = sht30.humidity;
  } else {
    tmp = 0, hum = 0;
  }
}

// NTPサーバ、システム時刻同期
void getTimeFromNTP(){
  configTime(gmtOffset_sec, daylightOffset_sec, ntpServer);
  while (!getLocalTime(&timeinfo)) {
    delay(1000);
  }
}

// システム日時取得
void getTime(String* year,String* month,String* day,String* hour,String* min,String* sec,String* wday){
  char buf[10];
  getLocalTime(&timeinfo);
  *year = String(timeinfo.tm_year + 1900);
  sprintf(buf,"%02d",timeinfo.tm_mon + 1);
  *month = String(buf);
  sprintf(buf,"%02d",timeinfo.tm_mday);
  *day = String(buf);
  sprintf(buf,"%02d",timeinfo.tm_hour);
  *hour = String(buf);
  sprintf(buf,"%02d",timeinfo.tm_min);
  *min = String(buf);
  sprintf(buf,"%02d",timeinfo.tm_sec);
  *sec = String(buf);
  strftime(buf,10, "%A", &timeinfo);
  *wday=String(buf);
}

// センサー値表示
void disp_ENV(){
  M5.Display.setCursor(0,86);
  M5.Display.print("温度: "+String(sht30.cTemp,1)+"℃");
  M5.Display.setCursor(0,98);
  M5.Display.print("湿度: "+String(hum,1)+"%");
  M5.Display.setCursor(0,110);
  M5.Display.print("気圧: "+String(pres,0)+"hPa");
}

void setup() {
  auto cfg = M5.config();
  M5.begin(cfg);

  // I2C設定
  Wire.begin(2,1,100000UL);

  // ENV3設定
  qmp6988.init();

  // ディスプレイ設定
  M5.Display.init();
  //M5.Display.setRotation(2);
  M5.Display.setFont(&fonts::lgfxJapanGothicP_12);
  M5.Display.setTextColor(WHITE, BLACK);
  M5.Display.print("Modbus_Slave_Test");

  // Connect WiFi
  if (!WiFi.config(IP, GATEWAY, NETMASK, DNS)) {
    M5.Display.print("Failed to configure!");
  }
  WiFi.begin(WIFI_SSID, WIFI_PASS);
  while( WiFi.status() != WL_CONNECTED) {
    M5.Display.setCursor(12,12);
    M5.Display.print("*  ");
    delay(200);
    M5.Display.setCursor(12,12);
    M5.Display.print(" * ");
    delay(200);
    M5.Display.setCursor(12,12);
    M5.Display.print("  *");
    delay(200);
  }
  M5.Display.setCursor(0,12);
  M5.Display.print("IP:");
  M5.Display.print(WiFi.localIP());
  M5.Display.setCursor(0,24);

  // 時刻設定
  getTimeFromNTP();

  // Modbusスタート
  mb.server();

  // Modbuレジスター確保
  for(int i=0;i<=8;i++)
  {
      mb.addIreg(i);
  }

  // 割り込みタイマーセット
  timer1 = timerBegin(0, 80, true);//タイマー作成 1μSec
  timerAttachInterrupt(timer1, &onTimer, true);
  timerAlarmWrite(timer1, 1000000*interval, true);
  timerAlarmEnable(timer1);
}

void loop() {

  // 日時取得、表示
  getTime(&year,&month,&dayOfMonth,&hour,&minute,&second,&dayOfWeek);
  M5.Display.setCursor(0,40);
  M5.Display.print(year+"/"+month+"/"+dayOfMonth);
  M5.Display.setCursor(0,52);
  M5.Display.print(hour+":"+minute+":"+second);
  M5.Display.print(" "+dayOfWeek);

  // センサー値取得、表示&Modbusデータ格納(5秒毎)
  if(INTFLG==1){
    INTFLG=0;
    readENV();
    disp_ENV();
    mb.Ireg(0, year.toInt());       //年
    mb.Ireg(1, month.toInt());      //月
    mb.Ireg(2, dayOfMonth.toInt()); //日
    mb.Ireg(3, hour.toInt());       //時
    mb.Ireg(4, minute.toInt());     //分
    mb.Ireg(5, second.toInt());     //秒
    mb.Ireg(6, tmp*10);             //温度(10倍して小数点以下1桁までを整数値で格納)
    mb.Ireg(7, hum*10);             //湿度(10倍して小数点以下1桁までを整数値で格納)
    mb.Ireg(8, pres);               //気圧(小数点以下切り捨て)
 }

  // Modbus周期処理
  mb.task();

  delay(50);
}
参考サイト