MVCモデル
ツール:Eclipse
MVCモデルについて説明していきます。
一般的なMVCは以下です。()内はSpring Bootの場合
| M | モデル Model (Entity) |
| (Repository) | |
| V | ビュー View (thymeleaf) |
| C | コントローラ Controller |

実際に作成してみましょう。
1. コントローラを作成します。
com.example.demoを右クリック > 新規 > クラス

2. 続けてモデルを作成します。
com.example.demoを右クリック > 新規 > クラス

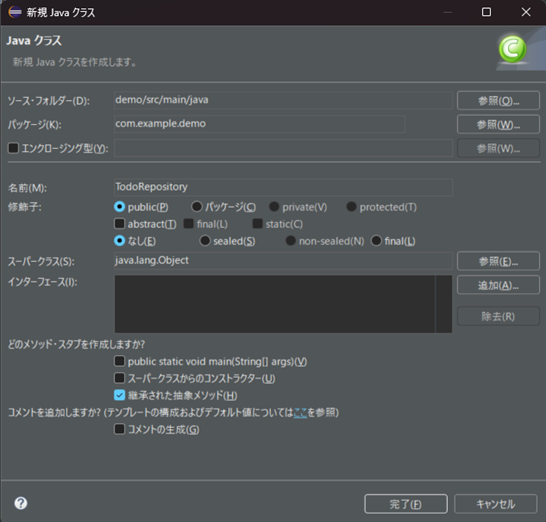
3.続けてリポジトリを作成します。
com.example.demoを右クリック > 新規 > クラス
※リポジトリの説明は後ほどします。
4.ビューを作成します。
/demo/src/main/resources/templatesを右クリック > 新規 > その他 > WEB > HTMLファイル

5.CSSフォルダを作成します。
/demo/src/main/resources/staticを右クリック > 新規 > フォルダ
6.CSSファイルを作成します。
/demo/src/main/resources/static/cssを右クリック > 新規 > その他 > WEB > CSSファイル

それではそれぞれのファイルを編集していきます。
/demo/src/main/java/com/example/demo/DemoApplication.java
	package com.example.demo;

	import org.springframework.boot.SpringApplication;
	import org.springframework.boot.autoconfigure.SpringBootApplication;
-	import org.springframework.web.bind.annotation.GetMapping;
-	import org.springframework.web.bind.annotation.RestController;

	@SpringBootApplication // Spring Bootのアプリケーションクラス
-	@RestController
	public class DemoApplication {

	    public static void main(String[] args) {
// アプリケーション起動メソッド アプリケーションクラスのインスタンスとパラメータを渡しています。
	        SpringApplication.run(DemoApplication.class, args);
	    }
-
-	    @GetMapping()
-	    String index() {
-	        return "hello world!";
-       }
-
	}
/demo/src/main/java/com/example/demo/Todo.java
	package com.example.demo;
+
+	import jakarta.persistence.Column;
+	import jakarta.persistence.Entity;
+	import jakarta.persistence.GeneratedValue;
+	import jakarta.persistence.GenerationType;
+	import jakarta.persistence.Id;
+	import jakarta.persistence.Table;
+
+	@Entity // エンティティを示すクラスに付けるアノテーション
+	@Table(name = "\"todos\"") // テーブルを指定するアノテーション
	public class Todo {
+
+	    @Id // エンティティクラスのフィールドをデータベースのプライマリーキー
+	    @GeneratedValue(strategy = GenerationType.IDENTITY) // 自動でIDを生成
+	    private Long id;
+
+	    @Column // DBカラムマッピング
+	    private String title;
+
+	    @Column // DBカラムマッピング
+	    private String memo;
+
+	    /*
+	     * getter・setter
+	     * getter : フィールドの値を取り出す
+	     * setter : フィールドに値を設定する
+	     */
+
+	    public Long getId() {
+	        return id;
+	    }
+
+	    public void setId(Long id) {
+	        this.id = id;
+	    }
+
+	    public String getTitle() {
+	        return title;
+	    }
+
+	    public void setTitle(String title) {
+	        this.title = title;
+	    }
+
+	    public String getMemo() {
+	        return memo;
+	    }
+
+	    public void setMemo(String memo) {
+	        this.memo = memo;
+	    }
+
	}
/demo/src/main/java/com/example/demo/TodoRepository.java
	package com.example.demo;
+
+	import org.springframework.data.jpa.repository.JpaRepository;
+
-	public class TodoRepository {
+	//DBにアクセスするインターフェースを継承
+	public interface TodoRepository extends JpaRepository<Todo, Long> {
+	    // カスタムクエリをここに追加することも可能
	}
Repository(リポジトリー)とは? データベースの操作をするオブジェクトを保存するクラス
/demo/src/main/java/com/example/demo/TodoController.java
	package com.example.demo;
+
+	import org.springframework.stereotype.Controller;
+	import org.springframework.web.bind.annotation.GetMapping;
+	import org.springframework.web.bind.annotation.PostMapping;
+	import org.springframework.web.servlet.ModelAndView;
+
+	@Controller
	public class TodoController {
+
+	    private final TodoRepository repository; // final修飾子のフィールド変数
+
+	    // コンストラクタ
+	    public TodoController(TodoRepository repository) {
+	        this.repository = repository;
+	    }
+
+	    @GetMapping() // GETリクエスト処理
+	    public ModelAndView index () {
+	        //  テンプレートで利用するデータと、Viewに関する情報を管理するオブジェクト
+	        ModelAndView mav = new ModelAndView();
+	        // keyがtodosのViewで使用できるデータを追加
+	        mav.addObject("todos", repository.findAll());
+	        // Viewファイル名を設定
+	        mav.setViewName("index");
+	        return mav;
+	    }
+
+	    @PostMapping() // POSTリクエスト処理
+	    public String store (Todo todo) {
+	        // 送られてきたtodoデータを保存
+	        repository.save(todo);
+	        // indexにリダイレクト
+	        return "redirect:/";
+	    }
	}
/demo/src/main/java/com/example/demo/TodoController.java
	<!DOCTYPE html>
	<html>
	<head>
+	    <meta charset="UTF-8">
+	    <meta name="viewport" content="width=device-width, initial-scale=1.0">
+	    <title>一覧画面</title>
+	    <link th:href="@{/css/style.css}" rel="stylesheet">
	</head>
	<body>
+	    <div class="container">
+	        <h2>一覧画面</h2>
+	        <form method="post" action="/">
+	            <input type="text" name="title" placeholder="タイトルを入力...">
+	            <br>
+	            <textarea name="memo" rows="4" placeholder="メモを入力..."></textarea>
+	            <br>
+	            <button type="submit">追加</button>
+	        </form>
+	        <table>
+	            <thead>
+	                <tr>
+	                    <th>#</th>
+	                    <th>タイトル</th>
+	                    <th>メモ</th>
+	                </tr>
+	            </thead>
+	            <tbody>
+	                <tr th:each="todo : ${todos}">
+	                    <td th:text="${todo.id}"></td>
+	                    <td th:text="${todo.title}"></td>
+	                    <td th:text="${todo.memo}"></td>
+	                </tr>
+	            </tbody>
+	        </table>
+	    </div>
	</body>
	</html>
/demo/src/main/resources/static/css/style.css
	@charset "UTF-8";
+	 body {
+	     font-family: Arial, sans-serif;
+	     margin: 20px;
+	     text-align: center;
+	 }
+	 .container {
+	     max-width: 400px;
+	     margin: 0 auto;
+	 }
+	 input[type="text"], textarea {
+	     width: 80%;
+	     padding: 8px;
+	     margin: 10px 0;
+	 }
+	 button {
+	     padding: 8px 12px;
+	     cursor: pointer;
+	 }
+	 table {
+	     width: 100%;
+	     border-collapse: collapse;
+	     margin-top: 20px;
+	 }
+	 th, td {
+	     border: 1px solid #ddd;
+	     padding: 8px;
+	     text-align: left;
+	 }
+	 th {
+	     background-color: #f4f4f4;
+	 }
アプリケーションを実行します。
で動作を確認して終了です。
次回はCRUDについてです。