はじめに
MLOps Advent Calendar 2023 の13日目です。
21日目の記事でも書いた通り、こちらで Azure Machine Learning のモデル監視について語りたいと思います。
その前に、少し宣伝・告知させて頂きます。
宣伝
Azure OpenAI ServiceではじめるChatGPT/LLMシステム構築入門という書籍を、1/24 に技術評論社より出版いたします。ChatGPT/LLM システムを構築するのに必要な要素を初級者~上級者レベルまでカバーしていますので、本格的な活用を目指していらっしゃる方はぜひお手に取って頂けると幸いです。
告知
生成AI MLOps LT大会!!!が 1/18 に開催されます。ぜひご参加ください。
それでは、早速本題に戻ります。
MLOps 成熟度モデルの中でのモデル監視の位置づけ
Microsoft は、現状の MLOps の成熟度レベルを測定するために必要な段階的要件を確立するためのメトリックを成熟度モデルとして提供しています。最上位の Level4 へ到達するためには、モデルの精度劣化を監視する体制が必須になります。

参考:
Step-by-step MLOps v1.2
Machine Learning 用の成熟度モデル
Azure Machine Learning で提供しているモデル監視機能
Azure Machine Learning (AzureML)では、モデル監視機能をプレビューで提供しています。
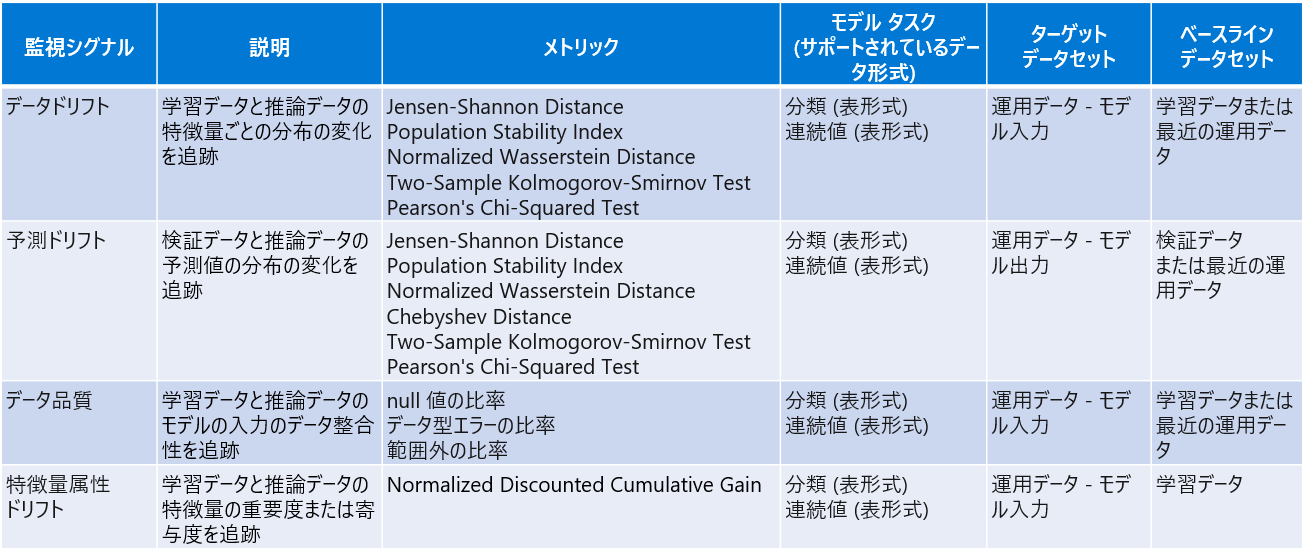
執筆時点では、以下の監視シグナルに対応しています。サポートしているデータ形式は表形式のみで、運用データであるターゲットデータセットと、学習データや検証データを用いることが多いベースラインデータセットを比較して、ドリフトやデータ品質のチェックを行います。
ドリフト系のメトリックの詳細は次の通りです。
モデル監視の流れ
モデル監視は次の流れで行います。ポイントは、モデルをデプロイ時に入力/出力データを収集する仕組みが必要なことと、監視ジョブ実行用のモデルモニターを作成するところです。
モデルの入力/出力データを収集する仕組み
モデルの入力/出力データの収集方法は、リアルタイムな推論環境を提供するオンラインエンドポイントとそれ以外とで異なります。
オンラインエンドポイント
MLFlow モデルをオンライン エンドポイントにデプロイする場合は、こちらのトグルをオンにするだけで

入力/出力データをストレージ内に {endpoint_name}/{deployment_name}/{collection_name}/{yyyy}/{MM}/{dd}/{HH}/{instance_id}.jsonl のパスで出力されます。収集されたデータは、次の JSON スキーマに従います。 収集されたデータは data キーから入手できます。
{"specversion":"1.0",
"id":"725aa8af-0834-415c-aaf5-c76d0c08f694",
"source":"/subscriptions/636d700c-4412-48fa-84be-452ac03d34a1/resourceGroups/mire2etesting/providers/Microsoft.MachineLearningServices/workspaces/mirmasterws/onlineEndpoints/localdev-endpoint/deployments/localdev",
"type":"azureml.inference.inputs",
"datacontenttype":"application/json",
"time":"2022-12-01T08:51:30Z",
"data":[{"label":"DRUG","pattern":"aspirin"},{"label":"DRUG","pattern":"trazodone"},{"label":"DRUG","pattern":"citalopram"}],
"correlationid":"3711655d-b04c-4aa2-a6c4-6a90cbfcb73f","xrequestid":"3711655d-b04c-4aa2-a6c4-6a90cbfcb73f",
"modelversion":"default",
"collectdatatype":"pandas.core.frame.DataFrame",
"agent":"monitoring-sdk/0.1.2",
"contentrange":"bytes 0-116/117"}
AutoML で学習したモデルは、標準で MLflow モデルとして出力されます。また、独自に学習コードを実装した場合も MLflow を使用して MLflow モデルとして出力できます。
なお、MLFlow モデルでない場合は、ログ収集コードを推論スクリプト (score.py) に追加することで自動で出力可能です。
バッチ推論や外部モデル
バッチ推論や外部モデルの場合は、推論時に以下の様に出力する処理を独自実装する必要があります。具体的には、推論で使用した特徴量や推論結果を jsonl 形式に変換し、ストレージの任意のディレクトリ先に yyyy/mm/dd/hh の階層を持たせて出力します。
なお、この yyyy/mm/dd/hh は後々作成する監視ジョブの監視対象範囲になります。つまり、xxxx/2023/12/31/23 配下に jsonl 形式で出力して、監視ジョブの監視対象範囲を 2024/01/01 00:00 ~ 現在 で指定した場合、xxxx/2023/12/31/23 配下のデータは除外されます。一方、 2023/12/31 23:00 ~ 現在 と指定した場合は、xxxx/2023/12/31/23 配下のデータも含めてメトリクスが計算されます。
jsonl 形式に変換して monit/target/2023/12/31/23/target.jsonl に出力するサンプルコードを載せておきます。
import pandas as pd
import json
from azureml.fsspec import AzureMachineLearningFileSystem
from azure.identity import DefaultAzureCredential
from azure.ai.ml import MLClient, Input, Output

# CSVファイル読込
data = pd.read_csv('nyc_taxi.csv')

# jsonl形式に変換してファイル出力
formatted_data = []
for index, row in data.iterrows():
    data_dict = {
        "vendorID": row["vendorID"],
        "lpepPickupDatetime": row["lpepPickupDatetime"],
        "passengerCount": row["passengerCount"],
        "tripDistance": row["tripDistance"],
        "pickupLongitude": row["pickupLongitude"],
        "pickupLatitude": row["pickupLatitude"],
        "dropoffLongitude": row["dropoffLongitude"],
        "dropoffLatitude": row["dropoffLatitude"],
        "totalAmount": row["totalAmount"]
    }
    formatted_data.append(json.dumps({"data": [data_dict]}))
with open("./outputs/target.jsonl", "w") as f:
    f.write("\n".join(formatted_data))

# Azure ML ワークスペースに接続 ※ご自身の環境情報を設定してください
SUBSCRIPTION_ID = ''
RESOURCE_GROUP = ''
AML_WORKSPACE = ''

credential = DefaultAzureCredential()
ml_client = MLClient(credential, SUBSCRIPTION_ID, RESOURCE_GROUP, AML_WORKSPACE)

# アップロード先のデータストア指定
fs = AzureMachineLearningFileSystem('azureml://subscriptions/' + ml_client.subscription_id + \
                                    '/resourcegroups/' + ml_client.resource_group_name + \
                                    '/workspaces/' + ml_client.workspace_name + \
                                    '/datastores/workspaceblobstore/paths/')

# ファイルアップロード
fs.upload(lpath='./outputs/target.jsonl',
            rpath='xxxx/2023/12/31/23',
            recursive=False,
            **{'overwrite': 'MERGE_WITH_OVERWRITE'})
ターゲットデータを資産登録
次のリンク先の手順に従って、ターゲットデータを Folder タイプで資産登録します。登録先のパスは xxxx までで、yyyy/mm/dd/hh の部分は含めないよう注意してください。
ベースラインデータを準備
ベースラインデータを mltable 形式でストレージに保存し、データ資産として登録します。
ベースラインデータを mltable 形式で保存
学習データや予測ドリフトのメトリクス算出で使用する検証データの推論結果は、それぞれストレージの任意のパスに mltable の形式で出力して準備します。
mltable の形式とは何ぞやという話ですが、端的にいうとparquetやCSV/TSV等の実データ以外に、MLTable ファイルという実データの読み込み方を定義する YAML ベースのファイルを同じディレクトリ内に配置する形式になります。
単に同じディレクトリ内の学習データや検証データの parquet ファイルを読み込む場合、MLTable の内容はシンプルに以下の記載のみでOKです。
$schema: http://azureml/sdk-2-0/MLTable.json
type: mltable
paths:
  - pattern: ./*.parquet
transformations:
  - read_parquet
さらに、複雑な読み込ませ方として、対象のディレクトリ、ファイルや列を制限したり、フィルタや型変換も行うことができます。実データへの列の追加や変更が頻繁に発生する場合、必須となる列のみ読み込む設定にしておけば、プログラムを変更しなくても対応できるといったメリットがあります。ただ、今回は複雑な読み込ませ方は不要です。
$schema: https://azuremlschemas.azureedge.net/latest/MLTable.schema.json
type: mltable

# Supported paths include:
# local: ./<path>
# blob: wasbs://<container_name>@<account_name>.blob.core.windows.net/<path>
# Public http(s) server: https://<url>
# ADLS gen2: abfss://<file_system>@<account_name>.dfs.core.windows.net/<path>/
# Datastore: azureml://subscriptions/<subid>/resourcegroups/<rg>/workspaces/<ws>/datastores/<datastore_name>/paths/<path>

paths:
  - file: abfss://<file_system>@<account_name>.dfs.core.windows.net/<path>/ # a specific file on ADLS
  # additional options
  # - folder: ./<folder> a specific folder
  # - pattern: ./*.csv # glob all the csv files in a folder

transformations:
    - read_delimited:
        encoding: ascii
        header: all_files_same_headers
        delimiter: ","
        include_path_column: true
        empty_as_string: false
    - keep_columns: [col1, col2, col3, col4, col5, col6, col7]
    # or you can drop_columns...
    # - drop_columns: [col1, col2, col3, col4, col5, col6, col7]
    - convert_column_types:
        - columns: col1
          column_type: int
        - columns: col2
          column_type:
            datetime:
                formats:
                    - "%d/%m/%Y"
        - columns: [col1, col2, col3]
          column_type:
            boolean:
                mismatch_as: error
                true_values: ["yes", "true", "1"]
                false_values: ["no", "false", "0"]
      - filter: 'col("col1") > 32 and col("col7") == "a_string"'
      # create a column called timestamp with the values extracted from the folder information
      - extract_columns_from_partition_format: {timestamp:yyyy/MM/dd}
      - skip: 10
      - take_random_sample:
          probability: 0.50
          seed: 1394
      # or you can take the first n records
      # - take: 200
ベースラインデータを資産登録
ベースラインデータを資産登録するには、AzureML スタジオの アセット>データ>+作成 から作成します。
種類は、mltable を選択し、
mltable の形式で出力したストレージの任意のパスを指定して資産登録します。
監視ジョブを作成
監視ジョブの作成はオンラインエンドポイントとそれ以外で異なります。
オンラインエンドポイント
オンラインエンドポイントの場合は、次の手順に従って、UI/CLI/SDKで監視ジョブを作成できます。
バッチ推論や外部モデル
バッチ推論や外部モデルの場合は、CLI/SDKで監視ジョブを作成するしかありません。以下はSDK で監視ジョブを作成する場合のコードになります。
from azure.identity import DefaultAzureCredential
from azure.ai.ml import Input, MLClient
from azure.keyvault.secrets import SecretClient
from azure.ai.ml.constants import (
    MonitorFeatureType,
    MonitorMetricName,
    MonitorDatasetContext,
)
from azure.ai.ml.entities import (
    AlertNotification,
    FeatureAttributionDriftSignal,
    FeatureAttributionDriftMetricThreshold,
    DataDriftSignal,
    PredictionDriftSignal,
    PredictionDriftMetricThreshold,
    DataQualitySignal,
    DataDriftMetricThreshold,
    DataQualityMetricThreshold,
    NumericalDriftMetrics,
    CategoricalDriftMetrics,
    DataQualityMetricsNumerical,
    DataQualityMetricsCategorical,
    MonitorFeatureFilter,
    MonitorInputData,
    MonitoringTarget,
    MonitorDefinition,
    MonitorSchedule,
    RecurrencePattern,
    RecurrenceTrigger,
    ServerlessSparkCompute,
    ReferenceData,
    ProductionData,
    FADProductionData,
    BaselineDataRange
)

# AzureML ワークスペースへ接続 ※ご自身の環境情報を設定してください
SUBSCRIPTION_ID = ''
RESOURCE_GROUP = ''
AML_WORKSPACE = ''
credential = DefaultAzureCredential()
ml_client = MLClient(credential, SUBSCRIPTION_ID, RESOURCE_GROUP, AML_WORKSPACE)

spark_compute = ServerlessSparkCompute(
    instance_type="standard_e4s_v3",
    runtime_version="3.3"
)

# 運用(ターゲット)データ
production_data = ProductionData(
    input_data=Input(
        type="uri_folder",
        path="azureml:target_dataset:1"
    ),
    data_context=MonitorDatasetContext.MODEL_INPUTS,
    data_window=BaselineDataRange(
      lookback_window_size="P200D",
    )
)

# 学習(ベースライン)データ
reference_data_training = ReferenceData(
    input_data=Input(
        type="mltable",
        path="azureml:baseline_dataset:1"
    ),
    target_column_name="targetvalue",
    data_context=MonitorDatasetContext.TRAINING
)

# データドリフトメトリクス設定
features = MonitorFeatureFilter(top_n_feature_importance=10)
metric_thresholds = DataDriftMetricThreshold(
    numerical=NumericalDriftMetrics(
        population_stability_index=0.2
    ),
    categorical=CategoricalDriftMetrics(
        population_stability_index=0.2
    )
)

# データドリフト設定
advanced_data_drift = DataDriftSignal(
    production_data=production_data,
    reference_data=reference_data_training,
    features=features,
    metric_thresholds=metric_thresholds,
    alert_enabled=True
)

# データ品質メトリクス設定
metric_thresholds = DataQualityMetricThreshold(
    numerical=DataQualityMetricsNumerical(
        null_value_rate=0.01,
        data_type_error_rate=0.01,
        out_of_bounds_rate=0.01
    ),
    categorical=DataQualityMetricsCategorical(
        null_value_rate=0.01,
        data_type_error_rate=0.01,
        out_of_bounds_rate=0.01
    )
)

# データ品質設定
advanced_data_quality = DataQualitySignal(
    production_data=production_data,
    reference_data=reference_data_training,
    features=features,
    metric_thresholds=metric_thresholds,
    alert_enabled=True
)

# 運用(ターゲット)データ for 特徴属性ドリフト
fad_production_data = FADProductionData(
    input_data=Input(
        type="uri_folder",
        path="azureml:target_dataset:1"
    ),
    data_context=MonitorDatasetContext.MODEL_INPUTS,
    data_window=BaselineDataRange(
      lookback_window_size="P200D",
    )
)

production_data = [fad_production_data]

# 特徴属性ドリフトメトリクス設定
metric_thresholds = FeatureAttributionDriftMetricThreshold(normalized_discounted_cumulative_gain=0.9)

# 特徴属性ドリフト設定
feature_attribution_drift = FeatureAttributionDriftSignal(
    production_data=production_data,
    reference_data=reference_data_training,
    metric_thresholds=metric_thresholds,
    alert_enabled=False
)


# 運用(ターゲット)データ for 予測ドリフト
production_data = ProductionData(
    input_data=Input(
        type="uri_folder",
        path="azureml:target_dataset:1"
    ),
    data_context=MonitorDatasetContext.MODEL_INPUTS,
    data_window=BaselineDataRange(
      lookback_window_size="P200D",
    )
)

# 学習(ベースライン)データ for 予測ドリフト
reference_data_training = ReferenceData(
    input_data=Input(
        type="mltable",
        path="azureml:baseline_dataset:1"
    ),
    target_column_name="targetvalue",
    data_context=MonitorDatasetContext.TRAINING
)

# 予測ドリフトメトリクス設定
metric_thresholds = PredictionDriftMetricThreshold(
    numerical=NumericalDriftMetrics(
        population_stability_index=0.2
    )
)

# 予測ドリフト設定
advanced_prediction_drift = PredictionDriftSignal(
    production_data=production_data,
    reference_data=reference_data_training,
    metric_thresholds=metric_thresholds,
    alert_enabled=True
)

# モニタリングシグナル設定
monitoring_signals = {
    'data_drift_advanced':advanced_data_drift,
    'data_quality_advanced':advanced_data_quality,
    'feature_attribution_drift':feature_attribution_drift,
    'advanced_prediction_drift':advanced_prediction_drift
}

# アラート通知設定
alert_notification = AlertNotification(
    emails=['hogehoge@hogehoge.com']
)

# モニター定義
monitor_definition = MonitorDefinition(
    compute=spark_compute,
    monitoring_signals=monitoring_signals,
    alert_notification=alert_notification
)

# モニタースケジュール設定
recurrence_trigger = RecurrenceTrigger(
    frequency="month",
    interval=1,
    schedule=RecurrencePattern(hours=19, minutes=1, month_days=[20]),
    time_zone="Tokyo Standard Time",

)

# モニタースケジュール作成
model_monitor = MonitorSchedule(
    name="model-monitoring-122001",
    trigger=recurrence_trigger,
    create_monitor=monitor_definition
)

# モニタースケジュール作成実行
poller = ml_client.schedules.begin_create_or_update(model_monitor)
created_monitor = poller.result()
自身の監視ジョブを作成する場合は、以下の見直しを行ってください。
- AzureML ワークスペースへ接続
- サブスクID等をご自身の環境情報に変更してください。

- 運用(ターゲット)データ、学習(ベースライン)データ
- 自身で登録したデータ資産に変更してください。


- 監視対象期間
- lockback_window_sizeを指定している個所をすべて、監視ジョブ実行日を起点として監視対象に含めたい日数をPとDの間で指定してください。例では、監視ジョブ実行日から200日前までを対象とします。

- アラート通知設定
- アラート通知したいメールアドレスに変更してください。

- 監視ジョブ実行スケジュール
- 定期的に実行したい監視ジョブのスケジュールを指定してください。例は毎月1回20日に日本時間(JST)で19:01に定期実行するスケジュールになっています。
その他の設定方法は以下をご確認ください。
RecurrenceTrigger クラス
- 定期的に実行したい監視ジョブのスケジュールを指定してください。例は毎月1回20日に日本時間(JST)で19:01に定期実行するスケジュールになっています。

監視ジョブ実行結果
指定したタイミングでジョブが実行され正常終了すれば、監視ジョブの概要ページでそれぞれのシグナルの算出結果をサマリーで確認することができます。
さらにデータドリフトの場合は、個別の特徴量ごとに学習と運用データで分布がどう違うかヒストグラムで確認することができます。


