AMPのamp-listを実装する
お疲れ様です。仕様書読んでますか? :)
今回はAMPでリスト表示をする方法です。
最新情報
公式な実装サンプルは AMP by Example にありますので、最新の情報を確認すると良いでしょう。(よく変わります)
amp-list - AMP by Example
amp-list (github.com)
下準備
まずは下準備です。機能としては何も無いAMP HTMLを用意して、サーバにアップロードして表示させてみましょう。
<!DOCTYPE html>
<html amp>
<head>
<meta charset="utf-8">
<link rel="canonical" href="http://qiita.com/psn/items/448f09f6da7fbb4077aa">
<meta name="viewport" content="width=device-width,minimum-scale=1,initial-scale=1">
<style amp-boilerplate>body{-webkit-animation:-amp-start 8s steps(1,end) 0s 1 normal both;-moz-animation:-amp-start 8s steps(1,end) 0s 1 normal both;-ms-animation:-amp-start 8s steps(1,end) 0s 1 normal both;animation:-amp-start 8s steps(1,end) 0s 1 normal both}@-webkit-keyframes -amp-start{from{visibility:hidden}to{visibility:visible}}@-moz-keyframes -amp-start{from{visibility:hidden}to{visibility:visible}}@-ms-keyframes -amp-start{from{visibility:hidden}to{visibility:visible}}@-o-keyframes -amp-start{from{visibility:hidden}to{visibility:visible}}@keyframes -amp-start{from{visibility:hidden}to{visibility:visible}}</style><noscript><style amp-boilerplate>body{-webkit-animation:none;-moz-animation:none;-ms-animation:none;animation:none}</style></noscript>
<!-- ここに追加のスタイルを置きます -->
<!-- ここに追加の拡張スクリプトを置きます -->
<script async src="https://cdn.ampproject.org/v0.js"></script>
</head>
<body>
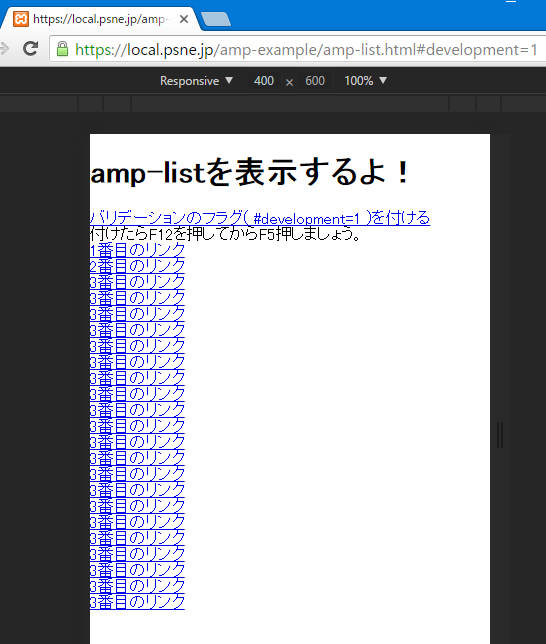
<h1>amp-listを表示するよ!</h1>
<div>
<a id="development=1"></a><a href="#development=1">バリデーションのフラグ( #development=1 )を付ける</a><br>
付けたらF12を押してからF5押しましょう。
</div>
<!-- ここに新しい要素を置きます -->
</body>
</html>
上手く表示できましたか?
F12キーを押してDeveloper Toolsを表示してConsoleを確認してみましょう。
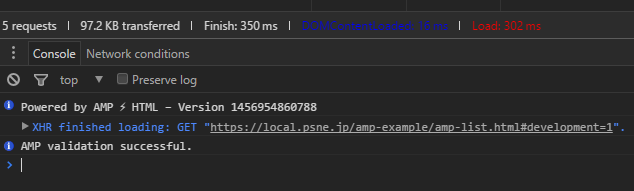
Powered by AMP ⚡ HTML – Version ....
と表示されていたら、ここまでは上手くいきました。次のステップです。 :)
URLの末尾に #development=1 を追加する事によって、検証モードになります。特にエラーが無ければ
AMP validation successful.
と表示されるでしょう。
使ってみよう
最初にリスト表示のデータを作りましょう。
items配列の中に必要なデータを入れます。
{
  "items": []
}
最初の例として、リンク一覧を表示させるためのタイトルとURLのセットを3つ用意します。
{
  "items": [

    {
      "title": "1番目のリンク",
      "url": "http://qiita.com/psn/items/448f09f6da7fbb4077aa#1"
    },

    {
      "title": "2番目のリンク",
      "url": "http://qiita.com/psn/items/448f09f6da7fbb4077aa#2"
    },

    {
      "title": "3番目のリンク",
      "url": "http://qiita.com/psn/items/448f09f6da7fbb4077aa#3"
    }

  ]
}
ファイル名を link-list.json として保存して、AMP HTMLと同じサーバにアップロードしましょう。
AMP HTMLにリスト表示を実装します。
まずは、
<!-- ここに追加の拡張スクリプトを置きます -->
と書いてある部分にリスト表示をするためのスクリプト amp-list-0.1.js と テンプレートを利用するためのスクリプト amp-mustache-0.1.js を呼び出すタグを追加します。
	<!-- ここに追加の拡張スクリプトを置きます -->
	<script async custom-template="amp-mustache" src="https://cdn.ampproject.org/v0/amp-mustache-0.1.js"></script>
	<script async custom-element="amp-list" src="https://cdn.ampproject.org/v0/amp-list-0.1.js"></script>
	<script async src="https://cdn.ampproject.org/v0.js"></script>
これで amp-mustache と amp-list を利用する準備ができました。
スクリプトは async (非同期)で読み込まれるため、追加する場所さえ間違えなければ特に順序は気にする必要がありません。
それでは、リスト表示のためのテンプレートを書いていきましょう。
	<!-- ここに新しい要素を置きます -->
	<amp-list width=300 height=100 src="./link-list.json" layout=responsive>
		<template type="amp-mustache">
			<a href="{{url}}">{{title}}</a>
			<br>
		</template>
	</amp-list>
<!-- ここに新しい要素を置きます -->とある部分に追加します。
既にお気づきかもしれませんが、 "title" のデータが {{title}} に、"url" のデータが {{url}} に入ります。
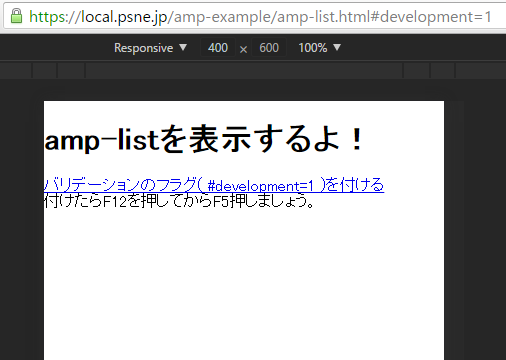
それでは、書き換えた AMP HTML をサーバにアップロードして、実際の表示を確認してみましょう。
実装の確認
表示されましたか?
読み込まれていないようだ
リストは何も表示されませんでした。という方は、サーバから閲覧しているのではなくAMP HTMLファイルを直接参照しているのかもしれません。 #development=1 を付けて確認してみましょう。
エラーが出ている
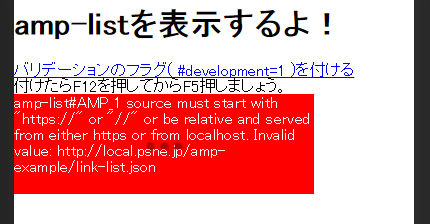
赤色で source must start with "https://" or "//" or be relative and served from either https or from localhost. と表示された! という方は、同じドメインかつ、https:// からアクセスできるようなサーバにて試してみましょう。(もし、同一ドメイン以外から取得する場合はCORSに関する設定も確認しましょう。)
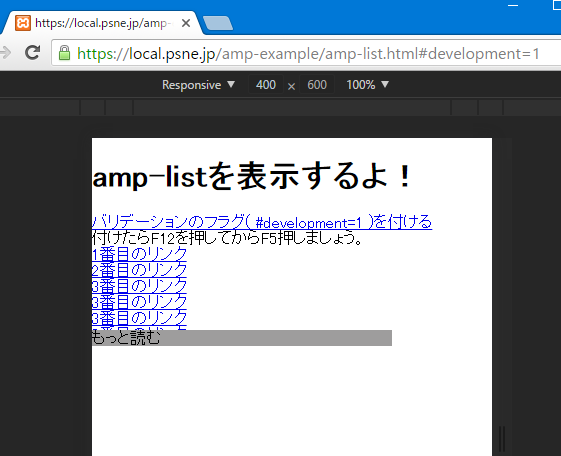
「もっと読む」表示を利用してリスト表示をコンパクトにする
モバイル端末の表示領域は思ったほど広くありません。
コンパクトに表示させて、興味がある方だけに多くの情報を表示するようにしてみましょう。
リスト表示のレスポンシブ表示を止めて、テンプレートの下に overflow という属性を持たせたタグを追加します。
	<amp-list width=300 height=100 src="./link-list.json">
		<template type="amp-mustache">
			<a href="{{url}}">{{title}}</a>
			<br>
		</template>
		<div overflow role=button aria-label="もっと読む" class="list-overflow">
			もっと読む
		</div>
	</amp-list>
「もっと読む」用のスタイルをヘッダに追加します。
<style amp-custom>
.list-overflow {
  position: absolute;
  bottom: 0;
  background: #9E9D9D;
  width: 100%;
}
</style>
※分かりやすくする為に色を付けてあります。
「もっと読む」をクリックすると、残りのリストが表示されます。
関連するもの
リスト表示に使われている[HTML テンプレート]には、フラグによる表示・非表示の分岐などが利用できます。
[HTML テンプレート]:(https://github.com/ampproject/amphtml/blob/master/spec/amp-html-templates.md)
この投稿は AMP(Google)のリスト表示(amp-list)を使う の内容を整理したものです。