ゴール
今回は、1枚の画像から深度情報を推定できるAIモデルを用い、ポイントクラウド(点群)を生成します。
ポイントクラウドとは
ポイントクラウドとは、空間上の点の集まりのことです。十分な点数があれば、3次元の形状や物体を表現することができます。
深度マップとは
深度マップは、カメラからどれくらい離れているのかを推定したものです。
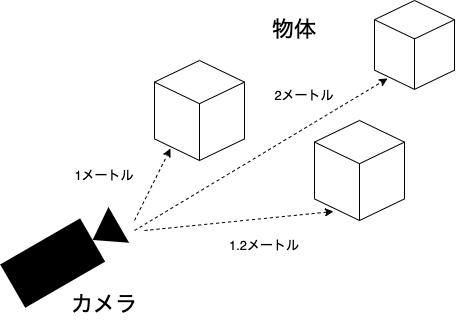
深度情報には、相対的なものと絶対的なものがあります。相対的な深度の場合、値2は深度値1の2倍の距離ですが、現実の距離を正確に伝えるものではありません。絶対深度は、現実の距離を伝えることができます。
今回は、相対的な距離を使用します。
深度情報を予測するAIモデル
今回、深度推定に使用するのは、MiDaS というモデルです。
このモデルは多くの異なるデータセットで学習されているため、様々な画像の被写体に対して良い結果を与えるはずです。
他のモデルに比べて非常に使いやすく、事前に学習されたモデルはTorch Hub から自動的にダウンロードすることができます。
他のアプローチ
深度情報はLIDARスキャナなどでも推定できますが、今回はPyTorchが動作するコンピュータと1枚の画像さえあればOKです。
依存ライブラリのインストール
まず最初に、MiDaSの依存ライブラリをインストールする必要があります。
最初のステップはtimmをインストールすることで、PyTorchとMiDaSが使用する一般的なモデルもインストールされます。
また、点群の作成と表示に使用される open3d もインストールする必要があります。
最後に画像からカメラの情報 (焦点距離など) を読み取るための exifread ライブラリもインストールします。
pip install timm
pip install open3d
pip install ExifRead
ソースコード
事前準備ができましたので、ソースコードを見てみましょう。
インポート
まず、これから使用するすべてのモジュールをインポートしましょう。
import argparse

import cv2
import torch

import open3d as o3d

import PIL
import exifread

import numpy as np
カメラの内部パラメータ作成
次のステップは、2次元画像の座標を3次元空間に投影するためにカメラの内部パラメータを設定することです。
こちらで、カメラの光学的中心および焦点距離を設定します。
この設定が正しく設定されていない場合、生成される点群が歪んで見えることがあります。
下記のPinholeCameraIntrinsicの最初の2つのパラメータは、画像の幅と高さに対応します。
次の2つのパラメータfxとfyは、カメラの焦点距離をピクセル単位で表したものです。
この値は、画像の EXIF 情報から焦点距離を抽出して計算しようとしますが、存在しない場合はデフォルトの値を使用します。
最後の2つのパラメータであるcxとcyは、視野の中心点に相当します。これは、画像の中心点に設定されます。
この関数は後ほど使用します。
def create_intrinsic(image_path, default_focal_length=35., sensor_width=36):
    image = PIL.Image.open(image_path)
    img_width, img_height = image.size
    max_side = max(img_width, img_height)
    min_side = min(img_width, img_height)
    with open(image_path, 'rb') as f:
        tags = exifread.process_file(f, details=False)
    if 'EXIF FocalLengthIn35mmFilm' in tags:
        focal_length = tags['EXIF FocalLengthIn35mmFilm'].values[0]
    else:
        print('Could not determine focal length; defaulting to 35.')
        focal_length = default_focal_length
    fx = focal_length * max_side / sensor_width
    # For pinhole cameras fx and fy will be the same.
    fy = fx
    cx = max_side / 2.
    cy = min_side / 2.
    return o3d.camera.PinholeCameraIntrinsic(max_side, min_side, fx, fy, cx, cy)
コマンドライン
ここで、main関数を作成し、コマンドラインからパラメータを読み込むためにargparseモジュールを使用します
def main():
    parser = argparse.ArgumentParser(description='Converts a single image into a point cloud.')
    parser.add_argument('--input_file',
                        help='The image to generate a point cloud from.')
    parser.add_argument('--max_depth',
                        help='The maximum depth of the resulting point cloud as a percentage of the maximum depth.',
                        type=float,
                        default=0.25)
    parser.add_argument('--rotate',
                        action='store_true',
                        help='Indicates that the model should rotate when displayed.')
    parser.add_argument('--model',
                        help='The model to use to estimate depth.',
                        choices=['DPT_Large', 'DPT_Hybrid', 'MiDaS_small'],
                        default='DPT_Large')
    args = parser.parse_args()
深度予測モデルのロード
次のステップでは、PyTorch Hubから学習済みのMiDaSモデルをダウンロードし、画像の前処理に使用する変換を設定します。
MiDaSは、複数学習ずみのモデルを用意しています。MiDaS_small は最も小さく、最も高速で、最も精度の低いモデルです。DPT_Largeは最も大きく、最も遅いモデルですが、最も高品質な深度マップを生成します。DPT_Hybridは処理速度と深度マップ品質が2つのモデルの中間になります。
    midas = torch.hub.load('intel-isl/MiDaS', args.model)

    device = torch.device('cuda') if torch.cuda.is_available() else torch.device('cpu')
    midas.to(device)
    midas.eval()

    midas_transforms = torch.hub.load('intel-isl/MiDaS', 'transforms')

    if args.model == 'DPT_Large' or args.model == 'DPT_Hybrid':
        transform = midas_transforms.dpt_transform
    else:
        transform = midas_transforms.small_transform
そして、入力画像をモデルに入力すると、深度情報が返されます。
    filename = args.input_file
    img = cv2.imread(filename)
    img = cv2.cvtColor(img, cv2.COLOR_BGR2RGB)

    input_batch = transform(img).to(device)

    with torch.no_grad():
        prediction = midas(input_batch)

        prediction = torch.nn.functional.interpolate(
            prediction.unsqueeze(1),
            size=img.shape[:2],
            mode='bicubic',
            align_corners=False,
        ).squeeze()

    depth = prediction.cpu().numpy()
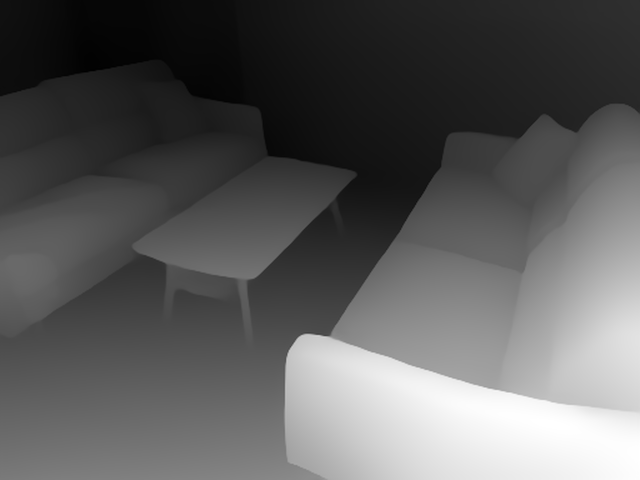
入力画像です。

そして予測した深度マップです。
深度マップの後処理
前のステップで読み込んだ画像を用いて、撮影に使用したカメラの内部パラメータを先に作った関数で推定します。
その後、深度マップを反転させ、深さを制限する追加ステップを実行します。
その結果、深度マップでは、カメラに近いオブジェクトは暗く、遠いオブジェクトは明るくなります。
これでopen3dで深度マップを読み込むことができるようになりました。
    intrinsic = create_intrinsic(filename)

    focal = intrinsic.intrinsic_matrix[0, 0]
    depth = focal / depth

    max_depth = args.max_depth * depth.max()
    depth[depth >= max_depth] = np.inf

処理後の深度マップを使用して、open3dライブラリを使用して点群を生成することができます。
また、入力画像は点群の点の色付けに使用されます。
    color = o3d.io.read_image(filename)
    depth = o3d.geometry.Image(depth)

    rgbd = o3d.geometry.RGBDImage.create_from_color_and_depth(color, depth, convert_rgb_to_intensity=False)
    pcd = o3d.geometry.PointCloud.create_from_rgbd_image(rgbd, intrinsic)

    # Flip the point cloud the right way up.
    pcd.transform([[-1, 0, 0, 0], [0, -1, 0, 0], [0, 0, -1, 0], [0, 0, 0, 1]])
結果の表示
最後に結果を表示します。点群を回転させるためにコールバックを使用します。
    vis = o3d.visualization.Visualizer()
    vis.create_window()

    def rotate_view(v):
        ctr = v.get_view_control()
        ctr.rotate(1, 0.0)
        return False

    vis.add_geometry(pcd)
    if args.rotate:
        vis.register_animation_callback(rotate_view)
    vis.run()
    vis.destroy_window()
これで画像1枚からのポイントクラウドが生成できました。
ソースコード(全体)
import argparse

import cv2
import torch

import open3d as o3d

import PIL
import exifread

import numpy as np


def create_intrinsic(image_path, default_focal_length=35., sensor_width=36):
    image = PIL.Image.open(image_path)
    img_width, img_height = image.size
    max_side = max(img_width, img_height)
    min_side = min(img_width, img_height)
    with open(image_path, 'rb') as f:
        tags = exifread.process_file(f, details=False)
    if 'EXIF FocalLengthIn35mmFilm' in tags:
        focal_length = tags['EXIF FocalLengthIn35mmFilm'].values[0]
    else:
        print('Could not determine focal length; defaulting to 35.')
        focal_length = default_focal_length
    fx = focal_length * max_side / sensor_width
    # For pinhole cameras fx and fy will be the same.
    fy = fx
    cx = max_side / 2.
    cy = min_side / 2.
    return o3d.camera.PinholeCameraIntrinsic(max_side, min_side, fx, fy, cx, cy)


def main():
    parser = argparse.ArgumentParser(description='Converts a single image into a point cloud.')
    parser.add_argument('--input_file',
                        help='The image to generate a point cloud from.')
    parser.add_argument('--max_depth',
                        help='The maximum depth of the resulting point cloud as a percentage of the maximum depth.',
                        type=float,
                        default=0.25)
    parser.add_argument('--rotate',
                        action='store_true',
                        help='Indicates that the model should rotate when displayed.')
    parser.add_argument('--model',
                        help='The model to use to estimate depth.',
                        choices=['DPT_Large', 'DPT_Hybrid', 'MiDaS_small'],
                        default='DPT_Large')
    args = parser.parse_args()

    midas = torch.hub.load('intel-isl/MiDaS', args.model)

    device = torch.device('cuda') if torch.cuda.is_available() else torch.device('cpu')
    midas.to(device)
    midas.eval()

    midas_transforms = torch.hub.load('intel-isl/MiDaS', 'transforms')

    if args.model == 'DPT_Large' or args.model == 'DPT_Hybrid':
        transform = midas_transforms.dpt_transform
    else:
        transform = midas_transforms.small_transform

    filename = args.input_file

    img = cv2.imread(filename)
    img = cv2.cvtColor(img, cv2.COLOR_BGR2RGB)

    input_batch = transform(img).to(device)

    with torch.no_grad():
        prediction = midas(input_batch)

        prediction = torch.nn.functional.interpolate(
            prediction.unsqueeze(1),
            size=img.shape[:2],
            mode='bicubic',
            align_corners=False,
        ).squeeze()

    depth = prediction.cpu().numpy()

    intrinsic = create_intrinsic(filename)

    focal = intrinsic.intrinsic_matrix[0, 0]
    depth = focal / depth

    max_depth = args.max_depth * depth.max()
    depth[depth >= max_depth] = np.inf

    color = o3d.io.read_image(filename)
    depth = o3d.geometry.Image(depth)

    rgbd = o3d.geometry.RGBDImage.create_from_color_and_depth(color, depth, convert_rgb_to_intensity=False)
    pcd = o3d.geometry.PointCloud.create_from_rgbd_image(rgbd, intrinsic)

    # Flip the point cloud the right way up.
    pcd.transform([[-1, 0, 0, 0], [0, -1, 0, 0], [0, 0, -1, 0], [0, 0, 0, 1]])

    vis = o3d.visualization.Visualizer()
    vis.create_window()

    def rotate_view(v):
        ctr = v.get_view_control()
        ctr.rotate(1, 0.0)
        return False

    vis.add_geometry(pcd)
    if args.rotate:
        vis.register_animation_callback(rotate_view)
    vis.run()
    vis.destroy_window()


if __name__ == '__main__':
    main()