目的
TextBlockに設定された文字列が表示しきれない時省略記号を付けたい。
概要
- 文字単位で省略したい時は、TextTrimmingプロパティにCharacterEllipsisを設定します。 → サンプル
- 単語単位で省略したい時は、TextTrimmingプロパティにWordEllipsisを設定します。 → サンプル
- 自分でカスタムしたい時は、自作Converter等で設定します。 → サンプル
動作環境
| 項目 | 内容 |
|---|---|
| OS | Windows 10 Home |
| プログラミング言語 | C#7.0 (.Net Framework4.6) + WPF |
| IDE | Visual Studio 2017 Community |
1. 文字単位で省略したい(CharacterEllipsis)
xamlを示します。
<Window x:Class="TextBlockTrimmingSample.CharacterEllipsisSample"
        xmlns="http://schemas.microsoft.com/winfx/2006/xaml/presentation"
        xmlns:x="http://schemas.microsoft.com/winfx/2006/xaml"
        Title="CharacterEllipsisSample" Height="450" Width="700">
    <Window.Resources>
        <Style TargetType="{x:Type TextBlock}">
            <Setter Property="FontSize" Value="20" />
            <Setter Property="HorizontalAlignment" Value="Left" />
        </Style>
    </Window.Resources>

    <StackPanel HorizontalAlignment="Left" Margin="10">
        <TextBlock Text="この幅で検証します" Width="200" Background="Aqua" />
        <TextBlock Text="元の文字列" />
        <TextBlock Text="red fox, Blandford's fox, pale fox" />
        <TextBlock Text="アカギツネ、アフガニスタンキツネ、オグロスナギツネ" />
        <TextBlock Text="red fox,Blandford's fox,pale fox" />
        <TextBlock FontSize="14" />
        <TextBlock Text="設定しない場合" />
        <TextBlock Text="red fox, Blandford's fox, pale fox" Width="200" Background="Aqua" />
        <TextBlock Text="アカギツネ、アフガニスタンキツネ、オグロスナギツネ" Width="200" Background="Aqua" />
        <TextBlock Text="red fox,Blandford's fox,pale fox" Width="200" Background="Aqua" />
        <TextBlock FontSize="14" />
        <TextBlock Text="CharacterEllipsis設定した場合" />
        <TextBlock Text="red fox, Blandford's fox, pale fox" Width="200" Background="Aqua"
                   TextTrimming="CharacterEllipsis" />
        <TextBlock Text="アカギツネ、アフガニスタンキツネ、オグロスナギツネ" Width="200" Background="Aqua"
                   TextTrimming="CharacterEllipsis" />
        <TextBlock Text="red fox,Blandford's fox,pale fox" Width="200" Background="Aqua"
                   TextTrimming="CharacterEllipsis" />
    </StackPanel>
</Window>
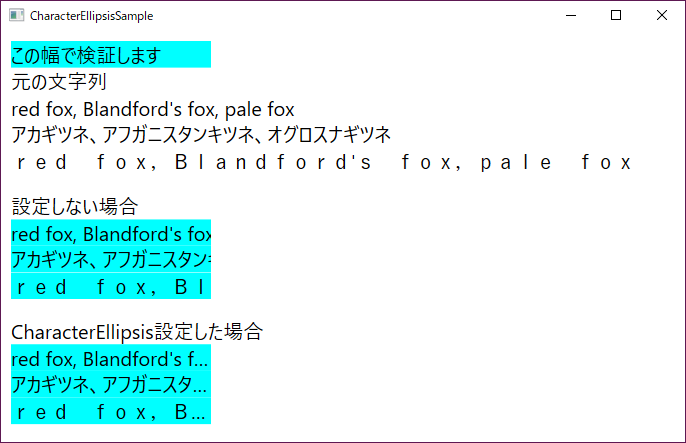
上の結果からTextTrimmingプロパティにCharacterEllipsisを設定した時は、
1文字でも多く表示し、収まらないない場合末尾に"..."が表示され、
それ以降の文字は表示されないことが確認できました。
2. 単語単位で省略したい(WordEllipsis)
xamlを示します。
<Window x:Class="TextBlockTrimmingSample.WordEllipsisSample"
        xmlns="http://schemas.microsoft.com/winfx/2006/xaml/presentation"
        xmlns:x="http://schemas.microsoft.com/winfx/2006/xaml"
        xmlns:d="http://schemas.microsoft.com/expression/blend/2008"
        xmlns:mc="http://schemas.openxmlformats.org/markup-compatibility/2006"
        xmlns:local="clr-namespace:TextBlockTrimmingSample"
        mc:Ignorable="d"
        Title="WordEllipsisSample" Height="450" Width="800">
    <Window.Resources>
        <Style TargetType="{x:Type TextBlock}">
            <Setter Property="FontSize" Value="20" />
            <Setter Property="HorizontalAlignment" Value="Left" />
        </Style>
    </Window.Resources>

    <StackPanel HorizontalAlignment="Left" Margin="10">
        <TextBlock Text="この幅で検証します" Width="200" Background="Aqua" />
        <TextBlock Text="元の文字列" />
        <TextBlock Text="red fox, Blandford's fox, pale fox" />
        <TextBlock Text="アカギツネ、アフガニスタンキツネ、オグロスナギツネ" />
        <TextBlock Text="red fox,Blandford's fox,pale fox" />
        <TextBlock FontSize="14" />
        <TextBlock Text="設定しない場合" />
        <TextBlock Text="red fox, Blandford's fox, pale fox" Width="200" Background="Aqua" />
        <TextBlock Text="アカギツネ、アフガニスタンキツネ、オグロスナギツネ" Width="200" Background="Aqua" />
        <TextBlock Text="red fox,Blandford's fox,pale fox" Width="200" Background="Aqua" />
        <TextBlock FontSize="14" />
        <TextBlock Text="CharacterEllipsis設定した場合" />
        <TextBlock Text="red fox, Blandford's fox, pale fox" Width="200" Background="Aqua"
                   TextTrimming="WordEllipsis" />
        <TextBlock Text="アカギツネ、アフガニスタンキツネ、オグロスナギツネ" Width="200" Background="Aqua"
                   TextTrimming="WordEllipsis" />
        <TextBlock Text="red fox,Blandford's fox,pale fox" Width="200" Background="Aqua"
                   TextTrimming="WordEllipsis" />
    </StackPanel>
</Window>
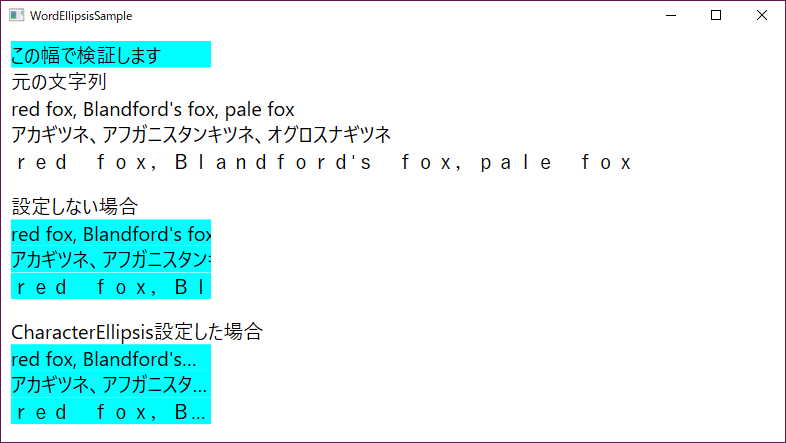
上の結果からTextTrimmingプロパティにWordEllipsisを設定した時は、
単語単位でできる限り多く表示し、収まらないない場合末尾に"..."が表示され、
それ以降の文字は表示されないことが確認できました。
CharacterEllipsis設定時と違うことは1文字単位では省略しないということが確認できました。
3. 自分でカスタムしたい(自作Converter)
多くの場合は、前述のTextTrimmingの設定だけで済むと思いますが中には、末尾に表示される文字を"..."ではなく"(略"みたいな感じで
表示させたい場合もあるかと思います。というわけで自分で指定文字以降は省略などのカスタムしたい場合はConverterを使用します。
また、TextBlockのフォントサイズ等の書式設定も文字列の幅計算時に必要になるため、複数のオブジェクトをバインドさせるためにMultiBindingを使用します。
Converterとは?という方はこちらのサイトで紹介されているのでご覧ください。
MultiBindingとは?という方はこちらのサイトで紹介されているのでご覧ください。
では、xamlを示します。
<Window x:Class="TextBlockTrimmingSample.CustomizeEllipsisSample"
        xmlns="http://schemas.microsoft.com/winfx/2006/xaml/presentation"
        xmlns:x="http://schemas.microsoft.com/winfx/2006/xaml"
        xmlns:d="http://schemas.microsoft.com/expression/blend/2008"
        xmlns:mc="http://schemas.openxmlformats.org/markup-compatibility/2006"
        xmlns:local="clr-namespace:TextBlockTrimmingSample"
        mc:Ignorable="d"
        Title="CustomizeEllipsisSample" Height="450" Width="800">

    <Window.Resources>
        <local:TextBlockTrimmingConverter x:Key="TextBlockTrimmingConverter" />
        <Style TargetType="{x:Type TextBlock}">
            <Setter Property="FontSize" Value="20" />
            <Setter Property="HorizontalAlignment" Value="Left" />
        </Style>
    </Window.Resources>

    <!-- DataContextに設定されているインスタンス -->
    <Window.DataContext>
        <local:CustomTrimmingViewModel />
    </Window.DataContext>

    <StackPanel HorizontalAlignment="Left" Margin="10">
        <TextBlock Text="この幅で検証します" Width="200" Background="Aqua" />
        <TextBlock Text="元の文字列" />
        <TextBlock Text="red fox, Blandford's fox, pale fox" />
        <TextBlock Text="アカギツネ、アフガニスタンキツネ、オグロスナギツネ" />
        <TextBlock Text="red fox,Blandford's fox,pale fox" />
        <TextBlock FontSize="14" />
        <TextBlock Text="設定しない場合" />
        <TextBlock Text="red fox, Blandford's fox, pale fox" Width="200" Background="Aqua" />
        <TextBlock Text="アカギツネ、アフガニスタンキツネ、オグロスナギツネ" Width="200" Background="Aqua" />
        <TextBlock Text="red fox,Blandford's fox,pale fox" Width="200" Background="Aqua" />
        <TextBlock FontSize="14" />
        <TextBlock Text="Converterを使用した場合" />
        <TextBlock Width="200" Background="Aqua">
            <TextBlock.Text>
                <MultiBinding Converter="{StaticResource TextBlockTrimmingConverter}" >
                    <!-- EnglishWordはCustomViewModelに記述されています。 -->
                    <Binding Path="EnglishWord" />
                    <Binding Path="ActualWidth" RelativeSource="{RelativeSource Mode=Self}" />
                    <Binding RelativeSource="{RelativeSource Mode=Self}" />
                </MultiBinding>
            </TextBlock.Text>
        </TextBlock>
        <TextBlock Width="200" Background="Aqua" >
            <TextBlock.Text>
                <MultiBinding Converter="{StaticResource TextBlockTrimmingConverter}" >
                    <!-- JapaneseWordはCustomViewModelに記述されています。 -->
                    <Binding Path="JapaneseWord" />
                    <Binding Path="ActualWidth" RelativeSource="{RelativeSource Mode=Self}" />
                    <Binding RelativeSource="{RelativeSource Mode=Self}" NotifyOnTargetUpdated="False" />
                </MultiBinding>
            </TextBlock.Text>
        </TextBlock>
        <TextBlock Width="200" Background="Aqua" >
            <TextBlock.Text>
                <MultiBinding Converter="{StaticResource TextBlockTrimmingConverter}" >
                    <!-- FullWidthEnglishWordはCustomViewModelに記述されています。 -->
                    <Binding Path="FullWidthEnglishWord" />
                    <Binding Path="ActualWidth" RelativeSource="{RelativeSource Mode=Self}" />
                    <Binding RelativeSource="{RelativeSource Mode=Self}" NotifyOnTargetUpdated="False" />
                </MultiBinding>
            </TextBlock.Text>
        </TextBlock>
    </StackPanel>
</Window>
上記では、MultibindingをTextBlockのTextプロパティに使用していますが、Convereterにはここで記述した順番でvalues配列に詰められますので、記述する順番に注意してください。
EnglishWordが設定されているTextBlockのMultiBindingのvalues配列の詰められる内容です。
| index | values[index] |
|---|---|
| 0 | EnglishWord |
| 1 | ActualWidth |
| 2 | TextBlock |
また、TextBlockからActualWidthプロパティを取得することは可能ですが、それだとConverter処理時ActualWidthに0が入っていることがあり適切な処理ができなかったので、ActualWidthプロパティだけ別にバインドしています。
以下にCustomTrimmingViewModelクラスを示します。
using System.ComponentModel;
using System.Runtime.CompilerServices;
using System.Windows;

namespace TextBlockTrimmingSample
{
    // バインド用のViewModel
    public class CustomTrimmingViewModel : INotifyPropertyChanged
    {
        public CustomTrimmingViewModel()
        {
        }

        private string englishWord = "red fox, Blandford's fox, pale fox";
        public string EnglishWord
        {
            get { return englishWord; }
            set { englishWord = value; this.OnPropertyChanged(); }
        }

        private string japaneseWord = "アカギツネ、アフガニスタンキツネ、オグロスナギツネ";
        public string JapaneseWord
        {
            get { return japaneseWord; }
            set { japaneseWord = value; this.OnPropertyChanged(); }
        }

        private string fullWidthEnglishWord = "red fox,Blandford's fox,pale fox";
        public string FullWidthEnglishWord
        {
            get { return fullWidthEnglishWord; }
            set { fullWidthEnglishWord = value; this.OnPropertyChanged(); }
        }

        public event PropertyChangedEventHandler PropertyChanged;
        private void OnPropertyChanged([CallerMemberName] string name = null)
        {
            this.PropertyChanged?.Invoke(this, new PropertyChangedEventArgs(name));
        }
    }
}
行っていることは文字列を設定し表示しているだけです。今回は1度設定したら文字列は変更していないので、INotifyPropertyChangedの実装も要らないと思います。
では最後にTextBlockTrimmingConverterクラスを記載します。
using System;
using System.Globalization;
using System.Windows.Controls;
using System.Windows.Data;
using System.Windows.Media;

namespace TextBlockTrimmingSample
{
    class TextBlockTrimmingConverter : IMultiValueConverter
    {
        // ViewModel -> Viewの通知が動作した時処理されるConverter
        public object Convert(object[] values, Type targetType, object parameter, CultureInfo culture)
        {
            if (values[0] is string == false) throw new ArgumentException("第1引数がstring型ではありません。");
            if (values[1] is double == false) throw new ArgumentException("第2引数がdouble型ではありません。");
            if (values[2] is TextBlock == false) throw new ArgumentException("第3引数がTextBlock型ではありません。");

            var str = values[0] as string;
            var actualWidth = (double)values[1];
            var textBlock = values[2] as TextBlock;

            double displayWidth = actualWidth - 10;
            double currentWidth = GetDrawingWidth(str, textBlock);

            // 省略時に末尾に設定する文字列
            string ellipsis = "(略";
            // Xaml側でConverterParameterに"(略"を設定している場合は以下でも処理できました
            // string ellipsis = (string)parameter;

            if (string.IsNullOrWhiteSpace(str) || displayWidth <= 0)
            {
                return str + ellipsis;
            }

            if (currentWidth < displayWidth)
            {
                return str;
            }
            else
            {
                string trimmedText = str;
                while (currentWidth > displayWidth)
                {
                    trimmedText = trimmedText.Substring(0, trimmedText.Length - 1);
                    currentWidth = this.GetDrawingWidth(trimmedText + ellipsis, textBlock);
                    if (string.IsNullOrWhiteSpace(trimmedText))
                    {
                        break;
                    }
                }

                return trimmedText + ellipsis;
            }
        }

        // 実際の書式設定で文字列の描画幅を取得します
        private double GetDrawingWidth(string str, TextBlock textBlock)
        {
            var formattedText = new FormattedText(
                str,
                CultureInfo.CurrentCulture,
                textBlock.FlowDirection,
                new Typeface(textBlock.FontFamily, textBlock.FontStyle, textBlock.FontWeight, textBlock.FontStretch),
                textBlock.FontSize,
                textBlock.Foreground);

            return formattedText.Width;
        }

        // View -> ViewModelの通知が動作した時処理されるConverter
        public object[] ConvertBack(object value, Type[] targetTypes, object parameter, CultureInfo culture)
        {
            throw new NotImplementedException();
        }
    }
}
MultiBindingのConverterに設定する場合はIMultiValueConverterを実装しなければなりません。
上記の設定では、省略時に末尾に設定する文字列を直接設定していますが、ソース内のコメントに書いている通りxaml側でConverterParameterに設定しても同じように表示されました。
以下に設定例を記載します。
        <TextBlock Width="200" Background="Aqua" >
            <TextBlock.Text>
                <!--                                                                    ↓変更点はここです    -->
                <MultiBinding Converter="{StaticResource TextBlockTrimmingConverter}" ConverterParameter="(略" >
                    <!-- FullWidthEnglishWordはCustomViewModelに記述されています。 -->
                    <Binding Path="FullWidthEnglishWord" />
                    <Binding Path="ActualWidth" RelativeSource="{RelativeSource Mode=Self}" />
                    <Binding RelativeSource="{RelativeSource Mode=Self}" NotifyOnTargetUpdated="False" />
                </MultiBinding>
            </TextBlock.Text>
        </TextBlock>
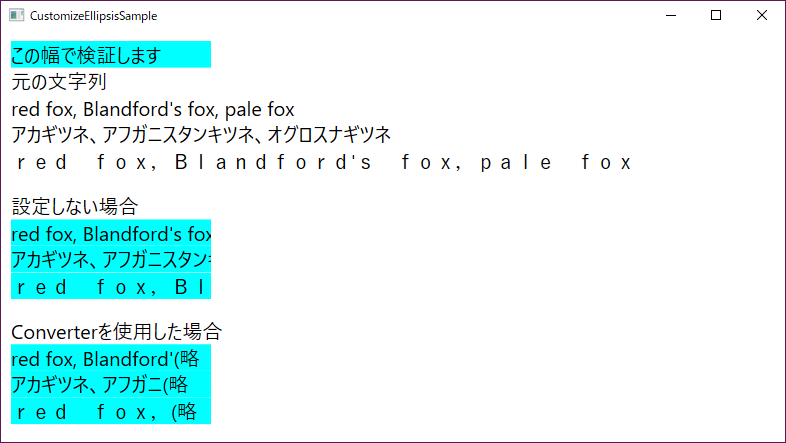
上記の結果から、省略記号をMultiBindingとConverterでカスタムすることができることが確認できました。
ただ、今の文字列省略判定処理は判定を範囲内に収まるまで最後尾から1文字ずつ削る処理を繰り返しているので、設定される文字列が多くなればなるほど、重くなります。
なので2分探索等の探索アルゴリズムを採用された方が早くなると思います。
まとめ
- TextTrimmingプロパティにCharacterEllipsisを設定した場合、1文字でも多く表示し
収まらないない場合末尾に"..."が表示されます - TextTrimmingプロパティにWordEllipsisを設定した場合、単語単位でできる限り多く表示し
収まらないない場合末尾に"..."が表示されます - 自分でカスタマイズする場合はMultiBindingとConverterを使用し、自作します
※ Multibindingは記述された順番にオブジェクトがvalues配列に詰められていますので、
Converterを使用するときは記述する順番に注意してください。
省略関係で役に立つかもしれないサイト
調べている中で見かけた省略処理関係で役に立つかもしれないサイトのURLも記載しておきます。
- コンテンツエリアがいっぱいになった時にだけ ToolTip を表示する
- TextTrimmingプロパティを設定時、省略後の文字を取得したい
- 文字列の末尾ではなく先頭を省略したい(...こんな感じ)
- 省略記号の代わりに画像を使用したい
- DataGridのセル内にTextBlockを使用し省略機能を追加する
参考サイト
- WPFのデータ変換(https://qiita.com/paralleltree/items/449a96debdade0adb377)
- MultiBindingの使い方と使いどころ(http://joynote.hatenablog.com/entry/2015/06/30/005222)
- Typefaceについて(https://docs.microsoft.com/ja-jp/dotnet/api/system.windows.media.typeface?view=netframework-4.7.2)
- .Netのソースコードを読む(https://qiita.com/Marimoiro/items/e255eecc265cd5a45025)
- INotifyPropertyChanged(https://docs.microsoft.com/ja-jp/dotnet/api/system.componentmodel.inotifypropertychanged?view=netframework-4.7.2)
- IMultiValueConverter(https://docs.microsoft.com/ja-jp/dotnet/api/system.windows.data.imultivalueconverter?view=netframework-4.7.2)
- 2分探索(https://ja.wikipedia.org/wiki/%E4%BA%8C%E5%88%86%E6%8E%A2%E7%B4%A2)
- キツネ-Wikipedia-(https://ja.wikipedia.org/wiki/%E3%82%AD%E3%83%84%E3%83%8D)
雑感
自分で省略記号をカスタムする方法がConverter以外にありましたら教えていただけると嬉しいです。![]()
中身が薄い記事でも時間はかかりますね。。。1
ちなみに省略時に使用される三点リーダのunicodeは\x2026みたいです。2
参考URL : https://referencesource.microsoft.com/#PresentationCore/Core/CSharp/System/Windows/Media/TextFormatting/TextTrailingWordEllipsis.cs,f319f4c292028bf3,references
※ソースコードは自己責任でご自由にご利用ください


