はじめに
VSCodeの拡張機能である、Remote Containersを使って、Goの開発環境を構築したら快適だったので、紹介します。
尚、VSCodeおよび、Docker Desktopのインストール方法については割愛します。
Remote Containers
Remote Containersとは、VSCodeのリモート開発機能のうち、Dockerに特化した拡張機能です。
他にもSSH経由でリモート接続する「Remote SSH」、WSL(Windows Subsystem for Linux)を使用してリモート接続する「Remote WSL」があるようです。
ローカルのVSCodeからVSCodeServerを介して、Dockerコンテナにリモート接続することで、ローカル環境とは切り離された環境で開発をすることが可能です。
つまり、Docker上で、全てが完結するため、コード補完などの恩恵を受けつつ、ローカル環境を汚さなくて良い素晴らしい機能です。
※公式サイト
※2020年10月時点ではプレビュー版となります。
インストール
VSCodeのExtentionsからRemote Containersを検索してインストールします。

初期設定
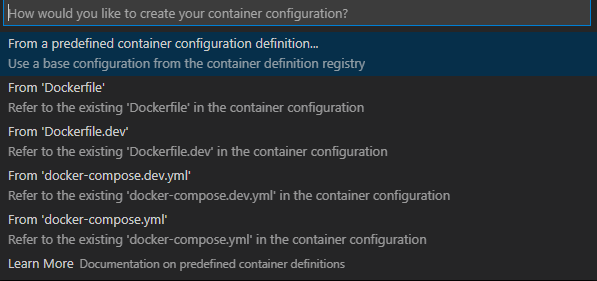
Ctrl + Shift + Pでメニューを出して、
Remote-Containers:Add Development Cotainers Configuration Files...を選択します。

私の環境ではすでにdocker-compose.yml及びDockerFileで環境を構築しているため、そちらの設定を元に初期設定を行うことができます。
また、From a predefined container configuration definition...を選択すると、あらかじめ用意されている、設定を使用することも可能です。
今回は、既存のdocker-composeファイルを使用して初期設定を行います。

.devcontainer
初期設定をすると.devcontainerフォルダが自動的に作成され、配下に
・devcontainer.json
・docker-compose.yml
が自動生成されます。
devcontainer.jsonが設定ファイルになります。
ここで、現在のディレクトリ構造は以下のようになりました。
- .devcontainer
 ├ devcontainer.json
  └ docker-compose.yml
- sample
  └ ソースコード
- docker-compose.yml
- docker-compose.dev.yml
- Dockerfile
- Dockerfile.dev
自動生成されたファイルは以下。
// If you want to run as a non-root user in the container, see .devcontainer/docker-compose.yml.
{
	"name": "Existing Docker Compose (Extend)",

	// Update the 'dockerComposeFile' list if you have more compose files or use different names.
	// The .devcontainer/docker-compose.yml file contains any overrides you need/want to make.
	"dockerComposeFile": [
		"..\\docker-compose.dev.yml",
		"docker-compose.yml"
	],

	// The 'service' property is the name of the service for the container that VS Code should
	// use. Update this value and .devcontainer/docker-compose.yml to the real service name.
	"service": "sample",

	// The optional 'workspaceFolder' property is the path VS Code should open by default when
	// connected. This is typically a file mount in .devcontainer/docker-compose.yml
	"workspaceFolder": "/workspace",

	// Set *default* container specific settings.json values on container create.
	"settings": {
		"terminal.integrated.shell.linux": null
	},

	// Add the IDs of extensions you want installed when the container is created.
	"extensions": []

	// Use 'forwardPorts' to make a list of ports inside the container available locally.
	// "forwardPorts": [],

	// Uncomment the next line if you want start specific services in your Docker Compose config.
	// "runServices": [],

	// Uncomment the next line if you want to keep your containers running after VS Code shuts down.
	// "shutdownAction": "none",

	// Uncomment the next line to run commands after the container is created - for example installing curl.
	// "postCreateCommand": "apt-get update && apt-get install -y curl",

	// Uncomment to connect as a non-root user if you've added one. See https://aka.ms/vscode-remote/containers/non-root.
	// "remoteUser": "vscode"
}
version: '3'
services:
  # Update this to the name of the service you want to work with in your docker-compose.yml file
  sample:
    # If you want add a non-root user to your Dockerfile, you can use the "remoteUser"
    # property in devcontainer.json to cause VS Code its sub-processes (terminals, tasks,
    # debugging) to execute as the user. Uncomment the next line if you want the entire
    # container to run as this user instead. Note that, on Linux, you may need to
    # ensure the UID and GID of the container user you create matches your local user.
    # See https://aka.ms/vscode-remote/containers/non-root for details.
    #
    # user: vscode

    # Uncomment if you want to override the service's Dockerfile to one in the .devcontainer
    # folder. Note that the path of the Dockerfile and context is relative to the *primary*
    # docker-compose.yml file (the first in the devcontainer.json "dockerComposeFile"
    # array). The sample below assumes your primary file is in the root of your project.
    #
    # build:
    #   context: .
    #   dockerfile: .devcontainer/Dockerfile

    volumes:
      # Update this to wherever you want VS Code to mount the folder of your project
      - .:/workspace:cached

      # Uncomment the next line to use Docker from inside the container. See https://aka.ms/vscode-remote/samples/docker-from-docker-compose for details.
      # - /var/run/docker.sock:/var/run/docker.sock

    # Uncomment the next four lines if you will use a ptrace-based debugger like C++, Go, and Rust.
    # cap_add:
    #   - SYS_PTRACE
    # security_opt:
    #   - seccomp:unconfined

    # Overrides default command so things don't shut down after the process ends.
    command: /bin/sh -c "while sleep 1000; do :; done"
※一旦ファイルは生成されたものの、私は、docker-compose.ymlの2重管理になってしまうのが嫌だったので、.devcontainer配下のdocker-compose.ymlに全てを移しました。
Go向け設定
Goを開発するための設定を加えていきます。
extensions
ローカルにインストールしたVSCodeの拡張機能は、リモートコンテナ内部では使用できないので、コンテナ起動時に、自動的にインストールする拡張機能を設定します。
Goの拡張機能を入れます。この文字列は、拡張機能一覧で右クリックCopy Extension Idから取得できます。
	"extensions": [
		"golang.go"
	]
settings
goplsを使用するので、githubを参考に、設定を追加します。
Gomod設定(GO111MODULE)に関しては、1.13以降不要となりましたが、設定しないとimport文にエラーが出てしまうので、設定します。
"settings": {
		"terminal.integrated.shell.linux": "/bin/bash",
		"go.useLanguageServer": true,
		"[go]": {
			"editor.formatOnSave": true,
			"editor.codeActionsOnSave": {
				"source.organizeImports": true,
			},
			// Optional: Disable snippets, as they conflict with completion ranking.
			"editor.snippetSuggestions": "none",
		},
		"[go.mod]": {
			"editor.formatOnSave": true,
			"editor.codeActionsOnSave": {
				"source.organizeImports": true,
			},
		},
		"gopls": {
			// Add parameter placeholders when completing a function.
			"usePlaceholders": true,
			// If true, enable additional analyses with staticcheck.
			// Warning: This will significantly increase memory usage.
			"staticcheck": false,
		},
		"go.toolsEnvVars":{
			"GO111MODULE":"on"
		}
	}
workspaceFolder
リモートコンテナ起動時のワークスペースを設定します。
docker-compose.yml側で、ボリュームを/go/src/配下にマウントするので、ワークスペースもそれに合わせて変更します。
"workspaceFolder": "/go/src/sample",
以上で設定は終了です。
起動
実際にコンテナを起動します。
Ctrl+Shift+Pから、Remote-Containers:Reopen in Containerを選択

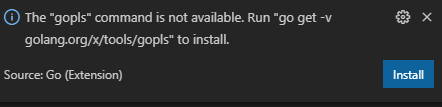
初回起動時では、ツール類が/go/binにインストールされていないのでインストールします。
goplsを使用するので、以下の通知からインストールするか、
go get -v golang.org/x/tools/goplsを実行します
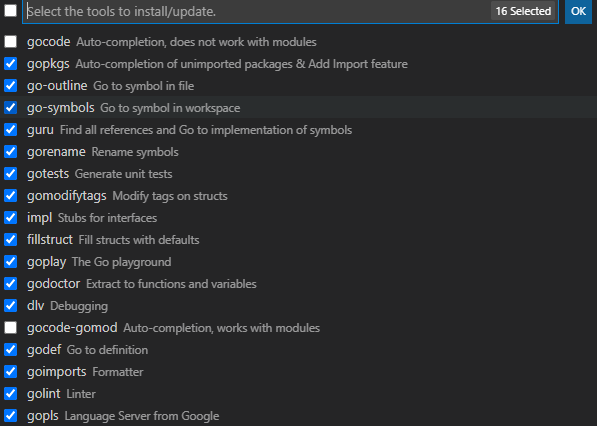
その他ツールに関しては、Go:Install/Update Toolsからgocodeとgocode-gomod以外をインストールします。

/go/bin配下に全てインストールされていることが確認できました。

ここまでで、コンテナ上で開発することができるようになります。
当然ながら、コンテナ単位での管理となるため、コンテナの削除を行うと、インストールしたものについては、消えるので、再設定が必要となります。
デバッグ
コンテナ内でのデバッグも可能です。
マウントした、ソースコードと同じディレクトリに.vscodeフォルダを作成して、launch.jsonを作成します。
{
    "version": "0.2.0",
    "configurations": [
        {
            "name": "Remote",
            "type": "go",
            "request": "launch",
            "host": "localhost",
            "program": "${workspaceRoot}",
            "args": []
        }
    ]
}
まとめ
最終的に作成したファイルを記載しておきます。何かのご参考になれば幸いです。
{
	"name": "Existing Docker Compose (Extend)",
	"dockerComposeFile": [
		"docker-compose.yml"
	],
	"service": "sample",
	"workspaceFolder": "/go/src/sample",
	"settings": {
		"terminal.integrated.shell.linux": "/bin/bash",
		"go.useLanguageServer": true,
		"[go]": {
			"editor.formatOnSave": true,
			"editor.codeActionsOnSave": {
				"source.organizeImports": true,
			},
			"editor.snippetSuggestions": "none",
		},
		"[go.mod]": {
			"editor.formatOnSave": true,
			"editor.codeActionsOnSave": {
				"source.organizeImports": true,
			},
		},
		"gopls": {
			"usePlaceholders": true,
			"staticcheck": false,
		},
		"go.toolsEnvVars":{
			"GO111MODULE":"on"
		}
	},
	"extensions": [
		"golang.go"
	]
}
version: '3'
services:
  # Update this to the name of the service you want to work with in your docker-compose.yml file
  sample:
    image: golang:1.14
    volumes:
      - ./../:/go/src/:cached
    tty: true
    environment:
      - MYSQL_CONNECTION_STRING=${CONNECTION_STRING}
    networks:
      - default
      - db-network
networks:
  db-network:
    external: true
参考
- Go勉強(1) mac+VSCode+Go環境を設定:https://qiita.com/oruharo/items/545378eae5c707f717ed
- VS Code Dev Container Guidebook:https://techbookfest.org/product/4696850535809024?productVariantID=5428870601768960