前回に引き続き、今回は Docker for AWS で生成される swarm クラスタで実際に
アプリを起動させたりスケールさせたりしてみます。
( 8月1日出版予定の AWS 本で ECS や ECR の章書きました!
AWS での Docker 利用の手引きにぜひご参照ください)
目次
通常の Swarm クラスタとの違いは、docker service をご覧ください。
- Swarm マネージャに接続する
- docker node
- docker service
- 続編..
Swarm マネージャに接続する
2 つ方法 があります(いずれも Docker を利用する上で一般的1 なもので
Docker for AWS や Swarm クラスタならではというわけではありません)。
- Docker ホストに SSH ログインして、ホストの Docker クライアントから直接操作
- SSH トンネルを利用して、ローカルの Docker クライアントから Swarm マネージャを操作
方法 1. SSH ログイン
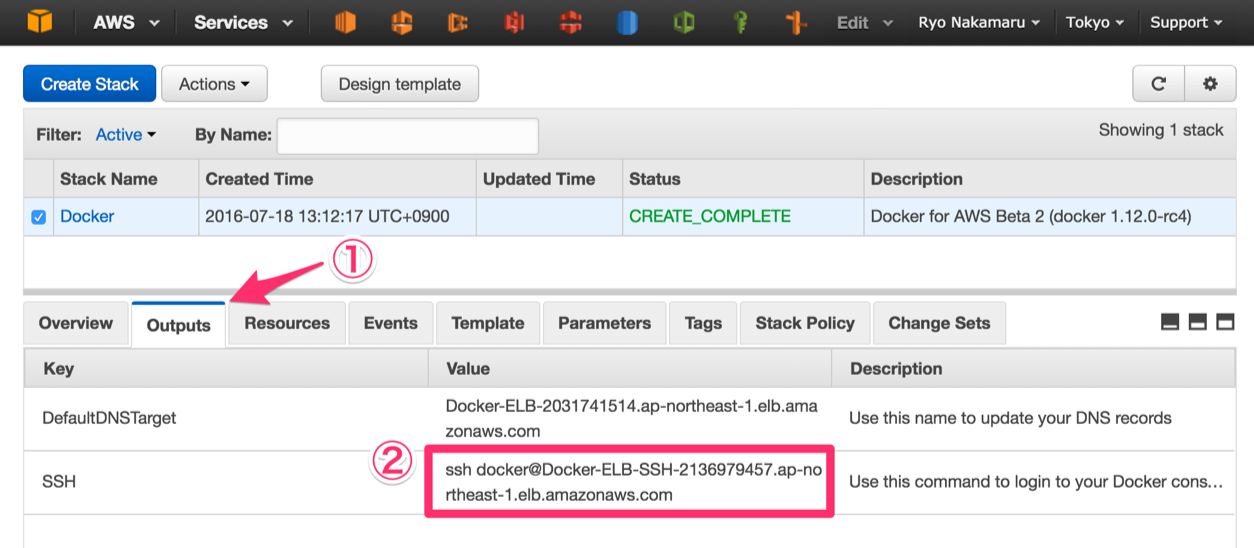
SSH の接続先は、前回の構成図にある通り、SSH 用の ELB エンドポイントです2。
1. CloudFormation でスタックが CREATE_COMPLETE になったら Outputs を覗きます
2. SSH 行、Value 列の SSH コマンドをコピーしましょう
3. コピーした ELB のエンドポイントが <ssh-host-name> だとして、
CloudFormation 実行時に指定した キーペアも -i で渡し、以下のコマンドを実行します
$ ssh -i docker.pem docker@<ssh-host-name>

Welcome to Docker!
~ $
4. 接続確認
~ $ docker version

Client:
 Version:      1.12.0-rc4
 API version:  1.24
 Go version:   go1.6.2
 Git commit:   e4a0dbc
 Built:        Wed Jul 13 03:28:51 2016
 OS/Arch:      linux/amd64
 Experimental: true

Server:
 Version:      1.12.0-rc4
 API version:  1.24
 Go version:   go1.6.2
 Git commit:   e4a0dbc
 Built:        Wed Jul 13 03:28:51 2016
 OS/Arch:      linux/amd64
 Experimental: true
方法 2. SSH トンネル
こちらは OpenSSH 6.7 以降3 可能な方法です。
1. トンネルを掘ります
$ ssh -i docker.pem -NL localhost:2374:/var/run/docker.sock docker@<ssh-host-name> &
2. docker -H localhost:2374 ps などと、都度のホスト指定が嫌なら環境変数をセット
$ DOCKER_HOST="localhost:2374"
3. 接続確認
$ docker version
docker node
ノード一覧
docker node ls で Swarm クラスタのノード一覧が返ってきます。
$ docker node ls

ID                           HOSTNAME                                          MEMBERSHIP  STATUS  AVAILABILITY  MANAGER STATUS
1liubx22e0l66dodtsyum0lug    ip-192-168-33-30.ap-northeast-1.compute.internal  Accepted    Ready   Active
1omamwirdem28ktytpucw3m73    ip-192-168-33-29.ap-northeast-1.compute.internal  Accepted    Ready   Active
2xt623cbm1riexpus7w92tg3j *  ip-192-168-33-53.ap-northeast-1.compute.internal  Accepted    Ready   Active        Leader
489thmtfpn5zfj63i5022b1hf    ip-192-168-34-87.ap-northeast-1.compute.internal  Accepted    Ready   Active
docker node ls コマンドを受け付けたマネージャノードの行は、ID 列に * が付いています。また、上記は ManagerSize を 1、ClusterSize を 3 台で CloudFormation スタックを生成した結果ですが、マネージャが複数の場合リーダー以外のノードでは MANAGER 列には * がつきます。
ノードの詳細確認
試しに、マネージャノードの詳細を確認してみましょう。マネージャノードの ID を使い docker node inspect します。(Docker のよくある API 同様、ID は一意なら短い指定でも OK)
$ docker node inspect 2xt

[
    {
        "ID": "2xt623cbm1riexpus7w92tg3j",
        "Version": {
            "Index": 10
        },
        "CreatedAt": "2016-07-18T04:18:44.240072915Z",
        "UpdatedAt": "2016-07-18T04:18:44.52518808Z",
        "Spec": {
            "Role": "manager",
            "Membership": "accepted",
            "Availability": "active"
        },
        "Description": {
            "Hostname": "ip-192-168-33-53.ap-northeast-1.compute.internal",
            "Platform": {
                "Architecture": "x86_64",
                "OS": "linux"
            },
            "Resources": {
                "NanoCPUs": 1000000000,
                "MemoryBytes": 1041694720
            },
            "Engine": {
                "EngineVersion": "1.12.0-rc4",
                "Plugins": [
                  ...
                ]
            }
        },
        "Status": {
            "State": "ready"
        },
        "ManagerStatus": {
            "Leader": true,
            "Reachability": "reachable",
            "Addr": "192.168.33.53:2377"
        }
    }
]
結果の JSON をみておわかりのように、ID を複数並べれば、複数分の情報が返ります。
また、docker inspect 同様、--format オプションでデータの絞り込みが使えます。
検査対象が自分自身なら self を使うといったこともできます。
$ docker node inspect --format '{{ .ManagerStatus.Addr }}' self

192.168.33.53:2377
ノードの更新
追い追い、サービスを起動するノードに制約を設けるために docker node update コマンドを使おうと思ったのですが、ドキュメントに反してまだラベルの更新には対応していない模様。(by using the docker node update command って書いてあるのに..)
仕方がないので、後ほどドレインしてみます。敵から HP を吸収する某魔法を毎回思い出してしまう私ですが、Swarm のドレインは、ほぼ Kubernetes のドレインです。ECS にもほしいなあ。
docker service
Swarm は サービス という単位で、その生成・更新・スケールイン / アウトが行えます。
docker run で起動する通常のコンテナとは違い、サービスとして起動したコンテナには
スケールアウトやローリングアップデートといった便利な機能が付加されます。
例えば Nginx や Redis はいずれももちろん docker run でも起動しますが
サービスとして起動すれば、とても簡単にスケールアウトできるようになります。
サービスの起動
さていよいよ、Docker for AWS の一番盛り上がるところです!
Swarm マネージャにサービスの生成を依頼してみましょう。
$ docker service create --name hello -p 80:80 dockercloud/hello-world
コマンドは一瞬で返ってきますが、裏でイメージの pull などをせっせと頑張っています。
そして・・・

・・・自動的に追加された!!
Description タブから DNS name のエンドポイントをブラウザで開くと、

Hello world〜
では調子に乗って「Alpine Linux で軽量な Docker イメージを作る」にある
軽量イメージなどから、いくつかそれのみで動くサービスを起動してみます。
$ docker service create --name mysql -p 3306:3306 -e MYSQL_USER=test -e MYSQL_PASSWORD=test -e MYSQL_DATABASE=db mysql:5.7
$ docker service create --name postgres -p 5432:5432 -e POSTGRES_USER=test -e POSTGRES_PASSWORD=test -e POSTGRES_DB=db kiasaki/alpine-postgres
$ docker service create --name redis -p 6379:6379 redis:3.0-alpine
$ docker service create --name nginx -p 8080:80 nginx:1.11-alpine
$ docker service create --name php -p 10080:80 pottava/php:5.6
すると、ELB のリスナーはこうなります。

おもしろいですね。もちろん、各サービスはいつものように使えます。
$ SERVICE_HOST=<ELB のエンドポイント>
$ mysql -h $SERVICE_HOST -u test -p db
$ psql -h $SERVICE_HOST -d db -U test
$ redis-cli -h $SERVICE_HOST
$ curl -i $SERVICE_HOST:8080
$ curl -i $SERVICE_HOST:10080
サービスの一覧・詳細表示
docker service ls でサービス一覧を取得してみます。
$ docker service ls

ID            NAME      REPLICAS  IMAGE                    COMMAND
0l6soy9e1dd3  mysql     1/1       mysql:5.7
4bs6bm51eeal  nginx     1/1       nginx:1.11-alpine
7e6v87yy1lav  hello     1/1       dockercloud/hello-world
7sz1yy4hsg9a  redis     1/1       redis:3.0-alpine
ck5fydfm2oaj  php       1/1       pottava/php:5.6
ejbdhcm735h4  postgres  1/1       kiasaki/alpine-postgres
docker service inspect で hello サービスの詳細を確認しましょう。
$ docker service inspect hello

[
    {
        "ID": "7e6v87yy1lavv3jrfie5d4ov2",
        "Version": {
            "Index": 42
        },
        "CreatedAt": "2016-07-18T07:24:25.085911486Z",
        "UpdatedAt": "2016-07-18T07:37:55.512100018Z",
        "Spec": {
            "Name": "hello",
            "TaskTemplate": {
                "ContainerSpec": {
                    "Image": "dockercloud/hello-world"
                },
                "Resources": {
                    "Limits": {},
                    "Reservations": {}
                },
                "RestartPolicy": {
                    "Condition": "any",
                    "MaxAttempts": 0
                },
                "Placement": {}
            },
            "Mode": {
                "Replicated": {
                    "Replicas": 1
                }
            },
            "UpdateConfig": {},
            "EndpointSpec": {
                "Mode": "vip",
                "Ports": [
                    {
                        "Protocol": "tcp",
                        "TargetPort": 80,
                        "PublishedPort": 80
                    }
                ]
            }
        },
        "Endpoint": {
            "Spec": {
                "Mode": "vip",
                "Ports": [
                    {
                        "Protocol": "tcp",
                        "TargetPort": 80,
                        "PublishedPort": 80
                    }
                ]
            },
            "Ports": [
                {
                    "Protocol": "tcp",
                    "TargetPort": 80,
                    "PublishedPort": 80
                }
            ],
            "VirtualIPs": [
                {
                    "NetworkID": "1yaai0qnqhby71xdetn1yrlri",
                    "Addr": "10.255.0.7/16"
                }
            ]
        }
    }
]
Docker v1.12 で導入された内部ロードバランサ4 によって、難しい環境設定などなしに
コンテナではなくサービスごとに公開ポートを用意できていることが見てとれます。
$ docker service inspect --format '{{ range .Endpoint.Ports }}{{ .PublishedPort }}{{ end }}' hello

80
サービスのスケール
引き続き、サービスを docker service scale でスケールさせてみましょう。
$ docker service scale hello=10

hello scaled to 10
しばらくすると、レプリカ数が増えています。
$ docker service inspect --format '{{ .Spec.Mode.Replicated.Replicas }}' hello

10
実際に、コンテナが 10 こにスケールしたことを確かめましょう。
以下のコマンドを何度も投げると、ホスト名が変わることが確認できます。
$ curl -s docker-elb-2031741514.ap-northeast-1.elb.amazonaws.com | grep host

	<h3>My hostname is 808e0322e5c7</h3>	</body>
・・これ、ECS だとできないやつですね。
そう、ELB 配下のインスタンス数 < コンテナ数 です。
ECS、Swarm モードをとりいれるなどして、動的ポートマッピング早く対応してほしい・・
タスクの一覧
いま 10 こにスケールした hello サービスですが、それぞれのコンテナが
どのホストで動いているかを docker service tasks コマンドで把握しましょう。
$ docker service tasks hello

ID                         NAME      SERVICE  IMAGE                    LAST STATE              DESIRED STATE  NODE
6vlexizzn84zm8fk6tmpulc9f  hello.1   hello    dockercloud/hello-world  Running 2 hours ago     Running        ip-192-168-33-29.ap-northeast-1.compute.internal
5xayab428r6osmutnqp57b9a1  hello.2   hello    dockercloud/hello-world  Running 10 minutes ago  Running        ip-192-168-33-30.ap-northeast-1.compute.internal
1liu4q4drydufsxev01fyoc9k  hello.3   hello    dockercloud/hello-world  Running 10 minutes ago  Running        ip-192-168-34-87.ap-northeast-1.compute.internal
bbamufe9ylyzo1wepd2asjcpl  hello.4   hello    dockercloud/hello-world  Running 10 minutes ago  Running        ip-192-168-33-29.ap-northeast-1.compute.internal
626g75ru8r1vmen17la3u48w5  hello.5   hello    dockercloud/hello-world  Running 10 minutes ago  Running        ip-192-168-33-53.ap-northeast-1.compute.internal
0hl6r1th2dkfwy6rpxgqji73t  hello.6   hello    dockercloud/hello-world  Running 10 minutes ago  Running        ip-192-168-34-87.ap-northeast-1.compute.internal
169g3qbtp2nwvnap8pp90qkgv  hello.7   hello    dockercloud/hello-world  Running 10 minutes ago  Running        ip-192-168-33-30.ap-northeast-1.compute.internal
4zbdkx4d8xp6mllmapn8kvrxw  hello.8   hello    dockercloud/hello-world  Running 10 minutes ago  Running        ip-192-168-33-30.ap-northeast-1.compute.internal
19vcdgfj0vzio7g5d5d0d0mzt  hello.9   hello    dockercloud/hello-world  Running 10 minutes ago  Running        ip-192-168-33-53.ap-northeast-1.compute.internal
8pulhjksyx01junvmvvjuzt4m  hello.10  hello    dockercloud/hello-world  Running 10 minutes ago  Running        ip-192-168-33-29.ap-northeast-1.compute.internal
さてここで、みなさん忘れかけているであろうドレインを実行してみます。
$ docker node ls

ID                           HOSTNAME                                          MEMBERSHIP  STATUS  AVAILABILITY  MANAGER STATUS
1liubx22e0l66dodtsyum0lug    ip-192-168-33-30.ap-northeast-1.compute.internal  Accepted    Ready   Active
1omamwirdem28ktytpucw3m73    ip-192-168-33-29.ap-northeast-1.compute.internal  Accepted    Ready   Active
2xt623cbm1riexpus7w92tg3j *  ip-192-168-33-53.ap-northeast-1.compute.internal  Accepted    Ready   Active        Leader
489thmtfpn5zfj63i5022b1hf    ip-192-168-34-87.ap-northeast-1.compute.internal  Accepted    Ready   Active

$ docker node update --availability drain 1om

1om
しばらくしてタスクをもう一度表示してみましょう。
$ docker service tasks hello

ID                         NAME      SERVICE  IMAGE                    LAST STATE              DESIRED STATE  NODE
6vlexizzn84zm8fk6tmpulc9f  hello.1   hello    dockercloud/hello-world  Running 14 seconds ago  Running        ip-192-168-33-30.ap-northeast-1.compute.internal
5xayab428r6osmutnqp57b9a1  hello.2   hello    dockercloud/hello-world  Running 18 minutes ago  Running        ip-192-168-33-30.ap-northeast-1.compute.internal
1liu4q4drydufsxev01fyoc9k  hello.3   hello    dockercloud/hello-world  Running 18 minutes ago  Running        ip-192-168-34-87.ap-northeast-1.compute.internal
bbamufe9ylyzo1wepd2asjcpl  hello.4   hello    dockercloud/hello-world  Running 14 seconds ago  Running        ip-192-168-33-87.ap-northeast-1.compute.internal
626g75ru8r1vmen17la3u48w5  hello.5   hello    dockercloud/hello-world  Running 18 minutes ago  Running        ip-192-168-33-53.ap-northeast-1.compute.internal
0hl6r1th2dkfwy6rpxgqji73t  hello.6   hello    dockercloud/hello-world  Running 18 minutes ago  Running        ip-192-168-34-87.ap-northeast-1.compute.internal
169g3qbtp2nwvnap8pp90qkgv  hello.7   hello    dockercloud/hello-world  Running 18 minutes ago  Running        ip-192-168-33-30.ap-northeast-1.compute.internal
4zbdkx4d8xp6mllmapn8kvrxw  hello.8   hello    dockercloud/hello-world  Running 18 minutes ago  Running        ip-192-168-33-30.ap-northeast-1.compute.internal
19vcdgfj0vzio7g5d5d0d0mzt  hello.9   hello    dockercloud/hello-world  Running 18 minutes ago  Running        ip-192-168-33-53.ap-northeast-1.compute.internal
8pulhjksyx01junvmvvjuzt4m  hello.10  hello    dockercloud/hello-world  Running 14 seconds ago  Running        ip-192-168-33-53.ap-northeast-1.compute.internal
ip-192-168-33-53 というホストからコンテナがいなくなりました。
地味に裏で動いていた Nginx や PHP コンテナは 1 つだけだったので
しばらく接続できない状態になったかもしれませんが、この hello サービスは
スケールした状態であったためサービスそのものは落とさずにドレインできました。
これで Docker ホストのメンテナンスも簡単ですね!
補足
-
サービス起動時の制約
Specify service constraints を使えばコンテナを起動するホストを制限できます。
これまで使えていた他の制約や affinity はどこにいったのだろうか・・ -
スケジューリング・ストラテジ
CloudFormation で生成された Swarm クラスタのストラテジをどこで変更できるかは不明..
続編
長くなってしまったので、以下はまた次回。次回があれば。
- docker deploy
- クラスタそのものの構成変更
-
Swarm マネージャの起動する AutoScaling グループに ELB が設定されています ↩
-
バージョン不明な方は
ssh -Vなどで ↩ -
参考: Docker ロードバランサ内部実装(次回の JAWS-UG コンテナ支部で登壇くださいます) ↩