はじめに
WPFはC#やVisual Basicでの実装を前提とされている面がありますが、Powshellでの実装もそれなりに対応しています。
自由に言語を選ぶならC#でしょうけど、C#よりPowerShellに触れる機会の多い職種の人もたくさんいますし、プロジェクトによってはC#の開発環境が許可されないなんてことも。最近のWindowsだと、PowerShell 5はデフォルトで入っているんですよね。
ということでPoworShellでのWPFアプリの作成ができると案外便利ですし、割と普通に作れます。
最初の表示
まずは最低限の表示から。
using namespace System.Xml

Add-Type -AssemblyName PresentationFramework
[xml]$xaml = '
<Window xmlns="http://schemas.microsoft.com/winfx/2006/xaml/presentation"
xmlns:x="http://schemas.microsoft.com/winfx/2006/xaml"
Width="100" Height="100">
Hello WPF!!
</Window>'

$nodeReader = (New-Object XmlNodeReader $xaml)
$window = [Windows.Markup.XamlReader]::Load($nodeReader)

$window.ShowDialog()

xamlファイル
XAMLは別ファイルにしておいたほうがいいかもしれません。
方法は簡単です。Get-Contentで呼び出すだけ。
<Window xmlns="http://schemas.microsoft.com/winfx/2006/xaml/presentation"
xmlns:x="http://schemas.microsoft.com/winfx/2006/xaml"
Width="100" Height="100">
Hello WPF!!
</Window>
using namespace System.Xml

Add-Type -AssemblyName PresentationFramework
[xml]$xaml = Get-Content .\wpf-2.xaml
$nodeReader = (New-Object XmlNodeReader $xaml)
$window = [Windows.Markup.XamlReader]::Load($nodeReader)

$window.ShowDialog()
コントロールの取得
$label=$window.FindName("label")
上のようにFindNameメソッドを使えば、コントロールを取得することができ、それに対する操作もできます。
<Window xmlns="http://schemas.microsoft.com/winfx/2006/xaml/presentation"
xmlns:x="http://schemas.microsoft.com/winfx/2006/xaml"
Width="100" Height="100">
    <StackPanel>
        <Label x:Name="label"/>
    </StackPanel>
</Window>
using namespace System.Xml

Add-Type -AssemblyName PresentationFramework
[xml]$xaml = Get-Content .\wpf-3.xaml
$nodeReader = (New-Object XmlNodeReader $xaml)
$window = [Windows.Markup.XamlReader]::Load($nodeReader)

$label=$window.FindName("label")
$label.Content = "Hello"

$window.ShowDialog()

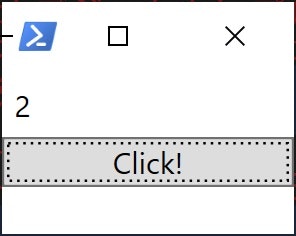
イベント
イベントは、「add_イベント名」というメソッドにスクリプトブロックを引き渡すことによって登録できます。
$button.add_Click({$label.Content++})
これを利用して以下のように書くことができます。
<Window xmlns="http://schemas.microsoft.com/winfx/2006/xaml/presentation"
xmlns:x="http://schemas.microsoft.com/winfx/2006/xaml"
Width="100" Height="100">
    <StackPanel>
        <Label x:Name="label"/>
        <Button x:Name="button">Click!</Button>
    </StackPanel>
</Window>
Add-Type -AssemblyName PresentationFramework
[xml]$xaml = Get-Content .\wpf-4.xaml
$nodeReader = (New-Object XmlNodeReader $xaml)
$window = [Windows.Markup.XamlReader]::Load($nodeReader)
$label=$window.FindName("label")
$button=$window.FindName("button")
$label.Content = 1
$button.add_Click({$label.Content++})
$window.ShowDialog()

↓クリック!
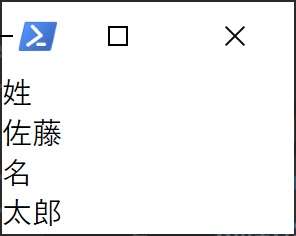
データバインド
データバインドも普通にできます。
PSCustomObjectも普通に使えます。
<Window xmlns="http://schemas.microsoft.com/winfx/2006/xaml/presentation"
xmlns:x="http://schemas.microsoft.com/winfx/2006/xaml"
Width="100" Height="100">
    <StackPanel>
        <TextBlock>姓</TextBlock>
        <TextBlock Text="{Binding LastName}" />
        <TextBlock>名</TextBlock>
        <TextBlock Text="{Binding FirstName}" />
    </StackPanel>
</Window>
Add-Type -AssemblyName PresentationFramework
[xml]$xaml = Get-Content .\wpf-5.xaml
$nodeReader = (New-Object XmlNodeReader $xaml)
$window = [Windows.Markup.XamlReader]::Load($nodeReader)
$window.DataContext = [PSCustomObject]@{
    FirstName = "太郎";
    LastName = "佐藤"
}
$window.ShowDialog()
PowerShellのクラスを使ってもバインドできます。
using namespace System.Xml

Add-Type -AssemblyName PresentationFramework
[xml]$xaml = Get-Content .\wpf-5.xaml
$nodeReader = (New-Object XmlNodeReader $xaml)
$window = [Windows.Markup.XamlReader]::Load($nodeReader)

class PSClass
{
    [string]$FirstName
    [string]$LastName
}

$obj = New-Object PSClass
$obj.FirstName = "太郎"
$obj.LastName = "佐藤"

$window.DataContext = $obj
$window.ShowDialog()
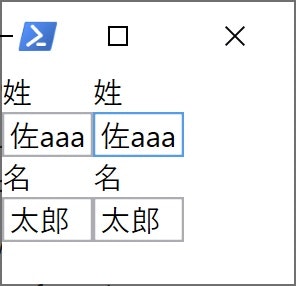
INotifyPropertyChanged
WPFでアプリケーションを実装するにはINotifyPropertyChangedインターフェースを実装することが重要になってきます。
PowerShellでそれを簡単に実現するためにはExpandoObjectを利用するという方法があります。
生成する関数を作っておくとよいでしょう。
function New-ExpandoObject([PSCustomObject]$source){
    $source = [PSCustomObject]$source
    $ret = New-Object ExpandoObject
    $source | Get-Member | ?{$_.MemberType -eq "NoteProperty"} | %{$ret.($_.Name) = $source.($_.Name)}
    return ,$ret
}
ExpandoObjectはINotifyPropertyChangedを実装しているため、データバインドを使ったデータの連携ができます。
<Window xmlns="http://schemas.microsoft.com/winfx/2006/xaml/presentation"
xmlns:x="http://schemas.microsoft.com/winfx/2006/xaml"
Width="100" Height="120">
    <StackPanel Orientation="Horizontal">
        <StackPanel>
            <TextBlock>姓</TextBlock>
            <TextBox Text="{Binding LastName, UpdateSourceTrigger=PropertyChanged}" />
            <TextBlock>名</TextBlock>
            <TextBox Text="{Binding FirstName, UpdateSourceTrigger=PropertyChanged}" />
        </StackPanel>
        <StackPanel>
            <TextBlock>姓</TextBlock>
            <TextBox Text="{Binding LastName, UpdateSourceTrigger=PropertyChanged}" />
            <TextBlock>名</TextBlock>
            <TextBox Text="{Binding FirstName, UpdateSourceTrigger=PropertyChanged}" />
        </StackPanel>
    </StackPanel>
</Window>
using namespace System.Xml
using namespace System.Dynamic

function New-ExpandoObject([PSCustomObject]$source){
    $source = [PSCustomObject]$source
    $ret = New-Object ExpandoObject
    $source | Get-Member | ?{$_.MemberType -eq "NoteProperty"} | %{$ret.($_.Name) = $source.($_.Name)}
    return ,$ret
}

Add-Type -AssemblyName PresentationFramework
[xml]$xaml = Get-Content .\wpf-6.xaml
$nodeReader = (New-Object XmlNodeReader $xaml)
$window = [Windows.Markup.XamlReader]::Load($nodeReader)
$window.DataContext = New-ExpandoObject @{
    FirstName = "太郎";
    LastName = "佐藤"
}
$window.ShowDialog()


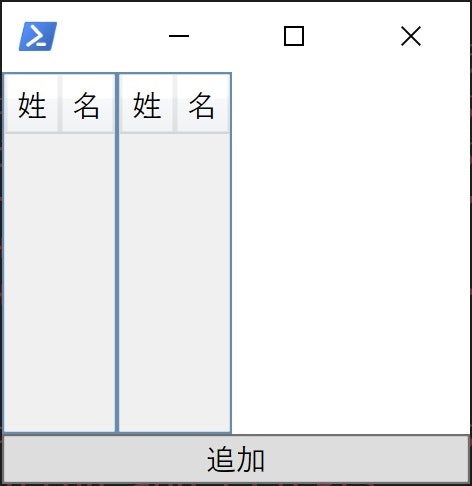
INotifyCollectionChanged
ObservableCollectionは普通に使えますね。
<Window xmlns="http://schemas.microsoft.com/winfx/2006/xaml/presentation"
xmlns:x="http://schemas.microsoft.com/winfx/2006/xaml"
Width="200" Height="200">
    <DockPanel LastChildFill="False">
        <Button DockPanel.Dock="Bottom" x:Name="button">追加</Button>
        <DataGrid ItemsSource="{Binding}" CanUserAddRows="False">
            <DataGrid.Columns>
                <DataGridTextColumn  Header="姓" Binding="{Binding LastName, UpdateSourceTrigger=PropertyChanged}"/>
                <DataGridTextColumn  Header="名" Binding="{Binding FirstName, UpdateSourceTrigger=PropertyChanged}"/>
            </DataGrid.Columns>
        </DataGrid>
    </DockPanel>
</Window>
using namespace System.Xml
using namespace System.Dynamic
using namespace System.Collections.ObjectModel

function New-ExpandoObject([PSCustomObject]$source){
    $source = [PSCustomObject]$source
    $ret = New-Object ExpandoObject
    $source | Get-Member | ?{$_.MemberType -eq "NoteProperty"} | %{$ret.($_.Name) = $source.($_.Name)}
    return ,$ret
}

Add-Type -AssemblyName PresentationFramework
[xml]$xaml = Get-Content .\wpf-7.xaml
$nodeReader = (New-Object XmlNodeReader $xaml)
$window = [Windows.Markup.XamlReader]::Load($nodeReader)
$button = $window.FindName("button")
$collection = New-Object ObservableCollection[ExpandoObject]
$window.DataContext = $collection
$button.add_Click({
    $collection.Add((New-ExpandoObject @{FirstName="";LastName=""}))
})
$window.ShowDialog()


C#でのクラス定義
PowerShellではC#でのクラスも定義できます。文字列でC#のコードを使うという大胆な記法。
C#との連携を強く考えて設計されているWPFは実装しやすくなるとは思いますが、PowerShell内にC#のコードが多数埋め込まれたコードは大変わかりにくくなり、PowerShellらしい書き方もできなくなるため、私はなるべく使わないに越したことはないと思います。
これを使えばINotifyPropertyChangedなども普通に実装できます。
<Window xmlns="http://schemas.microsoft.com/winfx/2006/xaml/presentation"
xmlns:x="http://schemas.microsoft.com/winfx/2006/xaml"
Width="100" Height="120">
    <StackPanel Orientation="Horizontal">
        <StackPanel>
            <TextBlock>姓</TextBlock>
            <TextBox Text="{Binding LastName, UpdateSourceTrigger=PropertyChanged}" />
            <TextBlock>名</TextBlock>
            <TextBox Text="{Binding FirstName, UpdateSourceTrigger=PropertyChanged}" />
        </StackPanel>
        <StackPanel>
            <TextBlock>姓</TextBlock>
            <TextBox Text="{Binding LastName, UpdateSourceTrigger=PropertyChanged}" />
            <TextBlock>名</TextBlock>
            <TextBox Text="{Binding FirstName, UpdateSourceTrigger=PropertyChanged}" />
        </StackPanel>
    </StackPanel>
</Window>
using namespace System.Xml

Add-Type -AssemblyName PresentationFramework
Add-Type '
using System.ComponentModel;
using System.Runtime.CompilerServices;
public class Name : INotifyPropertyChanged
{
    public event PropertyChangedEventHandler PropertyChanged;
    void Set<T>(ref T field, T value, [CallerMemberName] string propertyName = "")
    {
{
        if(!field.Equals(value))
        {
            field = value;
            if (PropertyChanged != null)
            {
                PropertyChanged(this, new PropertyChangedEventArgs(propertyName));
            }
        }
    }
    }
    string firstName = "";
    public string FirstName
    {
        get{return firstName;}
        set{Set(ref firstName, value);}
    }
    string lastName = "";
    public string LastName
    {
        get{return lastName;}
        set{Set(ref lastName, value);}
    }
}
'
[xml]$xaml = Get-Content .\wpf-8.xaml
$nodeReader = (New-Object XmlNodeReader $xaml)
$window = [Windows.Markup.XamlReader]::Load($nodeReader)
$name = New-Object Name
$name.LastName = "佐藤"
$name.FirstName = "太郎"
$window.DataContext = $name

$window.ShowDialog()