v6プラス環境でも “25565” で公開できるマインクラフトサーバー構築をしてみる
― WireGuard で IPv6宅内 <‑‑> IPv4インターネット を橋渡しする ―
はじめに
v6プラス(MAP‑E方式)の回線は IPv4アドレスを共有し、ユーザーに割り当てられる※「利用可能ポート範囲」※が固定されています。よって 25565/TCP のデフォルトポートでインターネットから直接アクセスさせるのは運よく25565が割り当てられていないと無理です。
そこで本稿では、
自宅サーバ (Ubuntu)
↓IPv6(WireGuardトンネル)
ConoHa VPS (Ubuntu)
↓IPv4
公開インターネット
という “踏み台” 型でVPS側で25565ポートを開けるのでV6プラスでも問題なくサーバーをたちあげられます。
VPS は安価・低スペックのVPSで構いません。
1. 前提
| 項目 | 内容 |
|---|---|
| 自宅回線 | V6プラス + IPv6 グローバルアドレスを取得できること |
| 自宅鯖 | Ubuntu 22.04(Minecraft サーバーは構築済み) |
| VPS | ConoHa VPS(初期状態の Ubuntu) |
| ポート | WireGuard: 51820/UDP / Minecraft: 25565/TCP |
役割 VPS=WireGuard “サーバー” / 自宅=WireGuard “クライアント”
ufwなどの設定は完了しているものとして進めていきます。
3. やり方(サーバークライアント両方)
3‑1 依存パッケージ & WireGuard インストール
sudo apt update
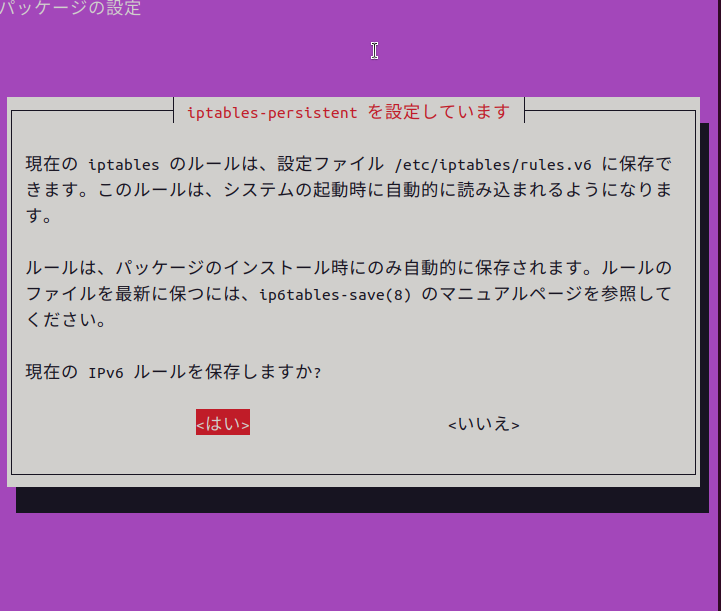
sudo apt -y install wireguard iptables-persistent
インストールすると現在のIPv6設定を保存するか聞いてくるので「はい」を選択(いいえでも問題ないかもしれないです。)
3-2 キー生成 & スクリプト実行
下記スクリプトを VPSと自宅でhogehoge.sh として保存します
保存の方法はSFTPで送信するのがいいかもしれないです。
(ubuntuのテキストエディタで作成してください。メモ帳はエラーが出ます)
    #!/bin/bash
    set -e

    # Basic Settings
    WG_IF="wg0"
    WG_DIR="/etc/wireguard"
    KEY_DIR="$WG_DIR/keys"
    PORT="51820"
    VPS_ADDR4="10.0.0.1/24"
    HOME_ADDR4="10.0.0.2/24"
    VPS_ADDR6="fd10:0:0::1/64"
    HOME_ADDR6="fd10:0:0::2/64"
    MINECRAFT_PORT="25565"

    echo "WireGuard Auto Setup Script"
    echo "----------------------------"

    # VPS or Home?
    read -p "Is this machine a VPS? (yes/no): " IS_VPS

    # Create key directory
    mkdir -p "$KEY_DIR"
    chmod 700 "$KEY_DIR"

    # Generate keys if not exist
    if [[ ! -f "$KEY_DIR/private.key" ]]; then
      wg genkey | tee "$KEY_DIR/private.key" | wg pubkey > "$KEY_DIR/public.key"
    fi
    chmod 600 "$KEY_DIR/"*.key

    PRIVATE_KEY=$(cat "$KEY_DIR/private.key")
    PUBLIC_KEY=$(cat "$KEY_DIR/public.key")

    # Display own public key
    echo
    echo "==============================="
    echo "Your public key (share this):"
    echo "$PUBLIC_KEY"
    echo "==============================="
    echo

    # Ask for peer's public key
    read -p "Enter the public key of the peer (the other machine): " PEER_PUBKEY

    # Ask for VPS IPv6 address (for home)
    if [[ "$IS_VPS" != "yes" ]]; then
        read -p "Enter the VPS's IPv6 address (e.g., 2400:xxxx:xxxx:xxxx::1): " VPS_IPV6
    fi

    # Write wg0.conf
    WG_CONF="$WG_DIR/$WG_IF.conf"
    cat > "$WG_CONF" <<EOF
    [Interface]
    PrivateKey = $PRIVATE_KEY
    EOF

    if [[ "$IS_VPS" == "yes" ]]; then
    cat >> "$WG_CONF" <<EOF
    Address = $VPS_ADDR4, $VPS_ADDR6
    ListenPort = $PORT
    PostUp = iptables -t nat -A PREROUTING -p tcp --dport $MINECRAFT_PORT -j DNAT --to-destination 10.0.0.2:$MINECRAFT_PORT ; iptables -A FORWARD -p tcp -d 10.0.0.2 --dport $MINECRAFT_PORT -j ACCEPT
    PostDown = iptables -t nat -D PREROUTING -p tcp --dport $MINECRAFT_PORT -j DNAT --to-destination 10.0.0.2:$MINECRAFT_PORT ; iptables -D FORWARD -p tcp -d 10.0.0.2 --dport $MINECRAFT_PORT -j ACCEPT

    [Peer]
    PublicKey = $PEER_PUBKEY
    AllowedIPs = 10.0.0.2/32, fd10:0:0::2/128
    EOF
    else
    cat >> "$WG_CONF" <<EOF
    Address = $HOME_ADDR4, $HOME_ADDR6

    [Peer]
    PublicKey = $PEER_PUBKEY
    Endpoint = [$VPS_IPV6]:$PORT
    AllowedIPs = 0.0.0.0/0, ::/0
    PersistentKeepalive = 25
    EOF
    fi

    chmod 600 "$WG_CONF"

    # Enable and restart WireGuard
    systemctl enable wg-quick@$WG_IF
    systemctl restart wg-quick@$WG_IF

    echo
    echo "✅ WireGuard Setup Complete!"
    echo "Your public key (above) should be shared with your peer."
    echo "Configuration saved to: $WG_CONF"
    echo "Keys saved in: $KEY_DIR"
実行すると
Is this machine a VPS? (yes/no):
と聞いてくるので
VPS側は yes
自宅鯖側は no
を入力してください
↓
エンターキーを押すと公開鍵が表示されます。
===============================
Your public key (share this):
public key
===============================
↓
自宅鯖とVPSで公開鍵を交換し入力してください(対向側の公開鍵を入力)
Enter the public key of the peer (the other machine):
↓
VPSの設定は完了です
自宅鯖のみVPS側のIPv6アドレスを入力する欄がでてくるので
VPS の IPv6 アドレス(例: 2400:cb00:....::abcd)を入力してください
Enter the VPS's IPv6 address (e.g., 2400:xxxx:xxxx:xxxx::1):
↓
VPS側の設定も完了です!
3-3設定確認
sudo wg show
ステータスが
interface: wg0
  public key: key
  private key: (hidden)
  listening port: 51182
  fwmark: 0xca6c

peer: key
  endpoint: [2400:xxxx:xxxx:xxxx::1]:51820
  allowed ips: 0.0.0.0/0, ::/0
  latest handshake: 1 minute, 11 seconds ago
  transfer: 94.84 MiB received, 28.14 MiB sent
  persistent keepalive: every 25 seconds
でステータスを確認、latest handshake およびtransfer,receivedが更新されていれば成功です。
4.完成!
マインクラフトサーバーにアクセスしてみましょう
v6プラスでも グローバルIPv6+WireGuard+VPS を組み合わせれば、
25565/TCP で “ふつうに” 公開 する Minecraft サーバーが構築できる
セキュリティは固めたほうがよさそう
コストは 月数百円の ConoHa VPS だけ。サーバー本体が動作しているのは自宅側なので、
“高性能 VPS” は不要。