M5Cameraで使わているアプリケーションは、multipart/x-mixed-replace というContent-Typeで、MotionJpeg形式の画像形式で撮影画像を配信してくれます。
あとは、HTMLのimgタグにM5CameraのURLを指定してくれれば表示されるという非常にありがたい機能が実装されています。
これだけでも十分なのですが、最近はHTTPSのページの中に、HTTPのURLがあるとエラーとなるため、追加の対応が必要です。
手っ取り早く、HTTPからHTTPSに変換するリバースプロキシを立ち上げようとしたところ、Request Header Fields Too Largeなるエラーが発生してできませんでした。
そこで、以下の方法があることがわかりました。
1.ESP32のhttpdを使わずに、WiFiClientを使う
httpdがエラーをはいているので、それを使わずにWiFiClientを使います。
https://www.iotsharing.com/2020/03/using-http-for-camera-live-stream.html
ただ、再度コンパイルやら書き込みが必要なので、以下に示す別の方法を模索しました。
2.ffmpegでHLSに変換して配信する
ffmpeg -f mjpeg -r [フレームレート] -i http://[M5カメラのIPアドレス]:81/stream -f hls -hls_time 10 -hls_list_size 5 -hls_allow_cache 0 -hls_segment_filename m5camera_%d.ts -hls_flags delete_segments m5camera.m3u8
実行すると、m5camera_%d.tsとm5camera.m3u8ファイルが出来上がります。HTTPSのコンテンツサーバに配備して使います。
HLSのためのファイルなので、多数のクライアントから同時に表示できるのがメリットです。
クライアント側からVLC media player などを使って、m5camera.m3u8のURLにアクセスすると少しタイムラグはありますが、映像として表示されます。
3.中継サーバを立ち上げる
2.でもよかったのですが、誰もアクセスしないのに、ずっとキャプチャリングやファイル保存をしているので、必要な時に動作するように、こちらの方法を使いました。
後述します。
※ダメだった方法:HTTPリバースプロキシを挟む
これが一番汎用性が高い方法だと思います。
例えば、nginxの設定ファイルで例えば以下のように追加すれば、リバースプロキシとして機能するのですが、このリバースプロキシを経由すると、クライアント側に「Request Header Fields Too Large」が表示されて再生できませんでした。
        location /m5camera/ {
                proxy_pass http://[M5カメラのIPアドレス]:81/;
        }
中継サーバを立ち上げる
WebAPIの中継サーバとしてExpressを立ち上げ、そこからHTTPのGetでコンテンツを取得し転送してあげるものです。
Node.jsのExpressを使いました。M5Cameraから取得できる画像ファイルは終わりがないストリーミングなので、Express内ではNode.jsのstreamを使っています。
例えば、以下をエンドポイント「/m5camera-stream」などに割り当てます。
'use strict';

const http = require('http');
const https = require('https');
const fetch = require('node-fetch');
const streamHost = 'http://【M5CameraのIPアドレス】';

// typedef enum {
// FRAMESIZE_QQVGA,    // 160x120  0
// FRAMESIZE_QQVGA2,   // 128x160  1
// FRAMESIZE_QCIF,     // 176x144  2
// FRAMESIZE_HQVGA,    // 240x176  3
// FRAMESIZE_QVGA,     // 320x240  4
// FRAMESIZE_CIF,      // 400x296  5
// FRAMESIZE_VGA,      // 640x480  6
// FRAMESIZE_SVGA,     // 800x600  7
// FRAMESIZE_XGA,      // 1024x768 8
// FRAMESIZE_SXGA,     // 1280x1024  9
// FRAMESIZE_UXGA,     // 1600x1200  10
// FRAMESIZE_QXGA,     // 2048*1536  11
// FRAMESIZE_INVALID
// } framesize_t;

const FRAME_SIZE = 6;

var mystream = null;

exports.handler = async (req, res) => {
  if (mystream)
    mystream.destroy();

  await fetch(streamHost + '/control?var=framesize&val=' + FRAME_SIZE)

  var myhttp;
  if (streamHost.startsWith('https'))
    myhttp = https;
  else
    myhttp = http;
  myhttp.get(streamHost + ':81/stream', (stream) => {
    mystream = stream;

    for (let key in stream.headers)
      res.set(key, stream.headers[key]);

    stream.pipe(res);
  });
};
ちなみに、以下の部分は、M5カメラに接続できるクライアント数は1つのみのため、過去に接続していたセッションはここでいったん切断しています。
  if (mystream)
    mystream.destroy();
あとは、ブラウザにおいて、WebページのCSSのbackground-imageに上記のエンドポイントを指定すれば背景色として表示されます。
<body style="height: 100vh; background-image: url('https://【中継サーバのホスト名】/m5camera-stream'); background-size: contain; background-repeat: no-repeat; background-position: center; background-color: #000000;">
(おまけ)GoogleHomeのInteractiveCanvasに表示する
スマホから、「〇〇につないで」というと、M5Cameraの画像を表示するのにも使えます。
しかしながら、Google Nest Hub本体で表示させる際の、ポート番号等の制約が厳しく、ためせていません。今回はAndroidのGoogleアシスタントから試してみました。
サーバ側(Google Homeからの起動要求に対する対応)
'use strict';

const {
	conversation,
	Canvas,
} = require('@assistant/conversation')

const app = conversation({ debug: true });

app.handle('start', conv => {
	console.log(conv);
	conv.add('これはインタラクティブキャンバスです。');

	if (conv.device.capabilities.includes("INTERACTIVE_CANVAS") ){
		conv.add(new Canvas({
			url: 'https://【インタラクティブキャンバスのWebページのホスト名】/m5camera/index.html',
			enableFullScreen: true,
			data: {
			}
		}));
	}else{
		conv.scene.next.name = 'actions.scene.END_CONVERSATION';
		conv.add('この端末はディスプレイがないため対応していません。');
	}
});

app.handle('continue', async conv => {
	console.log(conv);
	conv.add(new Canvas({
		data: {
			message: "continue"
		}
	}));
});

exports.fulfillment = app;
デバイス側での表示ページ(HTML)
<!DOCTYPE html>
<html lang="ja">
<head>
  <meta http-equiv="Content-Type" content="text/html; charset=utf-8" />
  <meta http-equiv="Content-Security-Policy" content="default-src * data: gap: https://ssl.gstatic.com 'unsafe-eval' 'unsafe-inline'; style-src * 'unsafe-inline'; media-src *; img-src * data: content: blob:;">
  <meta name="format-detection" content="telephone=no">
  <meta name="msapplication-tap-highlight" content="no">
  <meta name="apple-mobile-web-app-capable" content="yes" />
  <meta name="viewport" content="user-scalable=no, initial-scale=1, maximum-scale=1, minimum-scale=1, width=device-width">

  <!-- jQuery (necessary for Bootstrap's JavaScript plugins) -->
  <script src="https://code.jquery.com/jquery-1.12.4.min.js" integrity="sha384-nvAa0+6Qg9clwYCGGPpDQLVpLNn0fRaROjHqs13t4Ggj3Ez50XnGQqc/r8MhnRDZ" crossorigin="anonymous"></script>
  <!-- Latest compiled and minified CSS -->
  <link rel="stylesheet" href="https://stackpath.bootstrapcdn.com/bootstrap/3.4.1/css/bootstrap.min.css" integrity="sha384-HSMxcRTRxnN+Bdg0JdbxYKrThecOKuH5zCYotlSAcp1+c8xmyTe9GYg1l9a69psu" crossorigin="anonymous">
  <!-- Optional theme -->
  <link rel="stylesheet" href="https://stackpath.bootstrapcdn.com/bootstrap/3.4.1/css/bootstrap-theme.min.css" integrity="sha384-6pzBo3FDv/PJ8r2KRkGHifhEocL+1X2rVCTTkUfGk7/0pbek5mMa1upzvWbrUbOZ" crossorigin="anonymous">
  <!-- Latest compiled and minified JavaScript -->
  <script src="https://stackpath.bootstrapcdn.com/bootstrap/3.4.1/js/bootstrap.min.js" integrity="sha384-aJ21OjlMXNL5UyIl/XNwTMqvzeRMZH2w8c5cRVpzpU8Y5bApTppSuUkhZXN0VxHd" crossorigin="anonymous"></script>

  <link rel="stylesheet" href="css/start.css">
  <script src="js/methods_bootstrap.js"></script>
  <script src="js/components_bootstrap.js"></script>
  <script src="js/components_utils.js"></script>
  <script src="js/vue_utils.js"></script>
  <script src="js/gql_utils.js"></script>

  <script src="https://cdn.jsdelivr.net/npm/vconsole/dist/vconsole.min.js"></script>
  <script src="https://cdn.jsdelivr.net/npm/vue/dist/vue.js"></script>

  <script src="https://cdn.jsdelivr.net/npm/js-cookie@2/src/js.cookie.min.js"></script>
  <link rel="stylesheet" href="https://cdnjs.cloudflare.com/ajax/libs/toastr.js/latest/toastr.min.css">
  <script src="https://cdnjs.cloudflare.com/ajax/libs/toastr.js/latest/toastr.min.js"></script>
  <script src="https://cdnjs.cloudflare.com/ajax/libs/dat-gui/0.7.7/dat.gui.min.js"></script>

  <script src="https://www.gstatic.com/assistant/interactivecanvas/api/interactive_canvas.min.js"></script>

  <title>M5Camera</title>
</head>
<body style="height: 100vh; background-image: url('https://【中継サーバのホスト名】/m5camera-stream'); background-size: contain; background-repeat: no-repeat; background-position: center; background-color: #000000;">
    <div id="top" class="container">


        <!-- for progress-dialog -->
        <progress-dialog v-bind:title="progress_title"></progress-dialog>
    </div>

    <script src="js/start.js"></script>
</body>
デバイス側での表示ページ(Javascript)
'use strict';

//const vConsole = new VConsole();
//window.datgui = new dat.GUI();

const UPDATE_INTERVAL = 10000;
var updated = false;

var vue_options = {
    el: "#top",
    mixins: [mixins_bootstrap],
    data: {
    },
    computed: {
    },
    methods: {
    },
    created: function(){
    },
    mounted: function(){
        proc_load();

        const callbacks = {
            onUpdate: (data) => {
                console.log(data);
                if( !updated ){
                    setInterval(() => {
                        window.interactiveCanvas.sendTextQuery("継続して");
                    }, UPDATE_INTERVAL);
                    updated = true;
                }
            }
        };
        window.interactiveCanvas.ready(callbacks);
    }
};
vue_add_data(vue_options, { progress_title: '' }); // for progress-dialog
vue_add_global_components(components_bootstrap);
vue_add_global_components(components_utils);

/* add additional components */

window.vue = new Vue( vue_options );
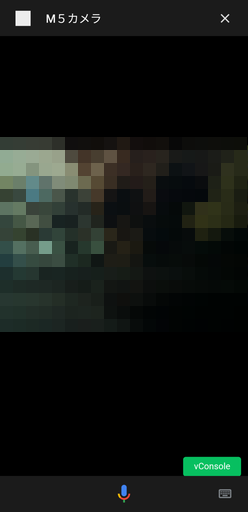
スマホのGoogleアシスタントから、「OK Google、M5カメラを開いて」と言った後の画像です。
詳細はこちらをご参照ください。
Actions on GoogleのInteractive Canvasを試してみる
Google Nest Hubに、WebRTCで映像配信してみた
以上