ESP32にWifiアクセスポイントに接続する能力があるのに、画面や入力手段がないと、SSIDやパスワードをファームウェアに埋め込むことになり、固定値となってしまいます。
世の中の記事を見ると、いったん自身がWifiアクセスポイントになった後に、Wifiアクセスポイントにつながる方法があるようです。
今回紹介するのは、いったん自身がBLEペリフェラルになった後に、BLEでSSIDやパスワードを受け取ってWifiアクセスポイントにつながる方法です。
この方法であれば、わざわざWifiのSSIDやパスワードを入力するために、入力端末側のWifi接続先を変える必要がなくなります。
また、最近は、ブラウザにWeb Bluetooth APIというのがあり、ブラウザからSSID・パスワードを入力することができるようになります。
Arduino側
# include <BLEDevice.h>
# include <BLEUtils.h>
# include <BLEServer.h>
# include <WiFi.h>

# define SERVICE_UUID        "4fafc201-1fb5-459e-8fcc-c5c9c331914b"
# define CHARACTERISTIC_UUID_1 "beb5483e-36e1-4688-b7f5-ea07361b26a8"
# define CHARACTERISTIC_UUID_2 "beb5483f-36e1-4688-b7f5-ea07361b26a8"
# define BLE_DEVICE_NAME  "MyESP32"

# define WIFI_MAX_COUNTER  30

std::string wifi_ssid;
std::string wifi_password;
std::string wifi_mask("this is the wifi mask.");

bool wifi_entered;

class MyCallbacks1: public BLECharacteristicCallbacks {
    void onWrite(BLECharacteristic *pCharacteristic) {
      wifi_ssid = pCharacteristic->getValue();
      Serial.print("SSID:");
      Serial.println(wifi_ssid.c_str());
    }
};

class MyCallbacks2: public BLECharacteristicCallbacks {
    void onWrite(BLECharacteristic *pCharacteristic) {
      wifi_password = pCharacteristic->getValue();
//      Serial.print("Password:");
//      Serial.println(wifi_password.c_str());

      wifi_entered = true;
    }
};

IPAddress wifi_connect_with_ble(std::string ssid, std::string password){
  wifi_ssid = ssid;
  wifi_password = password;

  BLEDevice::init(BLE_DEVICE_NAME);
  BLEServer *pServer = BLEDevice::createServer();
  BLEService *pService = pServer->createService(SERVICE_UUID);
  BLECharacteristic *pCharacteristic1 = pService->createCharacteristic(
                                         CHARACTERISTIC_UUID_1,
                                         BLECharacteristic::PROPERTY_READ |
                                         BLECharacteristic::PROPERTY_WRITE
                                       );
  BLECharacteristic *pCharacteristic2 = pService->createCharacteristic(
                                         CHARACTERISTIC_UUID_2,
                                         BLECharacteristic::PROPERTY_READ |
                                         BLECharacteristic::PROPERTY_WRITE
                                       );
  pCharacteristic1->setCallbacks(new MyCallbacks1());
  pCharacteristic1->setValue("Input SSID");
  pCharacteristic2->setCallbacks(new MyCallbacks2());
  pCharacteristic2->setValue("Input Password");

  BLEAdvertising *pAdvertising = pServer->getAdvertising();

  int wifi_counter;
  do{
    wifi_counter = WIFI_MAX_COUNTER;
    wifi_entered = false;

    if(wifi_ssid == "" || wifi_password == "" ){
      Serial.println("");
      Serial.println("Waiting Wifi password with BLE...");
      pService->start();
      pAdvertising->start();
      while(!wifi_entered){
        delay(1000);
        Serial.print(".");
      }
      pAdvertising->stop();
      pService->stop();

      Serial.println("");
    }

    for( int i = 0 ; i < wifi_password.length() && i < wifi_mask.length() ; i++ )
      wifi_password[i] ^= wifi_mask[i];

    Serial.println("Connecting to Wifi AP...");
    WiFi.begin(wifi_ssid.c_str(), wifi_password.c_str());
    while (WiFi.status() != WL_CONNECTED) {
      delay(1000);
      Serial.print(".");

      wifi_counter--;
      if( wifi_counter <= 0 )
        break;
    }
    wifi_password = "";
  }while( wifi_counter <= 0 );

  Serial.println("");

  return WiFi.localIP();
}
wifi_maskには秘匿の適当なマスク値を指定してください。
BLE通信路上を流れるWiFiパスワードを盗聴されにくくするためです。
★ですが、これでもやっぱり破られるので、ご利用は自己責任でお願いします。★
また、各UUIDも、各自適当な値を生成し設定してください。
入力する端末側は、BLEセントラルとして CHARACTERISTIC_UUID_1 のキャラクタリスティックックにSSIDをWriteし、CHARACTERISTIC_UUID_2 のキャラクタリスティックにパスワードをWriteすることで、ESP32は入力された値を使ってWiFi接続します。
ただし、 WIFI_MAX_COUNTER秒経過しても、WiFiアクセスポイントに接続できなければ、また、BLEペリフェラルとして、WiFiパスワードの入力待ちとなります。
あとは、setup()で、上記の関数wifi_connect_with_ble()を呼び出せばよいです。
void setup() {
  Serial.begin(9600);

  IPAddress ipaddress = wifi_connect_with_ble("", "");
  Serial.print("Connected : ");
  Serial.println(ipaddress);
}


void loop() {
  // put your main code here, to run repeatedly:
  Serial.println("loop() called");
  delay(2000);
}
設定端末側
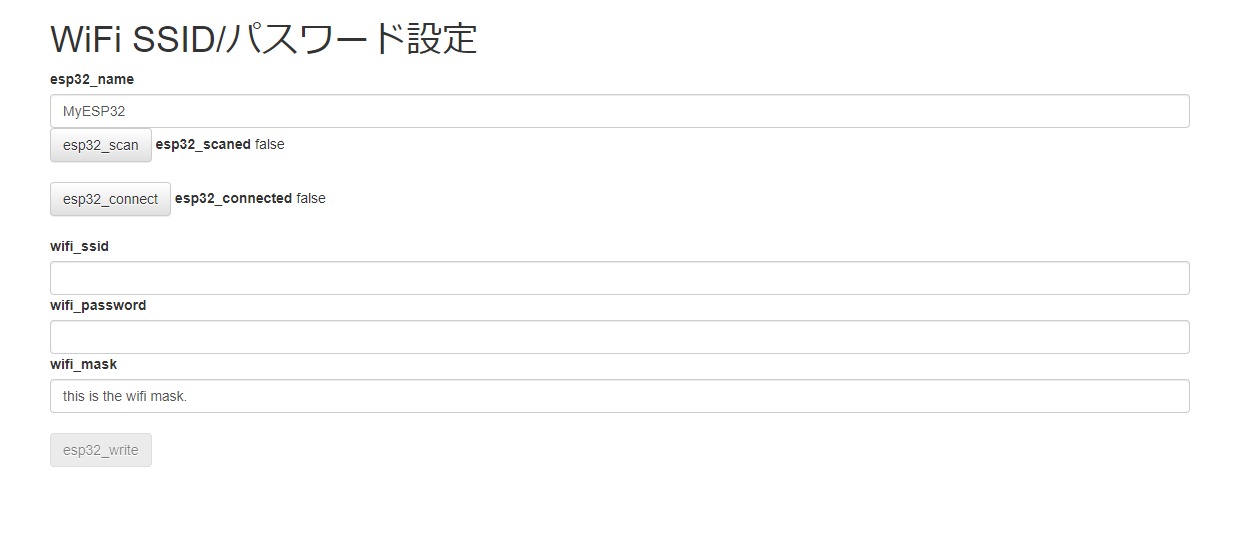
こんな感じのWebページを作ってみました。
Web Bluetooth APIが動作するOSであればよいので、Windows、Mac、AndroidのChromeで動きます。
esp32_nameとwifi_maskは、Arduino側に埋め込んだ値と同じ値を入力してください。
そして、wifi_ssid とwifi_password には、これから接続したいWiFiアクセスポイントのSSIDとパスワードを入力します。
BLEペリフェラルとして待ち受けているはずですので、「esp32_scan」ボタンを押下するとESP32が発見されます。
「esp32_connect」ボタンを押下すると、BLEペリフェラルに接続します。
接続完了すると、「esp32_write」ボタンが有効化されますので、押下します。これで、WiFiアクセスポイントの接続が始まります。
設定端末側のHTMLとJavascriptコードです。
'use strict';

//var vConsole = new VConsole();

const UUID_ESP32_SERVICE = '4fafc201-1fb5-459e-8fcc-c5c9c331914b';
const UUID_ESP32_CHARACTERISTIC_1 = 'beb5483e-36e1-4688-b7f5-ea07361b26a8';
const UUID_ESP32_CHARACTERISTIC_2 = 'beb5483f-36e1-4688-b7f5-ea07361b26a8';

var esp32_device = null;
var esp32_chars = new Map();

const encoder = new TextEncoder();

var vue_options = {
    el: "#top",
    data: {
        progress_title: '',

        esp32_name: "MyESP32",
        wifi_ssid: '',
        wifi_password: '',
        wifi_mask: 'this is the wifi mask.',
        esp32_scaned: false,
        esp32_connected: false,
    },
    computed: {
    },
    methods: {
        onDisconnect: function(event){
            console.log('onDisconnect');
            this.esp32_connected = false;
        },

        esp32_scan: function(){
            return navigator.bluetooth.requestDevice({
                filters: [{ name: this.esp32_name}],
                optionalServices : [UUID_ESP32_SERVICE]
            })
            .then(device => {
                console.log("requestDevice OK");
                console.log(device);

                esp32_device = device;
                esp32_device.addEventListener('gattserverdisconnected', this.onDisconnect);
                this.esp32_scaned = true;
            })
            .catch(error =>{
                console.log(error);
            });
        },
        esp32_connect: function(){
            if( esp32_device.connected )
                return;

            return esp32_device.gatt.connect()
            .then(server => {
                console.log('Execute : getPrimaryService');
                return server.getPrimaryService(UUID_ESP32_SERVICE);
            })
            .then(service => {
                console.log('Execute : getCharacteristic');
                return Promise.all([
                    set_characteristic(service, UUID_ESP32_CHARACTERISTIC_1),
                    set_characteristic(service, UUID_ESP32_CHARACTERISTIC_2),
                ]);
            })
            .then(()=>{
                this.esp32_connected = true;
                console.log('Connected!!');
            })
            .catch(error =>{
                console.log(error);
            });
        },
        esp32_write: async function(){
            await esp32_chars.get(UUID_ESP32_CHARACTERISTIC_1).writeValue(encoder.encode(this.wifi_ssid));

            var buffer = encoder.encode(this.wifi_password);
            var mask = encoder.encode(this.wifi_mask);
            for( var i = 0 ; i < buffer.length && i < mask.length ; i++ )
                buffer[i] ^= mask[i];
            await esp32_chars.get(UUID_ESP32_CHARACTERISTIC_2).writeValue(buffer);

            alert('wrote!');
    	},
    },
    created: function(){
    },
    mounted: function(){
        proc_load();
    }
};
vue_add_methods(vue_options, methods_utils);
var vue = new Vue( vue_options );

function set_characteristic(service, characteristicUuid) {
    return service.getCharacteristic(characteristicUuid)
    .then(characteristic => {
        console.log('setCharacteristic : ' + characteristicUuid);
        esp32_chars.set(characteristicUuid, characteristic);
        return service;
    });
}
<!DOCTYPE html>
<html lang="ja">
<head>
  <meta http-equiv="Content-Type" content="text/html; charset=utf-8" />
  <meta http-equiv="Content-Security-Policy" content="default-src * data: gap: https://ssl.gstatic.com 'unsafe-eval' 'unsafe-inline'; style-src * 'unsafe-inline'; media-src *; img-src * data: content: blob:;">
  <meta name="format-detection" content="telephone=no">
  <meta name="msapplication-tap-highlight" content="no">
  <meta name="apple-mobile-web-app-capable" content="yes" />
  <meta name="viewport" content="user-scalable=no, initial-scale=1, maximum-scale=1, minimum-scale=1, width=device-width">

  <!-- jQuery (necessary for Bootstrap's JavaScript plugins) -->
  <script src="https://ajax.googleapis.com/ajax/libs/jquery/1.12.4/jquery.min.js"></script>
  <!-- Latest compiled and minified CSS -->
  <link rel="stylesheet" href="https://maxcdn.bootstrapcdn.com/bootstrap/3.3.7/css/bootstrap.min.css" integrity="sha384-BVYiiSIFeK1dGmJRAkycuHAHRg32OmUcww7on3RYdg4Va+PmSTsz/K68vbdEjh4u" crossorigin="anonymous">
  <!-- Optional theme -->
  <link rel="stylesheet" href="https://maxcdn.bootstrapcdn.com/bootstrap/3.3.7/css/bootstrap-theme.min.css" integrity="sha384-rHyoN1iRsVXV4nD0JutlnGaslCJuC7uwjduW9SVrLvRYooPp2bWYgmgJQIXwl/Sp" crossorigin="anonymous">
  <!-- Latest compiled and minified JavaScript -->
  <script src="https://maxcdn.bootstrapcdn.com/bootstrap/3.3.7/js/bootstrap.min.js" integrity="sha384-Tc5IQib027qvyjSMfHjOMaLkfuWVxZxUPnCJA7l2mCWNIpG9mGCD8wGNIcPD7Txa" crossorigin="anonymous"></script>

  <title>WiFi SSID/パスワード設定</title>

  <script src="js/methods_utils.js"></script>
  <script src="js/vue_utils.js"></script>

  <script src="dist/js/vconsole.min.js"></script>
  <script src="https://cdn.jsdelivr.net/npm/js-cookie@2/src/js.cookie.min.js"></script>
  <script src="https://cdn.jsdelivr.net/npm/vue/dist/vue.js"></script>
</head>
<body>
    <div id="top" class="container">
        <h1>WiFi SSID/パスワード設定</h1>

        <label>esp32_name</label> <input type="text" class="form-control" v-model="esp32_name">
        <button class="btn btn-default" v-on:click="esp32_scan">esp32_scan</button>
        <label>esp32_scaned</label> {{esp32_scaned}}
        <br>
        <br>
        <button class="btn btn-default" v-on:click="esp32_connect">esp32_connect</button>
        <label>esp32_connected</label> {{esp32_connected}}
        <br>
        <br>
        <label>wifi_ssid</label> <input type="text" class="form-control" v-model="wifi_ssid">
        <label>wifi_password</label> <input type="text" class="form-control" v-model="wifi_password">
        <label>wifi_mask</label> <input type="text" class="form-control" v-model="wifi_mask"><br>
        <button v-bind:disabled="!esp32_connected" class="btn btn-default" v-on:click="esp32_write">esp32_write</button>

        <div class="modal fade" id="progress">
            <div class="modal-dialog">
                <div class="modal-content">
                    <div class="modal-header">
                        <h4 class="modal-title">{{progress_title}}</h4>
                    </div>
                    <div class="modal-body">
                        <center><progress max="100" /></center>
                    </div>
                </div>
            </div>
        </div>
    </div>

    <script src="js/start.js"></script>
</body>
そうそう、HTML5のWeb Bluetooth APIを使うので、上記Webページは、HTTPSにホスティングしてください。
補足
ほんとは、chirpを使いたかったんだけど、SDKをダウンロードできない。。。
以上
