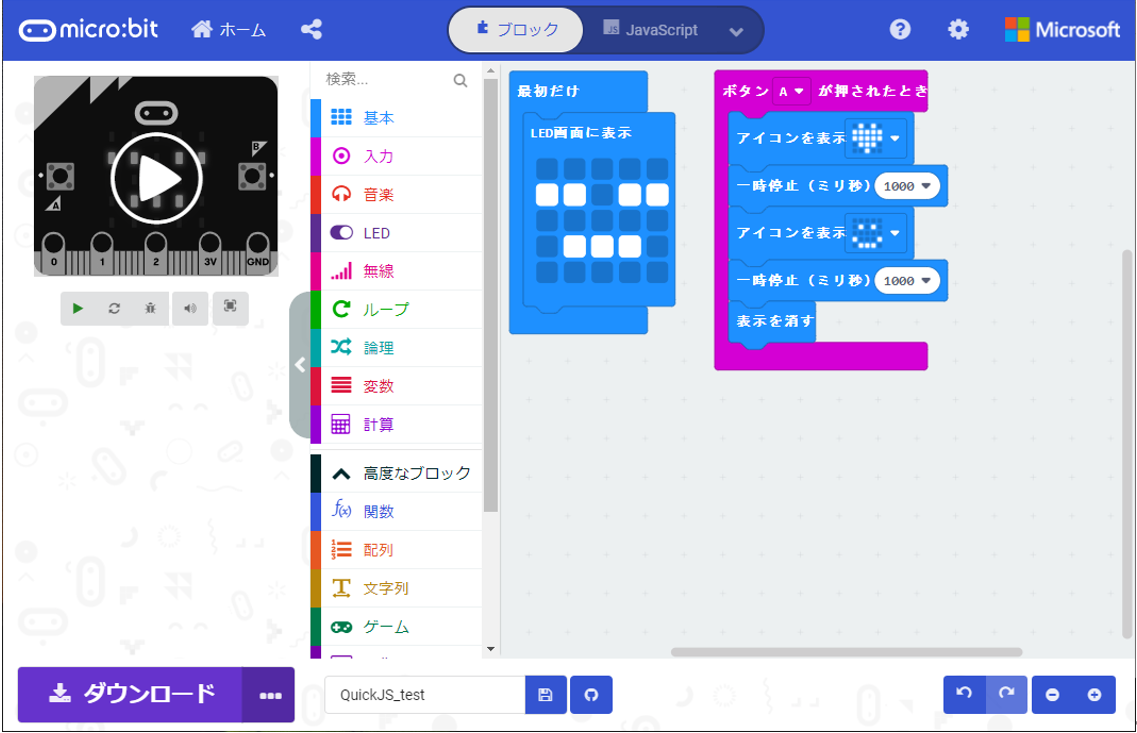
MakeCode for micro:bitで、ScratchのようにGUIでパーツを組み合わせて動作をプログラミングすることができます。
Microsoft MakeCode for micro:bit
出来上がったコードは、micro:bitにファイルを書き込む際に、コンパイルされたバイナリを書き込んでいます。
一方で、出来上がったコードは、Javascriptにも変換されていますので、それをESP32上で動作するJavascriptエンジンで動かせばESP32でも同じコードが動けるはずです。
M5Atomには、micro:bitと同じように、5x5のLEDがありますし、加速度センサもありますので、うってつけです。
ESP32上で動作するJavascriptエンジンは、QuickJSを採用しました。以下詳細。
(参考) QuickJSでお手軽ESP32+Javascript実行環境
今回のもろもろのソースコードは以下のGitHubに置いておきました。
poruruba/Esp32_MakeCode
Javacriptの例
例えば、以下のようなロジックを組んだとします。
上部のナビゲータにおいて、ブロックではなく、Javascriptを選択すると、Javascriptでの表現に切り替わります。
以下、再掲します。
input.onButtonPressed(Button.A, function () {
    basic.showIcon(IconNames.Heart)
    basic.pause(1000)
    basic.showIcon(IconNames.Happy)
    basic.pause(1000)
    basic.clearScreen()
})
basic.showLeds(`
    . . . . .
    # # . # #
    . . . . .
    . # # # .
    . . . . .
    `)
以下のJavascriptの関数を実装すればよさそうです。
・basic.showIcon
・basic.pause
・basic.clearScreen
・basic.showLeds
・input.onButtonPressed
実装は、以下の部分に該当します。
  static JSValue basic_showIcon(JSContext *ctx, JSValueConst jsThis, int argc,
                             JSValueConst *argv) {
    uint32_t value;
    JS_ToUint32(ctx, &value, argv[0]);

    uint8_t buffer[2 + 3 * MATRIX_WIDTH * MATRIX_WIDTH] = { MATRIX_WIDTH, MATRIX_WIDTH };
    const uint8_t *bmp = icon_list[value].bmp;
    for( int y = 0 ; y < MATRIX_WIDTH ; y++ ){
      for( int x = 0 ; x < MATRIX_WIDTH ; x++ ){
        if( (bmp[y] >> (MATRIX_WIDTH - x - 1)) & 0x01 ){
          buffer[2 + y * MATRIX_WIDTH * 3 + x * 3] = (LED_COLOR_ON >> 8) & 0xff;
          buffer[2 + y * MATRIX_WIDTH * 3 + x * 3 + 1] = (LED_COLOR_ON >> 16) & 0xff;
          buffer[2 + y * MATRIX_WIDTH * 3 + x * 3 + 2] = (LED_COLOR_ON >> 0) & 0xff;
        }
      }
    }

    M5.dis.displaybuff(buffer);

    return JS_UNDEFINED;
  }

  static JSValue input_onButtonPressed(JSContext *ctx, JSValueConst jsThis, int argc,
                             JSValueConst *argv) {
    uint32_t value;
    JS_ToUint32(ctx, &value, argv[0]);
    if( value == BUTTON_A ){
      ESP32QuickJS *qjs = (ESP32QuickJS *)JS_GetContextOpaque(ctx);
      qjs->setBtnFunc(JS_DupValue(ctx, argv[1]));
    }

    return JS_UNDEFINED;
  }

  static JSValue basic_showLeds(JSContext *ctx, JSValueConst jsThis, int argc,
                             JSValueConst *argv) {
    const char *str = JS_ToCString(ctx, argv[0]);
    if (!str)
      return JS_UNDEFINED;

    int index = 0;
    while( *str != '\0' ){
      if( *str != '.' && *str != '#'){
        str++;
        continue;
      }
      if( *str == '#'){
        M5.dis.drawpix(index, LED_COLOR_ON);
      }else if( *str == '.' ){
        M5.dis.drawpix(index, LED_COLOR_OFF);
      }
      str++;
      index++;
    }

    return JS_UNDEFINED;
  }

  static JSValue basic_pause(JSContext *ctx, JSValueConst jsThis, int argc,
                             JSValueConst *argv) {
    uint32_t value;
    JS_ToUint32(ctx, &value, argv[0]);

    delay(value);

    return JS_UNDEFINED;
  }

  static JSValue basic_clearScreen(JSContext *ctx, JSValueConst jsThis, int argc,
                             JSValueConst *argv) {
    uint8_t buffer[2 + 3 * MATRIX_WIDTH * MATRIX_WIDTH] = { MATRIX_WIDTH, MATRIX_WIDTH };
    for( int y = 0 ; y < MATRIX_WIDTH ; y++ ){
      for( int x = 0 ; x < MATRIX_WIDTH ; x++ ){
        buffer[2 + y * MATRIX_WIDTH * 3 + x * 3] = 0x000000;
        buffer[2 + y * MATRIX_WIDTH * 3 + x * 3 + 1] = 0x000000;
        buffer[2 + y * MATRIX_WIDTH * 3 + x * 3 + 2] = 0x000000;
      }
    }

    M5.dis.displaybuff(buffer);

    return JS_UNDEFINED;
  }
input.onButtonPressed は、M5Atomのボタンが押された契機に指定された関数を呼び出す必要がありますが、以下の部分で呼び出しています。
  void loop(bool callLoopFn = true) {
    // async
    JSContext *c;
    int ret = JS_ExecutePendingJob(JS_GetRuntime(ctx), &c);
    if (ret < 0) {
      qjs_dump_exception(ctx, JS_UNDEFINED);
    }

    // timer
    uint32_t now = millis();
    if (timer.GetNextTimeout(now) >= 0) {
      timer.ConsumeTimer(ctx, now);
    }

# ifdef ENABLE_WIFI
    httpFetcher.loop(ctx);
# endif

    // loop()
    if (callLoopFn && JS_IsFunction(ctx, loop_func)) {
      JSValue ret = JS_Call(ctx, loop_func, loop_func, 0, nullptr);
      if (JS_IsException(ret)) {
        qjs_dump_exception(ctx, ret);
      }
      JS_FreeValue(ctx, ret);
    }

    if (M5.Btn.wasReleased() && JS_IsFunction(ctx, btn_func)) {
      JSValue ret = JS_Call(ctx, btn_func, btn_func, 0, nullptr);
      if (JS_IsException(ret)) {
        qjs_dump_exception(ctx, ret);
      }
      JS_FreeValue(ctx, ret);
    }
  }
で、このloop関数は、以下で呼んでいます。
void loop() {
  M5.update();
  qjs.loop(); // For timer, async, etc.
}
サポートする関数
MakeCodeでパーツを配置すると割り当たる以下の関数を実装しておきました。
(これだけだと、MakeCodeのパーツのどれに対応するかわかりにくいですよね。。。ごめんなさい。)
| クラス名 | 関数名/プロパティ名 | 備考 |
|---|---|---|
| IconNames | 各種 | |
| basic | forever | |
| showLeds | ||
| pause | ||
| showNumber | ||
| showString | ただし先頭1文字のみ | |
| showIcon | ||
| Button | A | |
| Dimension | X | |
| Y | ||
| Z | ||
| Strength | ||
| input | onButtonPressed | |
| buttonIsPressed | ||
| acceleration | ||
| led | plot | |
| unplot | ||
| control | millis | |
| DigitalPin | P? | 要ソース変更 |
| AnalogPin | P? | 要ソース変更 |
| pins | digitalReadPin | |
| digitalWritePin | ||
| analogReadPin | ||
| Math | max | |
| min | ||
| abs | ||
| randint | ||
| randomBoolean | ||
| constrain | ||
| sqrt | ||
| sin | ||
| cos | ||
| tan |
DigitalPinおよびAnalogPinについては、ソースの以下の場所に追加してください。
const PIN_INFO analog_pin_list[] = {
  { "P0", GPIO_NUM_0 },
  { "P1", GPIO_NUM_1 }
};
const PIN_INFO digital_pin_list[] = {
  { "P0", GPIO_NUM_0 },
  { "P1", GPIO_NUM_1 }
};
以上

