以前の投稿で、Androidにおいて、UDPメッセージを待ち受けるバックグラウンドサービスを作成しました。(AndroidでバックグラウンドでUDP受信を待ち受ける)
今回は、AWS IoTすなわちMQTTのメッセージを待ち受けるバックグラウンドサービスを作成します。
それだけだと面白くないので、独立でサービスを起動し、AIDLを使って別のAndroidアプリケーションからサービスを操作し、メッセージを送受信できるようにします。
以下に構成をまとめます。

バックグラウンドサービスを独立に立ち上げるので、同じAndroid内の複数のアプリケーションで共用できます。
また、AWS IoT CoreをMQTTブローカとして使うので、他のMQTTクライアントからも送受信できるとともに、他のAndroidスマホでバックグラウンドサービスを立ち上げれば、それとも送受信することができるようになります。
ソースコードもろもろは、GitHubに上げておきました。
poruruba/AwsIotService
フォアグラウンドサービスを使ってバックグラウンドで立ち上げる。
以下の投稿で詳しく述べています。
AndroidでバックグラウンドでUDP受信を待ち受ける
以降、ポイントだけ説明します。
android.app.Serviceを継承したクラスを実装します。
オーバライドするメソッドonCreate()で、通知のためのチャネルを定義します。通知は、フォアグラウンドサービスを立ち上げる際に必須です。
        NotificationManager notificationManager = (NotificationManager) context.getSystemService(Context.NOTIFICATION_SERVICE);
        NotificationChannel channel = new NotificationChannel(CHANNEL_ID, NOTIFICATION_TITLE, NotificationManager.IMPORTANCE_DEFAULT);
        notificationManager.createNotificationChannel(channel);
フォアグラウンドサービスの開始は、MainActivityからは以下のように呼び出します。
                    SharedPreferences.Editor editor = pref.edit();
                    Intent intent = new Intent(this, AwsIotService.class);
                    EditText edit;
                    edit = (EditText) findViewById(R.id.edit_endpoint_prefix);
                    String endpointPrefix = edit.getText().toString();
                    edit = (EditText) findViewById(R.id.edit_client_id);
                    String clientId = edit.getText().toString();
                    edit = (EditText) findViewById(R.id.edit_topic_name);
                    String topicName = edit.getText().toString();
                    intent.putExtra("keyStorePath", keyStorePath);
                    intent.putExtra("endpointPrefix", endpointPrefix);
                    intent.putExtra("clientId", clientId);
                    intent.putExtra("topicName", topicName);
                    editor.putString("endpointPrefix", endpointPrefix);
                    editor.putString("clientId", clientId);
                    editor.putString("topicName", topicName);

                    startForegroundService(intent);
                    Toast.makeText(this, "待ち受けを開始しました。", Toast.LENGTH_LONG).show();
                    editor.apply();
なんかいろいろ引数を渡したり、次回呼び出したときに引数を覚えて置けるようにSharedPreferenceに保存したりしていますが、大事なのはstartForegroundService()です。
そうすると、Service側のオーバライドするメソッドonStartCommand()が呼び出されます。その中で、AWS IoT Coreをセットアップし、通知を生成してフォアグラウンドサービスを開始して、最後にSTART_NOT_STICKY を返して終わりです。
AWS IoT Coreのセットアップは後述しますが、フォアグラウンドサービスは以下のように開始します。通知を引数に渡す必要があります。
        Intent notifyIntent = new Intent(this, MainActivity.class);
        PendingIntent pendingIntent = PendingIntent.getActivity(this, 0, notifyIntent, PendingIntent.FLAG_UPDATE_CURRENT | PendingIntent.FLAG_IMMUTABLE);

        Notification notification = new Notification.Builder(getApplicationContext(), CHANNEL_ID)
                .setSmallIcon(android.R.drawable.btn_star)
                .setContentText(NOTIFICATION_CONTENT)
                .setContentIntent(pendingIntent)
                .setWhen(System.currentTimeMillis())
                .build();
        startForeground(NOTIFICATION_ID, notification);
PendingIntentを含めるのは任意ですが、フォアグラウンドサービス開始後に表示される通知をタップすると、MainActivityを起動させるためのものです。
そして、AndroidManifest.xmlに以下を追加します。
<uses-permission android:name="android.permission.FOREGROUND_SERVICE" />
・・・
        <service
            android:name=".AwsIotService"
            android:parentActivityName=".MainActivity"
            android:enabled="true"
            android:exported="true" >
            <intent-filter>
                <action android:name="AwsIotService" />
            </intent-filter>
        </service>
intent-filterとandroid:exported="true"は、後程説明するAIDLを使った別アプリからのバインド用に必要です。
以下のオーバライドメソッドも必要で、のちほど変更しますが、とりあえず、nullを返すようにしておきます。
    @Override
    public IBinder onBind(Intent intent) {
        Log.d(TAG, "onBind called");
        return null;
    }
補足:フォアグラウンドサービスの生存期間
フォアグラウンドサービスの生存期間については、2つの視点で考えます。
1つ目が、サービスとフォアグラウンドサービスの2つの状態があること
2つ目が、フォアグラウンドサービス自体の生存期間です。
1つ目の話ですが、通常は、MainActivityからstartForegroundService を呼び出すと、サービスのonCreateが呼び出されたのちonStartCommandが呼び出されます。一方で、AndroidManifest.xmlでサービスを定義してあるので、MainActivityからのstartForegroundServiceの呼び出しにかかわらず、呼び出し側からバインドできる状態です。startForegroundServiceを呼び出さずにバインドされるとonCreate()のみが呼ばれた状態になります。今回の実装の場合ですと、onStartCommandでAWS IoT Coreへ接続しているため、バインドできるがpublishMessageの呼び出しに失敗する形になります。
2つ目の話ですが、フォアグラウンドサービスは、MainActivityからstopServiceを呼び出すことで停止できます。しかし、他のクライアントからバインドされている状態ではまだサービスが破棄されず、すべてのクライアントからアンバインドされてから破棄されます。
AWS IoT Coreにポリシと証明書を作成
AWS IoT Coreを使えるように、まずは、AWSの管理コンソールから、AWS IoTの設定をしておく必要があります。
AWS管理コンソール
https://ap-northeast-1.console.aws.amazon.com/iot/home?region=ap-northeast-1#/home
左側のナビゲーションメニューからセキュリティの下のポリシを選択します。
「ポリシを作成」ボタンを押下します。ポリシ名は適当に決めます。
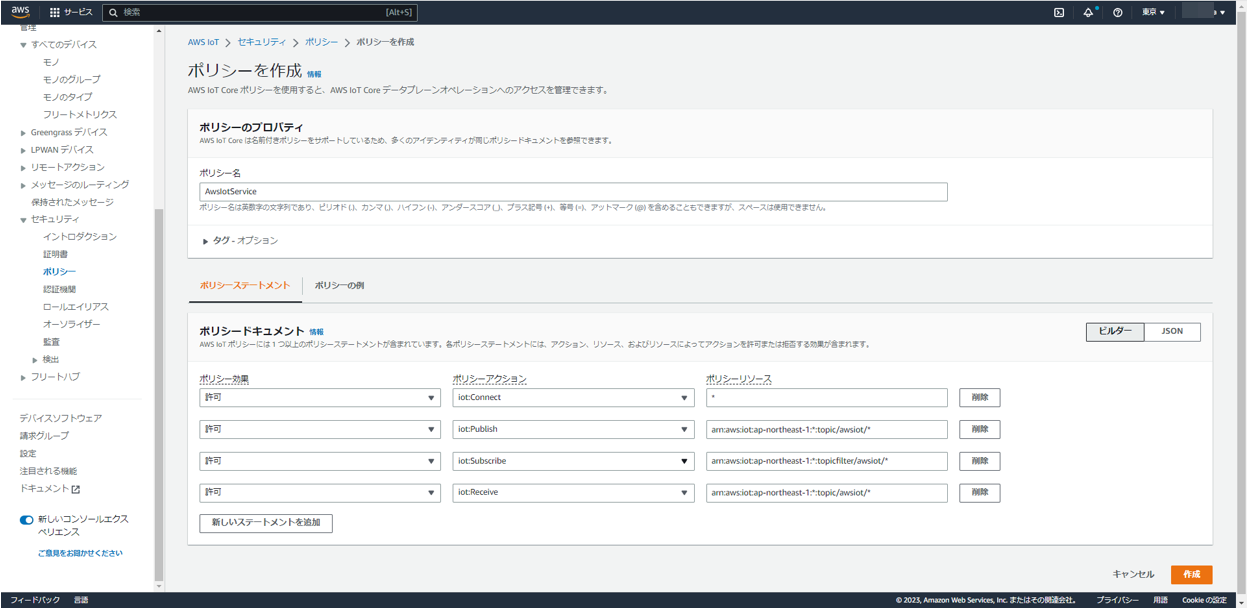
以下のアクションを許可します。
・iot:Connect : *
・iot:Publish : arn:aws:iot:ap-northeast-1::topic/awsiot/
・iot:Subscribe : arn:aws:iot:ap-northeast-1::topicfilter/awsiot/
・iot:Receive : arn:aws:iot:ap-northeast-1::topic/awsiot/
最後に「作成」ボタンを押下して作成完了です。
これで、awsiot/* という名前のトピックでPublishしたりSubscribeしたりできるようになります。
次に、上記ポリシを使える人であることを示すために、証明書を作成します。
左側のナビゲーションメニューからセキュリティの下の証明書を選択します。
「証明書を追加」ボタンを押下し、証明書を作成します。
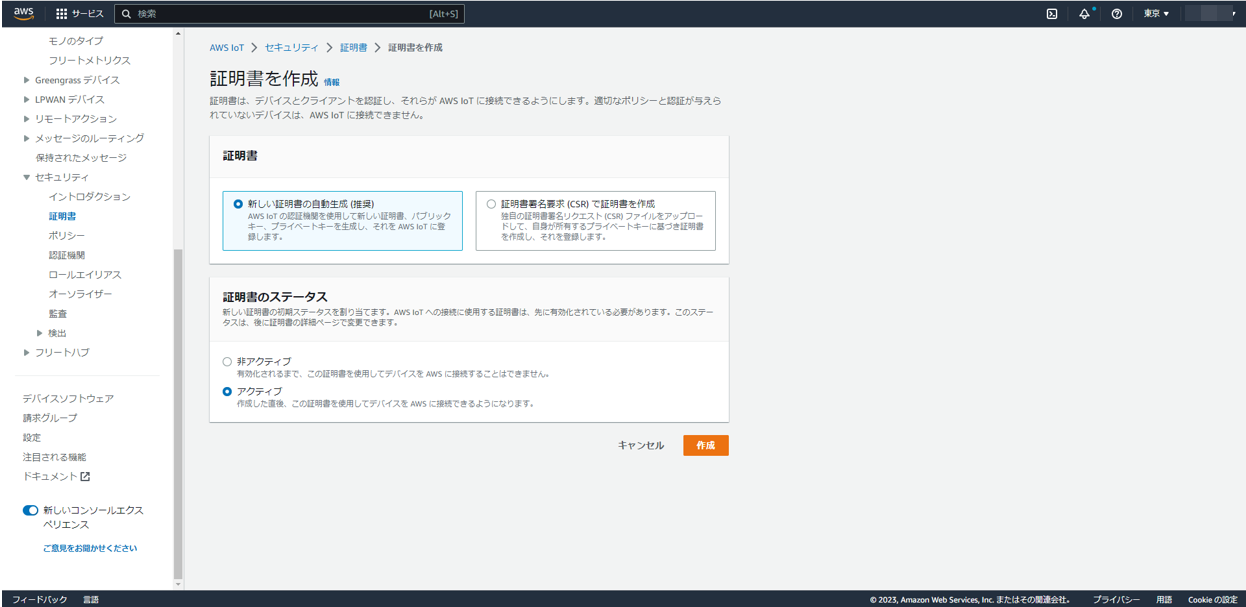
「新しい証明書の自動生成(推奨)」を選択します。また、すぐ使うので、証明書のステータスは「アクティブ」にします。
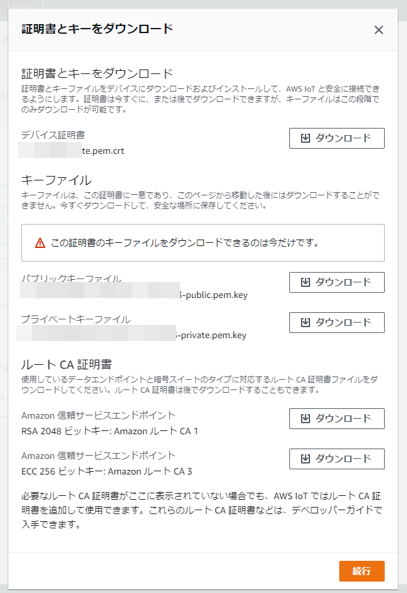
作成ボタンを押下すると、証明書が生成されるので、必要なファイルをダウンロードします。
デバイス証明書とプライベートキーファイルを使いますが、他のファイルもダウンロードしておきます。
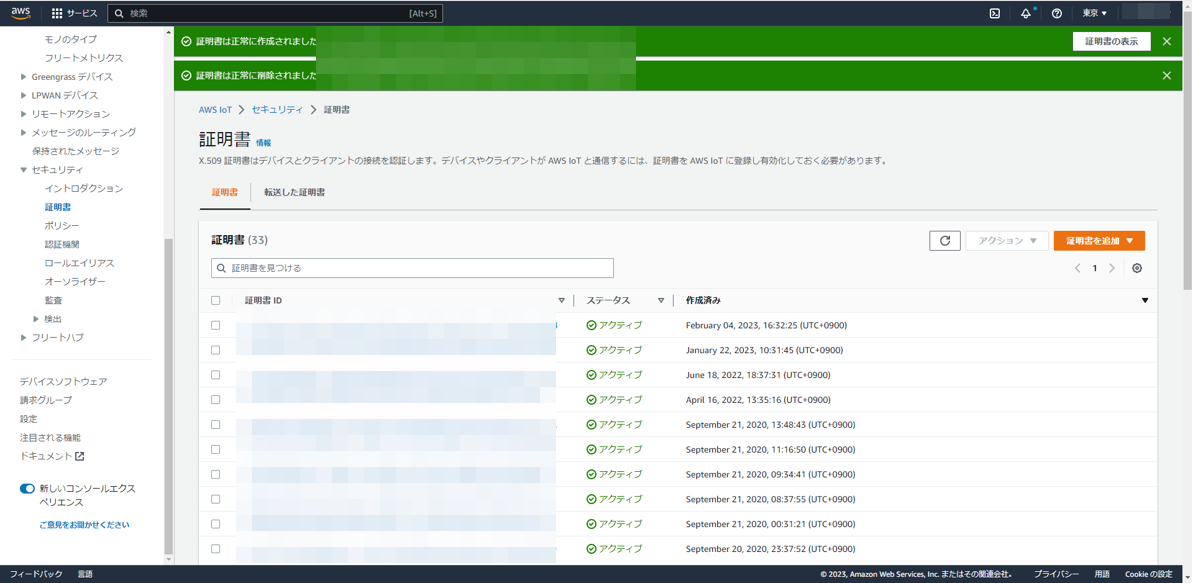
証明書一覧に、今回作成された証明書があるかと思います。それを選択します。
そして、「ポリシをアタッチ」ボタンを押下します。
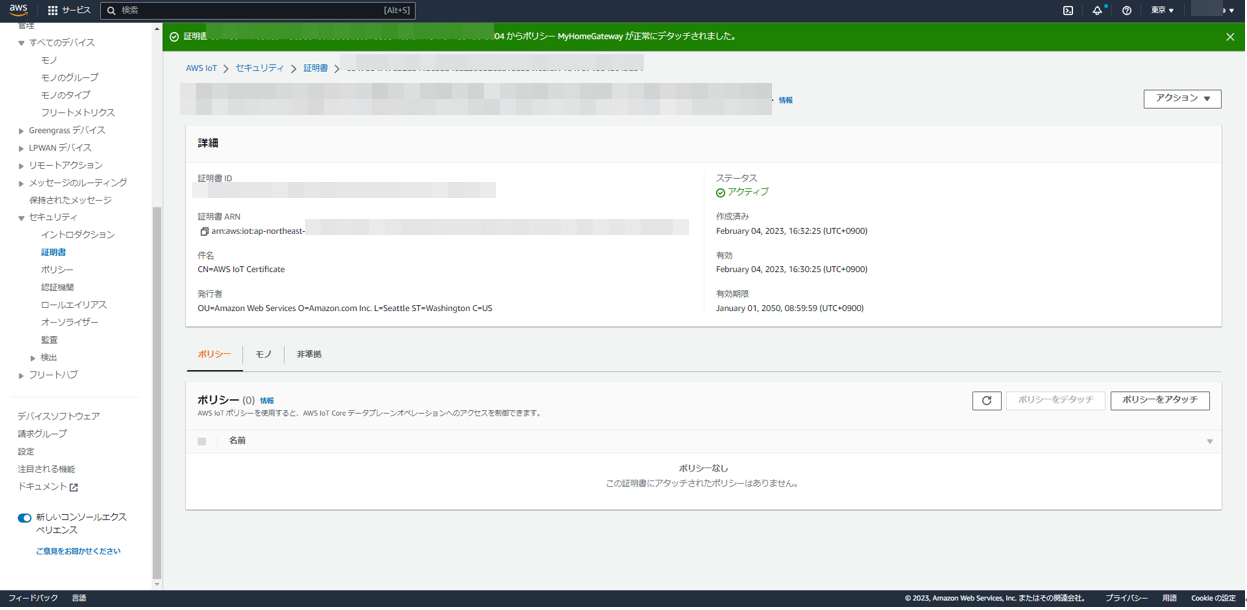
先ほど作成したポリシを選択して、「ポリシをアタッチ」ボタンを押下します。
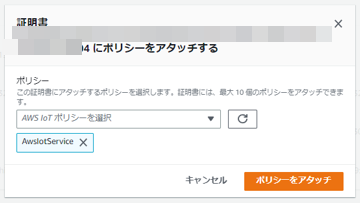
これでポリシの許可が証明書の持ち主に割当たりました。
AndroidからAWS IoT Coreに接続する
AWSがAndroid向けにAWS IoT Coreのライブラリを用意してくれているので簡単です。
appフォルダのbuild.gradleのdependenciesに以下を追記します。
implementation 'com.amazonaws:aws-android-sdk-iot:2.62.0'
まずは、このライブラリを使ってAWS IoT Coreに接続する前に、先ほどAWS管理コンソールからダウンロードした証明書とプライベートキーファイルを読み込み、アプリ内に保持しておく必要があります。
保持するためのstatic関数は以下のようにしました。
    public static void saveCertificate(String keyStorePath, String cert, String priv) {
        if (AWSIotKeystoreHelper.isKeystorePresent(keyStorePath, AWSIOT_KEY_STORE_NAME))
            AWSIotKeystoreHelper.deleteKeystoreAlias(AWSIOT_CERT_ID, keyStorePath, AWSIOT_KEY_STORE_NAME, AWSIOT_DEFAULT_PASSWORD);
        AWSIotKeystoreHelper.saveCertificateAndPrivateKey(AWSIOT_CERT_ID, cert, priv, keyStorePath, AWSIOT_KEY_STORE_NAME, AWSIOT_DEFAULT_PASSWORD);
    }
肝心のファイル読み出しは、MainActivity.javaの方で行っています。
便利なインテント「ACTION_OPEN_DOCUMENT」を使いました。
                Toast.makeText(this, "証明書ファイルを選択してください。", Toast.LENGTH_SHORT).show();
                Intent intent = new Intent(Intent.ACTION_OPEN_DOCUMENT);
                intent.addCategory(Intent.CATEGORY_OPENABLE);
                intent.setType("application/x-x509-ca-cert");
                startActivityForResult(intent, REQEST_CODE_FILEOPEN_CRT);
上記を呼び出すとファイル選択画面が表示されます。まずは証明書ファイル(application/x-x509-ca-cert)を選択します。
選択されると、以下のonActivityResultが呼び出されます。
そして、ファイルを読み出したのち、さらに続けて、プライベートキーファイル(application/pgp-keys)を選択するように促します。
プライベートキーファイルも選択されたら、ファイルを読み出したのち、さきほどのstatic関数を呼び出しています。
    @Override
    public void onActivityResult(int requestCode, int resultCode, Intent resultData) {
        super.onActivityResult(requestCode, resultCode, resultData);
        if( resultCode == RESULT_OK && requestCode == REQEST_CODE_FILEOPEN_CRT ){
            try {
                Uri fileUri = resultData.getData();
                InputStreamReader reader = new InputStreamReader(getContentResolver().openInputStream(fileUri));
                char[] buffer = new char[1024];
                StringWriter writer = new StringWriter();
                int size;
                while((size = reader.read(buffer)) != -1 ){
                    writer.write(buffer, 0, size);
                }
                crt_string = writer.toString();

                Toast.makeText(this, "秘密鍵ファイルを選択してください。", Toast.LENGTH_SHORT).show();
                Intent intent = new Intent(Intent.ACTION_OPEN_DOCUMENT);
                intent.addCategory(Intent.CATEGORY_OPENABLE);
                intent.setType("application/pgp-keys");
                startActivityForResult(intent, REQEST_CODE_FILEOPEN_KEY);
            }catch(Exception ex){
                Toast.makeText(this, ex.getMessage(), Toast.LENGTH_LONG).show();
            }
        }else if( resultCode == RESULT_OK && requestCode == REQEST_CODE_FILEOPEN_KEY ){
            try {
                Uri fileUri = resultData.getData();
                InputStreamReader reader = new InputStreamReader(getContentResolver().openInputStream(fileUri));
                char[] buffer = new char[1024];
                StringWriter writer = new StringWriter();
                int size;
                while((size = reader.read(buffer)) != -1 ){
                    writer.write(buffer, 0, size);
                }
                key_string = writer.toString();
                EditText edit;
                AwsIotService.saveCertificate(keyStorePath, crt_string, key_string);
                Toast.makeText(this, "証明書が設定されました。", Toast.LENGTH_LONG).show();
            }catch(Exception ex){
                Toast.makeText(this, ex.getMessage(), Toast.LENGTH_LONG).show();
            }
        }
    }
あとは、Serviceの派生クラスのonStartCommandの中でAWS IoT CoreのMQTTブローカに接続するために以下を呼び出します。
        String endpointPrefix = intent.getStringExtra("endpointPrefix");
        String keyStorePath = intent.getStringExtra("keyStorePath");
        mTopicName = intent.getStringExtra("topicName");
        String clientId = intent.getStringExtra("clientId");
        if (endpointPrefix != null && keyStorePath != null && clientId != null && mTopicName != null ) {
            try {
                mqttManager = new AWSIotMqttManager(clientId, Region.getRegion(Regions.AP_NORTHEAST_1), endpointPrefix);
                KeyStore keyStore = AWSIotKeystoreHelper.getIotKeystore(AWSIOT_CERT_ID, keyStorePath, AWSIOT_KEY_STORE_NAME, AWSIOT_DEFAULT_PASSWORD);
                mqttManager.connect(keyStore, new AWSIotMqttClientStatusCallback() {
                    @Override
                    public void onStatusChanged(AWSIotMqttClientStatus status, Throwable throwable) {
                        Log.d(TAG, "AWSIotMqttClientStatus changed.(" + status.toString() + ")");
                        if (status.equals(AWSIotMqttClientStatus.Connected)) {
                            mqttManager.subscribeToTopic(mTopicName, AWSIotMqttQos.QOS1, new AWSIotMqttNewMessageCallback() {
                                @Override
                                public void onMessageArrived(String topic, byte[] data) {
                                    Log.d(TAG, "onMessageArrived");
                                    String message = new String(data);
                                    fireReceiveMessage(topic, message);
                                }
                            });
                            isSubscribed = true;
                        }
                    }
                });
            } catch (Exception ex) {
                Log.d(TAG, ex.getMessage());
            }
        }
AWS IoT Coreに対して、connectを呼び出して接続を行い、接続が完了したらonStatusChangedが呼び出されるので、トピック名を指定してSubscribeを呼び出しています。
endpointPrefixとkeyStorePathとtopicNameとclientIdは、MainActivity側で指定できるようにしておきました。
endpointPrefixというのがありますが、これは、AWS管理コンソールのAWS IoT Coreの設定を選択すると表示されるデバイスデータエンドポイントにあります。
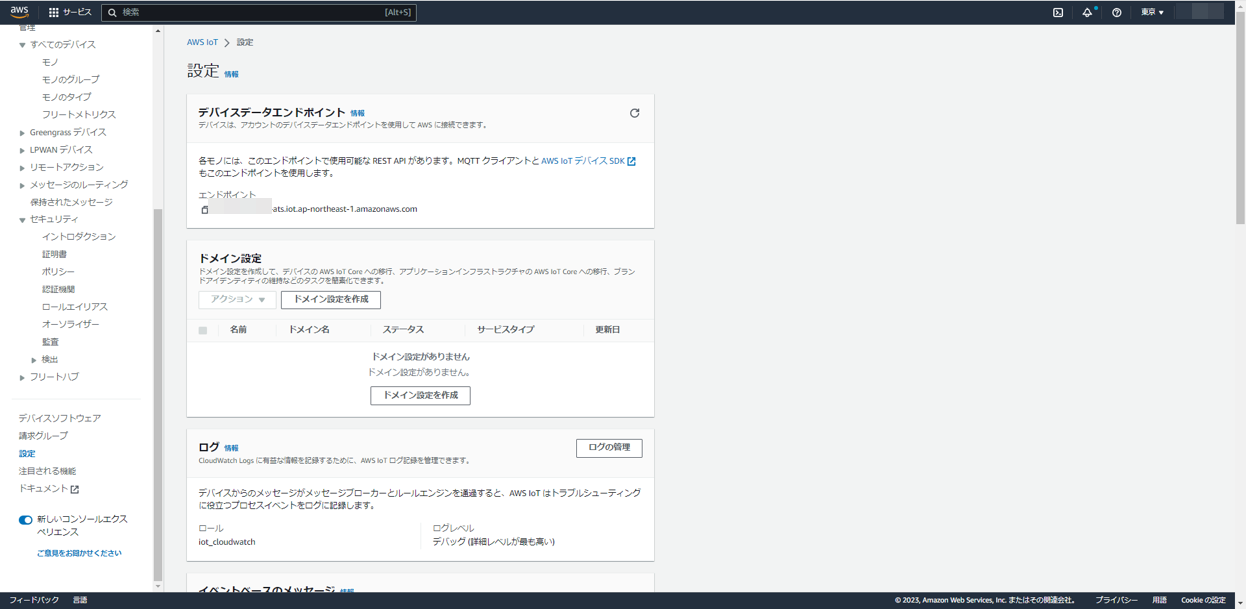
XXXXXXXX-ats.iot.ap-northeast-1.amazonaws.com
となっており、上記のXXXXXXXX-atsとなっている部分のことです。
AIDLを使った他のアプリからの呼び出し
AIDLを使うと、フォアグラウンドサービスとして立ち上げたサービスが公開する関数を別のアプリから呼び出したり、サービスから別のアプリのコールバック関数が呼び出されたりすることができます。
AIDLとは、呼び出し元、呼び出し側が、共通で認識しておくべきインタフェースを定義するものです。
Android Studioのプロジェクトから右クリックして、AIDLを生成します。
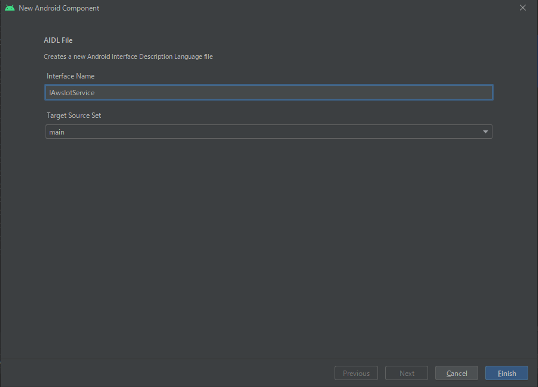
今回は、IAwsIotServiceとIAwsIotServiecListenerを作成します
package jp.or.myhome.sample.awsiotservice;

import jp.or.myhome.sample.awsiotservice.IAwsIotServiceListener;

interface IAwsIotService {
    void publishMessage(String topicName, String message);
    boolean isSubscribed();
    void addListener(IAwsIotServiceListener listener);
    void removeListener(IAwsIotServiceListener listener);
}
package jp.or.myhome.sample.awsiotservice;

interface IAwsIotServiceListener {
    void onReceiveMessage(String topicName, String message);
}
IAwsIotService.publishMessageは、AWS IoT CoreにMQTTメッセージを送信したいときに呼び出します
IAwsIotService.addListenerは、AWS IoT CoreからMQTTメッセージを受信した場合にコールバック呼び出しするためのIAwsIotServiceListenerのインスタンスを登録するためのものです。
IAwsIotServiceListener.onReceiveMessage は、AWS IoT CoreからMQTTメッセージを受信した場合に呼び出されるコールバック関数です。
この状態で一度ビルドすると、IAwsIotServiceListenerとIAwsIotServiceのクラスが生成されimportできるようになります。
この関数が呼び出し側から呼ばれたときのサービス側の実装を追加見ていきます。
    RemoteCallbackList<IAwsIotServiceListener> listeners;

    final IAwsIotService.Stub binder = new IAwsIotService.Stub() {
        @Override
        public void publishMessage(String topicName, String message) throws RemoteException {
            if( mqttManager == null )
                throw new IllegalStateException("is not subscribed");

            mqttManager.publishString(message, topicName == null ? mTopicName : topicName, AWSIotMqttQos.QOS1);
        }

        @Override
        public boolean isSubscribed() throws RemoteException {
            return isSubscribed;
        }

        @Override
        public void addListener(IAwsIotServiceListener listener) throws RemoteException {
            listeners.register(listener);
        }

        @Override
        public void removeListener(IAwsIotServiceListener listener) throws RemoteException {
            listeners.unregister(listener);
        }
    };
IAwsIotService.Stubの中身を実装しています。
publishMessage()が、AWS IoT CoreのMQTTブローカにPublishするための関数で、AWS IoTのライブラリのAPIを呼び出しています。
ちなみに、Exceptionを返したい場合は、返せるExceptionに限りがあるようです。
呼び出し元からaddListenerにコールバック関数を指定して呼び出されると、コールバック関数のインスタンスをlistenersに登録しておいています。後程使います。
出来上がったこのバインダbinderは、オーバライドする関数onBind()で呼び出し元に渡すことができます。
    @Override
    public IBinder onBind(Intent intent) {
        Log.d(TAG, "onBind called");
        return binder;
    }

    @Override
    public boolean onUnbind(Intent intent) {
        Log.d(TAG, "onUnbind called");
        return true;
    }

    @Override
    public void onRebind(Intent intent) {
        Log.d(TAG, "onRebind called");
    }
登録されるコールバック関数は、以下の関数で使っています。登録されたすべてのコールバック関数の、onReceiveMessage()を呼び出しています。それにより、呼び出し元のコールバック関数が発火する形になります。
    private void fireReceiveMessage(String topic, String message) {
        Log.d(TAG, "fireReceiveMessage");

        int num = listeners.beginBroadcast();
        try {
            for (int i = 0; i < num; i++) {
                try {
                    IAwsIotServiceListener listener = listeners.getBroadcastItem(i);
                    listener.onReceiveMessage(topic, message);
                } catch (RemoteException ex) {
                    Log.d(TAG, ex.getMessage());
                }
            }
        } catch (Exception ex) {
            Log.d(TAG, ex.getMessage());
        } finally {
            listeners.finishBroadcast();
        }
    }
この関数は、SubscribeによりMQTTメッセージを受信したとき(AWSIotMqttNewMessageCallback)に呼び出しています。
サービスの呼び出し
サービスの呼び出しは、バインダを使って呼び出します。
呼び出し元がサービスのインスタンスと同じアプリケーションの場合と、別のアプリケーションから呼び出す場合でちょっと異なりますが、今回は別のアプリケーションから呼び出してみます。
まず、同じAIDLを、今度は呼び出したいアプリケーションにコピーしておきます。
その後いったんビルドすると、それ用のクラスが生成されます。
次に、AndroidManifest.xmlに、接続するサービスのパッケージ名を指定します。Android 11以降はこれが必要だそうです。
    <queries>
        <package android:name="jp.or.myhome.sample.awsiotservice" />
    </queries>
(参考)パッケージの公開を求める宣言をする
https://developer.android.com/training/package-visibility/declaring?hl=ja
そして、以下を呼び出すことで、相手のサービスのバインダを取得することができます。
REMOTE_ACTION_NAME は、サービス側のAndroidManifest.xmlにおいて、serviceのintent-filterのactionで指定した値と同じにします。
public static final String REMOTE_ACTION_NAME = "AwsIotService";
                    Intent intent = new Intent(REMOTE_ACTION_NAME);
                    intent.setPackage(IAwsIotService.class.getPackage().getName());
                    bindService(intent, connection, Context.BIND_AUTO_CREATE);
bindServiceが成功すると、引数で指定したServiceConnectionのメソッドonServiceConnected()が呼び出され、引数でバインダを取得できます。
    private ServiceConnection connection = new ServiceConnection() {
        @Override
        public void onBindingDied(ComponentName className){
            Log.d(TAG, "onBindingDied(" + className.getClassName() + ")");
        }

        @Override
        public void onServiceConnected(ComponentName className, IBinder service) {
            Log.d(TAG, "onServiceConnected(" + className.getClassName() + ")");
            try {
                binder = IAwsIotService.Stub.asInterface(service);
                Log.d(TAG, "isSubscribed:" + binder.isSubscribed());
                binder.addListener(new IAwsIotServiceListener.Stub() {
                    @Override
                    public void onReceiveMessage(String topicName, String message) throws RemoteException {
                        Log.d(TAG, "onReceiveMessage: " + message);
                        try {
                            handler.sendTextMessage(message);
                        }catch(Exception ex){
                            Log.d(TAG, ex.getMessage());
                        }
                    }
                });
                mBound = true;
            }catch(Exception ex){
                Toast.makeText(getApplicationContext(), ex.toString(), Toast.LENGTH_LONG).show();
            }
        }

        @Override
        public void onServiceDisconnected(ComponentName className) {
            Log.d(TAG, "onServiceDisconnected(" + className.getClassName() + ")");
            unbindService(connection);
            mBound = false;
        }
    };
ついでに、binder.addListenerを呼び出して、コールバックを受け取れるようにしています。
(参考)Cordovaプラグインとして組み込む
横道にそれますが、Cordovaでプラグインの実装が面倒な場合、別アプリケーションとしてフォアグラウンドサービスを立ち上げ、AIDLで呼び出すCordovaプラグインを作れば、プラグイン開発の手間が減りますね。
plugin.xmlを例えば以下のように定義すればよいです。
<?xml version="1.0" encoding="UTF-8"?>
<plugin xmlns="http://apache.org/cordova/ns/plugins/1.0"
    id="cordova-plugin-sampleaidl" version="0.0.1">
    <name>SampleAidl</name>
    <js-module src="www/plugin_sampleaidl.js" name="sampleaidl">
        <clobbers target="sampleaidl" />
    </js-module>
    <platform name="android">
        <config-file target="res/xml/config.xml" parent="/*">
            <feature name="SampleAidl" >
                <param name="android-package" value="jp.or.sample.SampleAidl.Main"/>
                <param name="onload" value="true" />
            </feature>
        </config-file>
        <config-file target="AndroidManifest.xml" parent="/*">
            <queries>
                <package android:name="jp.or.myhome.sample.awsiotservice" />
            </queries>
        </config-file>
        <source-file src="src/android/jp/or/sample/SampleAidl/Main.java" target-dir="src/jp/or/sample/SampleAidl" />
        <source-file src="src/android/aidl/jp/or/myhome/sample/awsiotservice/IAwsIotService.aidl" target-dir="src/jp/or/myhome/sample/awsiotservice/" />
        <source-file src="src/android/aidl/jp/or/myhome/sample/awsiotservice/IAwsIotServiceListener.aidl" target-dir="src/jp/or/myhome/sample/awsiotservice/" />
    </platform>
</plugin>
ポイントは2つ。
source-file として、AIDLファイルを指定すれば、勝手に取り込んでくれます。
また、config-fileでqueriesの指定を追加します。
それ以外は、以下の参考の通りです。
Cordovaアプリ開発の備忘録(プラグイン編)
以上