今回は、Visual Studio Code(VSCode)の機能拡張を作っていきます。
ESP32で動くJavascript実行環境を作っていまして、普段使っているVSCodeからそのJavascriptの実装とアップロードができるようにしたかったのがモチベーションです。
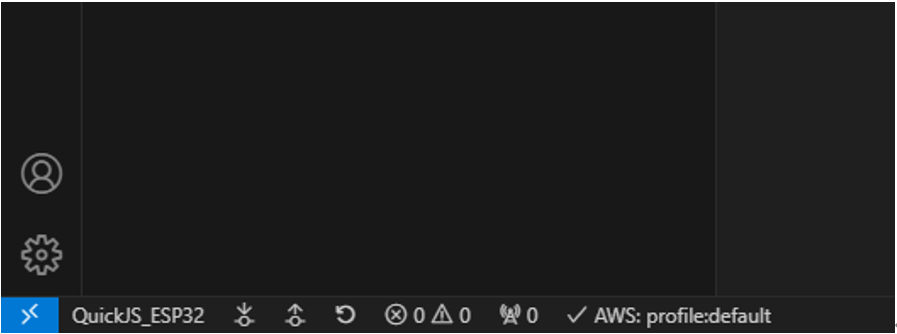
コマンドとしては、5つ作ります。また、VSCodeの画面の左下のステータスバーに、1つのテキストのボタンと3つのアイコンのボタンを作ります。
[VScode Extension Guide]
開発
・環境構築
・ひな型作成
・コマンドの実装
・ステータスバーのボタンの実装
・メッセージトーストの表示
・入力ダイアログ
・選択ダイアログ
・コマンドの実行
・クリップボードへのコピー
環境構築
> npm install -g yo generator-code
ひな型作成
適当なフォルダで以下を実行します。
> yo code
いろいろ聞いていますが、適当に入力します。
言語としてTypescriptでもいいですがJavascriptが簡単なのでそちらを選びました。
> yo code

     _-----_     ╭──────────────────────────╮
    |       |    │   Welcome to the Visual  │
    |--(o)--|    │   Studio Code Extension  │
   `---------´   │        generator!        │
    ( _´U`_ )    ╰──────────────────────────╯
    /___A___\   /
     |  ~  |
   __'.___.'__
 ´   `  |° ´ Y `

? What type of extension do you want to create? New Extension (JavaScript)
? What's the name of your extension? test
? What's the identifier of your extension? test
? What's the description of your extension?
? Enable JavaScript type checking in 'jsconfig.json'? No
? Initialize a git repository? Yes
? Which package manager to use? npm

Writing in C:\hogehoge\test...
   create test\.vscode\extensions.json
   create test\.vscode\launch.json
   create test\test\extension.test.js
   create test\.vscodeignore
   create test\.gitignore
   create test\README.md
   create test\CHANGELOG.md
   create test\vsc-extension-quickstart.md
   create test\jsconfig.json
   create test\extension.js
   create test\package.json
   create test\.vscode-test.mjs
   create test\.eslintrc.json

Changes to package.json were detected.
これにより、extension.jsやpackage.jsonなど、必要なファイルが自動生成されます。
コマンドの実装
async function activate(context) に実装します。
以下の場合、QuickJS_ESP32_Console.code_uploadという名前のコマンドが定義されます。
const module_name = "QuickJS_ESP32_Console";

	var disposable = vscode.commands.registerCommand(module_name + '.code_upload', async function () {

// ここに処理内容を実装する

	});
	context.subscriptions.push(disposable);
ステータスバーのボタンの実装
textのところに普通の文字列を指定してもいいですし、$くくりでアイコンを表示することもできます。
このボタンをクリックすると、commandで指定したコマンドが実行されます。
	var myButton = vscode.window.createStatusBarItem(vscode.StatusBarAlignment.Left, defaultPriority);
	myButton.text = "$(repo-push)";
	myButton.tooltip = "コードをダウンロードします。";
	myButton.command = module_name + ".code_download";
	myButton.show();
メッセージトーストの表示
処理中に、右下にトーストを表示させる場合です。
vscode.window.showInformationMessage('アップロードしました。');
入力ダイアログ
ユーザに何か文字を入力してもらうためのダイアログを表示します。
		const ipaddress = await vscode.window.showInputBox({
			title: '対象デバイスのIPアドレスを指定してください。',
			value: targetIp
		});
		if (ipaddress) {
// 入力されたときの処理
		}else{
			vscode.window.showInformationMessage('キャンセルされました。');
		}
選択ダイアログ
ユーザにいずれかを選択してもらいます。
		const selected = await vscode.window.showQuickPick(
				['Upload', 'Download', 'Restart', 'Setting'],
				{ placeHolder: 'コマンドを選択して下さい。' });
		switch(selected){
			case "Upload": /* 何かの処理 */; break;
			case "Download": /* 何かの処理 */; break;
			case "Restart": /* 何かの処理 */; break;
			case "Setting": /* 何かの処理 */; break;
		}
コマンドの実行
コード上からコマンドを実行します。
vscode.commands.executeCommand(module_name + '.code_download')
選択中のファイルの内容の取得
作成中のコードの内容をESP32にアップロードしたかったため、選択中のファイルの内容を取得する必要がありました。
		let script;
		try{
			const editor = vscode.window.activeTextEditor;
			script = editor.document.getText();
		}catch(error){
			console.error(error);
			vscode.window.showInformationMessage('ファイルがありません。');
			return;
		}
クリップボードへのコピー
テキストをクリップボードにコピーします。
vscode.env.clipboard.writeText(script);
ソースコード
const vscode = require('vscode');
const Arduino = require('./Arduino');

let targetIp = null;
let arduino = null;
const module_name = "QuickJS_ESP32_Console";
const defaultPriority = 1000;

/**
 * @param {vscode.ExtensionContext} context
 */
async function activate(context) {
	console.log("activate called");

	if( !targetIp ){
		const ipaddress = await vscode.window.showInputBox({
			title: '対象デバイスのIPアドレス'
		});
		if (ipaddress) {
			targetIp = ipaddress;
		}
	}

	if( targetIp ){
		arduino = new Arduino("http://" + targetIp);
		vscode.window.showInformationMessage(`対象デバイス(${targetIp})を開きました。`);
	}

	var myButton = vscode.window.createStatusBarItem(vscode.StatusBarAlignment.Left, defaultPriority);
	myButton.text = "QuickJS_ESP32";
	myButton.command = module_name + ".command_menu";
	myButton.show();

	var myButton = vscode.window.createStatusBarItem(vscode.StatusBarAlignment.Left, defaultPriority);
	myButton.text = "$(repo-pull)";
	myButton.tooltip = "コードをアップロードします。";
	myButton.command = module_name + ".code_upload";
	myButton.show();

	var myButton = vscode.window.createStatusBarItem(vscode.StatusBarAlignment.Left, defaultPriority);
	myButton.text = "$(repo-push)";
	myButton.tooltip = "コードをダウンロードします。";
	myButton.command = module_name + ".code_download";
	myButton.show();

	var myButton = vscode.window.createStatusBarItem(vscode.StatusBarAlignment.Left, defaultPriority);
	myButton.text = "$(debug-restart)";
	myButton.tooltip = "対象デバイスを再起動します。";
	myButton.command = module_name + ".terminal_restart";
	myButton.show();

	var disposable = vscode.commands.registerCommand(module_name + '.code_upload', async function () {
		if( !targetIp ){
			vscode.window.showInformationMessage('対象デバイスのIPアドレスを指定してください。');
			return;
		}

		let script;
		try{
			const editor = vscode.window.activeTextEditor;
			script = editor.document.getText();
		}catch(error){
			console.error(error);
			vscode.window.showInformationMessage('ファイルがありません。');
			return;
		}
		try{
			await arduino.code_upload_main(script, false);

			vscode.window.showInformationMessage('アップロードしました。');
		}catch(error){
			console.error(error);
			vscode.window.showInformationMessage('アップロードに失敗しました。');
		}
	});
	context.subscriptions.push(disposable);

	disposable = vscode.commands.registerCommand(module_name + '.command_menu', async function () {
		const selected = await vscode.window.showQuickPick(
				['Upload', 'Download', 'Restart', 'Setting'],
				{ placeHolder: 'コマンドを選択して下さい。' });
		switch(selected){
			case "Upload": 	vscode.commands.executeCommand(module_name + '.code_upload'); break;
			case "Download": 	vscode.commands.executeCommand(module_name + '.code_download'); break;
			case "Restart": 	vscode.commands.executeCommand(module_name + '.terminal_restart'); break;
			case "Setting": 	vscode.commands.executeCommand(module_name + '.setting_host'); break;
		}
	});
	context.subscriptions.push(disposable);

	disposable = vscode.commands.registerCommand(module_name + '.setting_host', async function () {
		const ipaddress = await vscode.window.showInputBox({
			title: '対象デバイスのIPアドレスを指定してください。',
			value: targetIp
		});
		if (ipaddress) {
			targetIp = ipaddress;
			arduino = new Arduino("http://" + targetIp);
			vscode.window.showInformationMessage(`対象デバイス(${targetIp})を開きました。`);
		}else{
			vscode.window.showInformationMessage('キャンセルされました。');
		}
	});
	context.subscriptions.push(disposable);

	var disposable = vscode.commands.registerCommand(module_name + '.code_download', async function () {
		if( !targetIp ){
			vscode.window.showInformationMessage('対象デバイスのIPアドレスを指定してください。');
			return;
		}

		try{
			const script = await arduino.code_download();

			vscode.env.clipboard.writeText(script);
			vscode.window.showInformationMessage('クリップボードにダウンロードしたコードをコピーしました。');

			// var answer = await vscode.window.showInformationMessage('コードを差し替えますがよいですか?', 'Yes', 'No');
			// console.log(answer);

			// vscode.window.activeTextEditor.edit(builder => {
			// 	const doc = vscode.window.activeTextEditor.document;
			// 	builder.replace(new vscode.Range(doc.lineAt(0).range.start, doc.lineAt(doc.lineCount - 1).range.end), script);
			// });

		}catch(error){
			console.error(error);
			vscode.window.showInformationMessage('ダウンロードに失敗しました。');
		}
	});
	context.subscriptions.push(disposable);

	var disposable = vscode.commands.registerCommand(module_name + '.terminal_restart', async function () {
		if( !targetIp ){
			vscode.window.showInformationMessage('対象デバイスのIPアドレスを指定してください。');
			return;
		}

		try{
			await arduino.restart();
		}catch(error){
			console.error(error);
			vscode.window.showInformationMessage('再起動に失敗しました。');
		}
	});
	context.subscriptions.push(disposable);
}

function deactivate() {}

module.exports = {
	activate,
	deactivate
}
コマンドの定義
コマンドは、package.jsonに定義します。
  "contributes": {
    "commands": [
      {
        "command": "QuickJS_ESP32_Console.command_menu",
        "title": "QuickJS_ESP32: Menu"
      },
      {
        "command": "QuickJS_ESP32_Console.code_upload",
        "title": "QuickJS_ESP32: Upload"
      },
      {
        "command": "QuickJS_ESP32_Console.code_download",
        "title": "QuickJS_ESP32: Download"
      },
      {
        "command": "QuickJS_ESP32_Console.setting_host",
        "title": "QuickJS_ESP32: Setting"
      },
      {
        "command": "QuickJS_ESP32_Console.terminal_restart",
        "title": "QuickJS_ESP32: Restart"
      }
    ]
  },
デバッグ
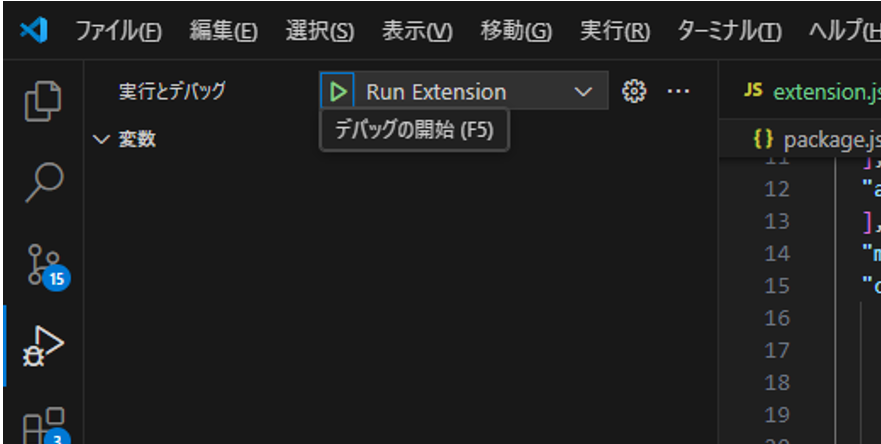
VSCodeで、「実行とデバッグ」から、Run Extensionを選択すると、別のVSCodeが立ち上がります。今回の機能拡張がインストールされた状態ですので、すぐにコマンドを実行できます。
コマンドの実行は、Ctrl+Shift+Pを押して、検索のところに、QuickJSと入れると、コマンドの選択肢が表示されます。
もちろん、もとのVSCode上でブレイクポイントで処理を止めることもできます。
公開
> npx vsce login <publisher name>
実際には上記の前にパブリッシャーIDを取得したりアクセストークンを生成したりする必要がありますが、詳細は以下を参考させていただきました。ただし、画面が結構変わってるので注意です。
ちなみに、package.jsonに以下のような文字を入れる必要がありました。ご自身の環境に合わせてください。
  "publisher": "poruruba",
  "repository": {
    "type": "git",
    "url": "https://github.com/poruruba/QuickJS-ESP32-Console.git"
  },
また、LICENSEファイルも置く必要がありました。(GitHubに置いたときに作られたものを使いました)
参考
ESP32で動くJavascript実行環境
・https://poruruba.booth.pm/items/3735175
・https://github.com/poruruba/QuickJS_ESP32_IoT_Device_M5Unified
作成した機能拡張
・https://marketplace.visualstudio.com/items?itemName=poruruba.QuickJS-ESP32-Console
・https://github.com/poruruba/QuickJS-ESP32-Console
以上


