概要
YDLIDARのROS2パッケージを使ってGalacticでYDLIDARを動かす方法のメモ
動作環境
OS: ubuntu20.04.3LTS
YDLIDAR : YDLiDAR X2
ROS2 : Galactic
YDLidar SDKのインストール
こちらのリポジトリからYDLidar-SDKをクローンしてインストール
$ cd
$ git clone https://github.com/YDLIDAR/YDLidar-SDK
$ cd YDLidar-SDK/build
$ cmake ..
$ make
$ sudo make install
YDLIDAR ROS2 Driverのインストール
ワークスペースの作成
$ cd
$ mkdir -p ~/ydlidar_ros2_ws/src
ROS2パッケージのインストール
$ cd ~/ydlidar_ros2_ws/src
$ git clone https://github.com/YDLIDAR/ydlidar_ros2_driver
$ cd ~/ydlidar_ros2_ws
$ colcon build --symlink-install
設定ファイル ydlidar.yamlの修正
ydlidar_ros2_driver/params にあるydlidar.yamlを使用するYDLiDARに合わせて変更する。
以下はYDLiDAR X2の例
ydlidar.yaml
ydlidar_ros2_driver_node:
  ros__parameters:
    port: /dev/ttyUSB0
    frame_id: laser_frame
    ignore_array: ""
    baudrate: 115200
    lidar_type: 1
    device_type: 0
    sample_rate: 3
    abnormal_check_count: 4
    resolution_fixed: true
    reversion: false
    inverted: true
    auto_reconnect: true
    isSingleChannel: true
    intensity: false
    support_motor_dtr: true
    angle_max: 180.0
    angle_min: -180.0
    range_max: 12.0
    range_min: 0.1
    frequency: 10.0
    invalid_range_is_inf: false
パラメータはYDLiDARのROSパッケージにあるlaunchファイルのrosparamの値を参照した
launchファイルの変更
Python launchファイルをGalacticで動作するように変更する。
変更点
・node_namespace='/',をコメントアウト
・node_executable, node_nameをそれぞれexecutable, nameに変更
・ydlidar_ros2_driverを起動するLifecycleNodeをNodeに変更
ydlidar_launch_view.py
# !/usr/bin/python3
from ament_index_python.packages import get_package_share_directory

from launch import LaunchDescription
from launch_ros.actions import LifecycleNode
from launch_ros.actions import Node
from launch.actions import DeclareLaunchArgument
from launch.substitutions import LaunchConfiguration
from launch.actions import LogInfo

import lifecycle_msgs.msg
import os

def generate_launch_description():
    share_dir = get_package_share_directory('ydlidar_ros2_driver')
    rviz_config_file = os.path.join(share_dir, 'config','ydlidar.rviz')
    parameter_file = LaunchConfiguration('params_file')
    node_name = 'ydlidar_ros2_driver_node'

    params_declare = DeclareLaunchArgument('params_file',
                                           default_value=os.path.join(
                                               share_dir, 'params', 'ydlidar.yaml'),
                                           description='FPath to the ROS2 parameters file to use.')

    driver_node = Node(package='ydlidar_ros2_driver',
                                executable='ydlidar_ros2_driver_node',
                                name='ydlidar_ros2_driver_node',
                                output='screen',
                                emulate_tty=True,
                                parameters=[parameter_file],
                                #node_namespace='/',
                                )
    tf2_node = Node(package='tf2_ros',
                    executable='static_transform_publisher',
                    name='static_tf_pub_laser',
                    arguments=['0', '0', '0.02','0', '0', '0', '1','base_link','laser_frame'],
                    )
    rviz2_node = Node(package='rviz2',
                    executable='rviz2',
                    name='rviz2',
                    arguments=['-d', rviz_config_file],
                    )

    return LaunchDescription([
        params_declare,
        driver_node,
        tf2_node,
        rviz2_node,
    ])
実行
YDLiDARをPCに接続して実行権限を付与
$ sudo chmod 777 /dev/ttyUSB0
rviz2に表示するlaunchを実行
$ source ~/ydlidar_ros2_ws/install/setup.bash
$ ros2 launch ydlidar_ros2_driver ydlidar_launch_view.py
そのままでは点群が表示されないのでrviz2のLaserScan, Topicの Reliability Policy の項目をSystem DefaultからBest Effortに変更
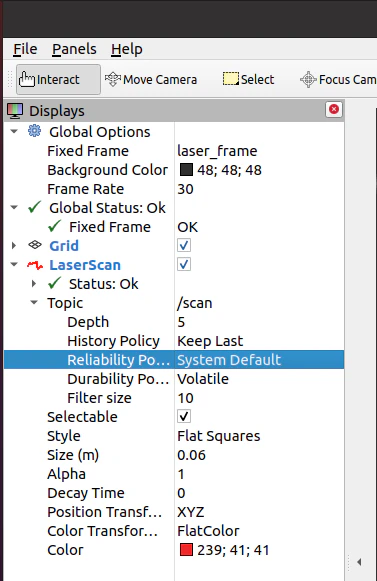
rviz2に点群が表示される。

参考