JAWSUG HPC支部 第16回勉強会 ParallelCluster Workshop
https://jawsug-hpc.connpass.com/event/132565/
Github : https://github.com/porcaro33/aws-parallelcluster-workshop
ParallelCluster Workshop Environment
1. What is ParallelCluster?
- AWS ParallelCluster は、AWS がサポートするオープンソースのクラスター管理ツールです。このツールは、AWS クラウドでハイパフォーマンスコンピューティング (HPC) クラスターを簡単にデプロイおよび管理するのに役立ちます。オープンソース CfnCluster プロジェクト上に構築されている AWS ParallelCluster を使用すると、AWS にすばやく HPC コンピューティング環境を構築できます。必要なコンピューティングリソースと共有ファイルシステムが自動的に設定されます。AWS ParallelCluster は、さまざまなバッチスケジューラ (AWS Batch、SGE、Torque、Slurm) で使用できます。AWS ParallelCluster では、クイックスタート PoC (概念実証) および本番稼働用デプロイのいずれも可能です。また、AWS ParallelCluster には、DNA シーケンスワークフロー全体を自動化するゲノミクスポータルなど、高度なワークフローを構築することもできます。
- https://docs.aws.amazon.com/ja_jp/parallelcluster/latest/ug/what-is-aws-parallelcluster.html
2. Infrastructure as Code x GitOps
- シンプルな設定ファイルとスクリプトでクラスターを記述できるのでIaCにもってこい。
- Gitでバージョン管理して、誰がいつ何を変更したかもバッチリ
- https://www.weave.works/technologies/gitops/
3. Build Infrastructure
Prerequisites
- まずはAWSにログイン https://console.aws.amazon.com/
- Oregonリージョンに移動、ログインしたユーザがAdmin権限であることを確認してください。
Create KeyPair
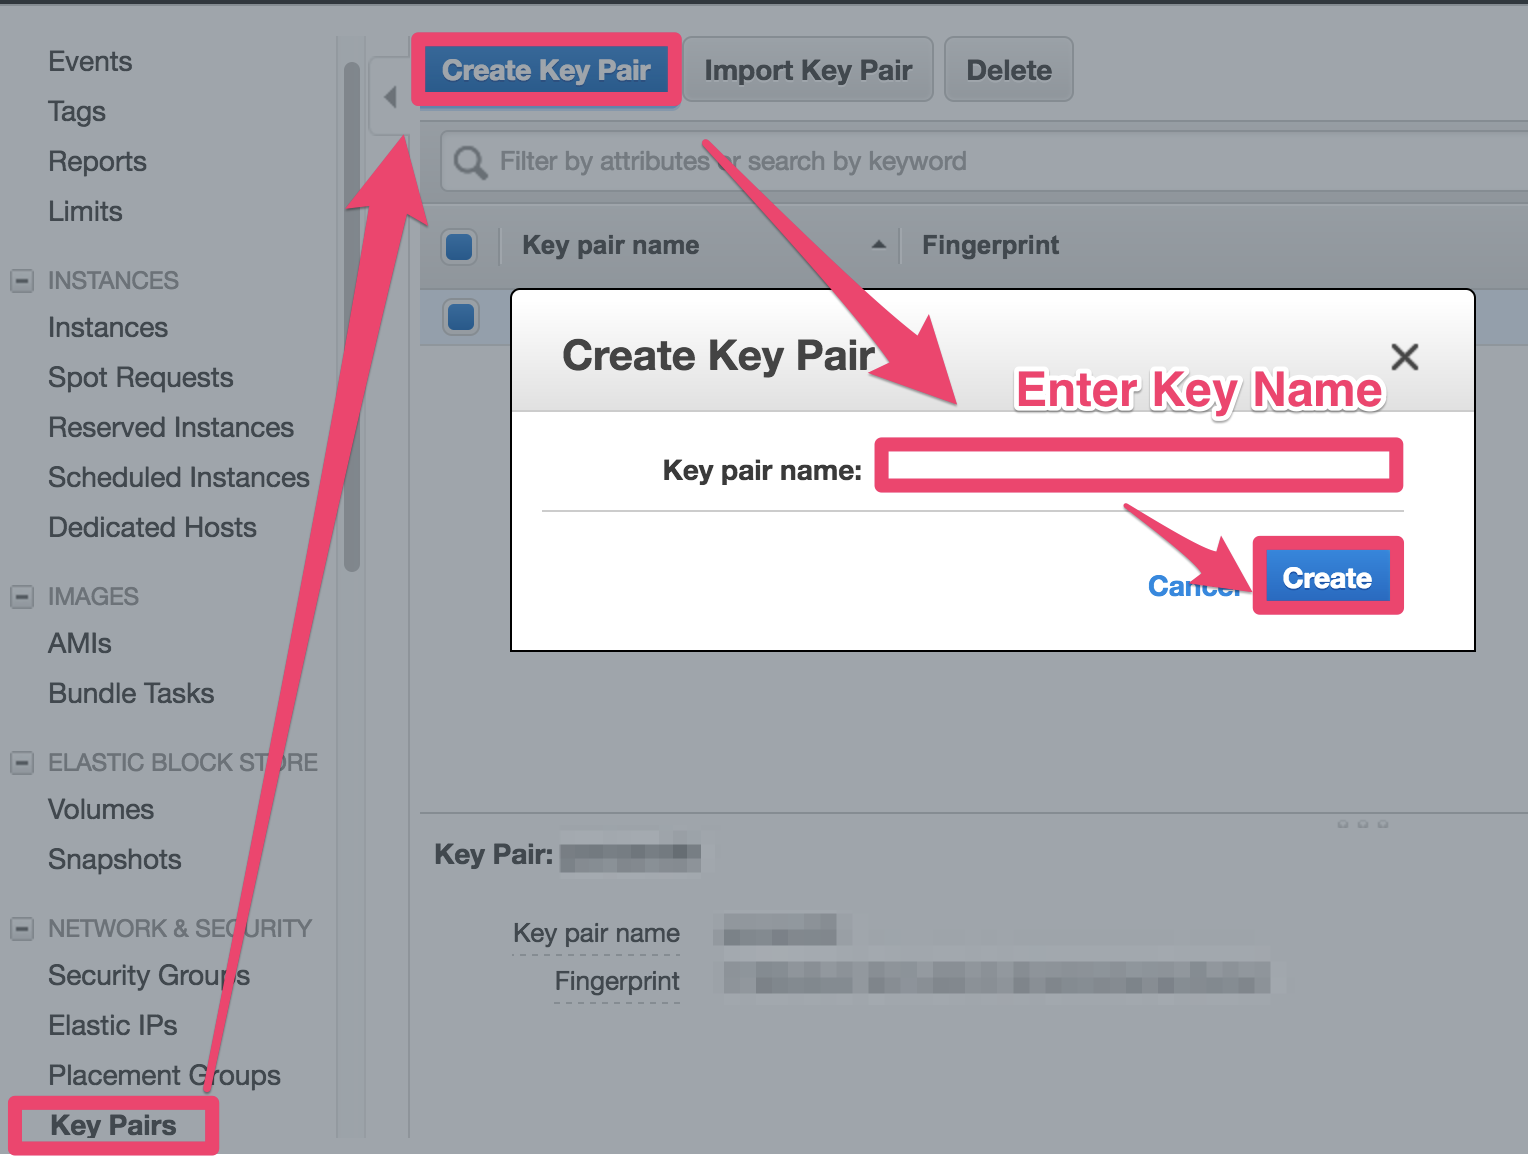
- Bastion Serverにアクセスするのに使用するKeyPairを作成します。
- 後ほどCloudFormationを実行するときにKeyNameを入力するのでメモしといてください。
AWS Console -> EC2 -> Key Pairs -> Create Key Pair -> Enter key name -> Create
CentOS Subscription
- このWorkshopではCentOS7でEC2を立てていきますが、CentOSを使うときはAMI Subscriptionが必要です。
- Subscribe -> Accept
Run CloudFormation
-
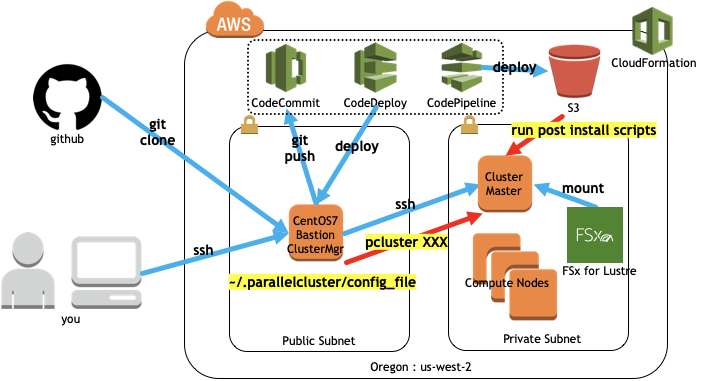
ParallelClusterで構築するクラスターの管理ノード兼踏み台ノードとして、CentOS7をPublic Subnetに構築します。このワークショップではCloudFormationで必要な環境を構築してしまいます。
-
VPC
-
Subnets
-
SecurityGroup
-
Bastion EC2 (CentOS7)
-
Bastion Instance Role
-
S3 Bucket
-
CodeCommit repo
-
...etc
-
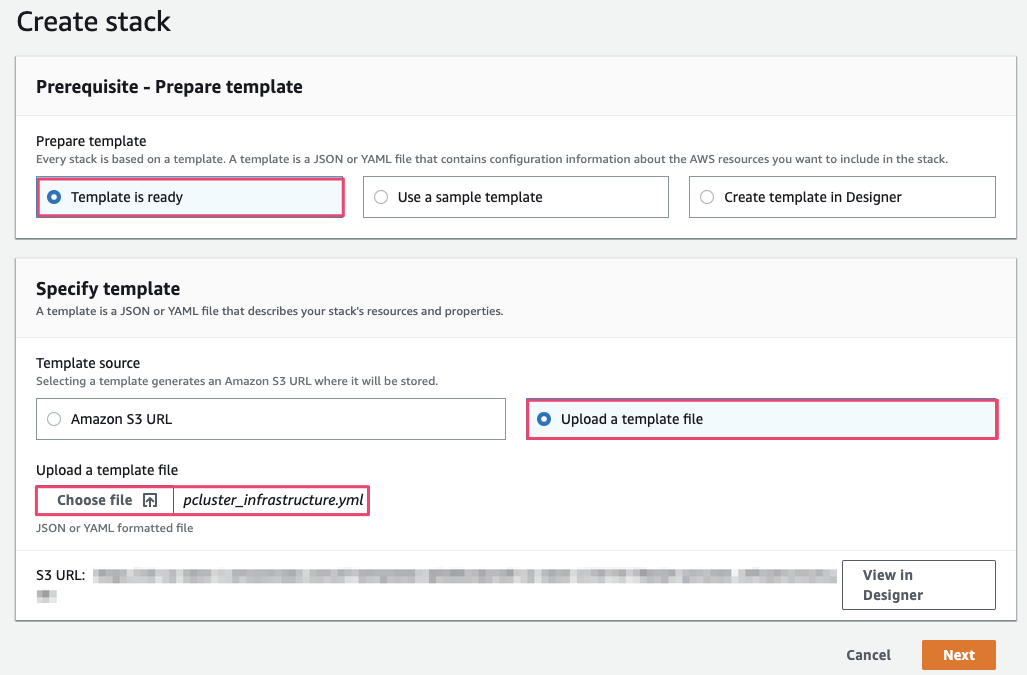
CloudFormationテンプレートをGithubからダウンロード
https://raw.githubusercontent.com/porcaro33/aws-parallelcluster-workshop/master/pcluster_infrastructure.yml -
CloudFormation -> Create New Stack -> Choose File -> Next
-
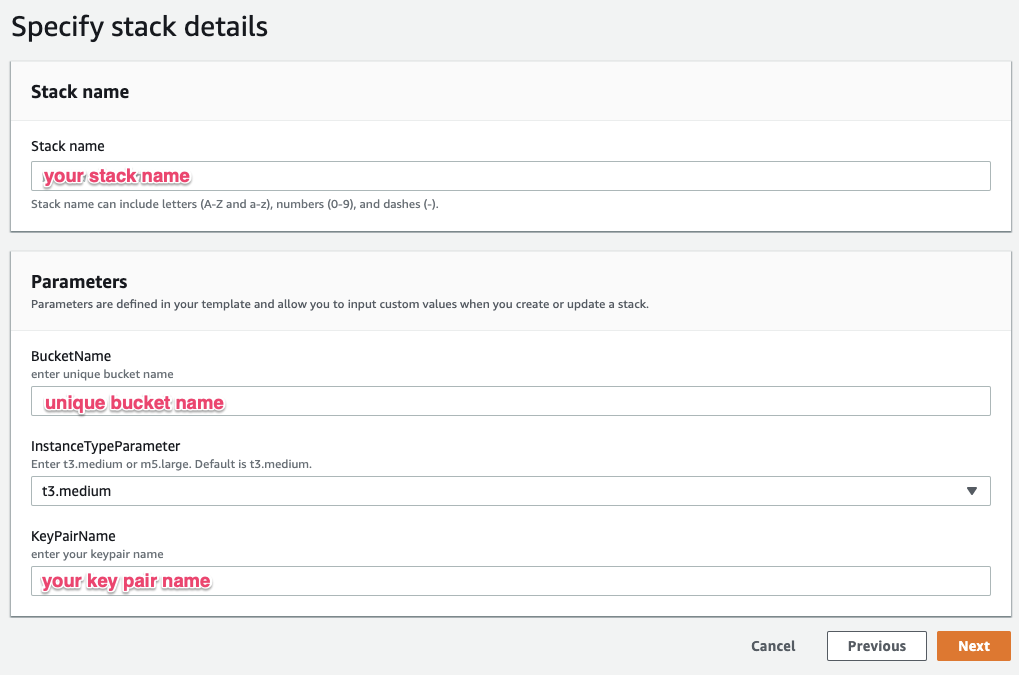
Enter Stack Name, Bucket Name, KeyPair Name -> Next
-
Next -> checkin at "I acknowledge that AWS CloudFormation..." -> Create
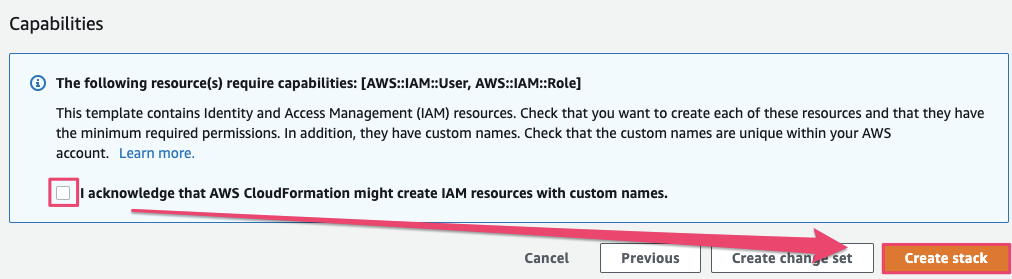
-
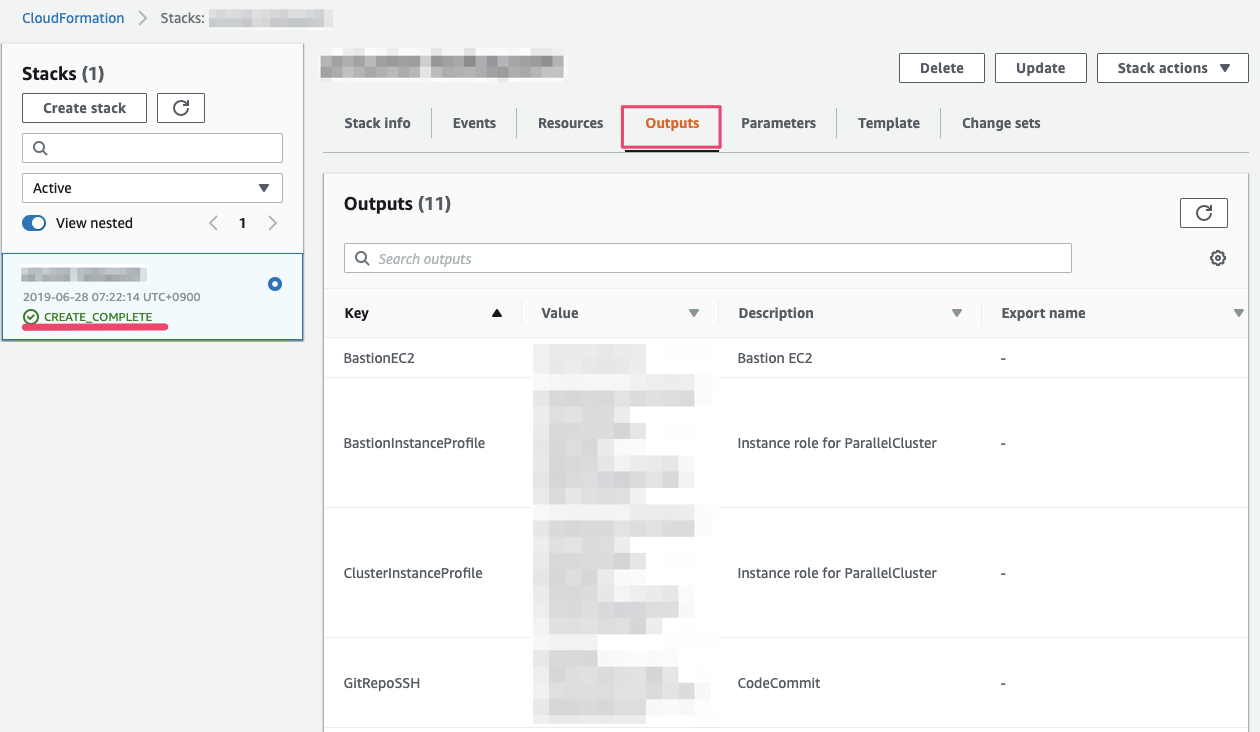
CloudFormaitonが収束したら、Outputsを見てください。ここの情報をあとでスクリプト編集をするときに使います。このBrowser Tabは残しておいてください。
4. Build Pipeline for ParallelCluster
Login to the bastion server
- CloudFormationで作成したCentOS7サーバにログインします。お好きなssh clientでログインしてください。ユーザ名は"centos"です。
ssh -i <path_to_keypair> centos@<IP_from_CF_OUTPUT>
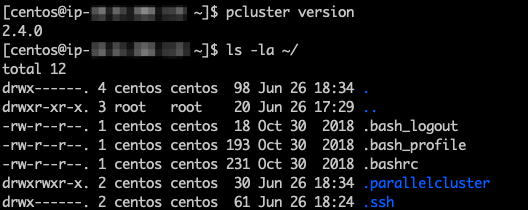
- parallelclusterはインストール済みです。確認してみましょう。またhomeに".parallelcluster"というフォルダがあるのを確認しましょう。
pcluster version
ls -la ~/
Create SSH key
- CodeCommitにアクセスするためのsshkeyを作成します。public keyを表示して内容をコピーしましょう。
ssh-keygen -f ~/.ssh/id_rsa -q -N ""
cat ~/.ssh/id_rsa.pub
- AWS Console -> IAM -> Users -> pcluster-admin -> Upload SSH public key -> public key貼り付け -> Upload SSH public key -> copy "SSH key ID"

SSH Config
- CodeCommitを使うための設定をしていきます。configファイルに先ほどコピーしたSSH key IDをセットします。
cd
git clone https://github.com/porcaro33/aws-parallelcluster-workshop.git
cd aws-parallelcluster-workshop/
vi config
- SSH key IDをセットしたconfigファイルを.sshフォルダにおいて、パーミッションを変更します。最後にCodeCommitへのsshを確認します。
cp ~/aws-parallelcluster-workshop/config ~/.ssh/config
chmod 600 ~/.ssh/config
ssh git-codecommit.us-west-2.amazonaws.com

Working on CodeCommit
- CodeCommitからgit cloneして空のローカルリポジトリを作っておきます。
cd
git clone ssh://git-codecommit.us-west-2.amazonaws.com/v1/repos/pcluster-git
- いくつかのファイルとフォルダをgithubからコピーして、CodeCommitにpushします。
cp -r ~/aws-parallelcluster-workshop/configs ~/pcluster-git
cp -r ~/aws-parallelcluster-workshop/projects ~/pcluster-git
cp -r ~/aws-parallelcluster-workshop/appspec.yml ~/pcluster-git/appspec.yml
cd ~/pcluster-git
git add .
git commit -m "initial commit"
git push origin master
-
push完了したら、実際にCodeCommitにアップされているか確認しましょう。
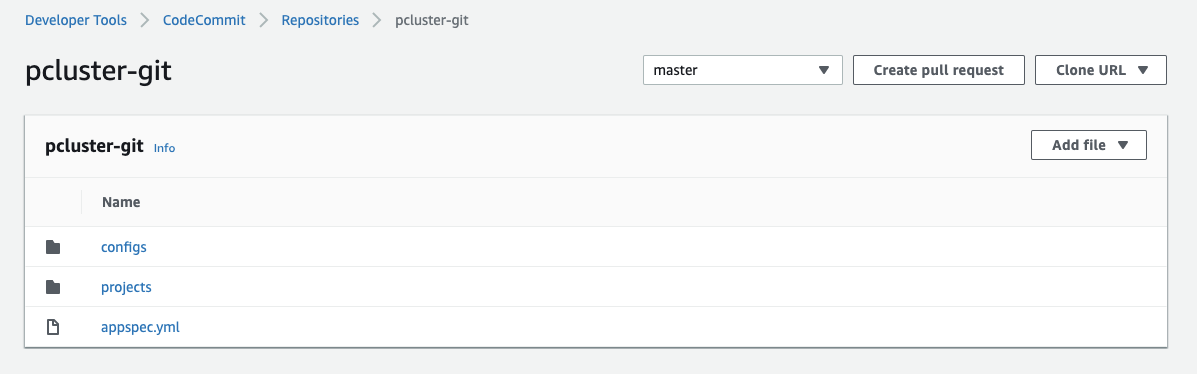
-
ここまでで、CodeCommitの準備はできました。ここからはCodePileline, CodeDeployを設定して、Pipelineを完成させます。
Create Pipeline to S3
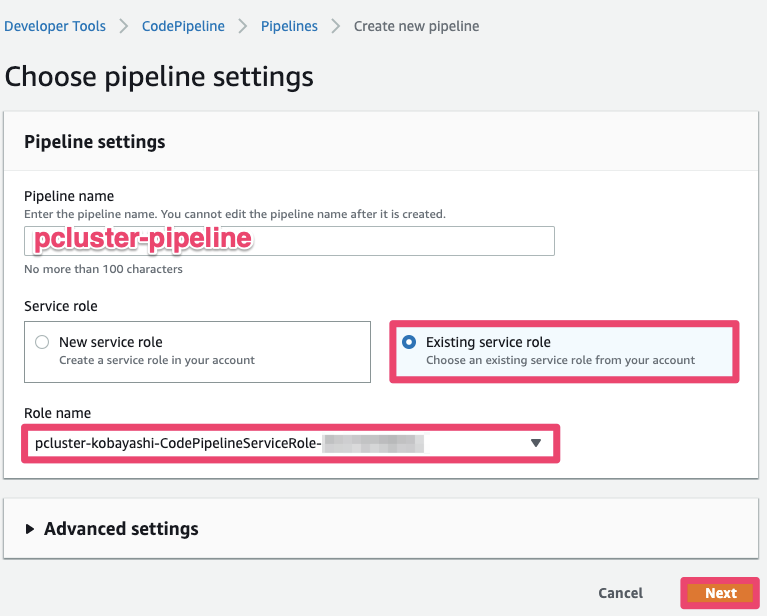
AWS Cosole -> CodePipeline -> Create pipeline
-
Pipeline name : pcluster-pipeline
-
Service role : Existing service role
-
Role name : -CodePipelineServiceRole-XXXXXX
-
click "Next"
-
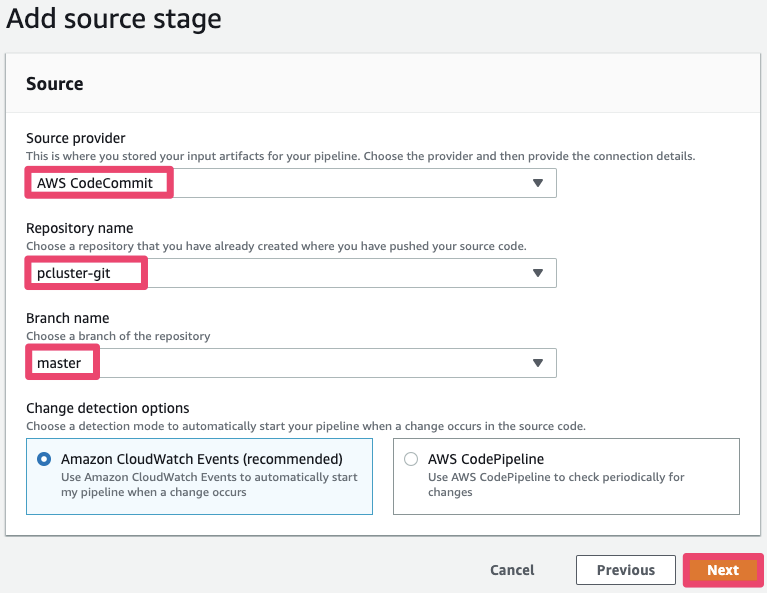
Source provider : AWS CodeCommit
-
Repository name: pcluster-git
-
Branch name : master
-
click "Next"
-
click "Skip build stage"
-
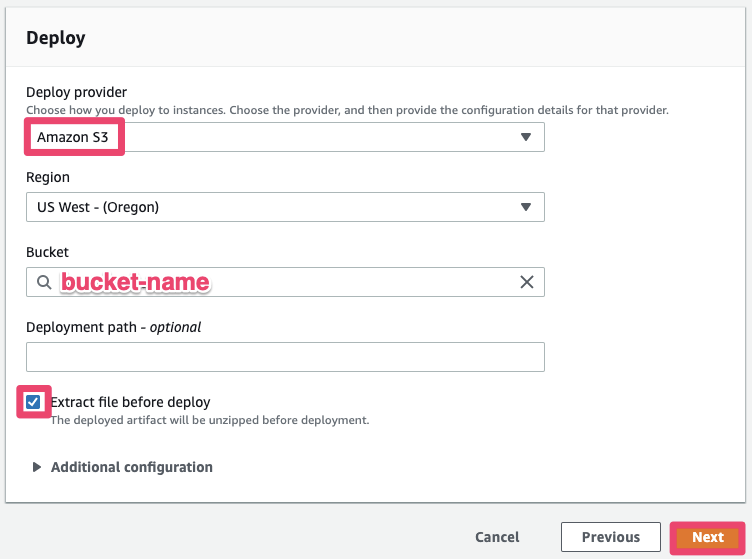
Deploy providor : Amazon S3
-
Region : US West - (Oregon)
-
Bucket :
-
Check-in : Extract file before deploy
-
click "Next"
-
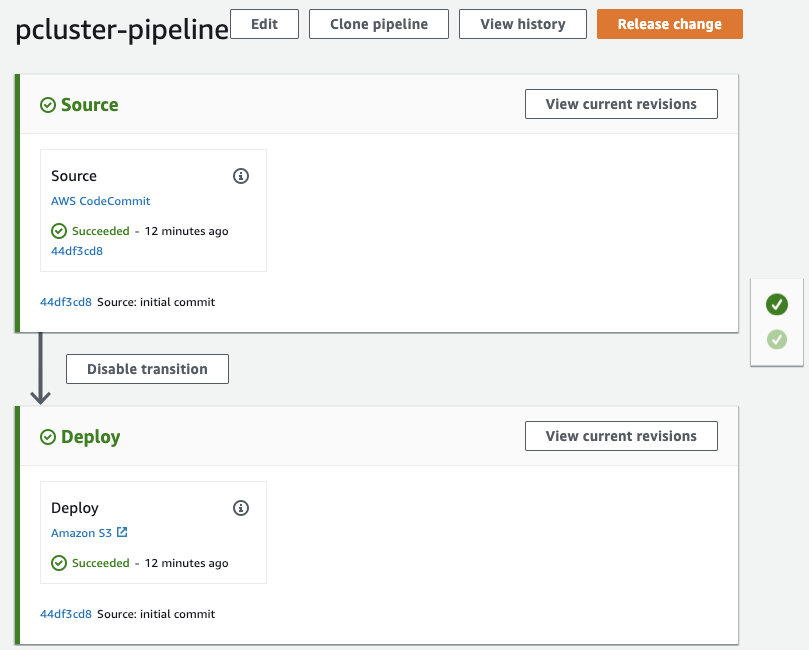
click "create pipeline"
-
これでParallelclusterで実行するpost_installスクリプトをCodeCommitからS3に送るPipelineができました。Pipelineを作成した時点で一回実行されるのでSucceededになっていることを確認してください。
Create Pipeline to EC2
-
CodeDeploy -> Applications -> Create application
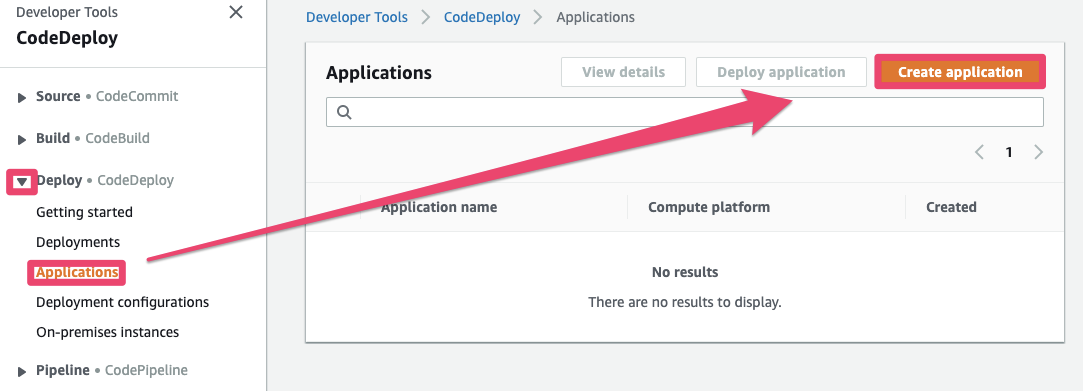
-
Application name : deploy2ec2
-
Compute platform : EC2/On-premises
-
Click "Create application"
-
Create deployment group
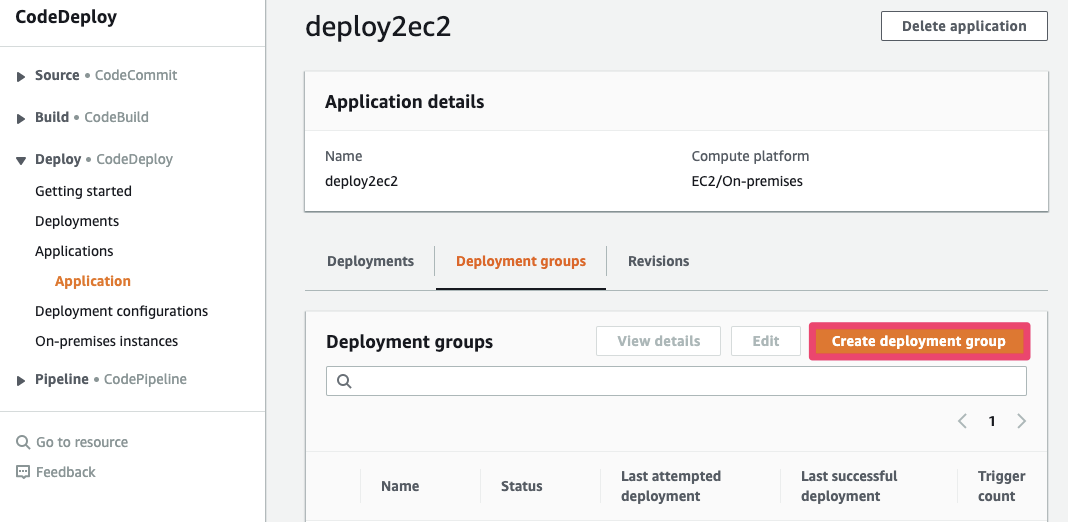
-
Enter a deployment group name : pcluster-mgr
-
Choose a service role : -CodeDeployServiceRole-XXXXXXXX
-
Deploy type : In-plane
-
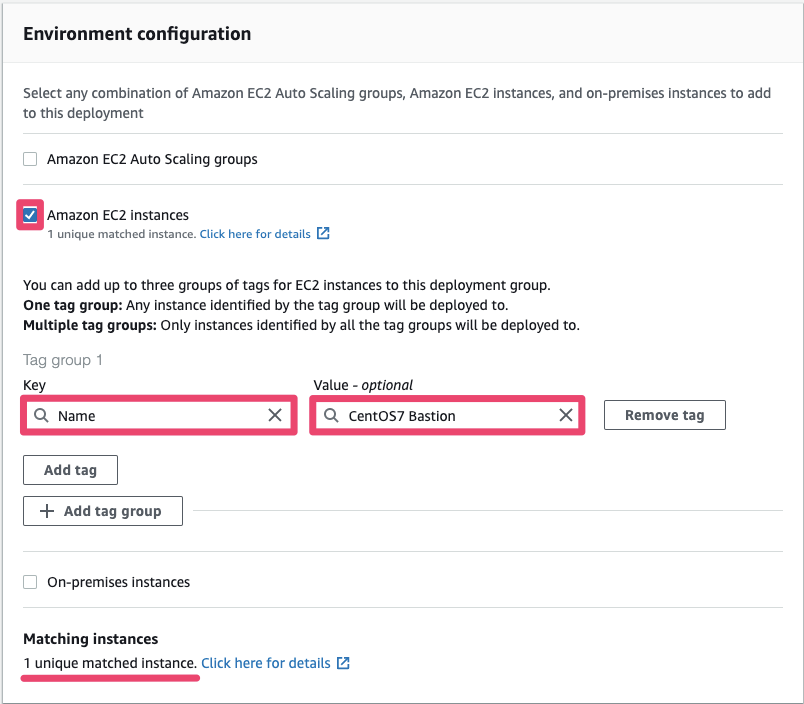
Environment configuration : Amazon EC2 Instances
-
Key : Name
-
Value : CentOS7 Bastion
-
Uncheck : Enable load balancing
-
Click "Create deployment group"
-
Add pipeline
-
pcluster-pipeline -> Edit
-
Edit deploy stage -> Add action
-
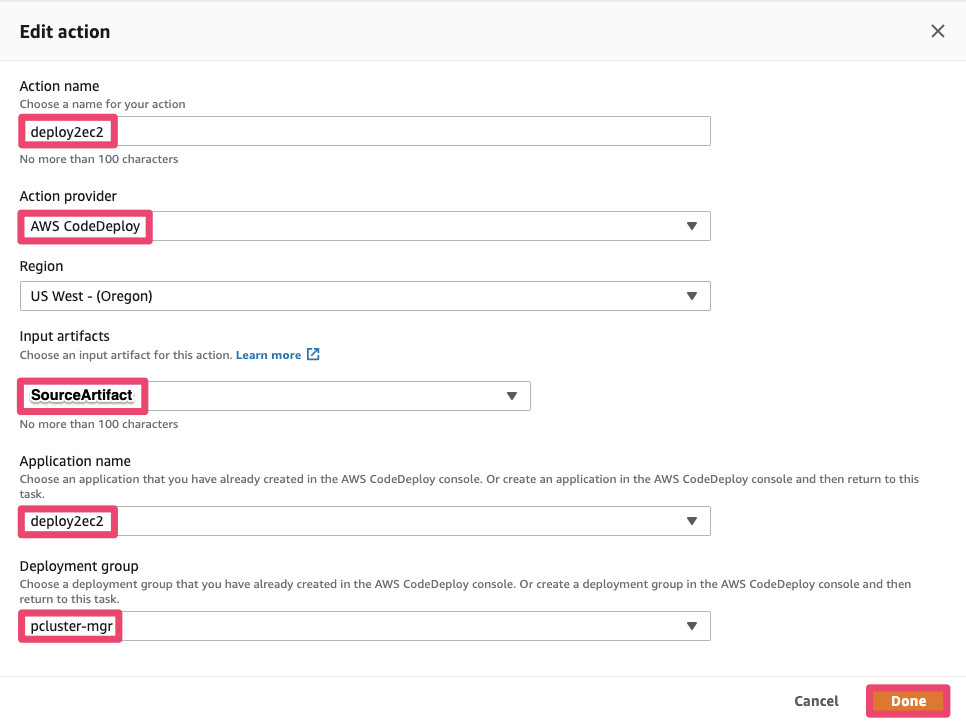
Action name : deploy2ec2
-
Action provider : AWS CodeDeploy
-
Input artifact : SourceArtifact
-
Application name : deploy2ec2
-
Deployment group : pcluster-mgr
-
Click "Done"
-
Click "Save"
-
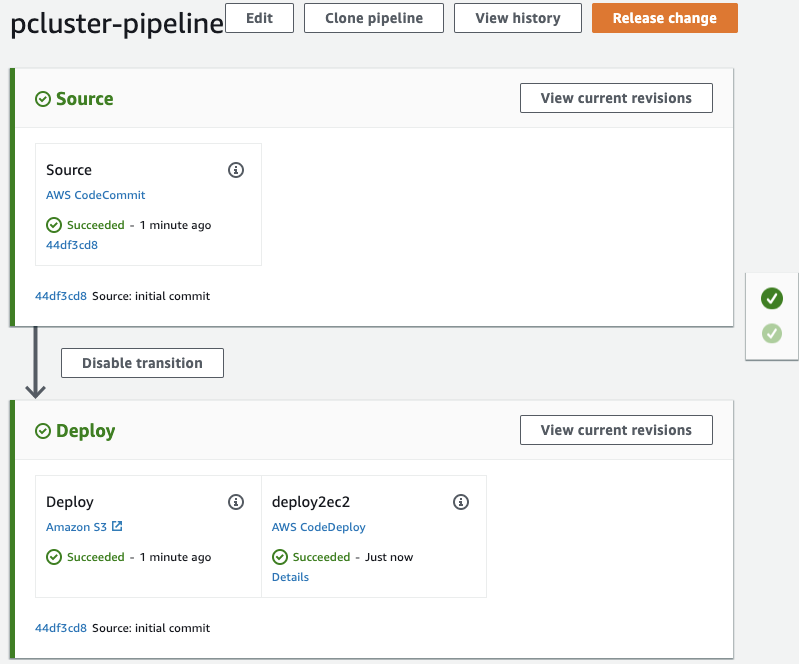
Click "Release change"
-
これでParallelClusterのクラスターConfigファイルを、クラスター管理ノードに送るPipelineができました。2つのデプロイがともにSucceededになっていることを確認してください。
-
5. Launch ParallelCluster
- pipelineが完成したので、cluster configファイルにbucket nameやsubnet idをセットしてクラスターを起動します。/home/pcluster-gitに移動して下記ファイルを編集してください。
- パラメータはCloudFormationのOutputから取ってきてください。
Edit cluster config and post_install scripts
-
projects/cpu/scripts/00-cluster-init.sh
- S3BUCKET
-
projects/cpu/scripts/00-cluster-init.sh
- S3BUCKET
-
config/cpu
- master_subnet_id
- compute_subnet_id
- vpc_id
- additional_sg
- key_name
- ec2_iam_role
- s3_read_resource
- s3_read_write_resource
- tags
- post_install
-
ファイルの修正が完了したら、CodeCommitのPush
git add .
git commit -m "first cluster"
git push origin master
Launch a cluster via ParallelCluster
- Pipelineが流れるのを確認したら、実際の起動コマンドを打つ
cd ~/.parallelcluster
pcluster list -r us-west-2
pcluster create cpu -c cpu
- 10分くらい待つと完了します。コンソールにIPが表示される。
- pem keyを踏み台ノードに転送して、踏み台ノードからCluster Masterノードにssh
- あとはご自由にアプリケーションをインストールして、ジョブスケジューラ使ってあそんでください。
- configファイルを修正して、git push, pcluster updateってやるとクラスターの設定が更新されます。
6. Terminate workshop environment
delete cluster
cd ~/.parallelcluster
pcluster delete cpu -c cpu
clean-up environment
- delete pipeline
- deleter deployment group
- delete deployment application
- delete s3 objects
- remove SSH key ID from IAM user "pcluster-admin"
- delete cloudformation stack
fin!
-
注意点
- ParallelClusterは様々なサービスを組み合わせて実行されます。このワークショップのIAM Roleまわりはいいかげんな設定なので、公式ドキュメントをみて適切に設定してください。
- ParallelClusterは追加機能絶賛開発中で、今後バージョンがどんどん上がっていくので、venvとかPythonの仮想環境を準備して、複数バージョン動かせるようにしておいた方がいいと思います。
- Bugとか不可思議な挙動があったら、AWS Supportに問い合わせるよりもGitHub Issueをあげる方がレスポンスも早いし、問題も早く解決できると思います。(要英語)
- 使いこなすならGitHub Issueは全部読む。公式ドキュメントは基本的なところだけしか記述がない。
- 現在計算インスタンスタイプは1種類のみだけど、複数インスタンスタイプの機能は開発中だそうです。
- クラスター起動のログは~/.parallelcluster/pcluster-cli.logにも出てくるが、これだと何もわからないので、クラスターノード内の/var/log/cfn-init.logを見るのがオススメ。Chefのログが見える。これでどこでコケたかがよくわかる。
- post_installスクリプトでは/etc/parallelcluster/cfnconfig内のパラメータを使ってあげると色々と楽に組める。
-
参考資料
- https://aws-parallelcluster.readthedocs.io/en/latest/getting_started.html
- https://github.com/aws/aws-parallelcluster
- https://docs.aws.amazon.com/ja_jp/codepipeline/latest/userguide/tutorials-s3deploy.html#tutorials-s3deploy-acc
- https://qiita.com/yukofeb/items/e077fc8755416c904032
- https://docs.aws.amazon.com/ja_jp/parallelcluster/latest/ug/processes.html