2016年末にリリースされたAWSの新サービスBatchを使ってOpenFoamを実行してみました。
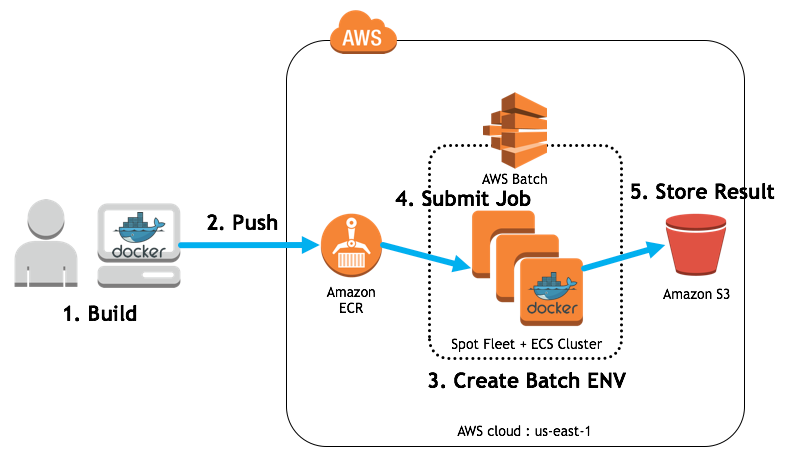
1.Build OpenFoam Docker Images
ubuntu14.04をベースにして、OpenFoam4.1とParaView5.0をインストールします。
その後AWSCLIをインストールします。OpenFoamで計算した結果をS3に保存するためです。
実際にOpenFoamを実行するShellスクリプトはGithubからダウンロードしてきます。
# OpenFOAM 4.1 and ParaView 5.0.1 on ubuntu 14.04
FROM ubuntu:trusty

MAINTAINER Hiroshi.Kobayashi

WORKDIR /root

RUN set -x && \

    # install openfoam
    sudo apt-get -y update && \
    sudo apt-get -y upgrade && \
    sudo apt-get -y install apt-file && \
    sudo apt-get -y install software-properties-common && \
    sudo add-apt-repository http://dl.openfoam.org/ubuntu && \
    sudo apt-get -y install wget && \
    sudo wget -O - http://dl.openfoam.org/gpg.key | apt-key add - && \
    sudo apt-get -y install apt-transport-https && \
    sudo apt-get -y update && \
    sudo apt-get -y install openfoam4 && \
    sudo echo "source /opt/openfoam4/etc/bashrc" >> /root/.bashrc && \

    # install awscli
    sudo curl -O https://bootstrap.pypa.io/get-pip.py && \
    sudo python3 get-pip.py --user && \
    export PATH=/root/.local/bin:$PATH && \
    /bin/bash -c "source /root/.bashrc" && \
    pip install awscli --upgrade --user

ENV AWS_DEFAULT_REGION=us-east-1 \
    AWS_DEFAULT_OUTPUT=json

ADD https://raw.githubusercontent.com/porcaro33/openfoam-docker/master/openfoam_run.sh /root
RUN sudo chmod +x /root/openfoam_run.sh
CMD ["/root/openfoam_run.sh"]
今回はopenfoam-dockerと名前をつけてbuildします。私のMacbook Airで15分くらいかかりました。
docker build -t openfoam-docker:latest .
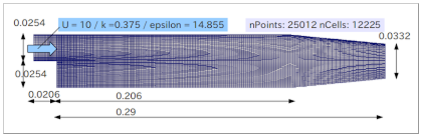
実際に計算するモデルはチュートリアルから持ってきました。 "incompressible/simpleFoam/pitzDaily"
2.Push Image to AWS ECR
ECRを作成する時に表示される手順にそって、コマンドを実行していくのみです。(ECR get-loginのオプションに --no-include-emailが追加されました)
- Retrieve the docker login command that you can use to authenticate your Docker client to your registry:
aws ecr get-login --no-include-email --region us-west-2 - Run the docker login command that was returned in the previous step.
- After the build completes, tag your image so you can push the image to this repository:
docker tag openfoam-docker:latest <account-id>.dkr.ecr.us-west-2.amazonaws.com/<ecr-name>:latest - Run the following command to push this image to your newly created AWS repository:
docker push <account-id>.dkr.ecr.us-west-2.amazonaws.com/<ecr-name>:latest

3.Create AWS Batch Environment
ジョブ定義、コンピューテング環境作成、ジョブキュー作成の順番で進めていきます。
- create job definition
aws batch register-job-definition --cli-input-json file://<path>/job_definition.json
https://raw.githubusercontent.com/porcaro33/openfoam-docker/master/job_definition.json
{
    "jobDefinitionName": "openfoam-docker-job",
    "type": "container",
    "parameters": {},
    "containerProperties": {
        "image": "<account-id>.dkr.ecr.us-west-2.amazonaws.com/<ecr-name>",
        "vcpus": 1,
        "memory": 500,
        "command": [],
        "jobRoleArn": "arn:aws:iam::<account-id>:role/openfoam-docker-job-role",
        "volumes": [],
        "environment": [],
        "mountPoints": [],
        "ulimits": []
    },
    "retryStrategy": {
        "attempts": 3
    }
}
- create computing environment
aws batch create-compute-environment --cli-input-json file://<path>/computing_env.json
https://raw.githubusercontent.com/porcaro33/openfoam-docker/master/computing_env.json
{
  "computeEnvironmentName": "M3Spot",
  "type": "MANAGED",
  "state": "ENABLED",
  "computeResources": {
    "type": "SPOT",
    "spotIamFleetRole": "arn:aws:iam::<account-id>:role/aws-ec2-spot-fleet-role",
    "minvCpus": 1,
    "maxvCpus": 10,
    "desiredvCpus": 1,
    "instanceTypes": [
      "m3"
    ],
    "bidPercentage": 40,
    "subnets": [
      "subnet-XXXXXXXX",
      "subnet-XXXXXXXX",
      "subnet-XXXXXXXX",
      "subnet-XXXXXXXX"
    ],
    "securityGroupIds": [
      "sg-XXXXXXXX"
    ],
    "ec2KeyPair": "<your-key-pair>",
    "instanceRole": "<your-role>"
  },
  "serviceRole": "arn:aws:iam::<account-id>:role/service-role/AWSBatchServiceRole"
}
- create job queue
aws batch create-job-queue --cli-input-json file://<path>/job_queue.json
https://raw.githubusercontent.com/porcaro33/openfoam-docker/master/job_queue.json
{
  "jobQueueName": "openfoam-docker-queue",
  "state": "ENABLED",
  "priority": 1,
  "computeEnvironmentOrder": [
    {
      "order": 1,
      "computeEnvironment": "M3Spot"
    }
  ]
}
4.Submit Jobs
AWSCLIで同じジョブを回数指定して10秒おきにsubmitします。
# !/bin/bash
QUEUE="openfoam-docker-queue"
JOBDEF="openfoam-docker-job"
MAXITR=10

for i in `seq 1 $MAXITR`
do
  JOBNAME="JOB_$i"
  aws batch submit-job --job-name $JOBNAME --job-queue $QUEUE --job-definition $JOBDEF
  echo "submitted $JOBNAME"
  sleep 10
done
実際にはDocker Imageに埋め込んであるshellスクリプトが実行されます。
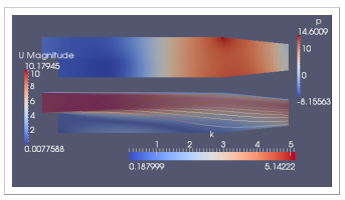
流速の結果が格納されているU fileをS3に転送します。
# !/bin/bash

# geting JOB ID, bucket name
BUCKETNAME="<bucket-name>"

# run OpenFoam4 with tutrial model "pitzDaily"
source /opt/openfoam4/etc/bashrc
source /root/.bashrc
export PATH=/root/.local/bin:$PATH

cd /root
mkdir -p $FOAM_RUN
cd $FOAM_RUN
cp -r $FOAM_TUTORIALS/incompressible/simpleFoam/pitzDaily .
cd pitzDaily
blockMesh
simpleFoam

# upload U to S3
TIMESTAMP=`date +%Y%m%d%H%M%S%N`
aws s3 cp ./298/U s3://$BUCKETNAME/$TIMESTAMP
Check the result on S3
go to S3 and check the U files
参考資料
http://qiita.com/pottava/items/d9886b2e8835c5c0d30f
http://qiita.com/pottava/items/452bf80e334bc1fee69a
https://openfoam.org/download/4-1-ubuntu/
http://docs.aws.amazon.com/cli/latest/reference/batch/index.html#cli-aws-batch
http://docs.aws.amazon.com/ja_jp/cli/latest/userguide/installing.html