Share Extensionって何?
あるアプリを、そのアプリの外側から操作したりするための拡張機能App Extensionの1つ。
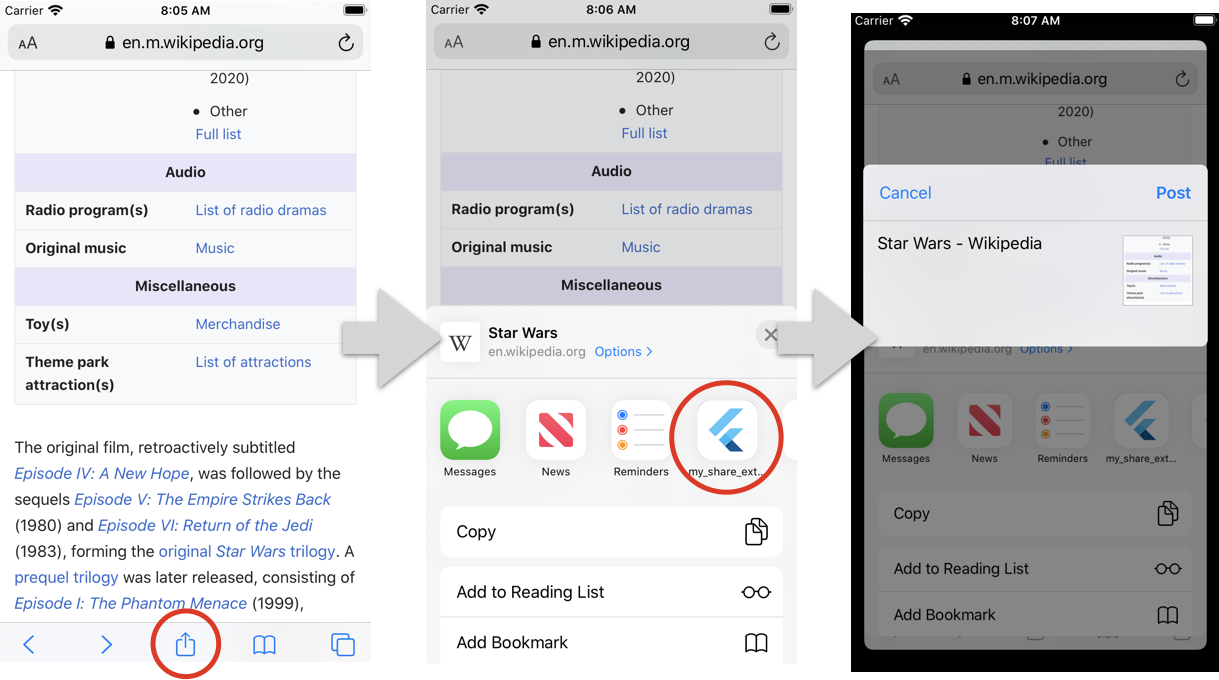
App Extensionを使えば、例えば、以下の画像のようにSafariの共有ボタンからあるアプリにデータを転送したり(Share Extension)、ホーム画面左に今日の天気Widgetを表示したり(Today Extension)することができる。

App Extensionの種類のまとめとしては、以下の記事がとても参考になりました。
iOSのApp Extensionまとめ - Satsuki Hashiba - Medium
App ExtensionはiOS(& OS X)での呼び方で、AndroidではIntent(?)を使って同じようなことができそう。
Share Extensionで共有できるものは、文字列、画像、URL、ファイルなどの種類があるが、
今回はURL+メッセージなどの情報をアプリに渡すサンプルを作ってみて、前回作ったメタデータを表示するアプリと連動させたい。
FlutterでShare Extensionを実装するため、今回は以下のパッケージを使う。
receive_sharing_intent | Flutter Package
上記パッケージのIssueを見たら、危ないよ〜・バグあるよ〜(適当)って言っている人がいたので、未成熟なのかもしれない。。。
やること
- Safariの共有メニューから現在表示しているWebサイトのURLと自分で決めたメッセージを転送するデモアプリを作る
- 前回作ったメタデータを表示するアプリと統合してみる
デモアプリを作る
基本的にはパッケージ公開サイトに書かれているReadme通りにやっていく。
Flutter側の準備
新規プロジェクトを作成
flutter create my_share_extensin
cd my_share_extension
receive_sharing_intentパッケージのインストール
dependencies:
  flutter:
    sdk: flutter

  // ↓↓↓↓↓↓↓↓↓↓
  receive_sharing_intent: ^1.4.0+2
注意:
Flutter内でreceive_sharing_intentパッケージの関数とかを使っていなくても、
Share Extensionを追加した状態でのビルド時にこのパッケージがインストールされていないとld: framework not found Flutterというエラーが出てビルドに失敗する。
main.dartの修正
細かいところは置いておいて、パッケージのReadmeの最後に書かれているコードをmain.dartに丸々コピーする。
import 'package:flutter/material.dart';
import 'dart:async';

import 'package:receive_sharing_intent/receive_sharing_intent.dart';

void main() => runApp(MyApp());

class MyApp extends StatefulWidget {
  @override
  _MyAppState createState() => _MyAppState();
}

class _MyAppState extends State<MyApp> {
  StreamSubscription _intentDataStreamSubscription;
  List<SharedMediaFile> _sharedFiles;
  String _sharedText;

  @override
  void initState() {
    super.initState();

    // For sharing images coming from outside the app while the app is in the memory
    _intentDataStreamSubscription = ReceiveSharingIntent.getMediaStream()
        .listen((List<SharedMediaFile> value) {
      setState(() {
        print("Shared:" + (_sharedFiles?.map((f) => f.path)?.join(",") ?? ""));
        _sharedFiles = value;
      });
    }, onError: (err) {
      print("getIntentDataStream error: $err");
    });

    // For sharing images coming from outside the app while the app is closed
    ReceiveSharingIntent.getInitialMedia().then((List<SharedMediaFile> value) {
      setState(() {
        _sharedFiles = value;
      });
    });

    // For sharing or opening urls/text coming from outside the app while the app is in the memory
    _intentDataStreamSubscription =
        ReceiveSharingIntent.getTextStream().listen((String value) {
      setState(() {
        _sharedText = value;
      });
    }, onError: (err) {
      print("getLinkStream error: $err");
    });

    // For sharing or opening urls/text coming from outside the app while the app is closed
    ReceiveSharingIntent.getInitialText().then((String value) {
      setState(() {
        _sharedText = value;
      });
    });
  }

  @override
  void dispose() {
    _intentDataStreamSubscription.cancel();
    super.dispose();
  }

  @override
  Widget build(BuildContext context) {
    const textStyleBold = const TextStyle(fontWeight: FontWeight.bold);
    return MaterialApp(
      home: Scaffold(
        appBar: AppBar(
          title: const Text('Plugin example app'),
        ),
        body: Center(
          child: Column(
            children: <Widget>[
              Text("Shared files:", style: textStyleBold),
              Text(_sharedFiles?.map((f) => f.path)?.join(",") ?? ""),
              SizedBox(height: 100),
              Text("Shared urls/text:", style: textStyleBold),
              Text(_sharedText ?? "")
            ],
          ),
        ),
      ),
    );
  }
}
Share Extensionを作成する
説明のため、RunnerとShareExtensionのBundle Identifierをそれぞれcom.example.shareExtensionSampleとcom.exmaple.shareExtensionSample.shareExtensionとする。
Xcodeを開く
open ios/Runner.xcodeproj/
ShareExtensionを新規作成する
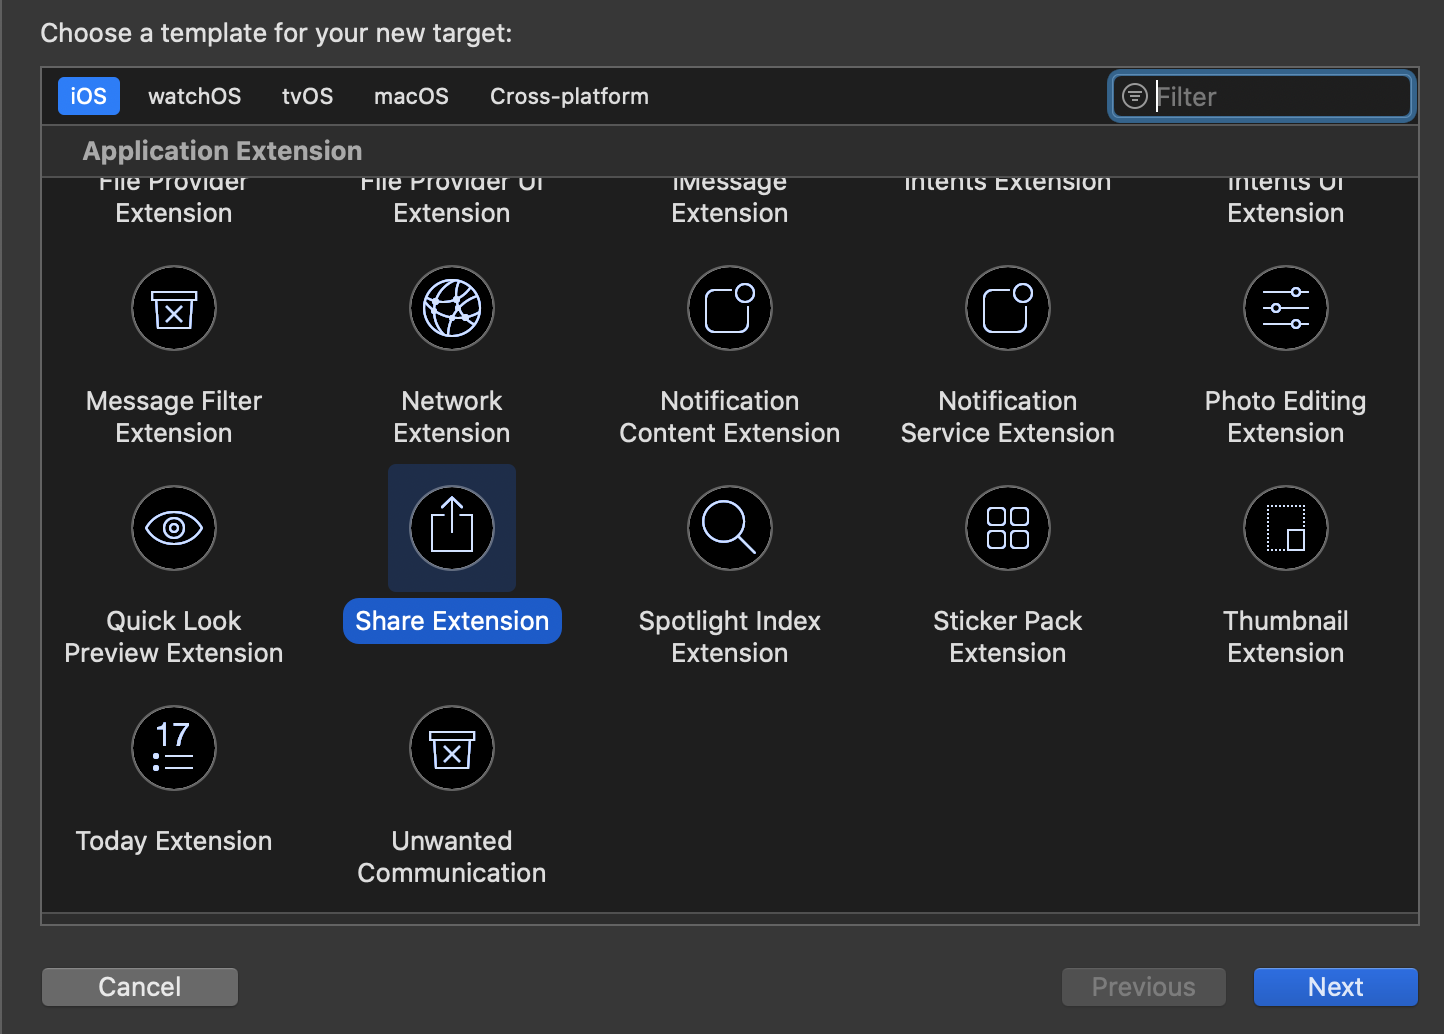
ツールバーからFile > New > Targetを選択し、表示されたダイアログからShare Extensionを選択する。
(本記事ではMyShareExtensionという名前を付けたとする)

Runner/Info.plistを編集する
Runner/Info.plistを右クリック > Open As ... Source Code を選択すると、ソースコードを直接編集できる。
以下のタグを追加する。
Property List表示でも、以下と同じ意味になるようにキーバリューを追加すればOK。
    <key>CFBundleURLTypes</key>
    <array>
        <dict>
            <key>CFBundleTypeRole</key>
            <string>Editor</string>
            <key>CFBundleURLSchemes</key>
            <array>
                <string>ShareMedia</string>
            </array>
        </dict>
        <dict/>
    </array>
MyShareExtension/Info.plistを修正する
MyShareExtension/Info.plistを右クリックして、Open as Source code を選択。
以下のように修正する。パッケージの説明だといろいろ追加しているが、今回はURLの共有だけするので、不要な物は省く。
〜〜
    <key>CFBundleShortVersionString</key>
	<string>$(FLUTTER_BUILD_NAME)</string>
	<key>CFBundleVersion</key>
	<string>$(FLUTTER_BUILD_NUMBER)</string>
	<key>NSExtension</key>
	<dict>
		<key>NSExtensionAttributes</key>
		<dict>
			<key>NSExtensionActivationRule</key>
			<dict>
				<key>NSExtensionActivationSupportsWebURLWithMaxCount</key>
				<integer>1</integer>
			</dict>
		</dict>
		<key>NSExtensionMainStoryboard</key>
		<string>MainInterface</string>
		<key>NSExtensionPointIdentifier</key>
		<string>com.apple.share-services</string>
	</dict>
〜〜
RunnerとMyShareExtensionを同じApp Groupに登録する

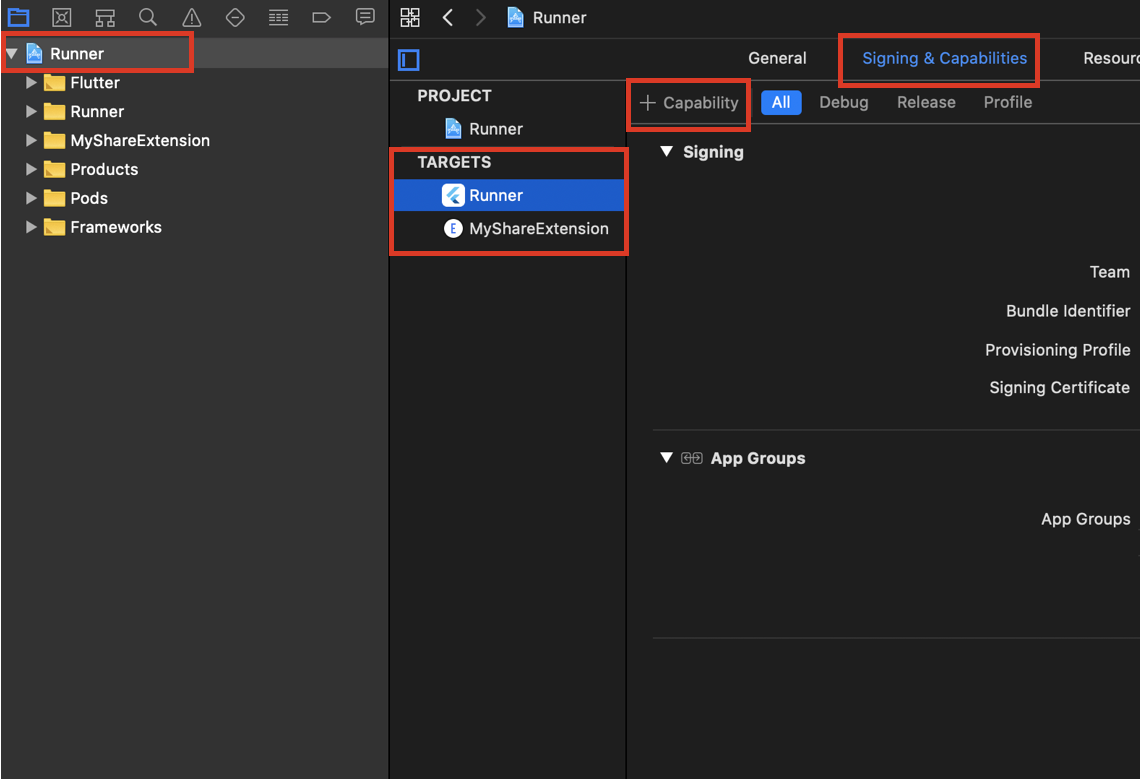
Runnerプロジェクトファイルを選択してプロジェクトの設定を開き、 TARGETSのRunnerを選択。
上のタブからSigning & Capabilitiesを選択し、左上の+Capabilityボタンを押して出てきたポップアップからApp Groupsを選択する。
▼Signingの下に、▼App Groupsが表示されると思うので、+ボタンを押して、新規グループを作成する。
グループ名はgroup.{RunnerのBundler Identifier}とする。(この例では、group.com.example.shareExtensionSample)
同様にTARGETS/MyShareExtensionにも同じグループを追加する。
MyShareExtension/ShareViewController.swiftを修正する
パッケージの説明だと長いコードが書かれているが、今回はURLのみに対応するので、必要なものを抽出する。
パッケージのサンプルだとviewDidLoad()にいろいろ書かれているが、didSelectPost()に書かないと挙動がおかしいので注意。
import UIKit
import Social
import MobileCoreServices
import Foundation

class ShareViewController: SLComposeServiceViewController {

    let hostAppBundleIdentifier = "com.example.shareExtension"
    let sharedKey = "ShareKey"
    var sharedText: [String] = []
    let urlContentType = kUTTypeURL as String

    override func isContentValid() -> Bool {
        // Do validation of contentText and/or NSExtensionContext attachments here
        return true
    }

    override func didSelectPost() {
        // This is called after the user selects Post. Do the upload of contentText and/or NSExtensionContext attachments.
        if let content = extensionContext!.inputItems[0] as? NSExtensionItem {
            if let contents = content.attachments {
                for (index, attachment) in (contents).enumerated() {
                    if attachment.hasItemConformingToTypeIdentifier(urlContentType) {
                        handleUrl(content: content, attachment: attachment, index: index)
                    }
                }
            }
        } else {
            // Inform the host that we're done, so it un-blocks its UI. Note: Alternatively you could call super's -didSelectPost, which will similarly complete the extension context.
            self.extensionContext!.completeRequest(returningItems: [], completionHandler: nil)
        }
    }

    override func configurationItems() -> [Any]! {
        // To add configuration options via table cells at the bottom of the sheet, return an array of SLComposeSheetConfigurationItem here.
        return []
    }

    private func handleUrl (content: NSExtensionItem, attachment: NSItemProvider, index: Int) {
        attachment.loadItem(forTypeIdentifier: urlContentType, options: nil) { [weak self] data, error in

            if error == nil, let item = data as? URL, let this = self {

                this.sharedText.append(item.absoluteString)

                // If this is the last item, save imagesData in userDefaults and redirect to host app
                if index == (content.attachments?.count)! - 1 {
                    let userDefaults = UserDefaults(suiteName: "group.\(this.hostAppBundleIdentifier)")
                    userDefaults?.set(this.sharedText, forKey: this.sharedKey)
                    userDefaults?.synchronize()
                    this.redirectToHostApp(type: .text)
                }
            } else {
                self?.dismissWithError()
            }
        }
    }

    private func dismissWithError() {
        print("[ERROR] Error loading data!")
        let alert = UIAlertController(title: "Error", message: "Error loading data", preferredStyle: .alert)

        let action = UIAlertAction(title: "Error", style: .cancel) { _ in
            self.dismiss(animated: true, completion: nil)
        }

        alert.addAction(action)
        present(alert, animated: true, completion: nil)
        extensionContext!.completeRequest(returningItems: [], completionHandler: nil)
    }

    enum RedirectType {
        case media
        case text
        case file
    }

    private func redirectToHostApp(type: RedirectType) {
        let url = URL(string: "ShareMedia://dataUrl=\(sharedKey)#\(type)")
        var responder = self as UIResponder?
        let selectorOpenURL = sel_registerName("openURL:")

        while (responder != nil) {
            if (responder?.responds(to: selectorOpenURL))! {
                let _ = responder?.perform(selectorOpenURL, with: url)
            }
            responder = responder!.next
        }
        extensionContext!.completeRequest(returningItems: [], completionHandler: nil)
    }
}
動作はこんな感じ。
Share Extension with Flutter pic.twitter.com/hXUOS1ndqy
— かーにゃ (@popy1017) June 7, 2020
おまけ
コード内で定数として書かれているBundle Identifierを外出しする
参考記事: iOSアプリ開発における環境切り替え(Debug⇔Release)方法まとめ - Qiita
Bundle Identifierをコード内に入れる是非がわからなかったので、外出しする方法を調査した。
上記の記事によれば、ProjectのBuildSettingで環境変数のような変数を定義して、ShareExtensionのInfo.plistでその値を指定したキーを設定すればできるらしい。
struct Configuration {
    static let shared = Configuration()

    private let config: [AnyHashable: Any] = {
        let path = Bundle.main.path(forResource: "Info", ofType: "plist")!
        let plist = NSDictionary(contentsOfFile: path) as! [AnyHashable: Any]
        return plist["AppConfig"] as! [AnyHashable: Any]
    }()

    let hostAppBundleIdentifier: String

    private init() {
        hostAppBundleIdentifier = config["HostAppBundleIdentifier"] as! String
    }
}

~~
  private func handleUrl (content: NSExtensionItem, attachment: NSItemProvider, index: Int) {
        attachment.loadItem(forTypeIdentifier: urlContentType, options: nil) { [weak self] data, error in

            if error == nil, let item = data as? URL, let this = self {
                  ~~
                    let suiteName = Configuration.shared.hostAppBundleIdentifier
                    // If this is the last item, save imagesData in userDefaults and redirect to host app
                    if index == (content.attachments?.count)! - 1 {
                        let userDefaults = UserDefaults(suiteName: "group.\(suiteName)")
                        userDefaults?.set(this.sharedText, forKey: this.sharedKey)
                        userDefaults?.synchronize()
                        this.redirectToHostApp(type: .text)
                    }
            } else {
                self?.dismissWithError()
            }
        }
    }
~~
json文字列を転送する
参考記事: Swift: Convert struct to JSON? - Stack Overflow
上記のままではURLしか転送できないので、例えばブクマアプリのように自分で編集可能なタイトルと、URLをセットで保持したい時などに困る。
(たぶんネイティブだとAnyで送受信できた気がするけど)FlutterのパッケージだとTextかMediaの受信関数しか用意されていないっぽいので、
力技だが、JSON形式の文字列を送受信することで構造データを送信できるようにする。
struct Payload : Codable{
    var url: String
    var message: String
}
~~
do {
  let payload = Payload(url: item.absoluteString, message: (self?.contentText)!)
  let payloadJson = try JSONEncoder().encode(payload)
  let stringPayload = String(data: payloadJson, encoding: .utf8)

  this.sharedText.append(stringPayload!)

  // If this is the last item, save imagesData in userDefaults and redirect to host app
  if index == (content.attachments?.count)! - 1 {
  ~~
以前作ったアプリと統合
以前作ったメタデータ表示アプリは状態管理にChangeNotifierを使っていて、パッケージのサンプルコードではStatefulWidgetでの書き方しか載っていなかったため少し苦戦。
以下のようにしたら動きました。
-
initState()はChangeNotifierにないので、 サンプルコードのinitState()で書かれているコードはChangeNotifier拡張クラスのコンストラクタで呼ぶ。 -
setStateは使えないので、モデルで保持している変数を直接書き換える or 書き換える関数を呼ぶ。 -
dispose()はChangeNotifierで使えるので、そのまま使う。
class MetadataModel extends ChangeNotifier {
  Metadata ogp = Metadata.fromJson(mockJson);
  StreamSubscription _intentDataStreamSubscription;

  MetadataModel() {
    // アプリ起動中の処理
    _intentDataStreamSubscription =
        ReceiveSharingIntent.getTextStream().listen((String value) {
      final json = jsonDecode(value);
      if (json["url"] != null) {
        fetchOgpFrom(json["url"]);
      }
    }, onError: (err) {
      print("getLinkStream error: $err");
    });

    // For sharing or opening urls/text coming from outside the app while the app is closed
    ReceiveSharingIntent.getInitialText().then((String value) {
      if (value != null) {
        final json = jsonDecode(value);
        if (json["url"] != null) {
          fetchOgpFrom(json["url"]);
        }
      }
    });
  }

  @override
  void dispose() {
    _intentDataStreamSubscription.cancel();
    super.dispose();
  }

  Future<bool> fetchOgpFrom(String _url) async {
    try {
      final response = await http.get(_url);
      final document = responseToDocument(response);
      ogp = MetadataParser.OpenGraph(document);

      notifyListeners();
      return true;
    } catch (e) {
      print(e.message ?? e);
      return false;
    }
  }
}
最終的な動作(結局URLだけしか使ってないことにここで気づく。。。)
Share Extension x OGP x Flutter pic.twitter.com/iN8Sc1ilHD
— かーにゃ (@popy1017) June 7, 2020
その他
実機検証時のエラー対処
シミュレーターで動かした時はエラーは出なかった(気づかなかっただけか...?)が、実機にインストールしようとすると、以下のようなエラーが出たのでざっくりした意味合いと対処方法を記録。
warning: linking against dylib not safe for use in application extensions
RunnerプロジェクトのBuild SettingsのRequire Only App-Extension-Safe APIをNoに変更すれば警告を消すことができる。
Extensionとそれを含むアプリでコードを共有したい時にEmbedded Frameworkというのを作れるが、その際、本来Extensionで使えないはずのAPIを使ってはいけないという決まりがあるらしい。
今回はプロジェクトにFlutterというフレームワークが入っているため警告が出たが、Extensionでは使ってないのでセーフ(?)という理解。
(Yesにしないと審査通らないって言っている人とNoでも審査通ったよって言っている人がいて線引きがよくわからない)
公式ドキュメント:
You can create an embedded framework to share code between your app extension and its containing app. For example, if you develop an image filter for use in your Photo Editing extension as well as in its containing app, put the filter’s code in a framework and embed the framework in both targets.
Make sure your embedded framework does not contain APIs unavailable to app extensions, as described in Some APIs Are Unavailable to App Extensions. If you have a custom framework that does contain such APIs, you can safely link to it from your containing app but cannot share that code with the app’s contained extensions. The App Store rejects any app extension that links to such frameworks or that otherwise uses unavailable APIs.
To configure an app extension target to use an embedded framework, set the target’s “Require Only App-Extension-Safe API” build setting to Yes. If you don’t, Xcode reminds you to do so by displaying the warning “linking against dylib not safe for use in application extensions”.
https://developer.apple.com/library/archive/documentation/General/Conceptual/ExtensibilityPG/ExtensionScenarios.html
ld: 'ライブラリ名' does not contain bitcode. You must rebuild it with bitcode enabled (Xcode setting ENABLE_BITCODE)
参考記事: Xcode7でbitcodeのエラーが出た - Qiita
Build Settings > Enable BitcodeをNOにすれば解決する。
Bitcodeの役割についてはこちらがわかりやすかったです。
NJF Wiki - xpwiki : iOSではBitcodeという仕組みがあり、うまく使うと便利なのですが、コンパイル時にエラーが出てしまうことがあります。 [iOS/Bitcodeをオフにする]