はじめに
前回は、VBA翻訳結果のJavaScriptをコーディングしました。(サンプルとしてください)
今回は、WindowsのCOMを利用したExcelのブックを更新するプログラムを作成します。
Excelのブックを更新する手段として、GoogleのV8エンジン、npmのWin32ole、前回使用したExcelJS、js-xlsxなどがありますが、あえてVC++(Visual Studio C++)で直接、Miscrosoft OfficeのCOMに対してブックを更新するプログラムを作ります。MicrosoftのOLEを利用するのが一番手っ取り早いのと、決して枯れた技術ではないので、改めて使用してみます。最終的には、このプログラムをnode.jsで呼ぶように再利用します。
前提
- OS : Windows7以上
- PoweShellのターミナルで実行
- VSCodeでコード編集
- node.js環境構築済み
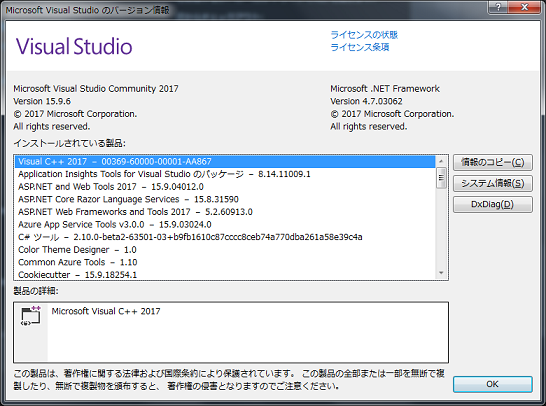
- Visual Studio Comminnuty 2017のインストール済み
- VC++のCLRをインストールしておくこと
ブックを更新するプログラムを作る
| 項目 | 内容 | 説明 |
|---|---|---|
| プログラム名 | TomCLR.exe | ブックを更新するアプリ |
| 引数1 | セル1 | "A2" |
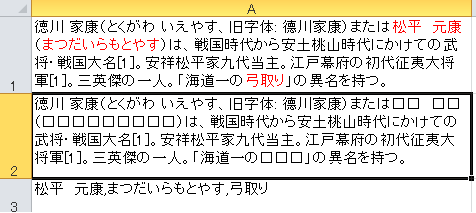
| 引数2 | 値1 | 問題箇所を□で伏字した文字列 |
| 引数3 | セル2 | "A3" |
| 引数4 | 値2 | 解答の文字列 |
1. プロジェクト作成
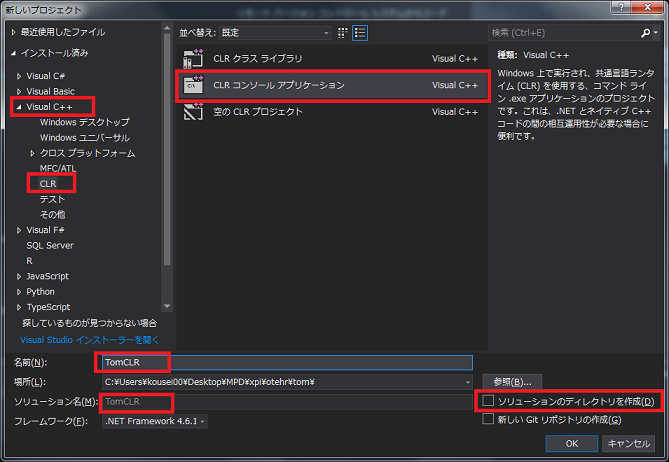
プロジェクト名とソリューション名
Visual C++ → CLR → CLRコンソールアプリケーション → 名前 (TomCLR入力) → 場所(任意のディレクトリ) → ソリューション名(TomCLR(自動で入力される)) → ソリューションのディレクトリ作成のチェックをはずす。
参照の追加
元のIDE画面 → ソリューションエクスプローラー → 参照にて右クリック →参照の追加を選択
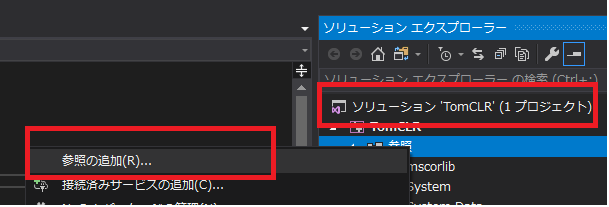
Microsoft Excel 14.0 Object Library 1.7参照追加
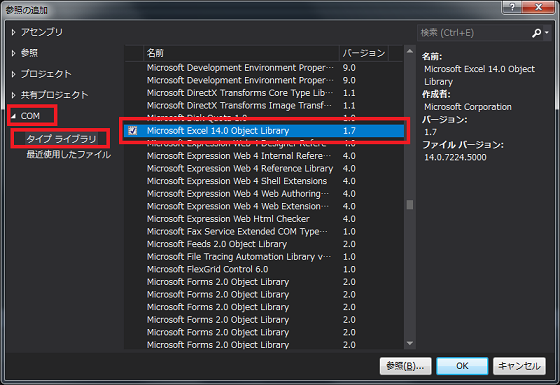
COM → タイプライブラリ → Microsoft Excel 14.0 Object Library 1.7 にチェック → OK
参照の確認
参照にタイプライブラリ[Interrop.Microsoft.Office.Interop.Excel.1.7]が追加されます。
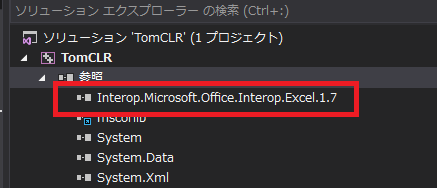
これで、C++でExcelのタイプライブラリが使用可能となります。
2. TomCLR.cppコーディング
ウィザードで作成されたTomCLR.cpp
# include "stdafx.h"

using namespace System;

int main(array<System::String ^> ^args)
{
    return 0;
}
1. Windowsの関数参照解決するため、インクルードにwindows.hを追加します。
2. Microsoft Office Interop参照解決するため、mainの前にusing namespace Microsoft::Office::Interop; を追加します。
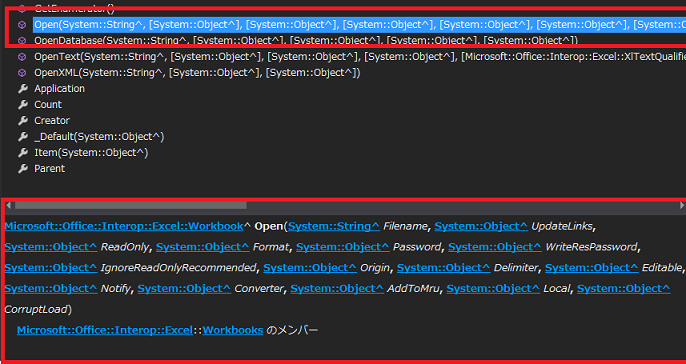
※ オブジェクトブラウザーからnamespaceを取得します。

# include "stdafx.h"
# include "windows.h" // 1.

using namespace System;
using namespace Microsoft::Office::Interop; // 2.

int main(array<System::String ^> ^args)
{
    return 0;
}
3.mainにExcelのインスタンスオブジェクト作成。
Excel::Application^ Xls = gcnew Excel::Application(); // 3.
4. tomCLRの実行ディレクトリに配置するブック「temp.xlsx」のパスとブック名を編集します。
GetCurrentDirectoryで実行ディレクトリのパスを取得します。 パスの長さが不定なので、MAX_PATHのサイズを確保します。
5. ブック名「temp.xlsx」は固定、一応128バイトのサイズを確保します。
※ TCHARをcharサイズで取扱います。(UNICODEではなくマルチバイトとします。)
これをやると、128バイト以下のfile名の場合、後ろに空白が設定されるので空白をトリミングします。
6. パスとブック名を結合します。
7. ブックオープンのファイル名がString指定のため、TCHARをStringへ変換します。
8. 空白をトリミングします。
        // カレントパス
	TCHAR path[MAX_PATH];
	GetCurrentDirectory(MAX_PATH, path); // 4.

	// ブック名
	TCHAR file[128] = TEXT("\\temp.xlsx"); // 5.

	// カレントパス + ブック名
	lstrcat(path, file); // 6.

	// TCHAR → String変換s
	String^ pathname = gcnew String(path); // 7.

	// 空白トリミング
	String^ book = pathname->Trim(); // 8.
9. ブックをオープンします。
※ 引数はオブジェクトブラウザーでコピーできます。
// ブックオープン
Excel::Workbook^ wbook = Xls->Workbooks->Open(book, \
		Type::Missing, \
		Type::Missing, \
		Type::Missing, \
		Type::Missing, \
		Type::Missing, \
		Type::Missing, \
		Type::Missing, \
		Type::Missing, \
		Type::Missing, \
		Type::Missing, \
		Type::Missing, \
		Type::Missing, \
		Type::Missing, \
		Type::Missing); // 9.
10. Sheet1のハンドルを作成します。
// シートハンドル
Excel::Worksheet^ wsheet = (Excel::Worksheet^)wbook->Worksheets[1]; // 10.
11. 引数で取得したRange(A2とA3)と値を設定します。
	// セル->Range(args[0]) 値->Value2(args[1])
	wsheet->Range[args[0], Type::Missing]->Value2 = args[1]; // 11.
    // セル->Range(args[2]) 値->Value2(args[3])
	wsheet->Range[args[2], Type::Missing]->Value2 = args[3]; // 11.
12. ブックを上書きで保存します。
	// ブックの上書き保存
	bool flag = true;
	wbook->Close(flag, \
		System::Type::Missing, \
		System::Type::Missing); // 12.
13. Excel Applicationの終了
	// Excel Application 終了
	Xls->Quit(); // 13.
14. COMハンドルのリリース
wsheet/wbook/Xlsをリリースします。
※ オブジェクトブラウザでReleaseComObjectを検索する。
※ GC(ガーベジコレクション)も解放。(2019.02.20 Add)
System::Runtime::InteropServices::Marshal::ReleaseComObject(wsheet); // 14.
System::Runtime::InteropServices::Marshal::ReleaseComObject(wbook); // 14.
System::Runtime::InteropServices::Marshal::ReleaseComObject(Xls); // 14.

System::GC::Collect(); // 14.
上記の全ソースです。
# include "stdafx.h"
# include "windows.h" // 1.

using namespace System;
using namespace Microsoft::Office::Interop; // 2.

int main(array<System::String ^> ^args)
{
	Excel::Application^ Xls = gcnew Excel::Application(); // 3.

	// カレントパス
	TCHAR path[MAX_PATH];
	GetCurrentDirectory(MAX_PATH, path); // 4.

	// ブック名
	TCHAR file[128] = TEXT("\\temp.xlsx"); // 5.

	// カレントパス + ブック名
	lstrcat(path, file); // 6.

	// TCHAR → String変換s
	String^ pathname = gcnew String(path); // 7.

	// 空白トリミング
	String^ book = pathname->Trim(); // 8.

	// ブックオープン
	Excel::Workbook^ wbook = Xls->Workbooks->Open(book, \
		Type::Missing, \
		Type::Missing, \
		Type::Missing, \
		Type::Missing, \
		Type::Missing, \
		Type::Missing, \
		Type::Missing, \
		Type::Missing, \
		Type::Missing, \
		Type::Missing, \
		Type::Missing, \
		Type::Missing, \
		Type::Missing, \
		Type::Missing); // 9.

	// シートハンドル
	Excel::Worksheet^ wsheet = (Excel::Worksheet^)wbook->Worksheets[1]; // 10.

	// セル->Range(args[0]) 値->Value2(args[1])
	wsheet->Range[args[0], Type::Missing]->Value2 = args[1]; // 11.
	// セル->Range(args[2]) 値->Value2(args[3])
	wsheet->Range[args[2], Type::Missing]->Value2 = args[3]; // 11.

	// ブックの上書き保存
	bool flag = true;
	wbook->Close(flag, \
		System::Type::Missing, \
		System::Type::Missing); // 12.

	// Excel Application 終了
	Xls->Quit(); // 13.

	// COMハンドルリリース
	System::Runtime::InteropServices::Marshal::ReleaseComObject(wsheet); // 14.
	System::Runtime::InteropServices::Marshal::ReleaseComObject(wbook); // 14.
	System::Runtime::InteropServices::Marshal::ReleaseComObject(Xls); // 14.

	System::GC::Collect(); // 14.

    return 0;
}
ビルドが成功すると、「TomCLR.exe」が作成されます。
TomCLR.exeと同じディレクトリにInterop.Microsoft.Office.Interop.Excel.1.7.dllが作成されます。このDLLはTomCLR.exeとセットでリリースします。
Mode                LastWriteTime     Length Name
----                -------------     ------ ----
-a---        2019/02/20     13:28     100352 TomCLR.exe
-a---        2019/02/20     10:21    1532928 Interop.Microsoft.Office.Interop.Excel.1.7.dll
4. 実行
C:\~\TomCLR\Debug\に前回準備したブック「temp.xlsx」を配置します。
※ 今回はJavaScriptから直接呼び出しをおこなわないで、前回のnode.jsの結果を、「temp.xlsx」のセル(A2)とセル(A3)に設定します。
C:\~\TomCLR\Debug>TomCLR.exe "A2" "徳川
家康(とくがわ いえやす、旧字体: 德川家康)または□□ □□(□□□□□□□□□
)は、戦国時代から安土桃山時代にかけての武将・戦国大名[1]。安祥松平家九代当主。
江戸幕府の初代征夷大将軍[1]。三英傑の一人。「海道一の□□□」の異名を持つ。 " "A
3" "松平 元康,まつだいらもとやす,弓取り"

C:\~\TomCLR\Debug>
5.結果
Node側から呼び出し
(2019.02.20 Add)
runexcel.jsを改修しました。
- .then(function(val) { の記述を .then((val) => { のコーディングに改めました。
- child_processライブラリーのspawnを利用してTomCLR.exeを実行します。
- 関数:AnsColor/関数:AnzColorからの戻り値の文字列に含まれる「半角スペース」を「全角スペース」に変換します。
if( process.argv[2] == undefined || process.argv[3] == undefined ) {
    console.log( '引数を指定してください!' );
    return;
};

const AnsColor = require('./tomexcel.js').AnsColor;
const AnzColor = require('./tomexcel.js').AnzColor;
const spawn = require('child_process').spawn;

// 半角スペース → 全角スペース
const chgSpcHF = (val) => {
  return val.replace(/ /g," ");
}

// 非同期のため処理する順番を制御する
const run = () => {
    let buf = [1];
    AnsColor(process.argv[2], process.argv[3]).then((val) => {
      buf[0] = chgSpcHF(val);
    }).then(() => {
        AnzColor(process.argv[2], process.argv[3]).then((val)  => {
          buf[1] = chgSpcHF(val);
        }).then(() => {
            let param = [1];
            param[0] = 'A2';
            param[1] = 'A3';
            spawn('.\\TomCLR.exe', [param[0], buf[0], param[1], buf[1]], { shell: true }, (err, stdout, stderr) => {
                if (err) { console.log(err); }
                console.log(stdout);
            });
        })
    }).catch(err => console.log(err));
};

run();
実行
PS C:\~\tom> node runexcel.js "A1" "FFFF0000"
まとめ
C++でExcelのCOMを利用したプログラムを作成しました。
COMを利用するとブックのI/Oのオーバーヘッドが発生します。限られたリソースを使用するので、必ずCOMで使用したハンドルはリリースします。Windowsのお約束です。
前回、ExcelJSでブックの読みとりをしたコードもC++に置き換えもできます。
これでこの翻訳プロジェクトの機能部分の主役が揃いました。次回から本格化か?
