この記事は、Pythonista3 Advent Calendar 2022 の15日目の記事です。
一方的な偏った目線で、Pythonista3 を紹介していきます。
ほぼ毎日iPhone(Pythonista3)で、コーディングをしている者です。よろしくお願いします。
以下、私の2022年12月時点の環境です。
--- SYSTEM INFORMATION ---
* Pythonista 3.3 (330025), Default interpreter 3.6.1
* iOS 16.1.1, model iPhone12,1, resolution (portrait) 828.0 x 1792.0 @ 2.0
他の環境(iPad や端末の種類、iOS のバージョン違い)では、意図としない挙動(エラーになる)なる場合もあります。ご了承ください。
ちなみに、model iPhone12,1 は、iPhone11 です。
音を出したい
「プログラミングにて、コードのみで音を出す」ということは全人類の夢です(n=1)。
ちょうどAudio 関係のAPI があるので、Pythonista3 で実装しましょう。
AVAudioSourceNode Class
AVAudioSourceNode | Apple Developer Documentation
AVAudioSourceNode クラスは、AVAudioSourceNodeRenderBlock を通してレンダリング用のオーディオデータを供給することができます。kAudioUnitProperty_SetRenderCallback でオーディオユニットの入力コールバックを設定する代わりに、オーディオデータを配信するための便利な方法です。
iOS13 より追加されたAVAudioSourceNode により、以前より簡単にオーディオデータを生成できるようになりました。
今回はAVAudioSourceNode の力を借りて実装していきます。
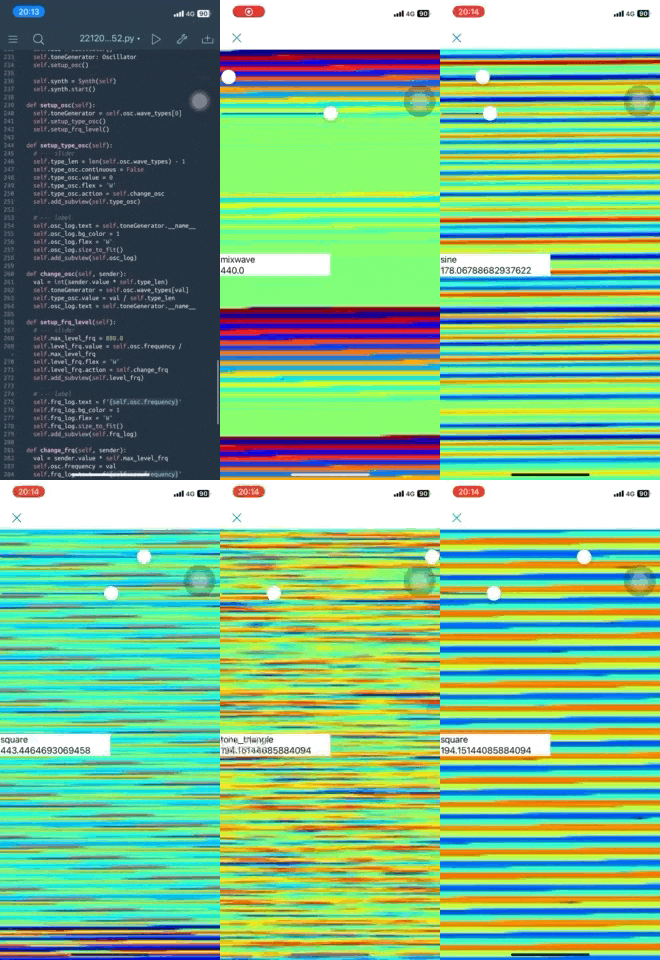
完成Demo
GIF なので音は出ません🙇
ui モジュールのui.View を使って、Pythonista3 上でアプリのような実装にしました。
波形関係の選択スライダーも、実装負担軽減のためui モジュールのui.Slider を使っています。
結果のグラフィックは、生成した波形情報を(無理矢理)画像情報と見立てて、画像変化させています。
matplotlib.image.imsave で波形情報からイメージ変換。変換情報をui.Image として、ui.View のView に随時反映させる流れです。
今回は「音の情報を作り、音を出す」がメインなので、メイン以外の実装はありもの(の力技)で済ませます。objc_util から、他API を呼び出して実装も面白そうですね。
実装
毎回毎回手探りで実装をしています。今回はそんな実際の流れに沿って進めていきたいと思います。
とりあえず音が出る仕組みを知る
どのように、音が
- 作られるのか
- 処理されるのか
- 出るのか
といった点を掴めるように、AVAudioSourceNode をキーワードに調べていきます。
-
【iOS】Core Audioでシンセサイザーを作る - Qiita
- ざっくりとした、設計イメージが持てる
- 派生した使い方を知れる
-
AVAudioEngineの使い方を整理できる- 「Node をコネクトする」「連結して音の流れを掴む」
- Web Audio API に似ている。と知れる
- ざっくりとした、設計イメージが持てる
-
AVAudioEngineでリアルタイムレンダリング - Speaker Deck
- オーディオデータの流れを知れる
- 永続的に処理をする大変さやシビアさ
- 「ポインタ」?何それ美味しいの?な自分の状態の把握
-
RenderBlockとしてBlock処理が出てきた。と知れる
他にも参照したサイトはありますが、AVAudioSourceNode | Apple Developer Documentation を中心に上記情報で大枠は掴めました。
これより(今回は)Swift で書かれたコードから、Pythonista3 への書き換えを始めます。
Pythonista3 で動くように書き換える
(前回紹介したpdbg モジュールを使っています)
objc_util の呼び出しが必要なものを用意しておきます。先に宣言しておくことで、何を使うかの把握も行いやすくなると思います。
self.set_up メソッドで、objc_util 関係をインスタンス化しています。
参考にしているSwift のコードを見ながら、ポチポチと実装です。
「こんなメソッドあるのかしら?」と不安になったらpdbg.state で、メソッドを確認しconsole よりコピペして実行確認をしていきます。
随時実行をしエラーを確認すると、どこでコケているか原因が早く判明できます。とにかく、実行しエラーが出ていないか確認の連続です。
なんなら、class 化せずにグローバルな変数で処理をしたり、self を付けてinspector で確認するのも手です。
from objc_util import ObjCClass

import pdbg

AVAudioEngine = ObjCClass('AVAudioEngine')
AVAudioSourceNode = ObjCClass('AVAudioSourceNode')
AVAudioFormat = ObjCClass('AVAudioFormat')


class Synth:
  def __init__(self):
    self.audioEngine: AVAudioEngine
    self.sampleRate: float = 44100.0  # set_up メソッド: outputNode より確定
    self.deltaTime: float = 0.0  # 1/sampleRate 時間間隔

    self.set_up()

  def set_up(self):
    audioEngine = AVAudioEngine.new()
    sourceNode = AVAudioSourceNode.alloc()
    mainMixer = audioEngine.mainMixerNode()
    outputNode = audioEngine.outputNode()
    format = outputNode.inputFormatForBus_(0)

    self.sampleRate = format.sampleRate()
    self.deltaTime = 1 / self.sampleRate

    inputFormat = AVAudioFormat.alloc(
    ).initWithCommonFormat_sampleRate_channels_interleaved_(
      format.commonFormat(), self.sampleRate, 1, format.isInterleaved())


if __name__ == '__main__':
  synth = Synth()
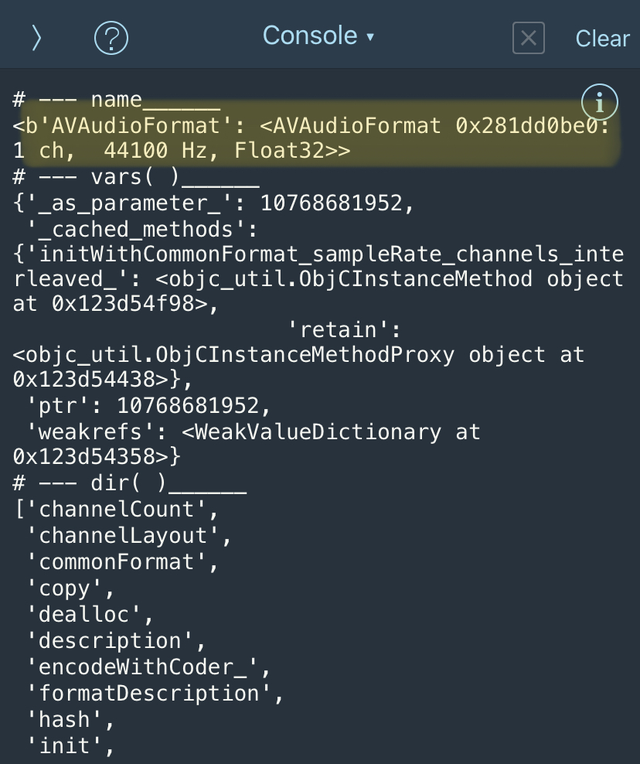
inputFormat の内容を見てみると、1 ch, 44100 Hz, Float32 であることがわかります:
pdbg.state(inputFormat)
# --- name______
<b'AVAudioFormat': <AVAudioFormat 0x281dd0be0:  1 ch,  44100 Hz, Float32>>
# --- vars( )______
{'_as_parameter_': 10768681952,
 '_cached_methods': {'initWithCommonFormat_sampleRate_channels_interleaved_': <objc_util.ObjCInstanceMethod object at 0x123d54f98>,
                     'retain': <objc_util.ObjCInstanceMethodProxy object at 0x123d54438>},
 'ptr': 10768681952,
 'weakrefs': <WeakValueDictionary at 0x123d54358>}
# --- dir( )______
['channelCount',
 'channelLayout',
 'commonFormat',
 'copy',
 'dealloc',
 'description',
 'encodeWithCoder_',
 'formatDescription',
 'hash',
 'init',
 'initStandardFormatWithSampleRate_channelLayout_',
 'initStandardFormatWithSampleRate_channels_',
 'initWithCMAudioFormatDescription_',
 'initWithCoder_',
〜 以下略 〜
AudioBuffer と、ObjCBlock
いよいよAVAudioSourceNode の処理に入りそうですね。
Block 処理が必要そうで、ObjCBlock を使うと思いきや。。。
まだ、下準備があります😇
Block 処理に流し込むための、AudioBuffer (そして、その配列のAudioBufferList)の構造体を定義する必要があります。
ctypes.Structure で構造体を用意する
AudioBuffer | Apple Developer Documentation
Structure であるAudioBuffer 。Pythonista3 では用意されていません。ですので、Python のctypes.Structure を用いて自力で指定していきます。
AudioBuffer のDocumentation より判明したことは
-
mNumberChannels | Apple Developer Documentation
- Objective-C
UInt32 mNumberChannels;
- Python
ctypes.c_uint32
- Objective-C
-
mDataByteSize | Apple Developer Documentation
- Objective-C
UInt32 mDataByteSize;
- Python
ctypes.c_uint32
- Objective-C
-
mData | Apple Developer Documentation
- Objective-C
void *mData;
- Python
ctypes.c_void_p
- Objective-C
ctypes.Structure | ctypes --- Pythonのための外部関数ライブラリ — Python 3.11.0b5 ドキュメント
基本データ型 | ctypes --- Pythonのための外部関数ライブラリ — Python 3.11.0b5 ドキュメント
ctypes の型で対応できることに感謝し、構造体を定義します:
import ctypes

class AudioBuffer(ctypes.Structure):
  _fields_ = [
    ('mNumberChannels', ctypes.c_uint32),
    ('mDataByteSize', ctypes.c_uint32),
    ('mData', ctypes.c_void_p),
  ]
_fields_ へ、tuple で定義したものを配列で格納します。
import ctypes
としている理由は、objc_util でもctypes モジュールを呼び出しているので「これはPython 側の処理」と、私が理解しやすくするためです。
AudioBufferList も、同様に
AudioBufferList | Apple Developer Documentation
-
mNumberBuffers | Apple Developer Documentation
- Objective-C
UInt32 mNumberBuffers;
- Python
ctypes.c_uint32
- Objective-C
-
mBuffers | Apple Developer Documentation
- Objective-C
AudioBuffer mBuffers[1];
- Python
AudioBuffer * チャンネル数
- Objective-C
mBuffers は、モノラルであれば1、ステレオであれば2 で指定します。
チャンネル数は、AudioBufferList 以外でも(AVAudioFormat 等)で使用するので、CHANNEL として変数で持たせます。
class AudioBufferList(ctypes.Structure):
  _fields_ = [
    ('mNumberBuffers', ctypes.c_uint32),
    ('mBuffers', AudioBuffer * CHANNEL),
  ]
静的型付け言語に慣れてないと、なかなか難しいところですね。。。
import ctypes
from objc_util import ObjCClass

import pdbg

CHANNEL = 1

AVAudioEngine = ObjCClass('AVAudioEngine')
AVAudioSourceNode = ObjCClass('AVAudioSourceNode')
AVAudioFormat = ObjCClass('AVAudioFormat')


class AudioBuffer(ctypes.Structure):
  _fields_ = [
    ('mNumberChannels', ctypes.c_uint32),
    ('mDataByteSize', ctypes.c_uint32),
    ('mData', ctypes.c_void_p),
  ]


class AudioBufferList(ctypes.Structure):
  _fields_ = [
    ('mNumberBuffers', ctypes.c_uint32),
    ('mBuffers', AudioBuffer * CHANNEL),
  ]


class Synth:
  def __init__(self):
    self.audioEngine: AVAudioEngine
    self.sampleRate: float = 44100.0  # set_up メソッド: outputNode より確定
    self.deltaTime: float = 0.0  # 1/sampleRate 時間間隔

    self.set_up()

  def set_up(self):
    audioEngine = AVAudioEngine.new()
    sourceNode = AVAudioSourceNode.alloc()
    mainMixer = audioEngine.mainMixerNode()
    outputNode = audioEngine.outputNode()
    format = outputNode.inputFormatForBus_(0)

    self.sampleRate = format.sampleRate()
    self.deltaTime = 1 / self.sampleRate

    inputFormat = AVAudioFormat.alloc(
    ).initWithCommonFormat_sampleRate_channels_interleaved_(
      format.commonFormat(), self.sampleRate, CHANNEL, format.isInterleaved())


if __name__ == '__main__':
  synth = Synth()
(とりあえず、実行してエラーがないか確認してみましょう)
ObjCBlock 実装へ、、、
AudioBuffer 、AudioBufferList の準備も終えたので、いよいよObjCBlock の実装に入りましょうか、、、
え?「参考にしているコードだとBlock 処理がない」ですと?
再掲しますが、【iOS】Core Audioでシンセサイザーを作る - Qiita のここの部分です(まるっと転用させてもらってます🙇):
// class Synthesizerの一部
private var audioSource: AudioSource?

lazy var sourceNode = AVAudioSourceNode { [self] (_, _, frameCount, audioBufferList) -> OSStatus in
    let abl = UnsafeMutableAudioBufferListPointer(audioBufferList)
    guard let oscillator = self.audioSource else {fatalError("Oscillator is nil")}
    for frame in 0..<Int(frameCount) {
        let sampleVal: Float = oscillator.signal(time: self.time) // この部分
        self.time += self.deltaTime
        for buffer in abl {
            let buf: UnsafeMutableBufferPointer<Float> = UnsafeMutableBufferPointer(buffer)
            buf[frame] = sampleVal
        }
    }
    return noErr
}
ここの[self] は:
lazy var sourceNode = AVAudioSourceNode { [self] (_, _, frameCount, audioBufferList) -> OSStatus in
Synthesizers With AVAudioSourceNode | LarzTech の「Setup」項のコードを確認してみましょう。
renderBlock(=[self]) と読み替えることもできそうです:
sourceNode = AVAudioSourceNode(renderBlock: { (_, _, frameCount, bufferList) -> OSStatus in
    // TODO: Audio generation
    return noErr
})
AVAudioSourceNode | Apple Developer Documentation Documentation にも、すぐさまAVAudioSourceNodeRenderBlock と記載がありました。
では、AVAudioSourceNodeRenderBlock の構成をみてみることにしましょう。
AVAudioSourceNodeRenderBlock | Apple Developer Documentation
うーんType Alias 。。。またもや、自作実装が必要そうですね😇
返り値がOSStatus(ctypes.c_int32)で、それぞれパラメータが
isSilencetimestampframeCountoutputData
と、なっており参考にしているコードでは、前半2つが_ となっているので
-
isSilence_
-
timestamp_
-
frameCount- 使う
-
outputData- 使う
このようになりそうですね!!
必要な情報は判明したので(行ったり来たりで忙しいですが)、Pythonista3 のObjCBlock を確認しましょう。
class objc_util.ObjCBlock(func, restype=None, argtypes=None) とあるで、
- 呼び出す関数(
func) - 返り値(
restype) - 引数(
argtypes)
これらを準備するですね!
source_node_render 関数の第一引数_cmd は、 Pythonista3 で必要な必須の引数です(型は、ctypes.c_void_p)。
return を0 としています。Pythonista3 は、エラーであると基本的に落ちるので決め打ちの成功として0(OSStatus = ctypes.c_int32) を返すようにしてます
import ctypes
from objc_util import ObjCBlock

CHANNEL = 1
OSStatus = ctypes.c_int32


class AudioBuffer(ctypes.Structure):
  _fields_ = [
    ('mNumberChannels', ctypes.c_uint32),
    ('mDataByteSize', ctypes.c_uint32),
    ('mData', ctypes.c_void_p),
  ]


class AudioBufferList(ctypes.Structure):
  _fields_ = [
    ('mNumberBuffers', ctypes.c_uint32),
    ('mBuffers', AudioBuffer * CHANNEL),
  ]


def source_node_render(_cmd, _isSilence_ptr, _timestamp_ptr, frameCount,
                       outputData_ptr) -> OSStatus:
  # todo: ここに処理を書く
  return 0


render_block = ObjCBlock(
  func=source_node_render,
  restype=OSStatus,
  # コード上`_` となっている箇所は、とりあえずの`ctypes.c_void_p`
  argtypes=[
    ctypes.c_void_p,  # _cmd の部分
    ctypes.c_void_p,  # _ -> isSilence
    ctypes.c_void_p,  # _ -> timestamp
    ctypes.c_void_p,  # frameCount
    ctypes.POINTER(AudioBufferList)  # outputData
  ])
実行をしても、何も起きませんが逆にエラーも出ていないので、無事にObjCBlock が完了しました。
現在の状況を組み上げる
class Synth の中に、render_block を入れて整えていきます。
class 内に入ったことでself. とつけたり引数にself を追加するなど、気をつけて書き換えていきましょう。
import ctypes
from objc_util import ObjCClass, ObjCBlock

import pdbg

CHANNEL = 1

OSStatus = ctypes.c_int32

AVAudioEngine = ObjCClass('AVAudioEngine')
AVAudioSourceNode = ObjCClass('AVAudioSourceNode')
AVAudioFormat = ObjCClass('AVAudioFormat')


class AudioBuffer(ctypes.Structure):
  _fields_ = [
    ('mNumberChannels', ctypes.c_uint32),
    ('mDataByteSize', ctypes.c_uint32),
    ('mData', ctypes.c_void_p),
  ]


class AudioBufferList(ctypes.Structure):
  _fields_ = [
    ('mNumberBuffers', ctypes.c_uint32),
    ('mBuffers', AudioBuffer * CHANNEL),
  ]


class Synth:
  def __init__(self):
    self.audioEngine: AVAudioEngine
    self.sampleRate: float = 44100.0  # set_up メソッド: outputNode より確定
    self.deltaTime: float = 0.0  # 1/sampleRate 時間間隔

    self.render_block = ObjCBlock(
      self.source_node_render,
      restype=OSStatus,
      argtypes=[
        ctypes.c_void_p, ctypes.c_void_p, ctypes.c_void_p, ctypes.c_void_p,
        ctypes.POINTER(AudioBufferList)
      ])

    self.set_up()

  def set_up(self):
    audioEngine = AVAudioEngine.new()
    sourceNode = AVAudioSourceNode.alloc()
    mainMixer = audioEngine.mainMixerNode()
    outputNode = audioEngine.outputNode()
    format = outputNode.inputFormatForBus_(0)

    self.sampleRate = format.sampleRate()
    self.deltaTime = 1 / self.sampleRate

    inputFormat = AVAudioFormat.alloc(
    ).initWithCommonFormat_sampleRate_channels_interleaved_(
      format.commonFormat(), self.sampleRate, CHANNEL, format.isInterleaved())

    sourceNode.initWithFormat_renderBlock_(inputFormat, self.render_block)

  def source_node_render(self, _cmd, _isSilence_ptr, _timestamp_ptr,
                         frameCount, outputData_ptr) -> OSStatus:
    # todo: ここに処理を書く
    return 0


if __name__ == '__main__':
  synth = Synth()
先に出力を繋いでおきますか
Block 実装という一つの山場を越えたので、sourceNode.initWithFormat_renderBlock_ 以降の処理もゴリゴリ実装していきましょう。
比較的に参考コードを素直に実装していけば、なんとかなりそうです。
audioEngine にsourceNode をattachNode

sourceNode(音のデータを処理) -> mainMixer(全体の調整役) -> outputNode(ここから音が出る)
node のコネクト処理:
audioEngine.attachNode_(sourceNode)
sourceNode.volume = 0.5  # ボリュームを抑えている

audioEngine.connect_to_format_(sourceNode, mainMixer, inputFormat)
audioEngine.connect_to_format_(mainMixer, outputNode, inputFormat)

audioEngine.prepare()
self.audioEngine = audioEngine
開始と終了の処理:
  def start(self):
    self.audioEngine.startAndReturnError_(None)

  def stop(self):
    self.audioEngine.stop()
これらをSynth class に取り込み、.start() を呼び出すと、Block 処理が走ることが確認できます。
import ctypes
from objc_util import ObjCClass, ObjCBlock

import pdbg

CHANNEL = 1

OSStatus = ctypes.c_int32

AVAudioEngine = ObjCClass('AVAudioEngine')
AVAudioSourceNode = ObjCClass('AVAudioSourceNode')
AVAudioFormat = ObjCClass('AVAudioFormat')


class AudioBuffer(ctypes.Structure):
  _fields_ = [
    ('mNumberChannels', ctypes.c_uint32),
    ('mDataByteSize', ctypes.c_uint32),
    ('mData', ctypes.c_void_p),
  ]


class AudioBufferList(ctypes.Structure):
  _fields_ = [
    ('mNumberBuffers', ctypes.c_uint32),
    ('mBuffers', AudioBuffer * CHANNEL),
  ]


class Synth:
  def __init__(self):
    self.audioEngine: AVAudioEngine
    self.sampleRate: float = 44100.0  # set_up メソッド: outputNode より確定
    self.deltaTime: float = 0.0  # 1/sampleRate 時間間隔

    self.render_block = ObjCBlock(
      self.source_node_render,
      restype=OSStatus,
      argtypes=[
        ctypes.c_void_p, ctypes.c_void_p, ctypes.c_void_p, ctypes.c_void_p,
        ctypes.POINTER(AudioBufferList)
      ])

    self.set_up()

  def set_up(self):
    audioEngine = AVAudioEngine.new()
    sourceNode = AVAudioSourceNode.alloc()
    mainMixer = audioEngine.mainMixerNode()
    outputNode = audioEngine.outputNode()
    format = outputNode.inputFormatForBus_(0)

    self.sampleRate = format.sampleRate()
    self.deltaTime = 1 / self.sampleRate

    inputFormat = AVAudioFormat.alloc(
    ).initWithCommonFormat_sampleRate_channels_interleaved_(
      format.commonFormat(), self.sampleRate, CHANNEL, format.isInterleaved())

    sourceNode.initWithFormat_renderBlock_(inputFormat, self.render_block)

    audioEngine.attachNode_(sourceNode)
    sourceNode.volume = 0.2

    audioEngine.connect_to_format_(sourceNode, mainMixer, inputFormat)
    audioEngine.connect_to_format_(mainMixer, outputNode, inputFormat)

    audioEngine.prepare()
    self.audioEngine = audioEngine

  def source_node_render(self, _cmd, _isSilence_ptr, _timestamp_ptr,
                         frameCount, outputData_ptr) -> OSStatus:
    # todo: ここに処理を書く
    print('test')
    return 0

  def start(self):
    self.audioEngine.startAndReturnError_(None)

  def stop(self):
    self.audioEngine.stop()


if __name__ == '__main__':
  synth = Synth()
  synth.start()
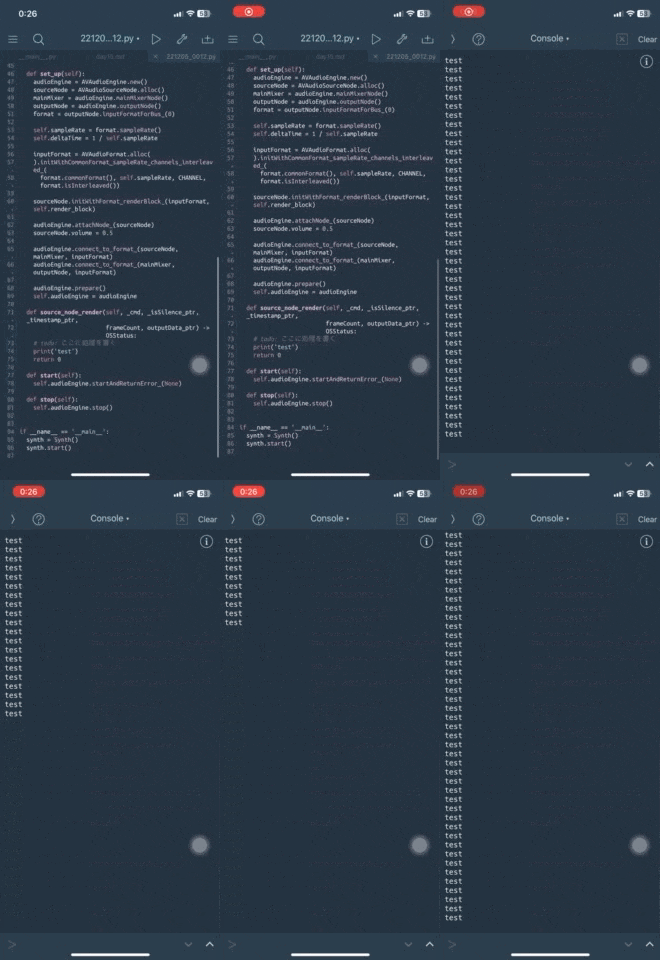
source_node_render メソッド内にprint('test') と出力指示をしました。
結果console にtest が乱立しています(まだ「音」の設定はできていませんので、無音です)。
また、恐ろしい話ではあるのですが、stop の処理を書いたのに関わらず、現在止める方法が、一度アプリを強制終了です。。。(time モジュールなど使って、n 秒後にstop を呼び出し、終了させるなど)
今回の終わりまでには、終了指示だせるようになりますので、いまはそのままにしておきます。
(はやくsine波 出したい)
sine波を生成する処理
みんな大好きsine波ちゃんです!!
ObjCBlock の、func にて定義したsource_node_render の中に、sine波を生成する計算式を書き上げます。
計算した数値の結果を、いい感じにfor でぶん回しながら
ctypes.POINTER(AudioBufferList) = outputData_ptr の各buffer にぶち込んでいくのです。
AVAudioSourceNode へrenderBlock を格納するまでは終えているので、あとは式を書き込むだけですねぇ☺️
# 引数の型を忘れそうなので、アノテーション入れました
def source_node_render(self,
                       _cmd: ctypes.c_void_p,
                       _isSilence_ptr: ctypes.c_void_p,
                       _timestamp_ptr: ctypes.c_void_p,
                       frameCount: ctypes.c_void_p,
                       outputData_ptr: ctypes.POINTER) -> OSStatus:
  # todo: ここに処理を書く
  ablPointer = outputData_ptr.contents
  for frame in range(frameCount):
    sampleVal = sin(440.0 * 2.0 * pi * self.timex)
    self.timex += self.deltaTime

    for bufferr in range(ablPointer.mNumberBuffers):
      _mData = ablPointer.mBuffers[bufferr].mData
      _pointer = ctypes.POINTER(ctypes.c_float * frameCount)
      buffer = ctypes.cast(_mData, _pointer).contents
      buffer[frame] = sampleVal
    #print('test')
  return 0
math モジュールでsin, pi を呼び出しています。この処理により、sine波を生成:
sampleVal = sin(440.0 * 2.0 * pi * self.timex)
440.0 を880.0 にすると、1オクターブ高いラA になります。
AudioBufferList のポインタへfor で回したものをしかるべき場所に格納している(みたいです):
for bufferr in range(ablPointer.mNumberBuffers):
  _mData = ablPointer.mBuffers[bufferr].mData
  _pointer = ctypes.POINTER(ctypes.c_float * frameCount)
  buffer = ctypes.cast(_mData, _pointer).contents
  buffer[frame] = sampleVal
正直なところ、ポインタの理解が追いついていません。
Objective-C のDocumentation で、引数に* が先頭についている場合にはポインタを意識して、試行錯誤を繰り返しています。
コードの全体としては:
from math import sin, pi
import ctypes

from objc_util import ObjCClass, ObjCBlock

import pdbg

CHANNEL = 1

OSStatus = ctypes.c_int32

AVAudioEngine = ObjCClass('AVAudioEngine')
AVAudioSourceNode = ObjCClass('AVAudioSourceNode')
AVAudioFormat = ObjCClass('AVAudioFormat')


class AudioBuffer(ctypes.Structure):
  _fields_ = [
    ('mNumberChannels', ctypes.c_uint32),
    ('mDataByteSize', ctypes.c_uint32),
    ('mData', ctypes.c_void_p),
  ]


class AudioBufferList(ctypes.Structure):
  _fields_ = [
    ('mNumberBuffers', ctypes.c_uint32),
    ('mBuffers', AudioBuffer * CHANNEL),
  ]


class Synth:
  def __init__(self):
    self.audioEngine: AVAudioEngine
    self.sampleRate: float = 44100.0  # set_up メソッド: outputNode より確定
    self.deltaTime: float = 0.0  # 1/sampleRate 時間間隔
    self.timex: float = 0.0  # Render の間隔カウンター

    self.render_block = ObjCBlock(
      self.source_node_render,
      restype=OSStatus,
      argtypes=[
        ctypes.c_void_p, ctypes.c_void_p, ctypes.c_void_p, ctypes.c_void_p,
        ctypes.POINTER(AudioBufferList)
      ])

    self.set_up()

  def set_up(self):
    audioEngine = AVAudioEngine.new()
    sourceNode = AVAudioSourceNode.alloc()
    mainMixer = audioEngine.mainMixerNode()
    outputNode = audioEngine.outputNode()
    format = outputNode.inputFormatForBus_(0)

    self.sampleRate = format.sampleRate()
    self.deltaTime = 1 / self.sampleRate

    inputFormat = AVAudioFormat.alloc(
    ).initWithCommonFormat_sampleRate_channels_interleaved_(
      format.commonFormat(), self.sampleRate, CHANNEL, format.isInterleaved())

    sourceNode.initWithFormat_renderBlock_(inputFormat, self.render_block)

    audioEngine.attachNode_(sourceNode)
    sourceNode.volume = 0.1

    audioEngine.connect_to_format_(sourceNode, mainMixer, inputFormat)
    audioEngine.connect_to_format_(mainMixer, outputNode, inputFormat)

    audioEngine.prepare()
    self.audioEngine = audioEngine

  def source_node_render(self,
                         _cmd: ctypes.c_void_p,
                         _isSilence_ptr: ctypes.c_void_p,
                         _timestamp_ptr: ctypes.c_void_p,
                         frameCount: ctypes.c_void_p,
                         outputData_ptr: ctypes.POINTER) -> OSStatus:
    # todo: ここに処理を書く
    ablPointer = outputData_ptr.contents
    for frame in range(frameCount):
      sampleVal = sin(440.0 * 2.0 * pi * self.timex)
      #print(sampleVal)
      self.timex += self.deltaTime

      for bufferr in range(ablPointer.mNumberBuffers):
        _mData = ablPointer.mBuffers[bufferr].mData
        _pointer = ctypes.POINTER(ctypes.c_float * frameCount)
        buffer = ctypes.cast(_mData, _pointer).contents
        buffer[frame] = sampleVal
    return 0

  def start(self):
    self.audioEngine.startAndReturnError_(None)

  def stop(self):
    self.audioEngine.stop()


if __name__ == '__main__':
  synth = Synth()
  synth.start()
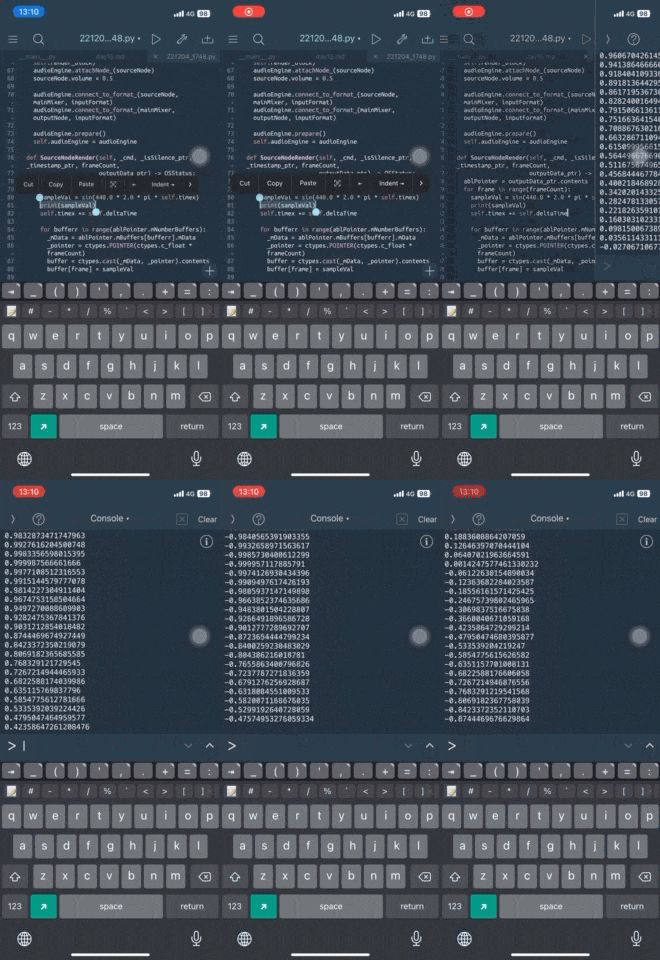
sine波生成のために、__init__ にself.timex を定義してRender 内で、数値をアップデートさせています。
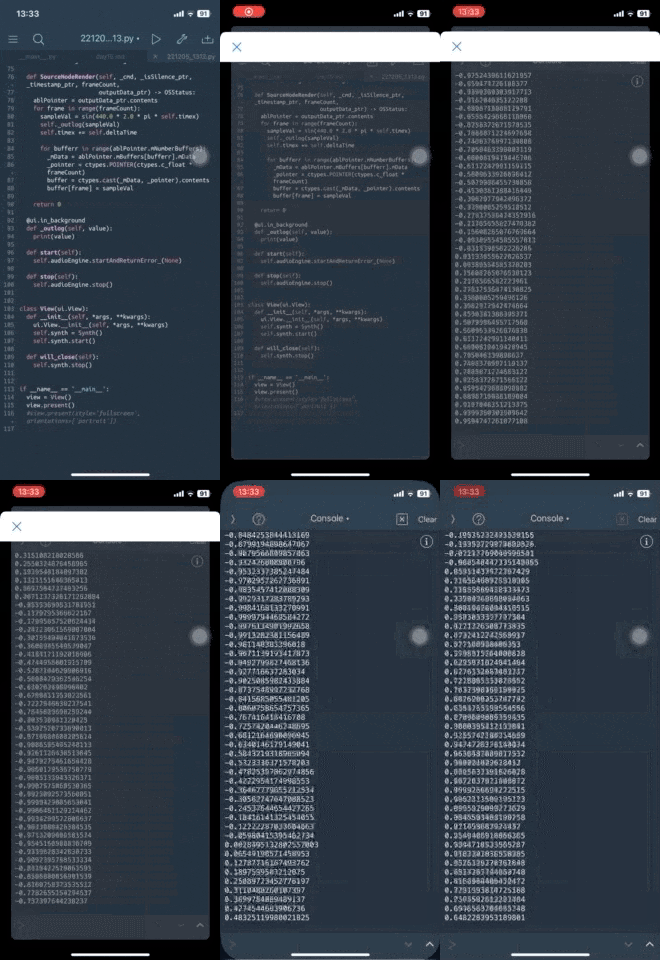
sampleVal をprint で出力するとそれっぽい数値が出ていますね!
print 出力中は音が出なくなってしまうので、コメントアウトすると、sine波が「ポーーー」と鳴りつづけています!!
もし音が出ない場合はマナーモードの可能性があるので、解除し再実行してください(音量注意)。
音を止めたい
「音を出したい」衝動が達成すると、次は「音を止めたい」ですね。
人間の欲の深さは恐ろしいものです。自分で始めた物語、しっかり物語を終えましょう。
ui モジュールでアプリライクな形状にして、View を閉じ(終了し)たら音が止まるようにします。
from math import sin, pi
import ctypes

from objc_util import ObjCClass, ObjCBlock
import ui

import pdbg

CHANNEL = 1

OSStatus = ctypes.c_int32

AVAudioEngine = ObjCClass('AVAudioEngine')
AVAudioSourceNode = ObjCClass('AVAudioSourceNode')
AVAudioFormat = ObjCClass('AVAudioFormat')


class AudioBuffer(ctypes.Structure):
  _fields_ = [
    ('mNumberChannels', ctypes.c_uint32),
    ('mDataByteSize', ctypes.c_uint32),
    ('mData', ctypes.c_void_p),
  ]


class AudioBufferList(ctypes.Structure):
  _fields_ = [
    ('mNumberBuffers', ctypes.c_uint32),
    ('mBuffers', AudioBuffer * CHANNEL),
  ]


class Synth:
  def __init__(self):
    self.audioEngine: AVAudioEngine
    self.sampleRate: float = 44100.0  # set_up メソッド: outputNode より確定
    self.deltaTime: float = 0.0  # 1/sampleRate 時間間隔
    self.timex: float = 0.0  # Render の間隔カウンター

    self.render_block = ObjCBlock(
      self.source_node_render,
      restype=OSStatus,
      argtypes=[
        ctypes.c_void_p, ctypes.c_void_p, ctypes.c_void_p, ctypes.c_void_p,
        ctypes.POINTER(AudioBufferList)
      ])

    self.set_up()

  def set_up(self):
    audioEngine = AVAudioEngine.new()
    sourceNode = AVAudioSourceNode.alloc()
    mainMixer = audioEngine.mainMixerNode()
    outputNode = audioEngine.outputNode()
    format = outputNode.inputFormatForBus_(0)

    self.sampleRate = format.sampleRate()
    self.deltaTime = 1 / self.sampleRate

    inputFormat = AVAudioFormat.alloc(
    ).initWithCommonFormat_sampleRate_channels_interleaved_(
      format.commonFormat(), self.sampleRate, CHANNEL, format.isInterleaved())

    sourceNode.initWithFormat_renderBlock_(inputFormat, self.render_block)

    audioEngine.attachNode_(sourceNode)
    sourceNode.volume = 0.1

    audioEngine.connect_to_format_(sourceNode, mainMixer, inputFormat)
    audioEngine.connect_to_format_(mainMixer, outputNode, inputFormat)

    audioEngine.prepare()
    self.audioEngine = audioEngine

  def source_node_render(self,
                         _cmd: ctypes.c_void_p,
                         _isSilence_ptr: ctypes.c_void_p,
                         _timestamp_ptr: ctypes.c_void_p,
                         frameCount: ctypes.c_void_p,
                         outputData_ptr: ctypes.POINTER) -> OSStatus:
    # todo: ここに処理を書く
    ablPointer = outputData_ptr.contents
    for frame in range(frameCount):
      sampleVal = sin(440.0 * 2.0 * pi * self.timex)
      #self._outlog(sampleVal)
      self.timex += self.deltaTime

      for bufferr in range(ablPointer.mNumberBuffers):
        _mData = ablPointer.mBuffers[bufferr].mData
        _pointer = ctypes.POINTER(ctypes.c_float * frameCount)
        buffer = ctypes.cast(_mData, _pointer).contents
        buffer[frame] = sampleVal
    return 0

  @ui.in_background
  def _outlog(self, value):
    """ 確認用で基本呼び出さない """
    print(value)

  def start(self):
    self.audioEngine.startAndReturnError_(None)

  def stop(self):
    self.audioEngine.stop()


class View(ui.View):
  def __init__(self, *args, **kwargs):
    ui.View.__init__(self, *args, **kwargs)
    self.synth = Synth()
    self.synth.start()

  def will_close(self):
    self.synth.stop()


if __name__ == '__main__':
  view = View()
  view.present()
  #view.present(style='fullscreen', orientations=['portrait'])
def will_close(self): の「閉じる指示をした時」に、Synth の.stop メソッドを呼ぶようにしています。
tips その1(ui.in_background)
GIF だと、音が出ないので無理やりprint で数値を出すようにしています(Synth._outlog)。
処理の関係で、出力音にノイズが乗る可能性がありますが。。。
デコレーション@ui.in_background で、音が出つつconsole へ出力できるように無理やり実装しています。無理やりなので、View が閉じても裏側で走り続けてしまっています。
普段Synth._outlog を呼ばなくていいですし、書かなくてもいいです。
tips その2(View.present)
View.present()
と引数なしに呼び出すと、sheet のView が出てきます。
また背景色を指定しないと、透過状態で出現するので、console が見える状態になります。
View.present(style='fullscreen')
fullscreen 指定にすると、背景色を指定しない場合には背景が黒になります(想定するに、実際は黒ではなく透過でfullscreen の背面に何も無いので事実黒く見える)。
参考文献
- 【iOS】Core Audioでシンセサイザーを作る - Qiita
- AVAudioEngineでリアルタイムレンダリング by 八十嶋祐樹 | トーク | iOSDC Japan 2020 - fortee.jp
- AVAudioEngineでリアルタイムレンダリング - Speaker Deck
- Building a Synthesizer in Swift. Making audio waveforms with… | by SwiftMoji | Better Programming
- Building a Signal Generator | Apple Developer Documentation
- Synthesizers With AVAudioSourceNode | LarzTech
次回は
今回で「音を出す」「音を止める」まで達成しました。音声ファイルを用意せずにコードのみで、音を作れるのですね☺️
source_node_render 関数内の数式を置き換えると、色々な音になりますので、ガチャガチャ書き換えて楽しむのもいいかもしれません。
冒頭でお見せした、完成Demo に近づくため次回は
- 出力音の種類を変更する
- 出ている音の可視化
の実装を進めていきます。
sine波(正弦波)が登場しましたが、矩形波などシンセサイザーで聞いたことのある波を出しましょう。
ここまで、読んでいただきありがとうございました。
せんでん
Discord
Pythonista3 の日本語コミュニティーがあります。みなさん優しくて、わからないところも親身に教えてくれるのでこの機会に覗いてみてください。
書籍
iPhone/iPad でプログラミングする最強の本。
その他
- サンプルコード
Pythonista3 Advent Calendar 2022 でのコードをまとめているリポジトリがあります。
コードのエラーや変なところや改善点など。ご指摘やPR お待ちしておりますー
なんしかガチャガチャしていますが、お気兼ねなくお声がけくださいませー
やれるか、やれないか。ではなく、やるんだけども、紹介説明することは尽きないと思うけど、締め切り守れるか?って話よ!(クズ)
— pome-ta (@pome_ta93) November 4, 2022
Pythonista3 Advent Calendar 2022 https://t.co/JKUxA525Pt #Qiita
- GitHub
基本的にGitHub にコードをあげているので、何にハマって何を実装しているのか観測できると思います。
