フロントエンドは初心者同然の僕ですが、ReactとかReduxをいろいろと触ってみました。
bootstrapベースのフォームが作りたかったのでreact-redux-form,react-bootstrapを使ってフォーム作ってみました。
とりあえず頑張ったので、フォーム作るまでの手順を書いていこうと思います。
- 必要なライブラリ等の準備
- まずはHTMLファイルを用意する
- webpackのconfigをそれっぽく用意する
- nodeのサーバスクリプトを用意する
- package.jsonにscriptsの設定をする
- index.jsを用意する
- DevToolsの準備
- configureStoreの作成
- AppComonentの作成
- RegistrationFormの作成
- エラーの場合はラベルや、inputを赤くしたい
- エラーメッセージの文字を赤くする
- 最後に
必要なライブラリ等の準備
まずは適当なディレクトリを作成しましょう。
$ cd ~/
$ mkdir redux-form-sample
次に必要なnpmライブラリを導入します。
$ npm init

$ npm install -S es6-promise lodash react react-dom redux react-redux react-redux-form react-bootstrap  redux-thunk whatwg-fetch

$ npm install -D babel-core babel-eslint babel-loader babel-preset-es2015 babel-preset-react babel-preset-react-hmre babel-preset-stage-0 cross-env css-loader cssnext-loader eslint eslint-plugin-babel eslint-plugin-react eventsource-polyfill express extract-text-webpack-plugin path style-loader webpack webpack-dev-middleware webpack-hot-middleware redux-devtools redux-devtools-log-monitor redux-devtools-dock-monitor
まずはHTMLファイルを用意する
bootstrap用のCSSとかとりあえずcdnにしときます。
至ってシンプルなhtmlですね。
<!DOCTYPE html>
<html>
<head>
    <title>Redux form test</title>
    <meta charset="utf-8">
    <meta name="viewport" content="width=device-width, initial-scale=1.0">

    <link href="./static/app.css" rel="stylesheet" type="text/css" />
    <link rel="stylesheet" href="https://cdnjs.cloudflare.com/ajax/libs/twitter-bootstrap/3.3.7/css/bootstrap.css" />
    <link rel="stylesheet" href="https://maxcdn.bootstrapcdn.com/font-awesome/4.5.0/css/font-awesome.min.css">

</head>
<body>

<div id="main"></div>

<script src="./static/bundle.js"></script>
</body>
</html>
webpackのconfigをそれっぽく用意する
webpackのconfigファイルを用意します。
var path = require('path');
var webpack = require('webpack');
var ExtractTextPlugin = require('extract-text-webpack-plugin');

var devFlagPlugin = new webpack.DefinePlugin({
  __DEV__: JSON.stringify(JSON.parse(process.env.DEBUG || 'false'))
});

module.exports = {
  devtool: 'cheap-module-eval-source-map',
  entry: [
    'eventsource-polyfill',
    'webpack-hot-middleware/client?path=/__webpack_hmr&timeout=20000',
    './js/index.js'
  ],
  output: {
    path: path.join(__dirname, 'dist'),
    publicPath: '/static/',
    filename: 'bundle.js',
    hot: true
  },
  plugins: [
    new webpack.optimize.OccurenceOrderPlugin(),
    new webpack.HotModuleReplacementPlugin(),
    new webpack.NoErrorsPlugin(),
    devFlagPlugin,
    new ExtractTextPlugin('app.css')
  ],
  module: {
    loaders: [
      {
        test: /\.js$/,
        loader: 'babel',
        exclude: /node_modules/,
        query: {
          presets: ["react", "es2015", "stage-0"],
          env: {
            "development": {
              "presets": ["react-hmre"]
            }
          }
        }
      },
      { test: /\.css$/, loader: ExtractTextPlugin.extract('css-loader?module!cssnext-loader') }
    ]
  },
  resolve: {
    extensions: ['', '.js', '.json']
  }
};
nodeのサーバスクリプトを用意する
これも適当にいい感じによういします。
var path = require('path');
var webpack = require('webpack');
var express = require('express');
var config = require('./webpack.config');

var app = express();
var compiler = webpack(config);

app.use(require('webpack-dev-middleware')(compiler, {
  noInfo: true,
  publicPath: config.output.publicPath,
  historyApiFallback: true
}));

app.use(require('webpack-hot-middleware')(compiler));

app.get('*', function(req, res) {
  res.sendFile(path.join(__dirname, 'index.html'));
});

app.listen(3000, 'localhost', function (err, result) {
  if (err) {
    console.log(err);
  }

  console.log('Listening at localhost:3000');
});
package.jsonにscriptsの設定をする
...
  "scripts": {
    "start": "DEBUG=true node server.js"
  }
index.jsを用意する
一旦適当にjs/index.jsを用意します。
import React from 'react'
import ReactDOM from 'react-dom'
ここまで準備できたら一旦サーバを起動してみましょう。
$ npm start
これでブラウザでlocalhost:3000にアクセスしてみて、200が返ってきていたら、大丈夫だと思います。
DevToolsの準備
ReduxにはStateやActionを可視化するDevToolsがあるみたいです。
その設定をまずしましょう。
詳しいことはDevToolsのリファレンスを参照してください。
import React from 'react';
import { createDevTools } from 'redux-devtools';

import LogMonitor from 'redux-devtools-log-monitor';
import DockMonitor from 'redux-devtools-dock-monitor';

const DevTools = createDevTools(
    <DockMonitor toggleVisibilityKey='ctrl-h'
                 changePositionKey='ctrl-q'
                 defaultIsVisible={true}>
        <LogMonitor theme='solarized' />
    </DockMonitor>
);

export default DevTools;
configureStoreの作成
createFormsを使います。これでreact-redux-formのreducerが準備できます。
react-redux-formではredux-thunkが必要なので、middlewareの登録もします。
今回はDevToolsも使うのでDevTools.instrument()も実行しています。
import {createStore, applyMiddleware, combineReducers, compose} from 'redux';
import thunkMiddleware from 'redux-thunk';
import { createForms } from 'react-redux-form';

import {createStore, applyMiddleware, combineReducers, compose} from 'redux';
import thunkMiddleware from 'redux-thunk';
import { combineForms } from 'react-redux-form';

let createStoreWithMiddleware = compose(
  applyMiddleware(thunkMiddleware),
  DevTools.instrument()
)(createStore);

let reducers = combineForms({
    user: {
      firstName: "",
      lastName: "",
      email: ""
    }
});


export default function configureStore(initialState) {
  return createStoreWithMiddleware(reducers, initialState);
}
もし他のreducerも使いたい場合は以下のようにcreateFormsを使用するのが良さそうです。
import { combineForms } from 'react-redux-form';

const reducers = combineReducers({
  otherReducer,
  ...createForms({
    giver: giver
  })
});
AppComonentの作成
この辺はReduxのチュートリアルなんかでも出て来るのと同じ感じで実装します。
このタイミングで<DevTools />を記載してあげましょう。
import React from 'react';
import {Provider} from 'react-redux';
import configureStore from '../store/configureStore';
import DevTools from '../containers/DevTools';

const store = configureStore();

export default React.createClass({
  render() {
    return (
      <Provider store={store}>
        <div>
          <DevTools />
        </div>
      </Provider>
    );
  }
});
Appコンポーネントが作成できたらjs/index.jsに以下の記述を追加します。
import React from 'react'
import ReactDOM from 'react-dom'
import App from './containers/App'

ReactDOM.render(<App />, document.getElementById('main'));
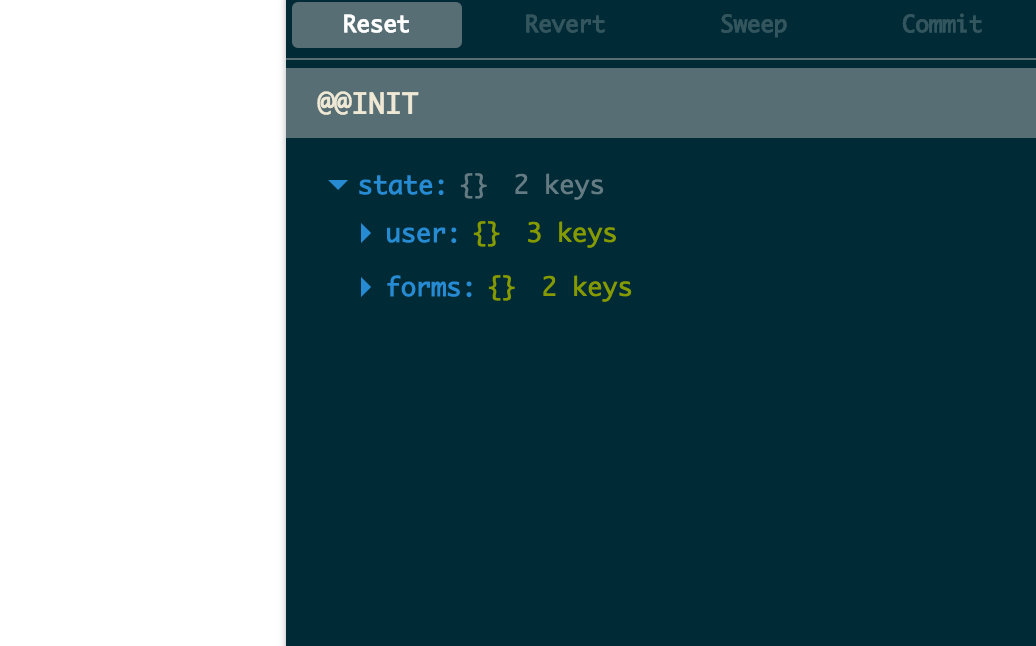
ここまで出来たらブラウザでアクセスしてみてください。
こんな感じにDevToolsが表示されるかと思います。
RegistrationFormの作成
ここまで出来たらあとはさくっと入力フォームを作りましょう。
まずはRegistrationForm.js を実装します。
バリデーションの指定はvalidatorsで関数を指定する形にしました。今回は簡易的な実装です。
Errorコンポーネントでバリデーションがfalseの場合エラーメッセージが表示されるようになっています。
Control,Errorのヒモ付はmodel属性で行っています。
詳しいことはreact-redux-formのバリデーションのドキュメントを参照してください。
import React, { Component } from 'react'
import { connect } from 'react-redux';
import { Control, Field, Form, actions, Errors } from 'react-redux-form';
import {FormGroup, ControlLabel, Button} from 'react-bootstrap'

const isRequired = (val) => !!(val && val.length);

class RegistrationForm extends Component {
  handleSubmit(user) {
    const { dispatch } = this.props;
    console.log(user);

    // TODO 適当に頑張る
  }

  render() {
    return (
      <div className="container">
        <div className="row">
          <div className="col-sm-6 col-sm-offset-2">
            <Form model="user" onSubmit={(user) => this.handleSubmit(user)}>
              <FormGroup controlId="name" >
                <ControlLabel>firstName</ControlLabel>
                <Control.text
                  model="user.name"
                  className="form-control"
                  validators={{isRequired}}
                  validateOn="blur" />
                <Errors
                  model="user.name"
                  messages={{
                      isRequired: '入力必須項目です!'
                  }}
                />
              </FormGroup>
              <div className="col-sm-4 col-md-offset-4">
                <button type="submit" href="#" className="btn btn-primary btn-lg btn-block">登録する</button>
              </div>
            </Form>
          </div>
        </div>
      </div>
    );
  }
}

const selector = (state) => ({ user: state.user });
export default connect(selector)(RegistrationForm);
つぎにApp.jsに先程のRegistrationFormを追加しましょう。
import React from 'react';
import {Provider} from 'react-redux';
import configureStore from '../store/configureStore';
import DevTools from '../containers/DevTools';

++ import RegistrationForm from '../containers/RegistrationForm'

const store = configureStore();

export default React.createClass({
  render() {
    return (
      <Provider store={store}>
        <div>
++          <RegistrationForm />
          <DevTools />
        </div>
      </Provider>
    );
  }
});
エラーの場合はラベルや、inputを赤くしたい
bootstrap使っているとlabelやエラーメッセージを赤くしたい。
でも現状だと色つかないんですよね。
react-bootstrapではFormGroupに対してvalidationStateの属性で色を追加できるようです。
<FormGroup validationState="error">...</FormGroup>
しかし、FormGroupでstate触ることできない・・・困った。。。
悩んだ結果、FormGroupをラップするものを作り事にしました。
本当はもっと良い方法あるのかもしれないけど、思いつかないので・・・。
だれか、よい方法を見つけたら教えてください。
とりあえず僕がやった実装はこんな感じです。
import React from 'react';
import { FormGroup } from 'react-bootstrap';
import { connect } from 'react-redux';
import { getModel } from 'react-redux-form';

const ExtFormGroup = ({children, bsClass, bsSize, controlId, validationState}) => {
    let props = {
        bsClass,
        bsSize,
        controlId,
        validationState,
    }
    return (
        <FormGroup {...props} >{children}</FormGroup>
    );
}

const mapStateToProps = (state, { model, bsClass, bsSize, controlId, validationState, children }) => {
    const modelString = getModel(model, state);

    if (modelString != undefined) {
        const formValue = getModel(state.forms, modelString);
        if (formValue !== undefined && !formValue.valid) {
            validationState="error";
        }
    }

    return {
        children,
        bsClass,
        bsSize,
        controlId,
        validationState
    }
}

const CustomFormGroup = connect(
    mapStateToProps
)(ExtFormGroup);

export default CustomFormGroup;
あとはFormGroupをCustomFormGroupに書き換えればエラーが発生した場合にラベルやらinputが赤くなります。
import React, { Component } from 'react'
import { connect } from 'react-redux';
import { Control, Field, Form, actions, Errors } from 'react-redux-form';
++ import {FormGroup, ControlLabel, Button} from 'react-bootstrap'

import CustomFormGroup from './CustomFormGroup'

const isRequired = (val) => !!(val && val.length);

class RegistrationForm extends Component {
  handleSubmit(user) {
    const { dispatch } = this.props;
    console.log(user);

    // TODO 適当に頑張る
  }

  render() {
    return (
      <div className="container">
        <div className="row">
          <div className="col-sm-6 col-sm-offset-2">
            <Form model="user" onSubmit={(user) => this.handleSubmit(user)}>
--				  <FormGroup controlId="name">
++              <CustomFormGroup controlId="name" model="user.name">
                <ControlLabel>firstName</ControlLabel>
                <Control.text
                  model="user.name"
                  className="form-control"
                  validators={{isRequired}}
                  validateOn="blur" />
                <Errors
                  model="user.name"
                  messages={{
                      isRequired: '入力必須項目です!'
                  }}
                />
++              </CustomFormGroup>
--				</FormGroup>
              <div className="col-sm-4 col-md-offset-4">
                <button type="submit" href="#" className="btn btn-primary btn-lg btn-block">登録する</button>
              </div>
            </Form>
          </div>
        </div>
      </div>
    );
  }
}

const selector = (state) => ({ user: state.user });
export default connect(selector)(RegistrationForm);
エラーメッセージを赤くする
最後にエラーメッセージだけ赤くならなかったのですが、これはErrorコンポーネントだけで対応できます。
<Errors
  model="user.name"
  messages={{
      isRequired: '入力必須項目です!'
  }}
  component={(props) => <span className="help-block">{props.children}</span>}
/>
こんな感じにcomponentを指定すればいいみたいです。
最後に
最近のフロントエンド難しすぎ・・・。
今回書いたコードはgithubで公開しておきました。
間違っていたらPull Requestください。


