前記事
RailsをAWS ECS(Fargate)でホストする環境構築のすべて【1. 前談、N/W+α】
https://qiita.com/polar_bear_tech/items/ecb755b34f143fa0085f
AWS上の準備は前の記事で書きました。
この記事ではECSにデプロイする前準備として、ECRにコンテナイメージをプッシュするまでを記載します。
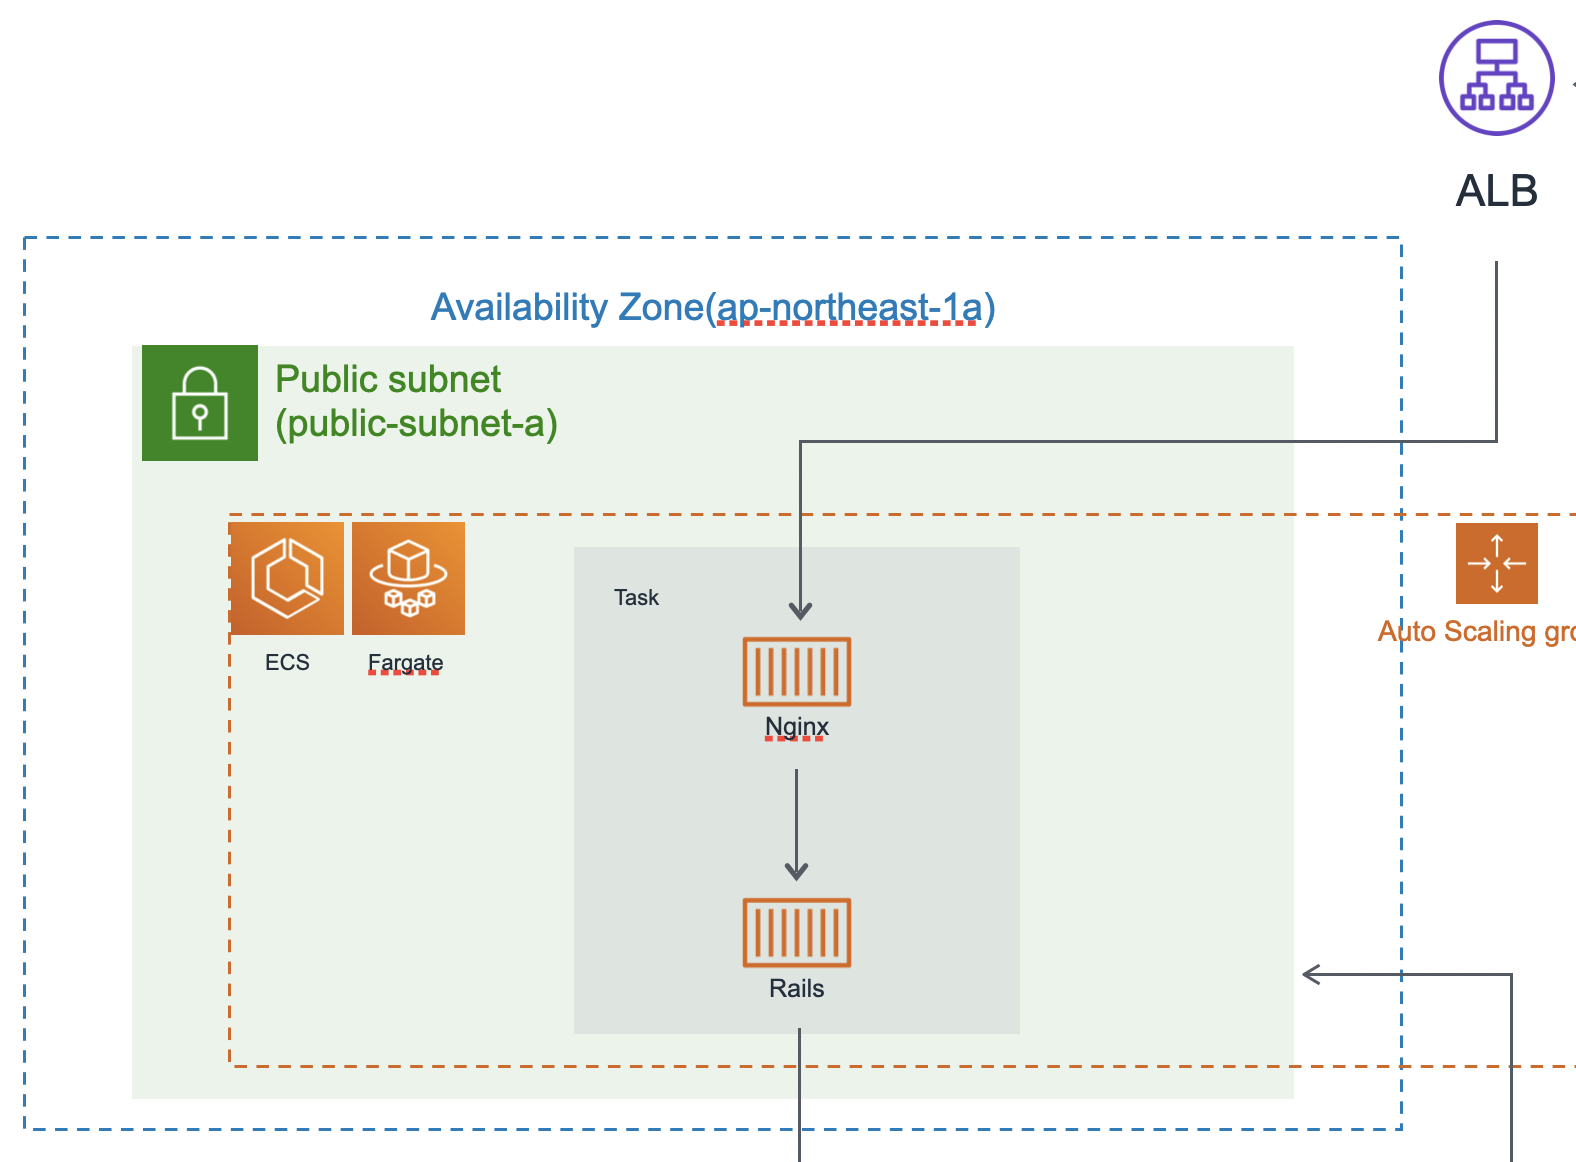
作成するコンテナの構成
ECSの1タスク(※)内では、nginxをリバースプロキシとして使用し、Railsのアプリケーションサーバー(unicorn)へとリクエストを捌く構成にしています。

※ タスク ... ECSで稼働させるコンテナのワンセットのこと。
Railsプロジェクトの構成など
サンプルでは、デプロイ環境名をstagingとして記載します。
言語、ミドルウェア関連のバージョンは、所々記載もありますが、下記の通りです。
- ruby: 2.6.6
- Ruby on Rails: 6.0.3
- nginx: 1.19.1
- unicorn: 5.6.0
アプリケーションのディレクトリ構成は下記の通りです。
後付け感出ちゃって綺麗じゃない構成ですが、ビルドするときにパス指定するので問題はないです。
/application
L /app
L /bin
  ...
L /containers
|   L /nginx
|       L Dockerfile
|       L nginx.conf
|       L conf.d
|           default.conf
  ...
L Dockerfile.development
L Dockerfile.staging
L entrypoint.sh
  ...
nginxの設定
nginxの設定ファイル
以下2点の設定ファイルを作成します。
nginxの基本設定ファイルです。
種々記事を参考にさせていただいていますが、一般的な設定内容と異なる点はkeepalive_timeoutを600秒に設定している点です。
user  nginx;
worker_processes  auto;

error_log  /var/log/nginx/error.log warn;
pid        /var/run/nginx.pid;

events {
    worker_connections 1024;
}

http {

  include       /etc/nginx/mime.types;
  default_type  application/octet-stream;

  log_format  main  '$remote_addr - $remote_user [$time_local] "$request" '
                    '$status $body_bytes_sent "$http_referer" '
                    '"$http_user_agent" "$http_x_forwarded_for"';

  access_log  /var/log/nginx/access.log  main;

  sendfile           on;
  keepalive_timeout  600;

  include  /etc/nginx/conf.d/*.conf;
}
アプリケーションに関するデフォルト設定ファイルです。
upstreamに記述する接続先を、ローカルでDockerコンテナ同士通信する場合と異なり、
127.0.0.1を設定する点が重要なようです。
また、タイムアウト値はnginx.conf同様600秒にしています。
upstream unicorn {
  server 127.0.0.1:3000;
}

server {
  listen 80 default_server;
  server_name  localhost;
  root  /usr/share/nginx/html;
  try_files  $uri/index.html $uri @unicorn;

  proxy_connect_timeout 600;
  proxy_read_timeout    600;
  proxy_send_timeout    600;

  client_max_body_size 100m;
  error_page 404             /404.html;
  error_page 505 502 503 504 /500.html;

  location @unicorn {
    proxy_set_header X-Real-IP $remote_addr;
    proxy_set_header X-Forwarded-For $proxy_add_x_forwarded_for;
    proxy_set_header Host $http_host;
    proxy_pass http://unicorn;
  }
}
nginx用Dockerfile
nginxは開発環境では使わないので、用意するDockerfileは1種類にしています。
先ほど作成した2つの設定ファイルをコンテナ内に配置しています。
FROM nginx:1.19.1
RUN apt-get update && \
    apt-get install -y apt-utils \
                       locales && \
    sed -i -e 's/# ja_JP.UTF-8/ja_JP.UTF-8/g' /etc/locale.gen && \
    locale-gen ja_JP.UTF-8
ENV LANG ja_JP.UTF-8
ENV LC_TIME C
COPY ./nginx.conf /etc/nginx/nginx.conf
COPY ./conf.d/default.conf /etc/nginx/conf.d/default.conf
Railsの設定
アプリケーションコンテナ用Dockerfile
開発環境のDockerfileとは差別化するため、Dockerfile.stagingとしてファイルを作成しています。
開発環境用のコンテナとの違いは、AWS System Manager セッションマネージャ(SSM)用のエージェントをインストールする点です。
また、SSMで接続した際に、sudoコマンドを実行するために加えてインストールしています。
FROM ruby:2.6.6

RUN curl -sS https://dl.yarnpkg.com/debian/pubkey.gpg | apt-key add - \
    && echo "deb https://dl.yarnpkg.com/debian/ stable main" | tee /etc/apt/sources.list.d/yarn.list
RUN apt-get update -qq && apt-get install -y --no-install-recommends build-essential nodejs curl git mariadb-client yarn sudo

# AWS System Manager セッションマネージャ用のエージェントをインストール
RUN curl https://s3.ap-northeast-1.amazonaws.com/amazon-ssm-ap-northeast-1/latest/debian_amd64/amazon-ssm-agent.deb -o /tmp/amazon-ssm-agent.deb \
    && dpkg -i /tmp/amazon-ssm-agent.deb \
    && cp /etc/amazon/ssm/seelog.xml.template /etc/amazon/ssm/seelog.xml

RUN gem install bundler

ENV INSTALL_PATH /application

RUN mkdir $INSTALL_PATH

WORKDIR $INSTALL_PATH

COPY ./Gemfile /application/Gemfile
COPY ./Gemfile.lock /application/Gemfile.lock

RUN bundle install

COPY . .

EXPOSE 3000
ここまででコンテナ関連の定義は完了。
AWS ECR
リポジトリの作成
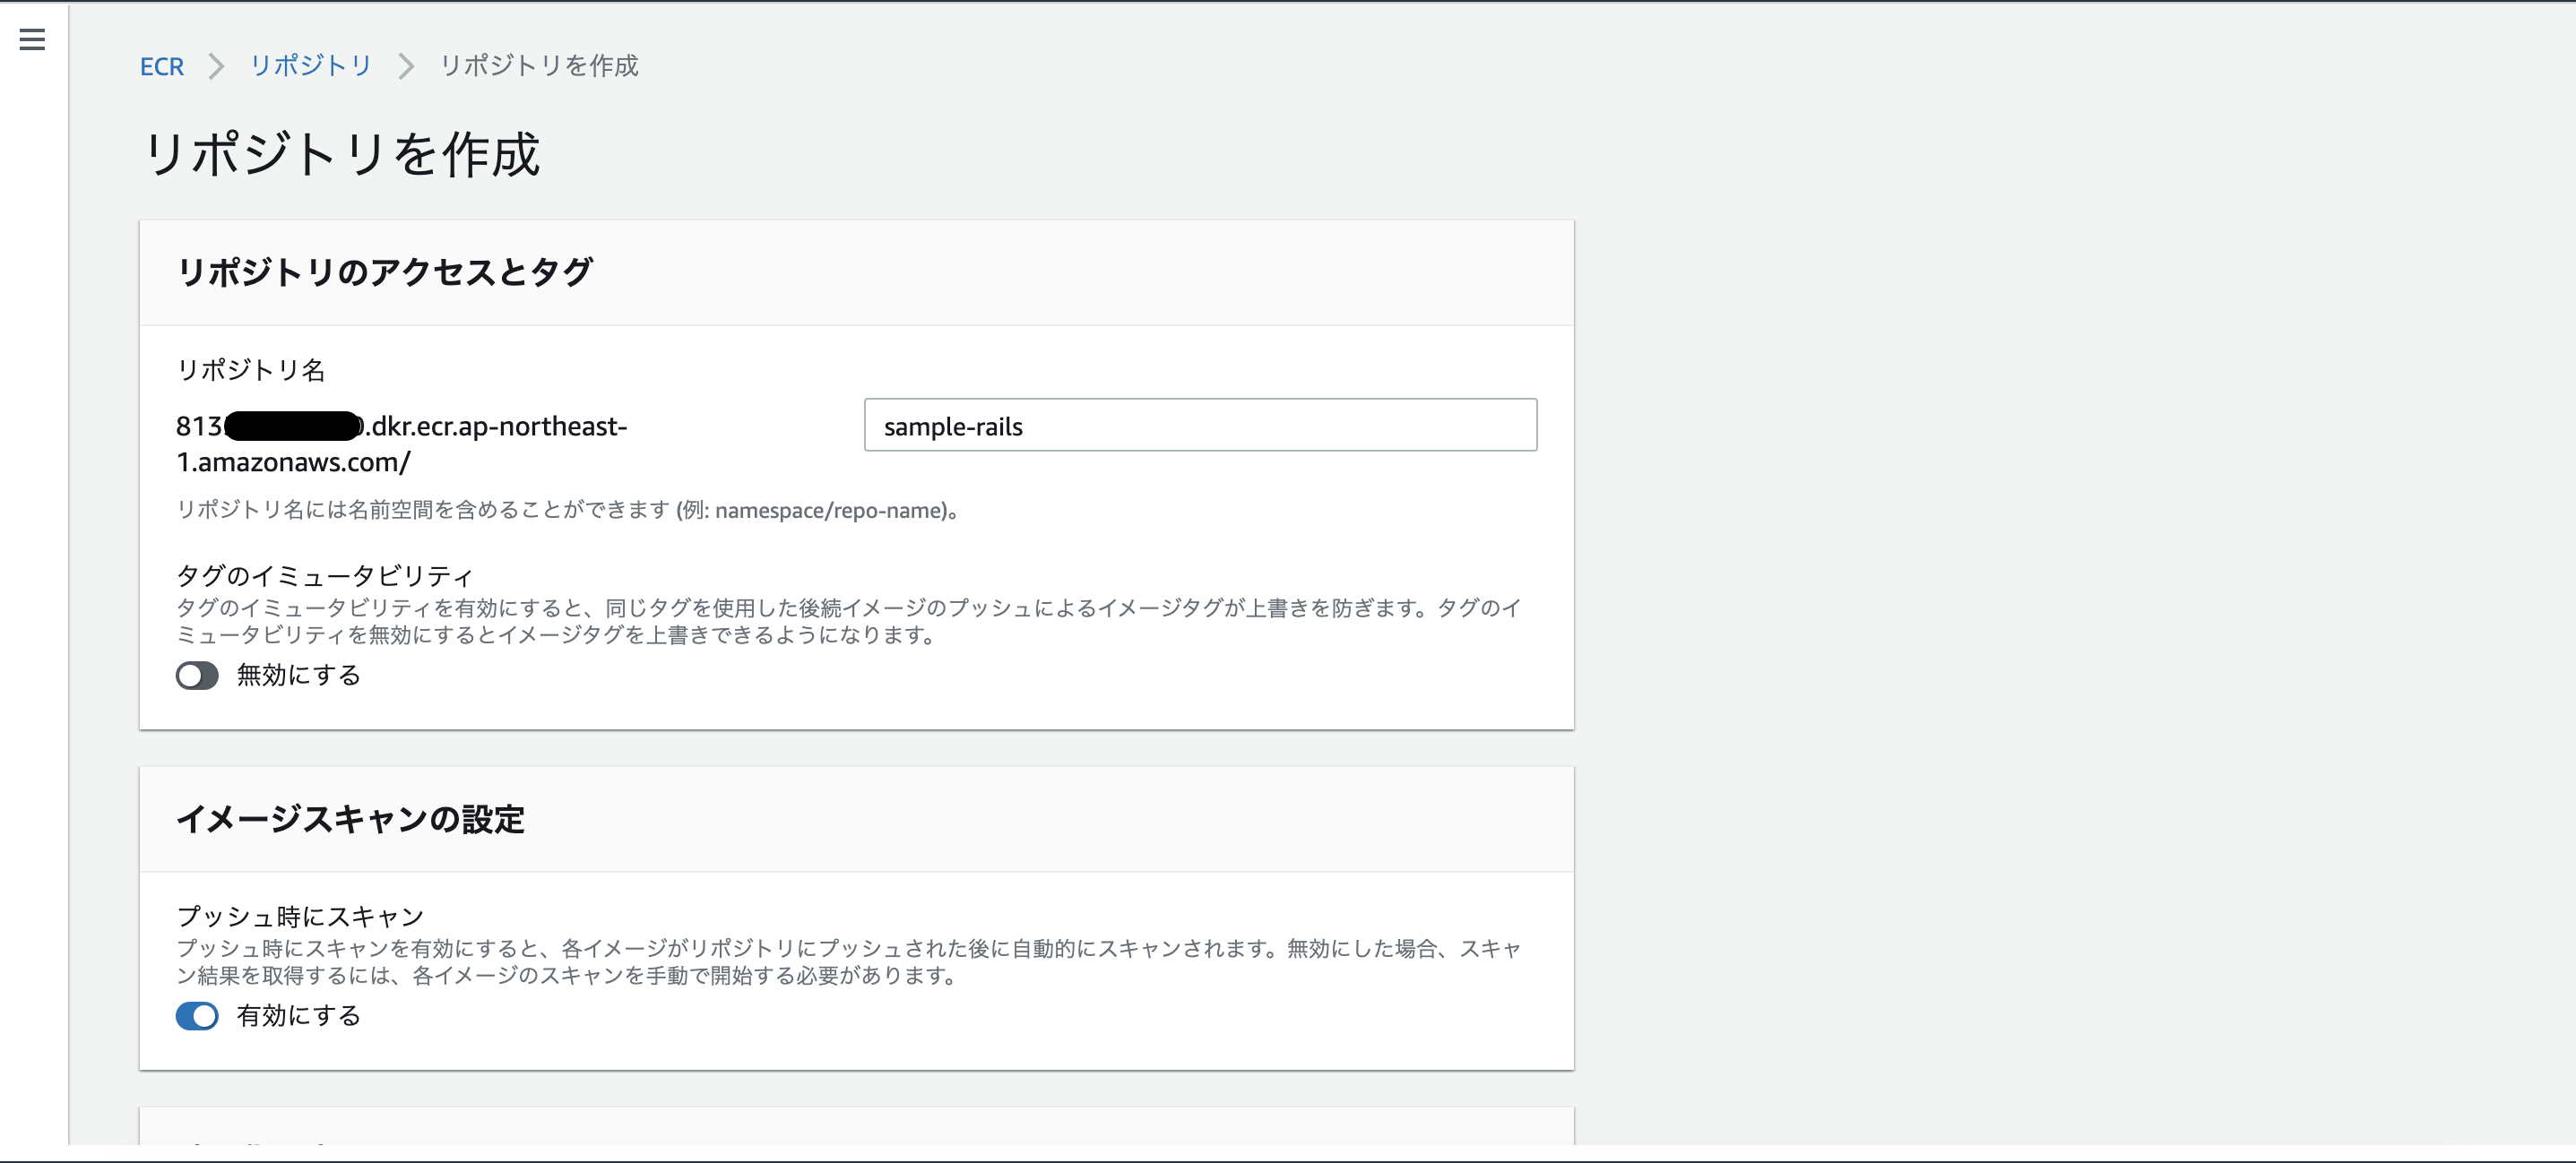
サービス>ECS>リポジトリから、ECRの一覧画面を表示します。
右上の「リポジトリを作成」から2つのコンテナイメージリポジトリを作成していきます。

作成は簡単です。
名前をつけて、あとは任意でイメージのスキャンや暗号化を行う場合には有効化してください。

リポジトリへのPush
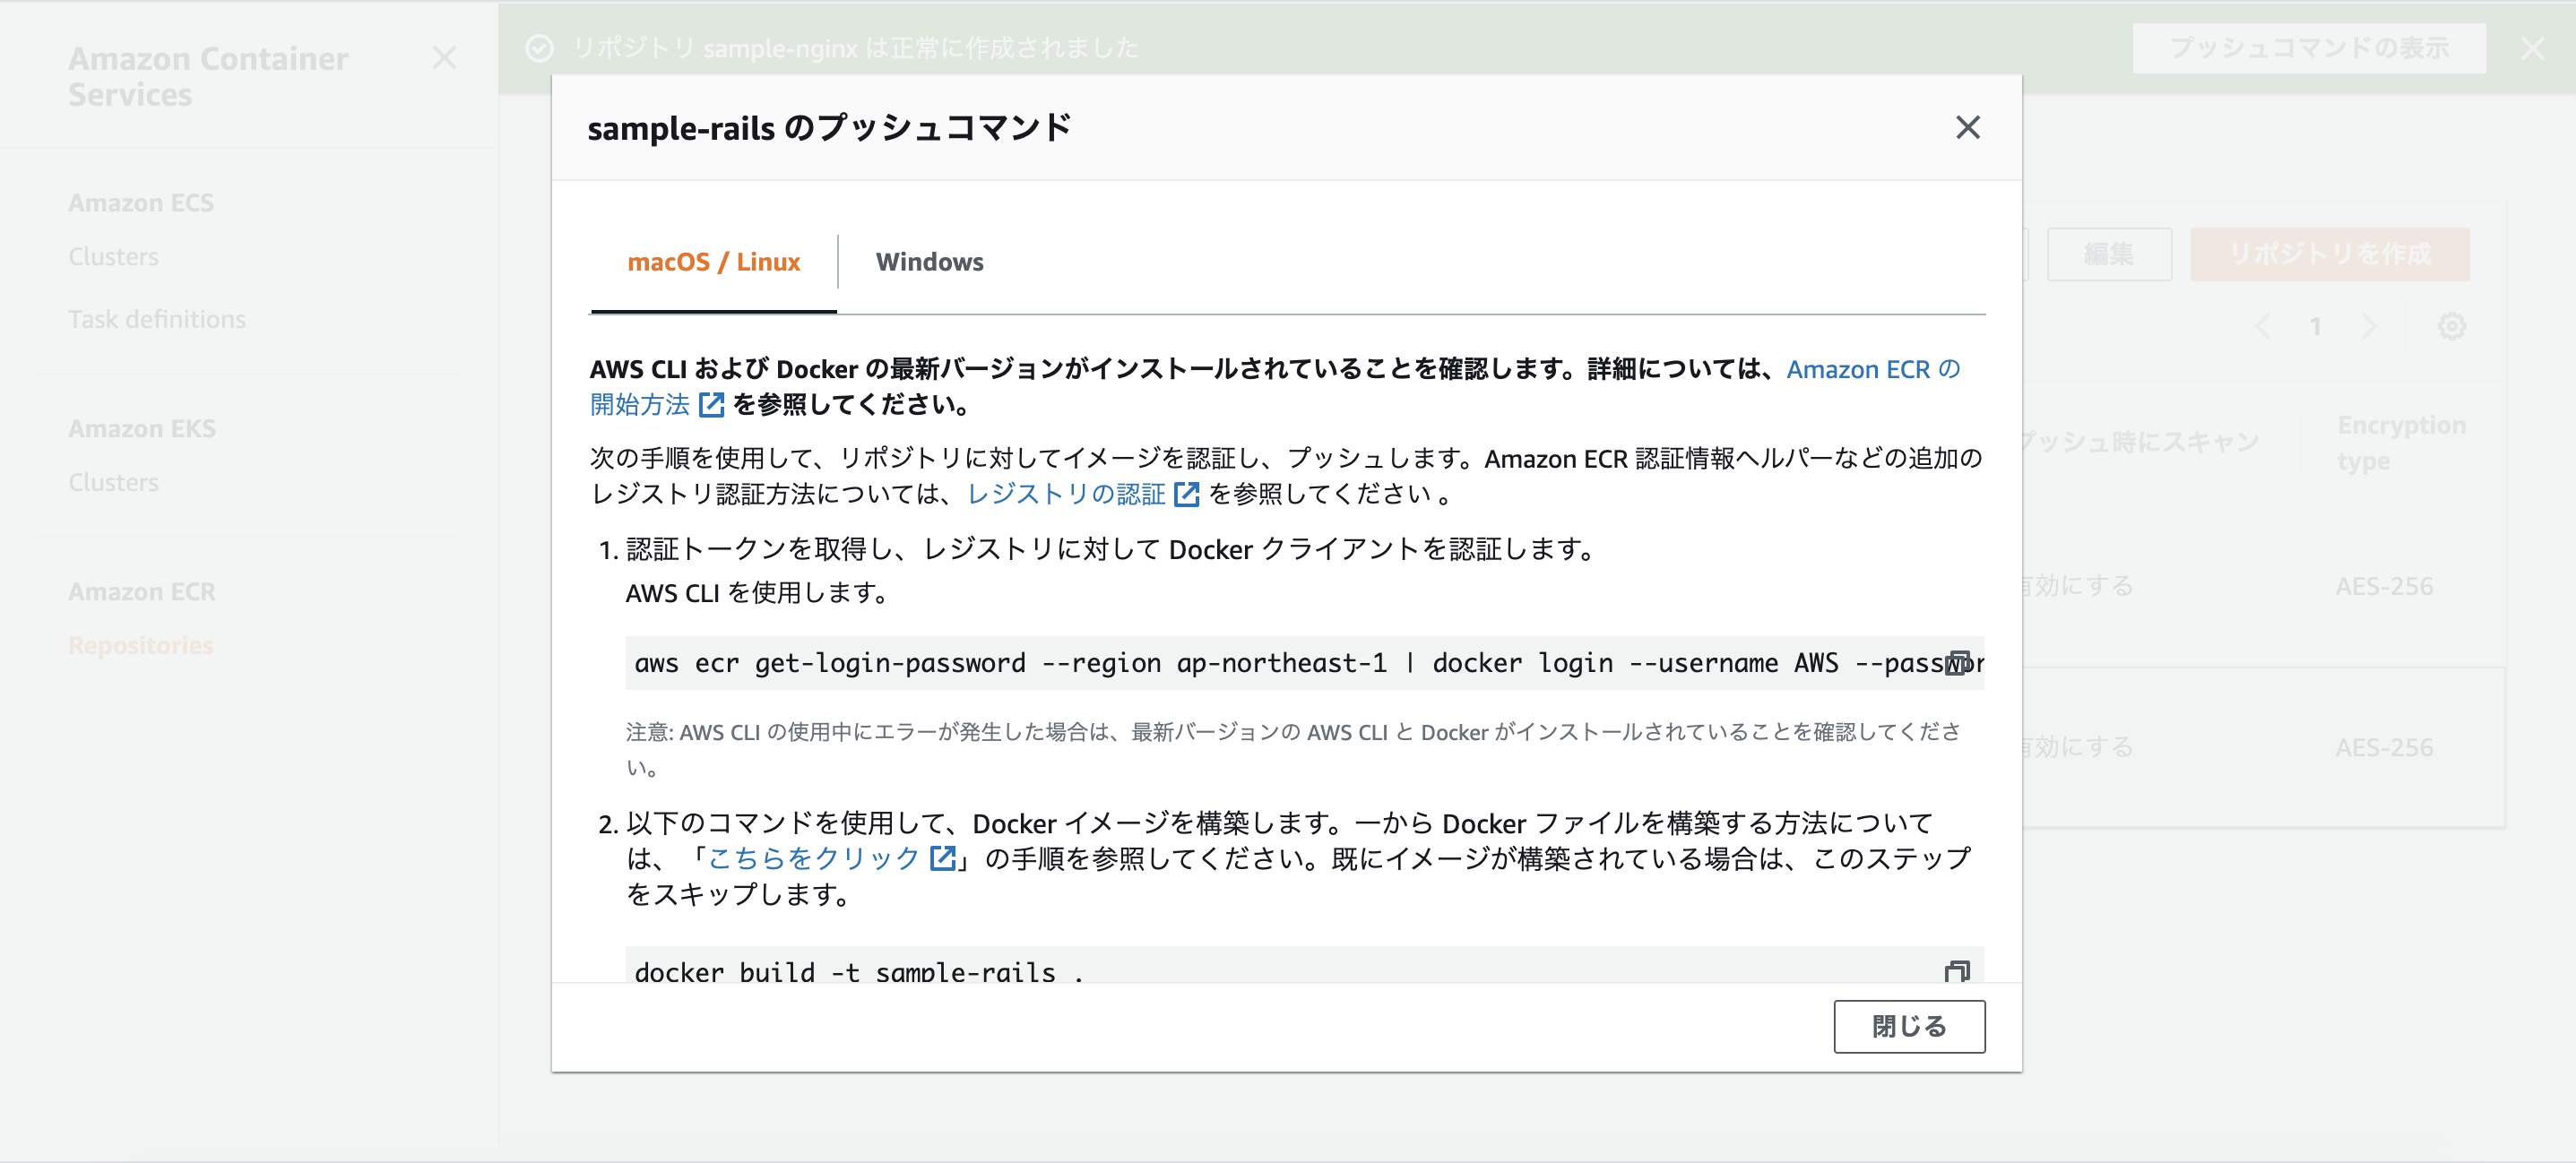
Railsアプリケーション用コンテナ、Nginx用コンテナのリポジトリを作成したら、
それぞれのコンテナのプッシュ用コマンドを表示します。

以下のようなコマンドになっています。
ビルドコマンドだけ、Dockerfileの名称を変更しているのでファイル名指定するように変更しています。
2つのリポジトリのプッシュコマンドをまとめて、シェルスクリプトにしてしまっても良いと思います。
# 認証トークンを取得し、レジストリに対して Docker クライアントを認証します。
$ aws ecr get-login-password --region ap-northeast-1 | docker login --username AWS --password-stdin 813xxxxxxxxxx.dkr.ecr.ap-northeast-1.amazonaws.com

# Docker イメージを構築します。
$ docker build -f ./Dockerfile.staging -t sample-rails .
$ docker build -f ./containers/nginx/Dockerfile -t sample-nginx ./containers/nginx

# リポジトリにイメージをプッシュできるように、イメージにタグを付けます。
$ docker tag sample-rails:latest 813xxxxxxxxxx.dkr.ecr.ap-northeast-1.amazonaws.com/sample-rails:latest
$ docker tag sample-nginx:latest 813xxxxxxxxxx.dkr.ecr.ap-northeast-1.amazonaws.com/sample-nginx:latest

# リポジトリにこのイメージをプッシュします。
$ docker push 813xxxxxxxxxx.dkr.ecr.ap-northeast-1.amazonaws.com/sample-rails:latest
$ docker push 813xxxxxxxxxx.dkr.ecr.ap-northeast-1.amazonaws.com/sample-nginx:latest
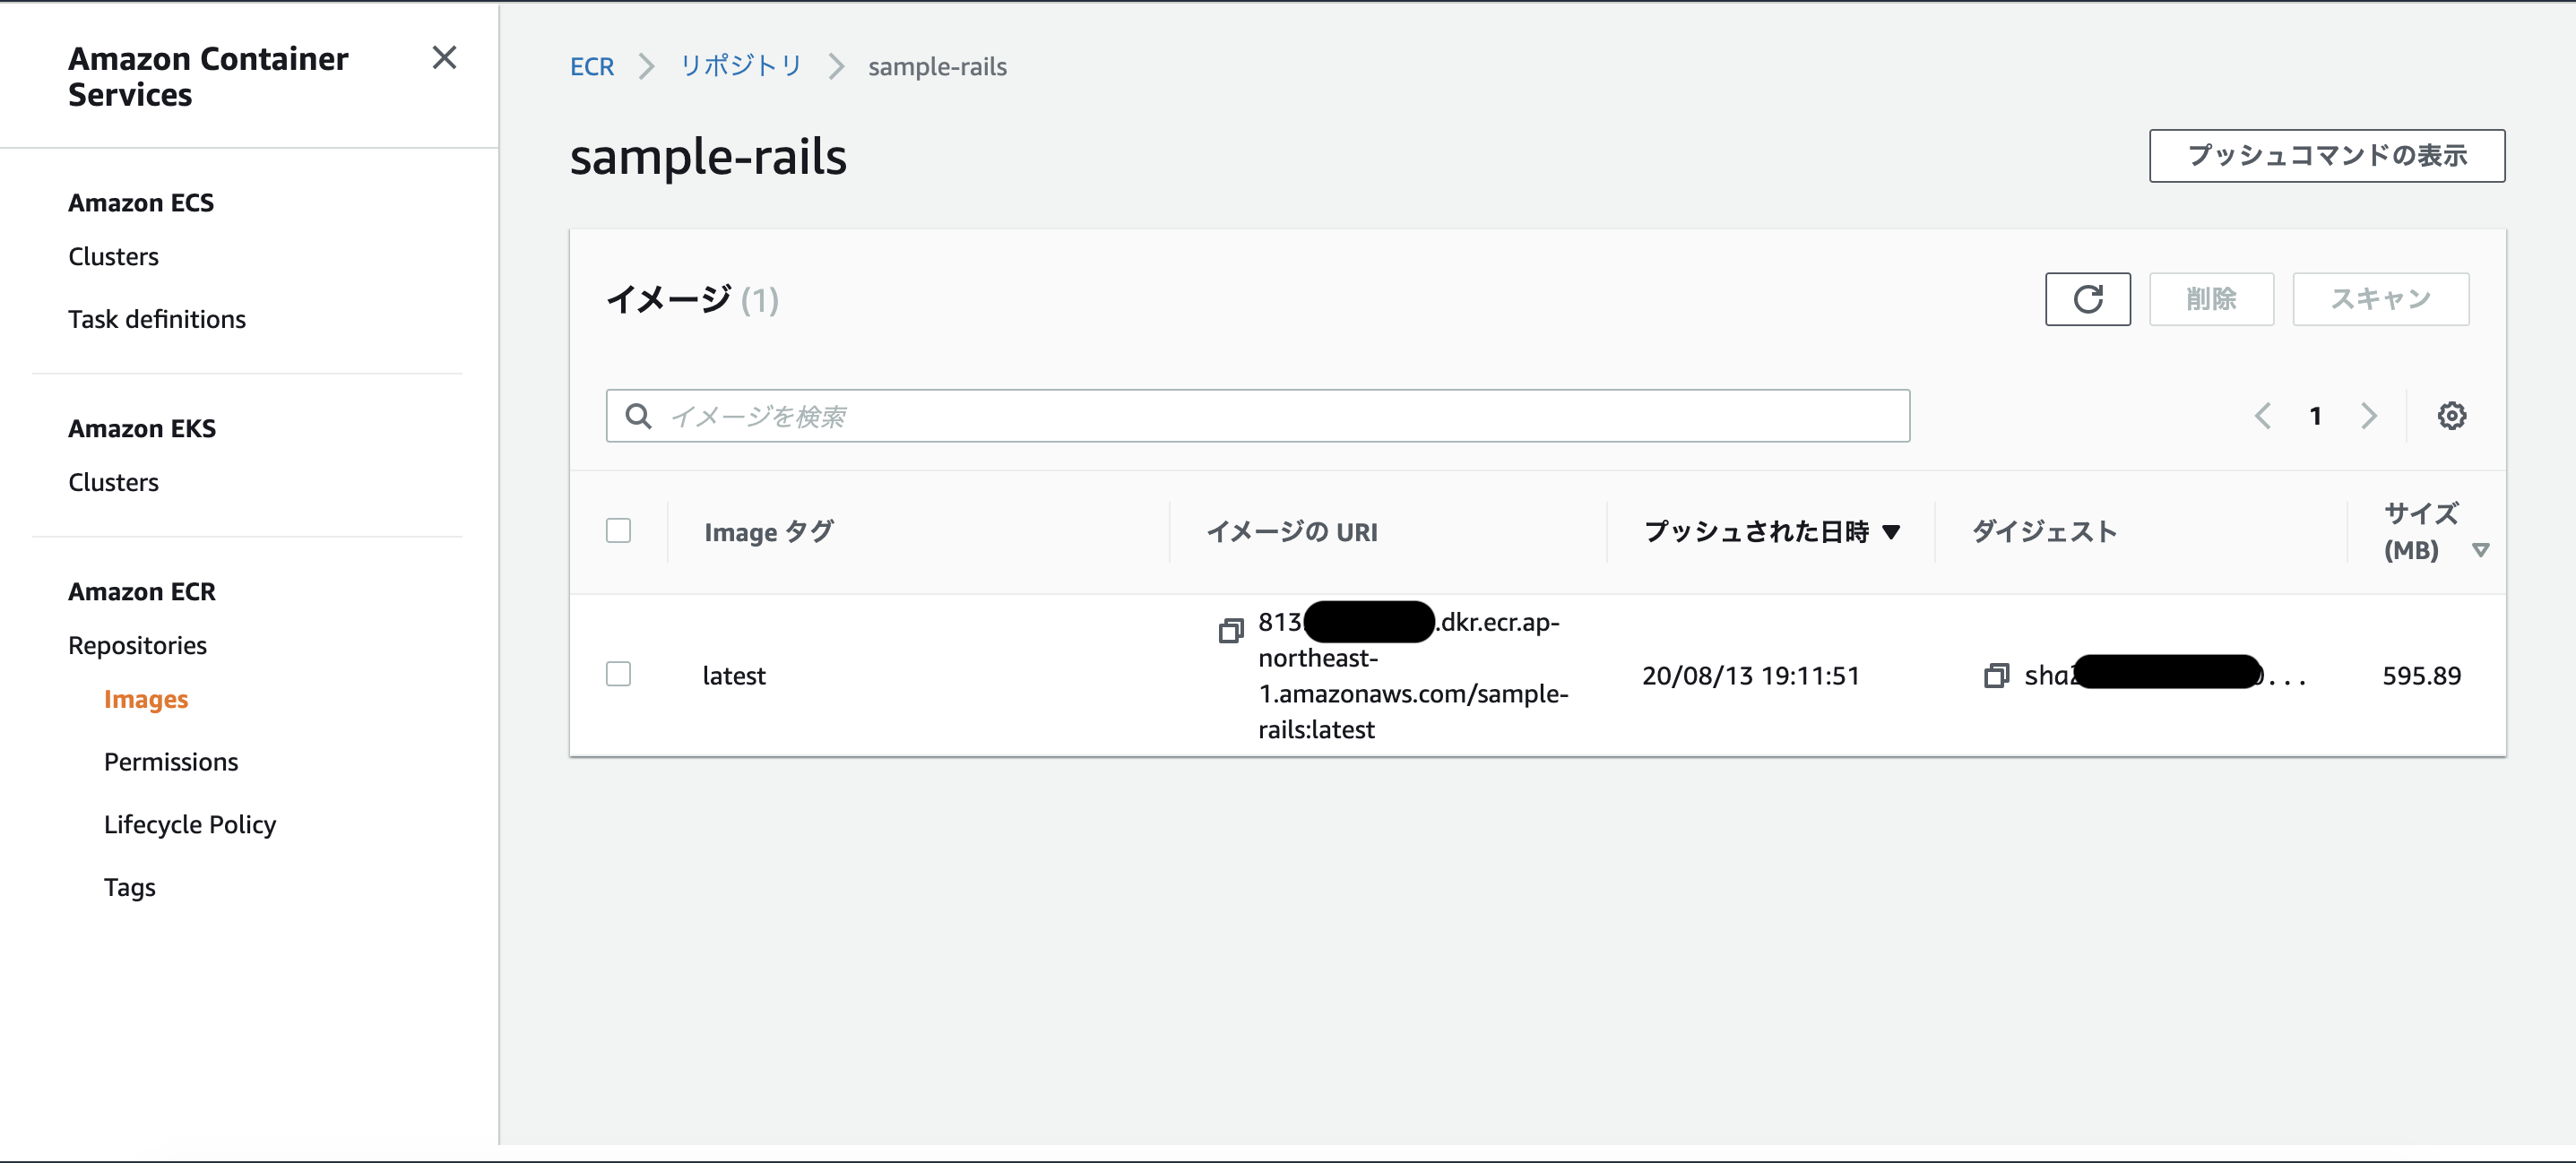
実行してプッシュできたら、イメージにlatestが追加されています。

まとめ
これでECSで起動するコンテナのイメージの準備ができました。
次の記事でECSを構築して起動するまでを記載します。
次の記事
https://qiita.com/polar_bear_tech/items/7ca2a0c168a621cbfdbf