動機
DJIのドローンはどうやら基本的にPCへカメラ映像をライブする事は出来なさそう。
一応スマート送信機というのを買えばHDMI出力できるっぽいけど、8万円ぐらいするしそもそも今は日本で取り扱ってないらしい。
なので自作した!
必要な/使用した機材
- DJI Mavic2 pro
- Raspberry Pi 3B
- 適当なモニタ
- 適当なキーボード
制作物の概要
DJIのドローンリモコン(送信機)はPCヘ映像を流す事は出来ないが、YouTubeなどへライブ配信をする事は出来る。それにおいて配信の手法としてRTMPを用いている為、それを利用し映像のストリーミング配信を行う。
またWi-Fiが無い環境など、場所を選ばず使用出来る様にする。
流れとしては...
- Raspberry PiにRTMPサーバを作る
- Raspberry Piにアクセスポイントを立てる
- 送信機に接続したスマホ、映像が欲しいPCを共にそこへ接続
- 送信機からRaspberry PiへRTMPを用いて映像を配信
- Raspberry PiからPCへストリーミングを行う
1.RTMPサーバを立てる
# 前提準備
$ sudo apt update
$ sudo apt upgrade

$ apt -y install ibus-mozc && apt -y install openssh-server && systemctl start ssh && apt -y install ufw && ufw enable && ufw allow 22 && ufw allow 1935 && ufw allow 80

# nginxをインストール
$ apt -y install nginx
# rtmpをインストール
$ apt -y install libnginx-mod-rtmp

# nginxの状況を確認
$ systemctl status -l nginx
# ここでActive: activeになっていればOK
● nginx.service - A high performance web server and a reverse proxy server
   Loaded: loaded (/lib/systemd/system/nginx.service; enabled; vendor preset: enabled)
   Active: active (running) since Wed 2022-01-05 05:37:10 JST; 3min 10s ago
     Docs: man:nginx(8)
  Process: 2942 ExecReload=/usr/sbin/nginx -g daemon on; master_process on; -s reload (code=
 Main PID: 2803 (nginx)
    Tasks: 6 (limit: 2059)
   CGroup: /system.slice/nginx.service
           ├─ nginx: master process /usr/sbin/nginx -g daemon on; master_process on;
           ├─ nginx: worker process
           ├─ nginx: worker process
           ├─ nginx: worker process
           ├─ nginx: worker process
           └─ nginx: cache manager process
次にnginxの設定ファイルを編集する、
/etc/nginx/nginx.confの一番下に以下を追記。
rtmp {
  server {
    listen 1935;
    chunk_size 4096;
    application 適当なアプリケーション名 {
      live on;
      hls on;
      hls_path /var/www/html;
      hls_fragment 2s; # 低遅延ならもう少し短くしても良いかもしれない
      hls_type live;
    }
  }
}
# 設定ファイルを適用
$ systemctl reload nginx
これで全設定が完了、あとは以下のリンクでストリーミングを配信・受信出来る。
rtmp://[Raspberry Piのipアドレス]/[アプリケーション名]/[適当なストリームキー]
2.Raspberry Piにアクセスポイントを立てる
パッケージのインストール
$ sudo apt-get update
$ sudo apt-get install hostapd
$ sudo apt-get install dnsmasq
hostapdのインストールが上手くいかない場合
# エラー状況の確認
$ systemctl status hostapd.service

● hostapd.service
   Loaded: masked (Reason: Unit hostapd.service is masked.)
   Active: failed (Result: exit-code) since Mon 2022-01-03 11:15:00 GMT; 33s ago

Jan 03 11:15:00 raspberrypi systemd[1]: hostapd.service: Service RestartSec=100ms expired, s
Jan 03 11:15:00 raspberrypi systemd[1]: hostapd.service: Failed to schedule restart job: Uni
Jan 03 11:15:00 raspberrypi systemd[1]: hostapd.service: Failed with result 'exit-code'.

# Active: failedになっていた場合
$ systemctl reset-failed hostapd.service
# これでActive: inactiveになっているかを確認
$ systemctl status hostapd.service

● hostapd.service
   Loaded: masked (Reason: Unit hostapd.service is masked.)
   Active: inactive (dead) since Mon 2022-01-03 11:15:00 GMT; 1min 53s ago

Jan 03 11:15:00 raspberrypi systemd[1]: hostapd.service: Service RestartSec=100ms expired, s
Jan 03 11:15:00 raspberrypi systemd[1]: hostapd.service: Failed to schedule restart job: Uni
Jan 03 11:15:00 raspberrypi systemd[1]: hostapd.service: Failed with result 'exit-code'.

# 一応もう一回apt-get
$ sudo apt-get install hostapd
環境の確認
ifconfigでwlan0を確認できればOK
$ ifconfig

eth0: ~~~~~~~~~~~

lo: ~~~~~~~~~~~~~

wlan0: ~~~~~~~~~~
create_apをインストール
$ git clone https://github.com/oblique/create_ap
$ cd create_ap/
$ sudo make install
$ service create_ap start
create_apを実行
SSH接続をしていた場合は一度切り、ラズパイにモニターとキーボードを接続し続行
実行コマンドなどの詳細は下記を参照
# これでアクセスポイントが立てられる筈だが...
$ sudo ./create_ap --no-virt -w 2 wlan0 eth0 SSID名 適当なパスワード

# 恐らく下記のエラーが出る(出なければ気にしなくてOK)
WARN: brmfmac driver doesn't work properly with virtual interfaces and
      it can cause kernel panic. For this reason we disallow virtual
      interfaces for your adapter.
      For more info: https://github.com/oblique/create_ap/issues/203
ERROR: Your adapter can not be a station (i.e. be connected) and an AP at the same time'

# 要は貴方のデバイスWi-Fi繋げたままアクセスポイントを立てられませんよとのこと
# なのでWi-Fiを切断し再度実行(Wi-Fiが自動接続出来ない様にしとくと良い)
# そうすると以下のようなエラーが出る場合がある
RTNETLINK answers: Operation not possible due to RF-kill
# これは無線LANが何故か無効化されてしまっているという事

# 以下で対処可能
$ sudo apt install rfkill
$ sudo nano /etc/rc.local

# `# By default this script does nothing.`以下に追記
/usr/sbin/rfkill unblock wifi

# これで再度実行すれば恐らく他デバイスでアクセスポイントが確認出来る
# 一応それに接続しSSH等出来れば成功
3.稼働テスト
事前にVLCを入れておくと良いかも
VLCを使って稼働確認をする場合
まずnginxのステータス確認とアクセスポイントを立てる
# nginxの状況を確認、Active: activeになっていればOK
$ systemctl status -l nginx
# アクセスポイントを立てる
$ cd create_ap
$ sudo ./create_ap --no-virt -w 2 wlan0 eth0 SSID名 適当なパスワード
アクセスポイントを確認したら、送信機に接続する用のスマホと映像を受け取りたいPCを接続。
送信機やドローンを起動し飛行可能な状態になったら、右上のメニューからライブ中継プラットフォームを選択するページへ移動、カスタムを選択する。
rtmp://[Raspberry Piのipアドレス]/[アプリケーション名]/[適当なストリームキー]
その後配信を開始する。
次に受信側であるPCでの作業。
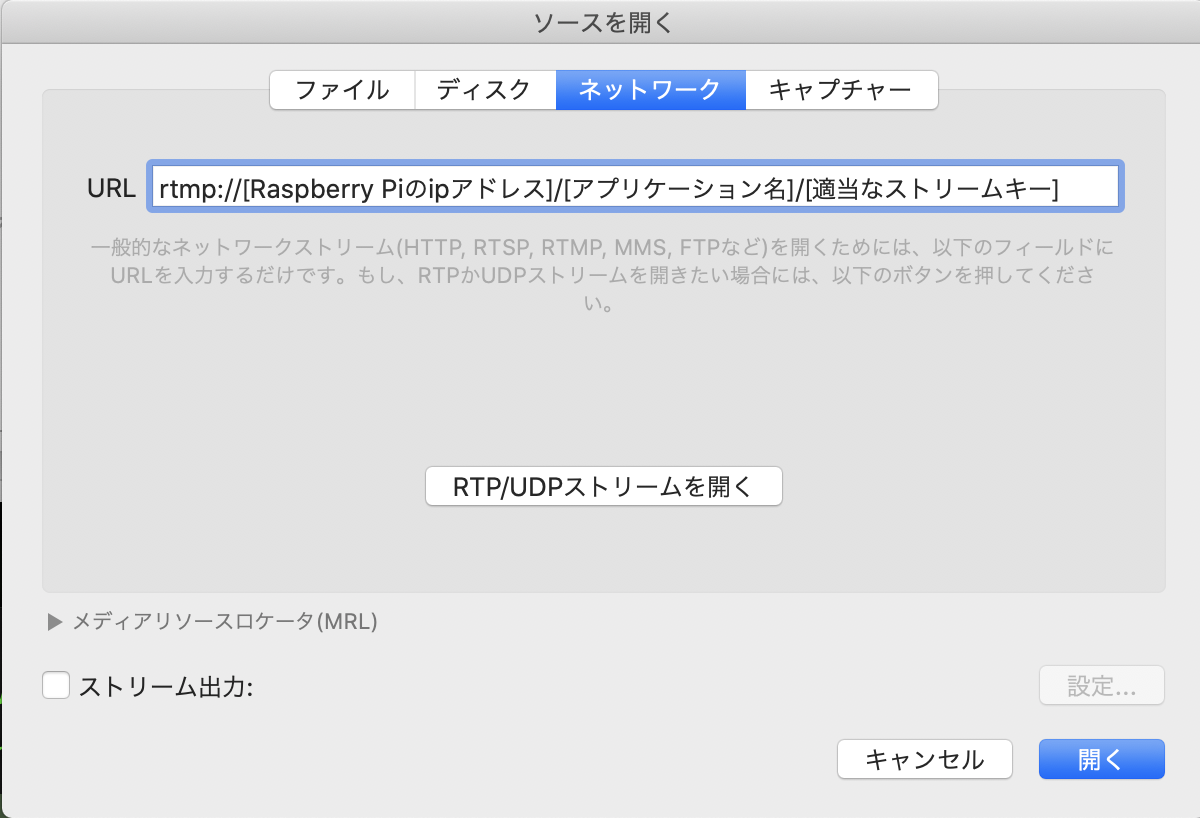
まずインストールしたVLCを起動し、以下を選択する。

その後、ストリーミングURLの入力が要求されるので、以下の様にし開く。

これでカメラ映像がストリーミング再生されれば稼働確認完了。
Pythonのcv2で開く
やはりPCへ受け取れたら物体検知やら色々いじりたくなる筈なので...
送信機側の配信開始までは同様の手順。
その後以下のスクリプトを実行、再生されれば完了。
import cv2
import sys

myrtmp_addr = "rtmp://[Raspberry Piのipアドレス]/[アプリケーション名]/[適当なストリームキー]"
cap = cv2.VideoCapture(myrtmp_addr)
window_name = 'frame'
delay = 1

if not cap.isOpened():
    sys.exit()

while True:
    ret, frame = cap.read()
    if ret:
        cv2.imshow(window_name, frame)
        if cv2.waitKey(delay) & 0xFF == ord('q'):
            break
    else:
        cap.set(cv2.CAP_PROP_POS_FRAMES, 0)

cv2.destroyWindow(window_name)
終わりに
知恵と勇気で8万円を節約出来た、
実際LAN環境無しにrtmp使えるのは色々出来そうな気がする。
参考