デプロイ時に詰まりどころがいくつかあったのでとりあえずHTTPSで動くところまで
1. AWSインスタンスを作成
EC2インスタンスを作成。
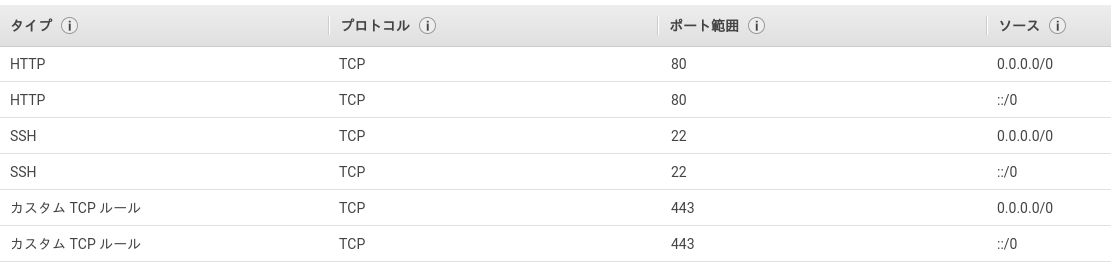
セキュリティグループを追加して22, 80, 443ポートが開いているのを確認。
下画像のようになっていればたぶん大丈夫。
取得した鍵(*.pemてやつ)を使って
$ ssh -i 取得した鍵 インスタンスのパブリックドメイン or ipアドレス
でインスタンスにssh接続する。毎回コマンド打って接続するのが面倒だったらconfigに書いてもよし
2. Amazon Linuxに作業用環境を導入
$ sudo -i
$ yum update -y
$ yum install -y vim git
$ useradd app-user
$ passwd app-user
$ usermod -aG wheel app-user
$ cp -r /home/ec2-user/.ssh /home/app-user/.ssh
$ chown -R app-user:app-user /home/app-user/.ssh
$ sudo su app-user
$ chmod 0600 ~/.ssh/authorized_keys
以下app-user内で作業を行う(その前にvisudoでwheelに権限を与える必要あり)
3. Python導入
公式から目的のバージョンのPython(今回は3.6.6)のtarファイルを持ってきてインストールする
$ sudo yum install -y gcc make zlib1g-dev zlib-devel openssl-devel tk-devel sqlite-devel bzip2 bzip2-devel readline-devel
$ wget https://www.python.org/ftp/python/3.6.6/Python-3.6.6.tar.xz
$ tar Jxfv Python-3.6.6.tar.xz
$ cd Python-3.6.6/
$ ./configure --prefix=/home/app-user/.local/python
$ make
$ make install
# シンボリックリンクを貼る
$ sudo ln -s ~/.local/python/bin/python3 /usr/local/bin/python3
$ sudo ln -s ~/.local/python/bin/pip3.6 /usr/local/bin/pip3
$ echo 'export PATH="/home/app-user/.local/python/bin:$PATH"' >> ~/.bashrc
$ exec $SHELL
$ python3 -c "print('Hello, Python36')"
# 以下のように帰ってきたらOK
Hello, Python36
# 以下のようにモジュールをインストールできる
$ pip3 install (インストールしたいモジュール名)
4. 目的のDjango applicationをgitで持ってくる
git cloneしてデプロイしたいアプリケーションをとってくる。
アプリケーションのルートに移動したあと
$ pip3 install pipenv
$ pipenv install
$ pipenv shell
上記コマンドで必要モジュールをインストール,環境に移動
以下コマンドを叩いて無事動いたらdjangoは正常に動いている
$ ./manage.py runserver 0:8000
5. djangoアプリケーションをproduction環境にする
settings.pyをいじる
# (省略)
DEBUG = False # True => Falseにする

ALLOWED_HOSTS = ["(EC2のドメイン or IPアドレス)"] # Hostを追記
# (省略)
STATIC_URL = '/static/' # 基本これで決め打ち
STATIC_ROOT = '(staticディレクトリの絶対パス)'
# (省略)
以下コマンドでstaticファイルを一箇所にまとめる
$ ./manage.py collectstatic
これしないとcssやjsが読み込まれないのでAPIの場合は特に問題ないが、せっかくのDjango Contributorsの方々のAdminページに対する情熱を4,5割ほど無駄にするので注意(Nginxで静的ファイルの処理を行うまでcssは効かないが気にせず先に進む)
(補足) STATIC_URL, STATIC_ROOTの違い
気になったので調べてみた
| 変数名 | 意味 |
|---|---|
| STATIC_URL | Djangoアプリケーション内で読み込む静的ファイルの場所 defaultはNone |
| STATIC_ROOT |
collectstaticしたときに集めたstaticファイルを置く場所 絶対パス |
STATIC_URL はアプリケーションのルートからの
STATIC_ROOT はOSのルートからの
絶対パスというのが味噌
6. Nginx導入
$ sudo yum install -y nginx
# もし上記でうまくリポジトリが登録されていない場合以下コマンドでインストール
# EC2の場合AWSの方でコマンドを用意してくれているみたい
$ sudo amazon-linux-extras install nginx1.12
$ sudo service nginx start
これでEC2のドメインをブラウザで開いてみてNginxが動いているかの確認
7. gunicorn導入
Wsgiサーバーとしてgunicornを導入する
$ pipenv install gunicorn
以下コマンドでwsgiと接続できているかを確認
(project_name).wsgiファイルはsettings.pyと同階層にいる
$ gunicorn (project_name).wsgi --bind=0.0.0.0:8000
ここでstatic fileが読み込まれないかもしれませんがそれは仕様なので気にせず次に行く
8. nginxとgunicornを接続
nginxのリバースプロキシ設定をする
# For more information on configuration, see:
#   * Official English Documentation: http://nginx.org/en/docs/
#   * Official Russian Documentation: http://nginx.org/ru/docs/

user nginx;
worker_processes auto;
error_log /var/log/nginx/error.log;
pid /var/run/nginx.pid;

# Load dynamic modules. See /usr/share/doc/nginx/README.dynamic.
include /usr/share/nginx/modules/*.conf;

events {
    worker_connections 1024;
}

http {


    include             /etc/nginx/mime.types;
    default_type        application/octet-stream;

    # Load modular configuration files from the /etc/nginx/conf.d directory.
    # See http://nginx.org/en/docs/ngx_core_module.html#include
    # for more information.
    include /etc/nginx/conf.d/*.conf;

    index   index.html index.htm;

    upstream app_server {
       server 127.0.0.1:8000 fail_timeout=0;
    }

    server {

        ## ここを書き換える
        listen    80;
        server_name     (EC2のドメイン or IPアドレス);
        client_max_body_size    6G;

        # Load configuration files for the default server block.
        include /etc/nginx/default.d/*.conf;

        location / {
            # 以下4行を追加
            proxy_set_header X-Forwarded-For $proxy_add_x_forwarded_for;
            proxy_set_header Host $http_host;
            proxy_redirect off;
            proxy_pass   http://app_server;
        }

        location /static {
            alias (アプリケーションのstaticファイルの絶対パスを記入);
            expires 5h;
        }

        # redirect server error pages to the static page /40x.html
        #
        error_page 404 /404.html;
            location = /40x.html {
        }

        # redirect server error pages to the static page /50x.html
        #
        error_page 500 502 503 504 /50x.html;
            location = /50x.html {
        }

        # proxy the PHP scripts to Apache listening on 127.0.0.1:80
        #
        #location ~ \.php$ {
        #    proxy_pass   http://127.0.0.1;
        #}

        # pass the PHP scripts to FastCGI server listening on 127.0.0.1:9000
        #
        #location ~ \.php$ {
        #    root           html;
        #    fastcgi_pass   127.0.0.1:9000;
        #    fastcgi_index  index.php;
        #    fastcgi_param  SCRIPT_FILENAME  /scripts$fastcgi_script_name;
        #    include        fastcgi_params;
        #}

        # deny access to .htaccess files, if Apache's document root
        # concurs with nginx's one
        #
        #location ~ /\.ht {
        #    deny  all;
        #}
    }

}
nginxの設定ファイルをいじり終えたら再起動
$ sudo service nginx restart
これで
Client -> Server80番ポート(Nginx) -> Server8000番ポート(gunicorn) -> Djangoアプリケーション
の流れを作ることができる
早速gunicornを起動
$ gunicorn app_name.wsgi --bind=0.0.0.0:8000
-DオプションをつけることでDaemon起動も可
もしjqueryやcssが403 forbiddenエラーにより効いていない場合は
以下コマンドで権限を与えてあげることでうまくいくはず
$ sudo chown o+x app-user
9. DBをPostgreSQLに変更
SQLiteのままなのでPostgreSQLに変更
postgresqlをインストール
$ sudo yum install -y postgresql93 postgresql93-devel postgresql93-server
$ sudo service postgresql initdb
$ sudo service postgresql start
$ sudo useradd postgres
$ sudo passwd postgres
$ sudo su - postgres
$ psql
> ALTER USER postgres with encrypted password 'ここにパスワード';  # パスワード変更
> CREATE DATABASE your-db-name; # アプリケーション用のDB作成
PostgreSQLでユーザー認証がデフォルトだとPeer認証になっているため変更
local   all             postgres                                md5  # <- peerからmd5に変更
local   all             all                                     peer
# IPv4 local connections:
host    all             all             127.0.0.1/32            md5 # <- peerからmd5に変更
(補足) Peer認証とは
Peer Authentication(以下Peer認証) とは postgresql に ローカルから接続する際に, 接続を試みるプロセスの実効ユーザ(OS側のユーザ)とデータベースへのログインユーザ(データベース側のユーザ)が一致している場合のみ接続を許可する認証方法である.
PostgreSQL の Peer Authentication と 他の認証方法への変更についてのメモ書き. Peer Authentication とは
ちなみにtrustにすればパスワード無しで入れる
configファイルをいじったので再起動
$ sudo service postgresql93 restart
再起動できたらPostgreSQLの方はこれで終わり
djangoでpostgresqlを使うためにモジュールを導入
$ pipenv install psycopg2
djangoの方にPostgresqlを使うことを明示
# (省略)
DATABASES = {
    'default': {
        'ENGINE':'django.db.backends.postgresql_psycopg2',
        'NAME': 'データベース名',
        'USER': 'データベースユーザー名',
        'PASSWORD': 'パスワード',
        'HOST': 'ホスト(今回はlocalhost)',
        'PORT': '',
    }
}
以上書き終わればまたWsgiサーバー起動してみてエラーが出なければうまくいってる
$ gunicorn app_name.wsgi --bind=0.0.0.0:8000
10. SSL認証させる
秘密鍵(.key)と証明書を(.crt)用意
オレオレで良いなら下記記事がまとめてくれている
SSLを利用するための自己証明書(オレオレ証明書)の設定メモ
Let's encryptで証明書を用意する場合
$ sudo service nginx stop
$ sudo su -
$ curl https://dl.eff.org/certbot-auto -o /usr/bin/certbot-auto
$ chmod 700 /usr/bin/certbot-auto
/etc/nginx/nginx.confに下記を追加して
server {
    listen 80;
    # 省略 (以下追記)
    location ^~ /.well-known/acme-challenge/ {
	root /usr/share/nginx/html;
}
以下を叩く
$ certbot-auto certonly --standalone -t --no-bootstrap
以上で証明書が手に入るはず
証明書が切れたら
$ certbot-auto renew --force-renewal
でOK
Nginxの設定変更
NginxのConfファイルに追記
# (省略)

server {
        listen    80;
        server_name     (証明書で証明したドメイン名);
        rewrite ^ https://$server_name$request_uri? permanent; # ここを追記
}

# 以下追記 SSL用ポートの設定
server {
        listen 443;
        ssl on;
        server_name  (EC2のドメイン or IPアドレス);
        client_max_body_size 250M;

        # let's encryptの場合 fullchain.pemてやつ
        # オレオレの場合 server.crt てやつ
        ssl_certificate "(証明書のフルパス)";

        # let's encryptの場合 privkey.pemてやつ
        # オレオレの場合 server.key てやつ
        ssl_certificate_key "秘密鍵のフルパス";

        keepalive_timeout 70;

        location / {
        # リバースプロキシの設定
        ## Load configuration files for the default server block.
            proxy_pass   http://app_server;
            proxy_set_header X-Forwarded-For $proxy_add_x_forwarded_for;
            proxy_redirect off;
            proxy_set_header Host $http_host;
            include /etc/nginx/default.d/*.conf;
        }

        location /static {
                alias (Djangoアプリケーションのstaticファイルへのフルパス);
                expires 5h;
        }

        error_page 404 /404.html;
            location = /40x.html {
        }

        error_page 500 502 503 504 /50x.html;
            location = /50x.html {
        }
}
confファイルの設定が文法的に間違ってないか確認
$ sudo nginx -t
うまくいったらNginx再起動, 鍵のパスワードが求められるのでちゃんと打ち込む
$ sudo service nginx restart
https://ホニャララでアクセスできればOK