まで、編集途中です。
これをFlaskで実装したときに調べた内容メモです。
https://developers.google.com/identity/protocols/oauth2/openid-connect
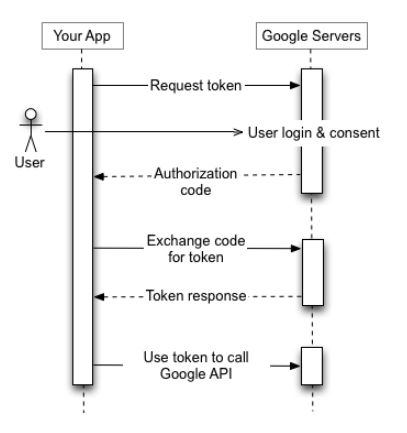
全体の手順
こちらに詳細が書かれています。
https://developers.google.com/identity/protocols/oauth2
ウェブサーバーアプリケーションに書かれているように
- ユーザー認証して認証コード取得
- 認証コードをアクセストークンへ変更
- アクセストークンを使ってAPI
アクセストークンは、認証済みユーザーを識別するためのもので、
アクセストークンがあれば、指定しているAPIが使えるらしい。
久しぶりに一番分かりやすいOAuthの説明を見たけど、
認可サーバーみたいな感じで、ユーザー認証用のサーバーに先にアクセスして、
情報を取得してから認可サーバー(アクセストークンの取得用のサーバー)へリクエストするという流れなんだろな。
ディスカバリドキュメント
ディスカバリドキュメントと呼ばれる色んなエンドポイントURIを持っているURIを叩くと
URIの指定が楽になるそうです。
実行方法は下記です。
jsonにする必要はないですが、JSONきれいできれいにしたかったので辞書からJSONに変換しました。
import requests
import json

GOOGLE_DISCOVERY_URL = (
    'https://accounts.google.com/.well-known/openid-configuration'
)
print(json.dumps(requests.get(GOOGLE_DISCOVERY_URL).json()))
実行結果は下記になります。
{
	"issuer": "https://accounts.google.com",
	"authorization_endpoint": "https://accounts.google.com/o/oauth2/v2/auth",
	"device_authorization_endpoint": "https://oauth2.googleapis.com/device/code",
	"token_endpoint": "https://oauth2.googleapis.com/token",
	"userinfo_endpoint": "https://openidconnect.googleapis.com/v1/userinfo",
	"revocation_endpoint": "https://oauth2.googleapis.com/revoke",
	"jwks_uri": "https://www.googleapis.com/oauth2/v3/certs",
	"response_types_supported": [
		"code",
		"token",
		"id_token",
		"code token",
		"code id_token",
		"token id_token",
		"code token id_token",
		"none"
	],
	"subject_types_supported": [
		"public"
	],
	"id_token_signing_alg_values_supported": [
		"RS256"
	],
	"scopes_supported": [
		"openid",
		"email",
		"profile"
	],
	"token_endpoint_auth_methods_supported": [
		"client_secret_post",
		"client_secret_basic"
	],
	"claims_supported": [
		"aud",
		"email",
		"email_verified",
		"exp",
		"family_name",
		"given_name",
		"iat",
		"iss",
		"locale",
		"name",
		"picture",
		"sub"
	],
	"code_challenge_methods_supported": [
		"plain",
		"S256"
	],
	"grant_types_supported": [
		"authorization_code",
		"refresh_token",
		"urn:ietf:params:oauth:grant-type:device_code",
		"urn:ietf:params:oauth:grant-type:jwt-bearer"
	]
}
今回はこの中のauthorization_endpointを使用します。
2.Googleに認証リクエストを送信する
この箇所をFlaskで実装すると下記になります。
ローカルで実行したときのアクセスはこちらになります。
http://127.0.0.1:5000/g_login
import requests
import os
import json

from flask import Flask, request, redirect
from oauthlib.oauth2 import WebApplicationClient

GOOGLE_CLIENT_ID = os.environ.get('GOOGLE_CLIENT_ID', 'クライアントID')
GOOGLE_CLIENT_SECRET = os.environ.get('GOOGLE_CLIENT_SECRET', 'クライアントシークレット')

GOOGLE_DISCOVERY_URL = (
    'https://accounts.google.com/.well-known/openid-configuration'
)
client = WebApplicationClient(GOOGLE_CLIENT_ID)

def get_google_provider_cfg():
    return requests.get(GOOGLE_DISCOVERY_URL).json()
app = Flask(__name__)

@app.route('/g_login')
def g_login():

    # 認証用のエンドポイントを取得
    google_provider_cfg = get_google_provider_cfg()
    authorization_endpoint = google_provider_cfg['authorization_endpoint']

    # ユーザのID,メールアドレス、プロファイルのリクエスト
    request_uri = client.prepare_request_uri(
        authorization_endpoint,
        redirect_uri = request.base_url + '/callback',
        scope=['openid', 'email', 'profile'],
    )

    print(request.url)  # https://127.0.0.1:5000/g_login
    print(request.base_url)  # https://127.0.0.1:5000/g_login
    print(request_uri)  # https://accounts.google.com/o/oauth2/v2/auth/oauthchooseaccount?response_type=code&client_id={クライアントID}&redirect_uri=http%3A%2F%2F127.0.0.1%3A5000%2Fg_login%2Fcallback&scope=openid%20email%20profile&flowName=GeneralOAuthFlow
    return redirect(request_uri)
この時点でGoogleの認証画面は出るようになります。
redirect_url_mismatchエラーが出るケース
今回設定したリダイレクトのURI(redirect_uriのパラメータ)と
OAuth 2.0 クライアントIDで設定しているリダイレクト承認済みのリダイレクトURIが一致していないと
400:redirect_url_mismatchのエラーがでるので出たら確認しましょう。
4.codeのアクセストークンとIDトークンを交換する
2で実行されるリダイレクトの動きを作っていきます。
ここではトークンの発行をしていきます。
@app.route('/g_login/callback')
def g_callback():

    # Googleから返却された認証コードを取得する
    code = request.args.get("code")

    # トークンを取得用のエンドポイントを取得
    google_provider_cfg = get_google_provider_cfg()
    token_endpoint = google_provider_cfg["token_endpoint"]

    # トークン取得用の情報を生成
    token_url, headers, body = client.prepare_token_request(
        token_endpoint,
        authorization_response=request.url,
        redirect_url=request.base_url,
        code=code,
    )

    # リクエスト(id_tokenの取得)
    token_response = requests.post(
        token_url,
        headers=headers,
        data=body,
        auth=(GOOGLE_CLIENT_ID, GOOGLE_CLIENT_SECRET),
    )

    # 確認用
    print('*******request*******')
    print(request.args.get("code"))
    print(request.args.get('state'))
    print(request.url)

    print('*******token*******')
    print(token_url)
    print(headers)
    print(body)

    print(request.base_url)
    print('*******token_response*******')
    print(json.dumps(token_response.json()))
1つ1つprintで確認すると公式サイトで必要だと書かれている
header, body情報が作られてリクエストしているのがわかります。
ここでIDトークンが取得できたので、
次はIDトークンからユーザー情報を取得していきます。
5.IDトークンからユーザー情報を取得する
ここは裏側の動きのイメージがつきづらかったです。
g_callback関数の続きで下記のコードを書いていきます。
    # トークンをparse
    client.parse_request_body_response(json.dumps(token_response.json()))

    userinfo_endpoint = google_provider_cfg["userinfo_endpoint"]
    uri, headers, body = client.add_token(userinfo_endpoint)
    userinfo_response = requests.get(uri, headers=headers, data=body)

    print(json.dumps(userinfo_response.json()))
このコードの実行で下記のJSONが取得できます。
{
	"sub": "",
	"name": "梅原克也",
	"given_name": "克也",
	"family_name": "梅原",
	"profile": "https://profiles.google.com/{sub}",
	"picture": "https://lh3.googleusercontent.com/a-/",
	"email": "@gmail.com",
	"email_verified": true,
	"gender": "male",
	"locale": "ja",
	"hd": ""
}


