■TableLayoutとは
表組みのレイアウトを作る時に使用するもの
<TableLayout xmlns:android="http://schemas.android.com/apk/res/android"
    xmlns:app="http://schemas.android.com/apk/res-auto"
    xmlns:tools="http://schemas.android.com/tools"
    android:layout_width="match_parent"
    android:layout_height="match_parent"
    tools:context=".MainActivity">


</TableLayout>
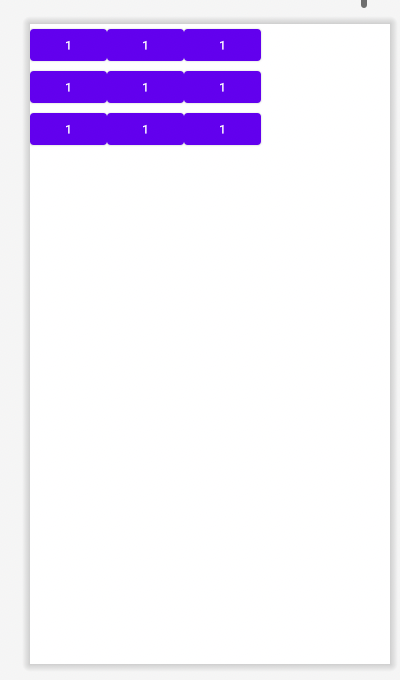
■TableRow
横1行にあたる範囲
TableRowの中にbuttonなどのViewを渡せば
横1列になる。
<?xml version="1.0" encoding="utf-8"?>
<TableLayout xmlns:android="http://schemas.android.com/apk/res/android"
    xmlns:app="http://schemas.android.com/apk/res-auto"
    xmlns:tools="http://schemas.android.com/tools"
    android:layout_width="match_parent"
    android:layout_height="match_parent"
    tools:context=".MainActivity">

    <TableRow
        android:layout_width="wrap_content"
        android:layout_height="wrap_content">

        <Button
            android:layout_width="wrap_content"
            android:layout_height="wrap_content"
            android:text="1" />

        <Button
            android:layout_width="wrap_content"
            android:layout_height="wrap_content"
            android:text="1" />

        <Button
            android:layout_width="wrap_content"
            android:layout_height="wrap_content"
            android:text="1" />
    </TableRow>

    <TableRow
        android:layout_width="wrap_content"
        android:layout_height="wrap_content">

        <Button
            android:layout_width="wrap_content"
            android:layout_height="wrap_content"
            android:text="1" />

        <Button
            android:layout_width="wrap_content"
            android:layout_height="wrap_content"
            android:text="1" />

        <Button
            android:layout_width="wrap_content"
            android:layout_height="wrap_content"
            android:text="1" />
    </TableRow>

</TableLayout>
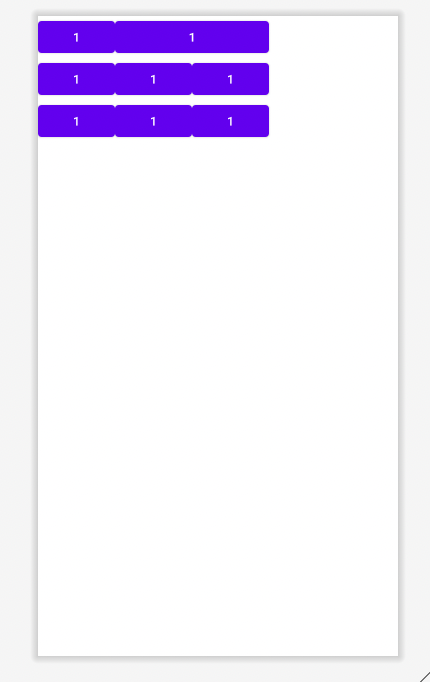
■span column
■span
2個分3個分など
view一つに定められたサイズの横のでかさを倍にする。
   <TableRow
        android:layout_width="wrap_content"
        android:layout_height="wrap_content">

        <Button
            android:layout_width="wrap_content"
            android:layout_height="wrap_content"
            android:text="1" />

        <Button
            android:layout_width="wrap_content"
            android:layout_height="wrap_content"
          //Button2つ分の横のでかさになる。
            android:layout_span="2"
            android:text="1" />

    </TableRow>

    //...以下のコード省略
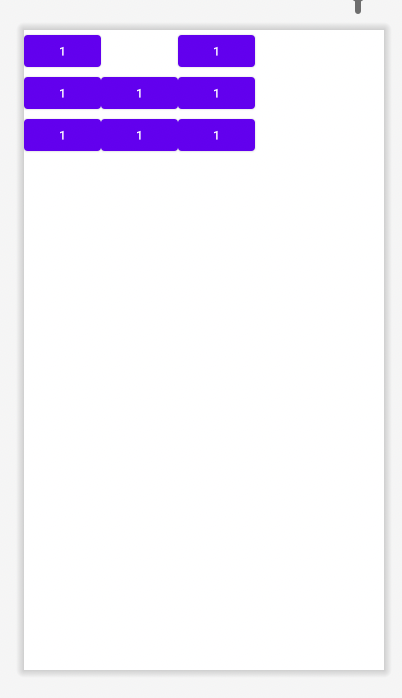
■column
指定した列の場所に表示する。(一番左を0列目とする。)
   <TableRow
        android:layout_width="wrap_content"
        android:layout_height="wrap_content">

        <Button
            android:layout_width="wrap_content"
            android:layout_height="wrap_content"
            android:text="1" />

        <Button
            android:layout_width="wrap_content"
            android:layout_height="wrap_content"
           //0列目からと数えて2列目へ
            android:layout_column="2"
            android:text="1" />

    </TableRow>
//...以下のコード省略
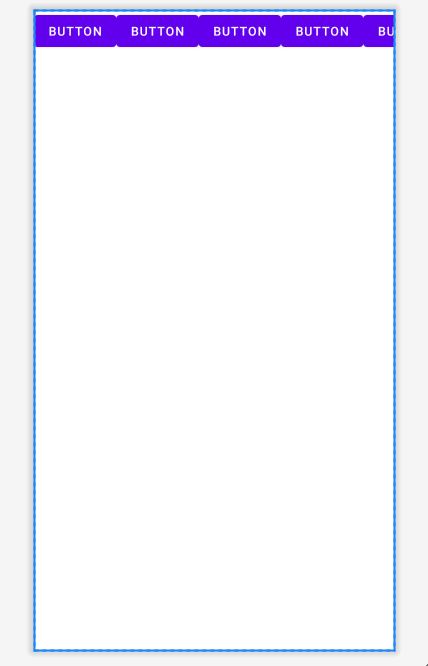
■stretchColumns
指定したViewを使って幅いっぱい広げる。
<TableLayout xmlns:android="http://schemas.android.com/apk/res/android"
    xmlns:app="http://schemas.android.com/apk/res-auto"
    xmlns:tools="http://schemas.android.com/tools"
    android:layout_width="match_parent"
    android:layout_height="match_parent"

   //0列目と2列目のviewを使って幅いっぱい広げる。
    android:stretchColumns="0,2"
    tools:context=".MainActivity">

 <TableRow
        android:layout_width="wrap_content"
        android:layout_height="wrap_content">

        <Button
            android:layout_width="wrap_content"
            android:layout_height="wrap_content"
            android:text="1" />

        <Button
            android:layout_width="wrap_content"
            android:layout_height="wrap_content"
            android:layout_column="2"
            android:text="1" />

    </TableRow>

//...以下コード省略
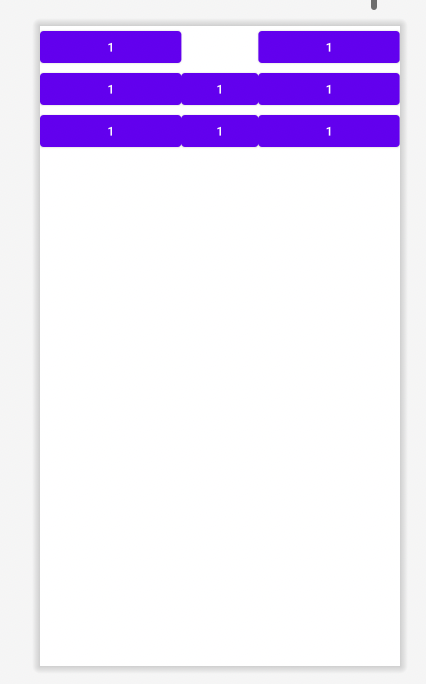
横幅いっぱいに広がっている。
■shrinkColumns
文字が多くてオーバーしてても
指定した列で無理やり幅いっぱいに収まるようにする。
TableLayout xmlns:android="http://schemas.android.com/apk/res/android"
    xmlns:app="http://schemas.android.com/apk/res-auto"
    xmlns:tools="http://schemas.android.com/tools"
    android:layout_width="match_parent"
    android:layout_height="match_parent"

    //2列目で収まって
    android:shrinkColumns="2"
    tools:context=".MainActivity">

    <TableRow
        android:layout_width="wrap_content"
        android:layout_height="wrap_content">

        <Button
            android:layout_width="wrap_content"
            android:layout_height="wrap_content"
            android:text="こんにちわおはよう" />

        <Button
            android:layout_width="wrap_content"
            android:layout_height="wrap_content"
            android:text="こんにちわおはよう" />

        <Button
            android:layout_width="wrap_content"
            android:layout_height="wrap_content"
            android:text="こんにちわおはよう"/>

    </TableRow>

■一番右のviewがはみ出していてshrinkColumnsで
全部の列を指定した動き
<TableLayout xmlns:android="http://schemas.android.com/apk/res/android"
    xmlns:app="http://schemas.android.com/apk/res-auto"
    xmlns:tools="http://schemas.android.com/tools"
    android:layout_width="match_parent"
    android:layout_height="match_parent"

 //全ての列を指定しました。
   android:shrinkColumns="0,1,2,3,4"
    tools:context=".MainActivity">
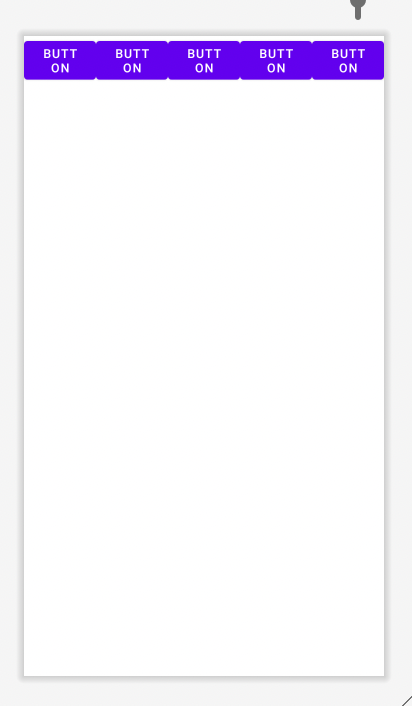
全て等しいサイズで収まる。