1. 初めに
閲覧ありがとうございます。
また、1日目の記事を読んだ方は重ね重ねありがとうございます。
読んでない方はぜひ見てください!!!
2.概要
1日目の記事の続きになります。
1日目 : Vagrant設定、PHPインストール・設定、Laravel インストール・設定
2日目 : Apache インストール・設定、Mysql インストール・設定 ←ここ
参考サイト :
https://qiita.com/hamburg-love/items/ae819a7abf921af77376
https://qiita.com/suzuki_web/items/2180a00a21d574bf7f55
https://terakoya.sejuku.net/question/detail/19710
https://zenn.dev/saxsir/scraps/d4815afb346582
https://www-creators.com/archives/5574
https://qiita.com/hamburg-love/items/ae819a7abf921af77376
3. 前提条件
1日目の記事の内容まで終わっていること。
4. 環境構築
4-1.Apacheインストール
4-1-1.Apacheインストール
sudo yum install httpd
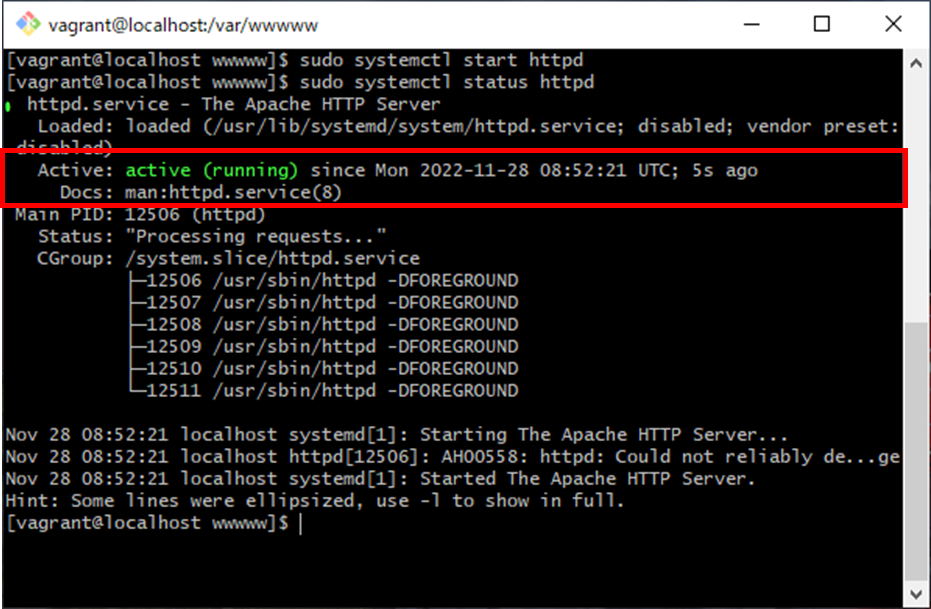
4-1-2.Apacheの起動と起動確認
sudo systemctl start httpd
sudo systemctl status httpd
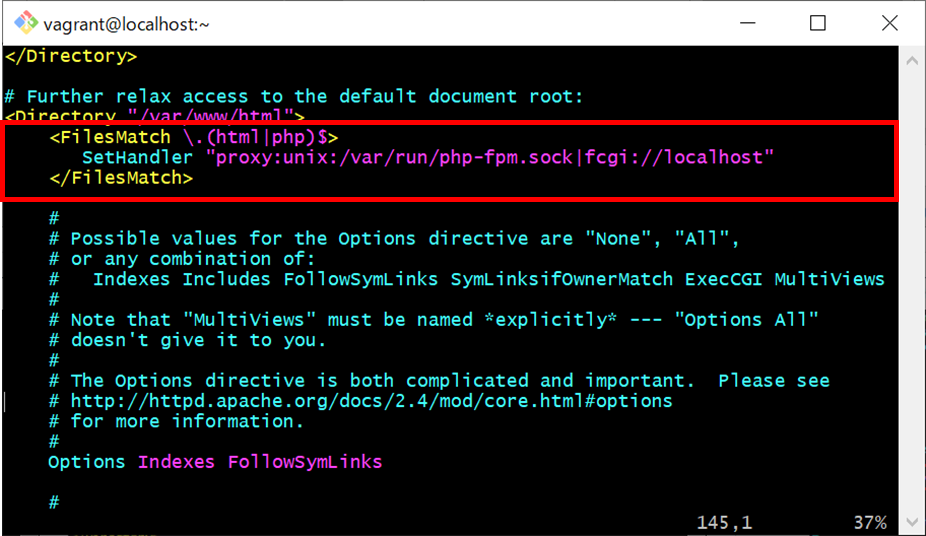
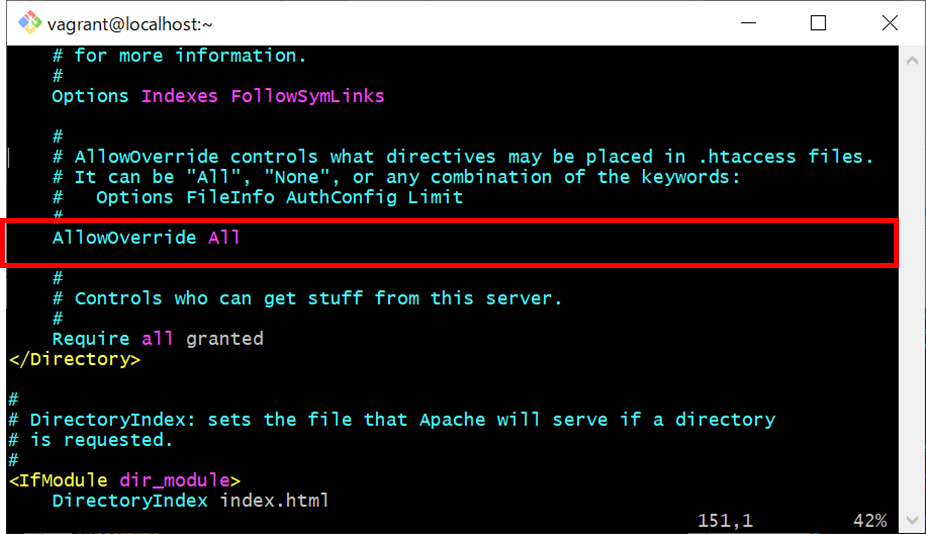
4-1-3.Apacheの設定
以下のコマンドで設定ファイルを開く
sudo vi /etc/httpd/conf/httpd.conf
DocumentRoot、FilesMatch、AllowOverrideを以下の様に設定
#
# DocumentRoot: The directory out of which you will serve your
# documents. By default, all requests are taken from this directory, but
# symbolic links and aliases may be used to point to other locations.
#
DocumentRoot "/var/www/html/src/laravel/public"

/////////// 省略 /////////////

# Further relax access to the default document root:
<Directory "/var/www/html">
    <FilesMatch \.(html|php)$>
       SetHandler "proxy:unix:/var/run/php-fpm.sock|fcgi://localhost"
    </FilesMatch>

/////////// 省略 /////////////

    #
    # AllowOverride controls what directives may be placed in .htaccess files.
    # It can be "All", "None", or any combination of the keywords:
    #   Options FileInfo AuthConfig Limit
    #
    AllowOverride All

/////////// 省略 /////////////

</Directory>

※「src/laravel/public」はLaravelの開発環境のパス
4-1-4.apache再起動
sudo systemctl restart httpd
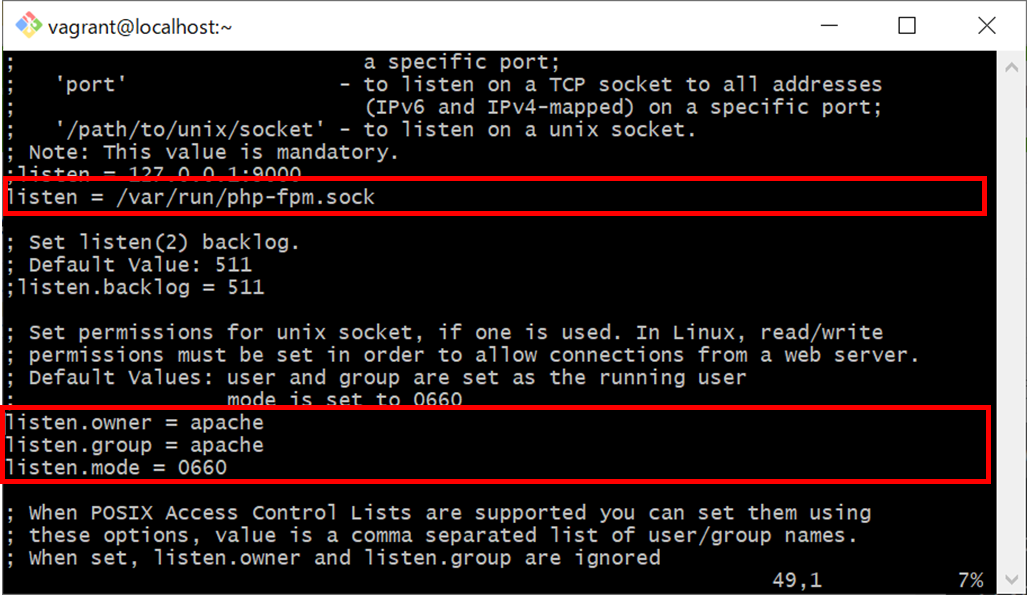
4-1-5.ApacheがPHP認識するように設定
以下のコマンドで設定ファイルを開く
sudo vi /etc/opt/remi/php81/php-fpm.d/www.conf
以下の内容を設定ファイルに記載
listen = /var/run/php-fpm.sock
listen.owner = apache
listen.group = apache
listen.mode = 0660
4-1-6.php-fpmのサービスが動作するようにフォルダ作成とサービス起動
sudo mkdir /var/run/php-fpm
sudo systemctl restart php81-php-fpm.service
sudo systemctl enable php81-php-fpm.service
4-2.Mysqlインストール(おまけ)
4-2-1.MySQLインストール
sudo yum localinstall http://dev.mysql.com/get/mysql80-community-release-el7-7.noarch.rpm
sudo yum install mysql-community-server
4-2-2.MysSQLを起動
sudo systemctl start mysqld.service
sudo systemctl enable mysqld.service
4-2-3.rootユーザーの初期パスワード確認
コマンド実行でパスワードが表示されます。
ランダム文字列部分をコピーして記憶してください。
[Note] A temporary password is generated for root@localhost: 【ランダム文字列】
sudo cat /var/log/mysqld.log | grep root@localhost
4-2-4. MySQLへログイン
mysql -u root -p
パスワードは3のランダム文字列
4-2-5.rootユーザーのパスワード変更
USE mysql;
ALTER USER 'root'@'localhost' identified BY '【設定したいパスワード】';
4-2-6.MySQLからログアウト
exit;
5. Vagrant再起動
5-1.再起動
5-1-1. AWS Linux2から切断
exit;
5-1-2. Vagran再起動
vagrant reload
5-1-3. AWS Linux2へ接続
vagrant ssh
6.Laravel構築
6-1.Laravel構築構築
6-1-1.コマンド実行してLaravel環境と初期設定
mkdir /var/www/html/src
sudo chmod 777 /var/www/html/src
cd /var/www/html/src
composer create-project --prefer-dist laravel/laravel
cd ./laravel
chmod -R 777 bootstrap/cache
chmod -R 777 storage
cp .env.example .env
5-1-1の手順前にVagrantを再起動すると共有フォルダが有効になります
7. ローカル環境にアクセス
以下のURLでLaravelのTop画面が表示されます。
http://192.168.33.10/index.php
IPアドレス : 192.168.33.10 はVagrantファイルの設定したIPアドレス
8.開発環境
Windows側で「C:\Users\user\php_workspase\vagrant\src\laravel」というフォルダのソースを直接編集することで開発ができます。
9.終わり
2日間ありがとうございました。
vageratはDoker、ApacheはNginxを使用が多く、本記事の環境構築が役に立たないかもしれません。
ただ私が構築した際の苦労が、他の人が少なくなればと思い投稿しました。
また今後もQiita投稿しますので、よろしくお願いいたします!