Pythonには cookiecutter という仕組みがあり、それを使ってみた際のメモです。
cookiecutterを使ってみる とまるかぶりの内容だけど自分用の備忘録。
どんな雛形がある?
cookiecutter の A Pantry Full of Cookiecutters とか Django Packages を見ると色々あります。
Django関連ではメジャーみたいなのとPythonやBootstrapの新しいバージョンに対応してるので cookiecutter-django を使ってみます。cookiecutter-django-crud とかも気になるけど、そちらははいずれ…
環境
cookiecutter-django が Python3.6、Django1.11 に対応となってるので、
- Python は 3.6
- Django は 1.11.8
- OS は Windows 10
- DB は PostgreSQL 10.1
- IDE は普段使ってる PyDev (Eclipse)
やってみる
Creating your first app with Cookiecutter-Django に従う。
virtualenvでPython仮想環境を使う説明になってるけど、自分のローカルでは Anaconda の仮想環境を使ってるのでPython仮想環境の手順はskipしていきます。
cookiecutterをインストール
condaにないのでpipで。
> pip install "cookiecutter>=1.4.0"
Python用の PostgreSQLクライアントをインストール
> conda install psycopg2
プロジェクトフォルダを作成&移動
> mkdir cookiecutter_sample
> cd cookiecutter_sample
cookiecutter-django を適用
cookiecutter-django で cookiecutter を実行。
> cookiecutter https://github.com/pydanny/cookiecutter-django
下のように色々聞かれますが、お試しなので project_name と author_name ぐらい変更してenterキーを連打します。
自分はwinなので Windows だけ y に。
project_name [Project Name]: cookiecutter_sample
project_slug [cookiecutter_sample]:
author_name [Daniel Roy Greenfeld]: ping2shi2
email [you@example.com]:
description [A short description of the project.]:
domain_name [example.com]:
version [0.1.0]:
timezone [UTC]: Asia/Tokyo
use_whitenoise [y]:
use_celery [n]:
use_mailhog [n]:
use_sentry_for_error_reporting [y]:
use_opbeat [n]:
use_pycharm [n]:
windows [n]: y
use_docker [n]:
use_heroku [n]:
use_elasticbeanstalk_experimental [n]:
use_compressor [n]:
Select postgresql_version:
1 - 10
2 - 9.6
3 - 9.5
4 - 9.4
5 - 9.3
6 - 9.2
Choose from 1, 2, 3, 4, 5, 6 [1]:
Select js_task_runner:
1 - Gulp
2 - Grunt
3 - None
Choose from 1, 2, 3 [1]:
custom_bootstrap_compilation [n]:
Select open_source_license:
1 - MIT
2 - BSD
3 - GPLv3
4 - Apache Software License 2.0
5 - Not open source
Choose from 1, 2, 3, 4, 5 [1]:
すると mkdirした cookiecutter_sampleフォルダの下に、更に cookiecutter_sampleフォルダが作成され、中身は以下のとおり。
D:.
│  .coveragerc
│  .editorconfig
│  .gitattributes
│  .gitignore
│  .pylintrc
│  .travis.yml
│  CONTRIBUTORS.txt
│  env.example
│  gulpfile.js
│  LICENSE
│  manage.py
│  package.json
│  pytest.ini
│  README.rst
│  setup.cfg
│
├─config
│  │  urls.py
│  │  wsgi.py
│  │  __init__.py
│  │
│  └─settings
│          base.py
│          local.py
│          production.py
│          test.py
│          __init__.py
│
├─cookiecutter_sample
│  │  __init__.py
│  │
│  ├─contrib
│  │  │  __init__.py
│  │  │
│  │  └─sites
│  │      │  __init__.py
│  │      │
│  │      └─migrations
│  │              0001_initial.py
│  │              0002_alter_domain_unique.py
│  │              0003_set_site_domain_and_name.py
│  │              __init__.py
│  │
│  ├─static
│  │  ├─css
│  │  │      project.css
│  │  │
│  │  ├─fonts
│  │  │      .gitkeep
│  │  │
│  │  ├─images
│  │  │      favicon.ico
│  │  │
│  │  ├─js
│  │  │      project.js
│  │  │
│  │  └─sass
│  │          custom_bootstrap_vars.scss
│  │          project.scss
│  │
│  ├─templates
│  │  │  403_csrf.html
│  │  │  404.html
│  │  │  500.html
│  │  │  base.html
│  │  │
│  │  ├─account
│  │  │      account_inactive.html
│  │  │      base.html
│  │  │      email.html
│  │  │      email_confirm.html
│  │  │      login.html
│  │  │      logout.html
│  │  │      password_change.html
│  │  │      password_reset.html
│  │  │      password_reset_done.html
│  │  │      password_reset_from_key.html
│  │  │      password_reset_from_key_done.html
│  │  │      password_set.html
│  │  │      signup.html
│  │  │      signup_closed.html
│  │  │      verification_sent.html
│  │  │      verified_email_required.html
│  │  │
│  │  ├─bootstrap4
│  │  │  │  field.html
│  │  │  │
│  │  │  └─layout
│  │  │          field_errors_block.html
│  │  │
│  │  ├─pages
│  │  │      about.html
│  │  │      home.html
│  │  │
│  │  └─users
│  │          user_detail.html
│  │          user_form.html
│  │          user_list.html
│  │
│  └─users
│      │  adapters.py
│      │  admin.py
│      │  apps.py
│      │  models.py
│      │  urls.py
│      │  views.py
│      │  __init__.py
│      │
│      ├─migrations
│      │      0001_initial.py
│      │      __init__.py
│      │
│      └─tests
│              factories.py
│              test_admin.py
│              test_models.py
│              test_urls.py
│              test_views.py
│              __init__.py
│
├─docs
│      conf.py
│      deploy.rst
│      docker_ec2.rst
│      index.rst
│      install.rst
│      make.bat
│      Makefile
│      __init__.py
│
├─requirements
│      base.txt
│      local.txt
│      production.txt
│      test.txt
│
└─utility
        install_os_dependencies.sh
        install_python_dependencies.sh
        requirements-jessie.apt
        requirements-trusty.apt
        requirements-xenial.apt
cookiecutter_sampleフォルダが1階層余分に見えます。手動で1つ減らして進めると後で失敗するので、このまま Pydev へ。
Pydev プロジェクトを作成
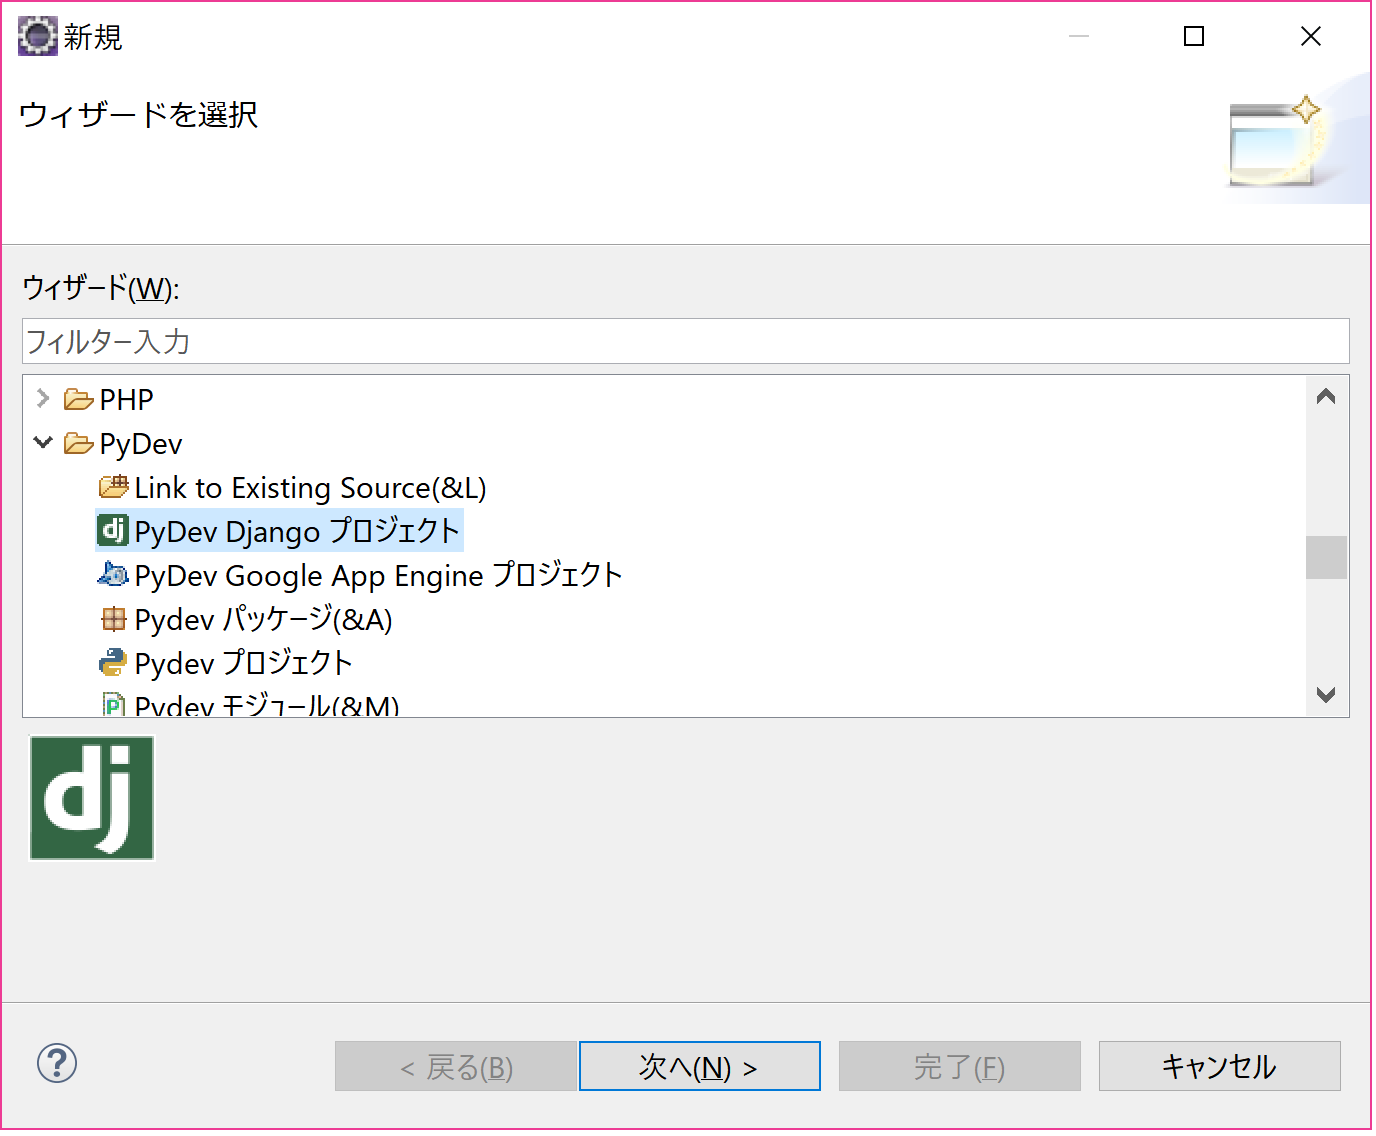
Eclipseで ファイル>新規>その他 のメニューを選択し、Pydev Django プロジェクトを選択。

[次へ] ボタンクリックして [プロジェクト名] に 上で作成したプロジェクト名を入力して[次へ]をクリック。
その後は環境に合わせて入力してから[完了]クリックします。
すると、先ほど \cookiecutter_sample\cookiecutter_sample\ 配下に出来たファイルが \cookiecutter_sample\ 配下に移動してくれます。
自分で移動すると、雛形のコードと構成がずれて動かなくなるので注意です。
DBの接続情報を設定
当然ですが事前に CREATE DATABASE はしておいて下さい。
プロジェクト直下の env.example というファイルにDBの接続情報を追加します。
DATABASE_URL="postgres://user:pass@127.0.0.1:port_no/db_name"
env.example のファイル名 を .env に変更します。
.env は環境変数を設定できるファイルみたいです。
.envファイル を有効に
.envファイルを有効にするため、
config\settings\base.py を以下のように修正します。
# READ_DOT_ENV_FILE = env.bool('DJANGO_READ_DOT_ENV_FILE', default=False)
READ_DOT_ENV_FILE = env.bool('DJANGO_READ_DOT_ENV_FILE', default=True)
Django settings module を Pydev に設定
プロジェクトのプロパティを開いて Pydev で起動する際の Django settings module に config.settings.local を設定します。
Djangoのマイグレーションを実行
コマンドでも良いですが Pydev から実行する場合は、プロジェクトを選択して右クリック>Django>マイグレーション をクリック
起動
Eclipseでデバッグ起動してブラウザでアクセスすると
のように、サインアップ、ログイン、ログアウト、パスワード変更、などユーザーアカウントまわりの機能は出来ています。
また、設定時にenter連打した環境まわりをちゃんと設定すると、そちらも自動的に出来るようです。
これにビジネスロジックだけ追加しよう。ということです。
おしまい。


