概要
やりたいこと概要:GraphQLでRDSのデータを取得できる環境をAmplifyで作成する。
JS app -> GraphQL -> Lambda (JS) -> RDS proxy -> RDS
ほぼ全て初めて触るのでおかしいとこあるかもしれないが、とりあえずできたので備忘録として。
余談:LambdaからのRDSアクセスは、もうアンチパターンではない。
オンラインセミナー「RDS+Lambda が始まる。過去のアンチパターンはどう変わるのか」 の資料が、アンチパターンと言われていた理由とAWSによる改善をわかりやすく説明している。
RDS proxyは入れなくてもRDSへのアクセスは可能だが、これこそがアンチパターン対策の一つなので、詳しくは上記リンクを参照のこと。
前提
-
awsCLIコマンド使えるくらいの知識はある。 -
awsCLIコマンド ver.2 インストール済み - アクセスできるRDS (AuroraだがServerlessではない) がある。
- フロントエンドアプリもLambdaもJS(ちなみに私はJS信者ではない)
手順概要
- Amplifyの準備
- AmplifyでLambda Layerを作成
- AmplifyでLambda関数を作成
- Lambda関数にVPCアクセス権限を追加
- VPCアクセスを設定する
- GraphQL APIを作成する
- LambdaでGraphQLからのパラメータを使用する
- フロントエンドアプリからGraphQL APIを呼び出す
- RDS proxyを導入する
- シークレットを作成
- シークレットを使用するポリシーを作成
- シークレットを使用するロールを作成
- RDS proxyを作成する
- RDS proxyを使用する
手順
Amplifyの準備
amplify initでAmplifyを使い始めるのだが、ソースツリーをロールバックしたり何が起こっているか把握するためにも、このコマンドの前にプロジェクトをgit管理して変化を確認できるようにしておくことをおすすめする。
まずは、このへんの公式チュートリアルでAmplifyのCLIインストールしたり、アプリのコードベースを作成する。チュートリアルではプロジェクト作成しているが、既存のプロジェクトでAmplifyを使いたければ、amplify initをすればよい。
とりあえずここでコミットしておく。
AmplifyでLambda Layerを作成
Lambda Layerは複数のLambdaで共用可能なコードの塊で、JSではnode_modulesに入るようなライブラリファイル群をLambda関数とは別のLambda Layerとして作成する。Lambda関数に含めてしまっても良いが、大きすぎるとLambdaコンソールのエディタが使えなくなるので分けておいたほうが無難。
今回はRDSへアクセスするためのライブラリ mysql2 などをこのレイヤーに入れる。
amplify add functionコマンドでLambda layerを選んで、順次質問に答えてLambda layerの設定ファイルを作成。
MacBook-Pro.local:amplify-js-app% amplify add function
? Select which capability you want to add: Lambda layer (shared code & resource used across functions)
? Provide a name for your Lambda layer: layer9da0e99d
? Choose the runtime that you want to use: NodeJS
? The current AWS account will always have access to this layer.
Optionally, configure who else can access this layer. (Hit <Enter> to skip)
✅ Lambda layer folders & files created:
amplify/backend/function/amplifyjsapplayer9da0e99d

Next steps:
Move your libraries to the following folder:
[NodeJS]: amplify/backend/function/amplifyjsapplayer9da0e99d/lib/nodejs
...
CLI出力の最後の行にあるように amplify/backend/function/amplifyjsapplayer9da0e99d/lib/nodejs に node_modules が配置されればよいので、このディレクトリに package.json を作成してパッケージをインストールする。
下記の例では、ついでにRDSアクセスのパフォーマンス計測に使用するAWS XRayのパッケージも入れている。不要であれば aws-xray-sdk-* は入れなくていい。
{
  "name": "rds-xray-js-lib",
  "description": "NPM dependencies for RDS access with XRAY support",
  "version": "1.0.0",
  "private": true,
  "dependencies": {
    "aws-xray-sdk-core": "2.4.0",
    "aws-xray-sdk-mysql": "2.4.0",
    "mysql2": "2.1.0"
  },
  "scripts": {}
}
そして、このpackage.jsonがあるディレクトリでnpm installしてパッケージをダウンロードする。
AmplifyでLambdaを作成
今度は、amplify add functionコマンドでLambda functionを選んでLambda関数の設定ファイルを作成する。
この際、先程設定したLambda layerを指定する。Spaceキーで選択なので注意。
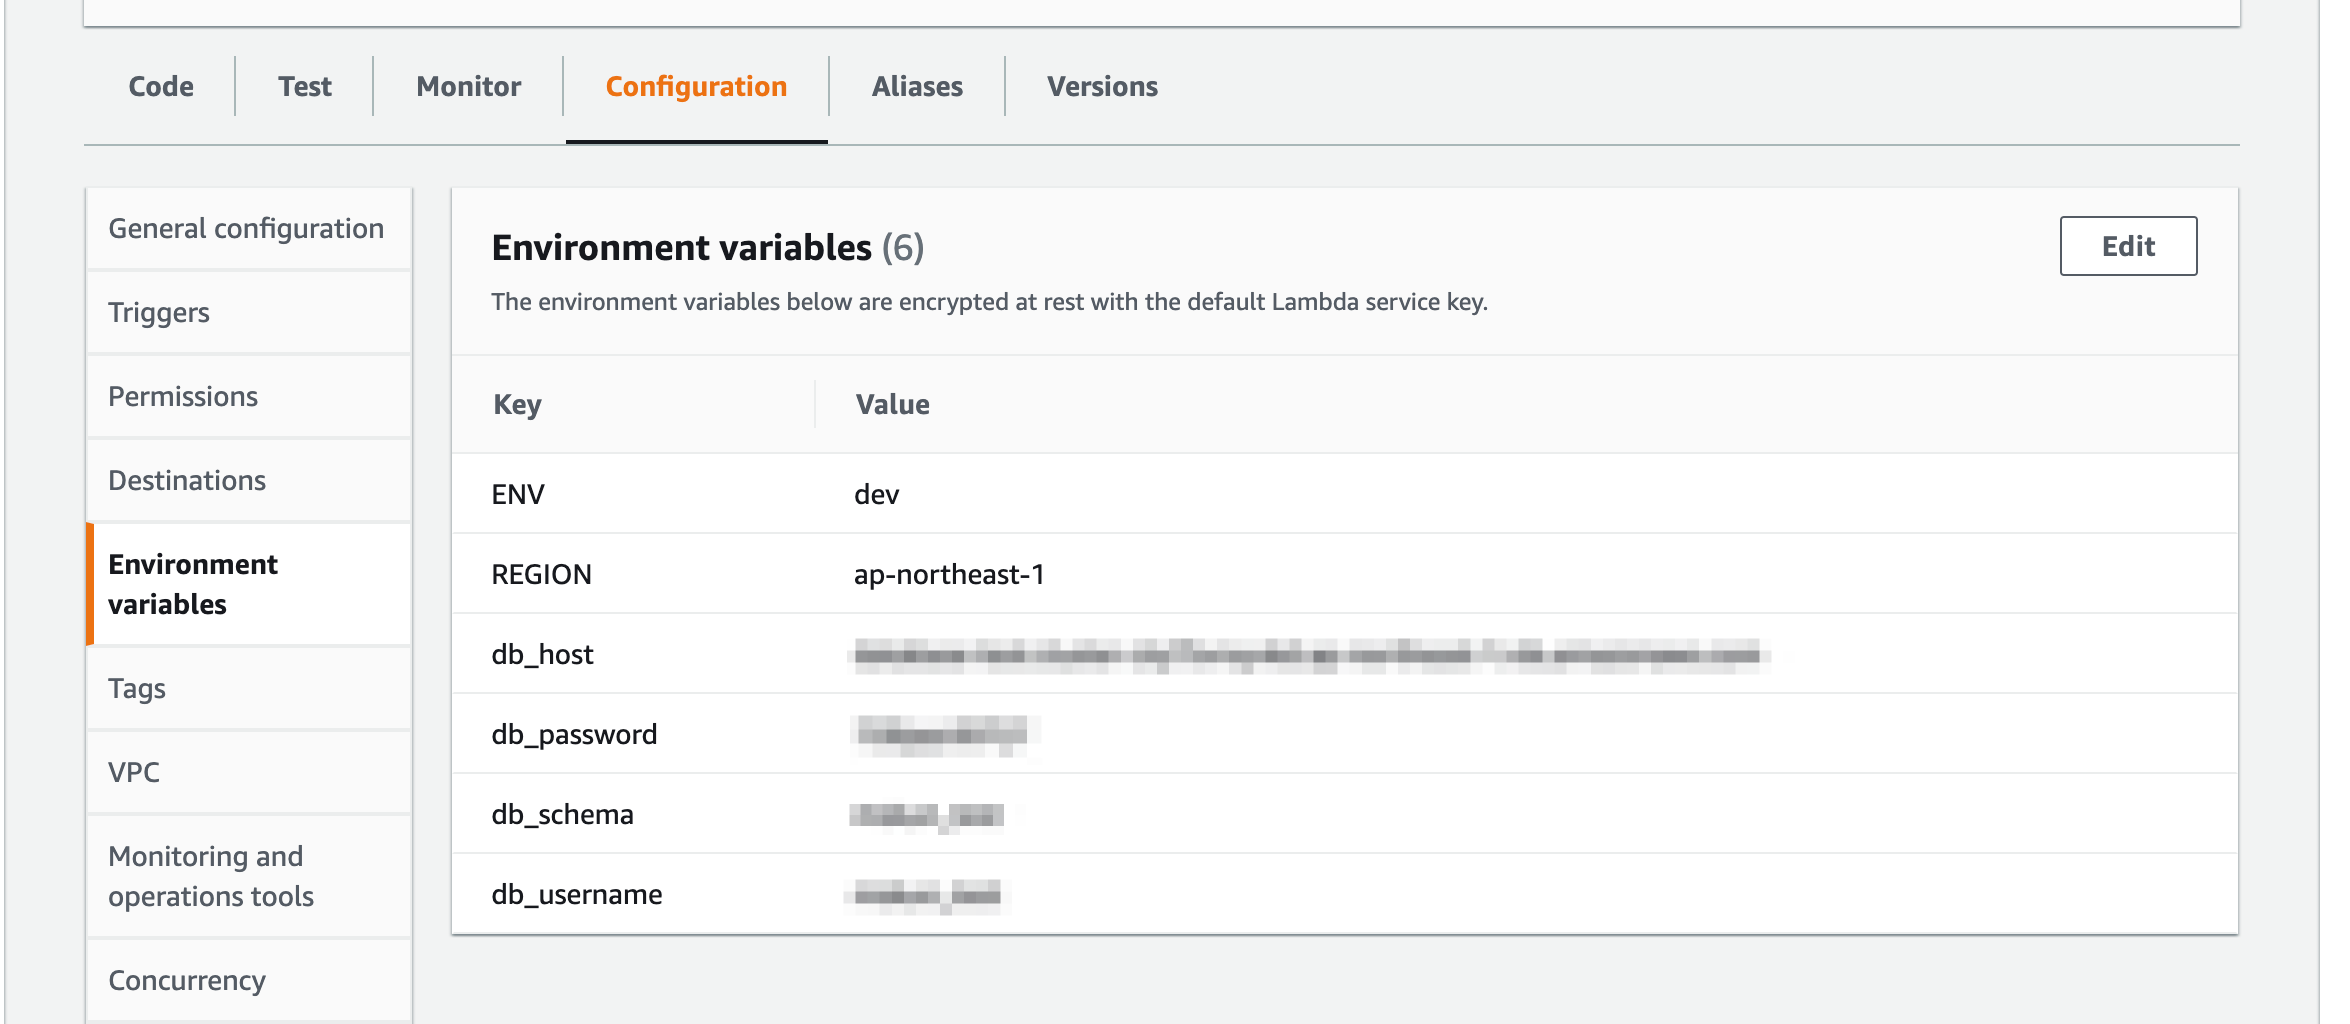
またここで、RDSへアクセスするためのDBホスト名、DB名、ユーザID&パスワードを環境変数として登録する。(IAMやシステムマネージャのシークレットを使用することもできるが、ここでは割愛する。シークレットはこの同ウィザードの "Do you want to configure secret values this function can access?" で設定できそう。)
MacBook-Pro.local:amplify-js-app% amplify add function
? Select which capability you want to add: Lambda function (serverless function)
? Provide an AWS Lambda function name: amplifyjsapp92a6207c
? Choose the runtime that you want to use: NodeJS
? Choose the function template that you want to use: Hello World

Available advanced settings:
- Resource access permissions
- Scheduled recurring invocation
- Lambda layers configuration
- Environment variables configuration
- Secret values configuration

? Do you want to configure advanced settings? Yes
? Do you want to access other resources in this project from your Lambda function? No
? Do you want to invoke this function on a recurring schedule? No
? Do you want to enable Lambda layers for this function? Yes
? Provide existing layers or select layers in this project to access from this function (pick up to 5): amplifyjsapplayer9da0e99d
? Do you want to configure environment variables for this function? Yes
? Enter the environment variable name: db_host
? Enter the environment variable value: database.cluster-xxxxxxxxxxxx.ap-northeast-1.rds.amazonaws.com
? Select what you want to do with environment variables: Add new environment variable
? Enter the environment variable name: db_schema
? Enter the environment variable value: my_database
? Select what you want to do with environment variables: Add new environment variable
? Enter the environment variable name: db_username
? Enter the environment variable value: my_user
? Select what you want to do with environment variables: Add new environment variable
? Enter the environment variable name: db_password
? Enter the environment variable value: my_password
? Select what you want to do with environment variables: I'm done
? Do you want to configure secret values this function can access? No
? Do you want to edit the local lambda function now? Yes
Successfully added resource amplifyjsapp92a6207c locally.
これでLambda関数のソースファイルがamplify/backend/function/amplifyjsapp92a6207c/src/index.jsに作成された。
これを下記のように変更。
const AWSXRay = require('aws-xray-sdk-core')
const captureMySQL = require('aws-xray-sdk-mysql')
const mysql = captureMySQL(require('mysql2/promise'))

exports.handler = async (event) => {
  const connection = await mysql.createConnection({
    host     : process.env.db_host,
    database : process.env.db_schema,
    user     : process.env.db_username,
    password : process.env.db_password
  })

  const [rows, fields] = await connection.execute('select * from users')
  console.log(rows)
  await connection.end()
  return rows[0].name
}
XRayが不要ならばはじめの3行を const mysql = require('mysql2/promise'); に置き換える。
'select * from users'とrows[0].nameも実際のテーブルに合わせて変更する。
amplify push を実行。数分かかるのでコーヒーを淹れに行く。
MacBook-Pro.local:amplify-js-app% amplify push
✔ Successfully pulled backend environment dev from the cloud.

Current Environment: dev

| Category | Resource name             | Operation | Provider plugin   |
| -------- | ------------------------- | --------- | ----------------- |
| Function | amplifyjsapplayer9da0e99d | Create    | awscloudformation |
| Function | amplifyjsapp92a6207c      | Create    | awscloudformation |
? Are you sure you want to continue? Yes

Suggested configuration for new layer versions:

amplifyjsapplayer9da0e99d
  - Description: Updated layer version  2021-07-27T10:49:26.931Z

? Accept the suggested layer version configurations? Yes
⠇ Updating resources in the cloud. This may take a few minutes...
...
✔ All resources are updated in the cloud
これで実際にLambdaが作成されて、Lambdaのコンソールで見られるようになった。
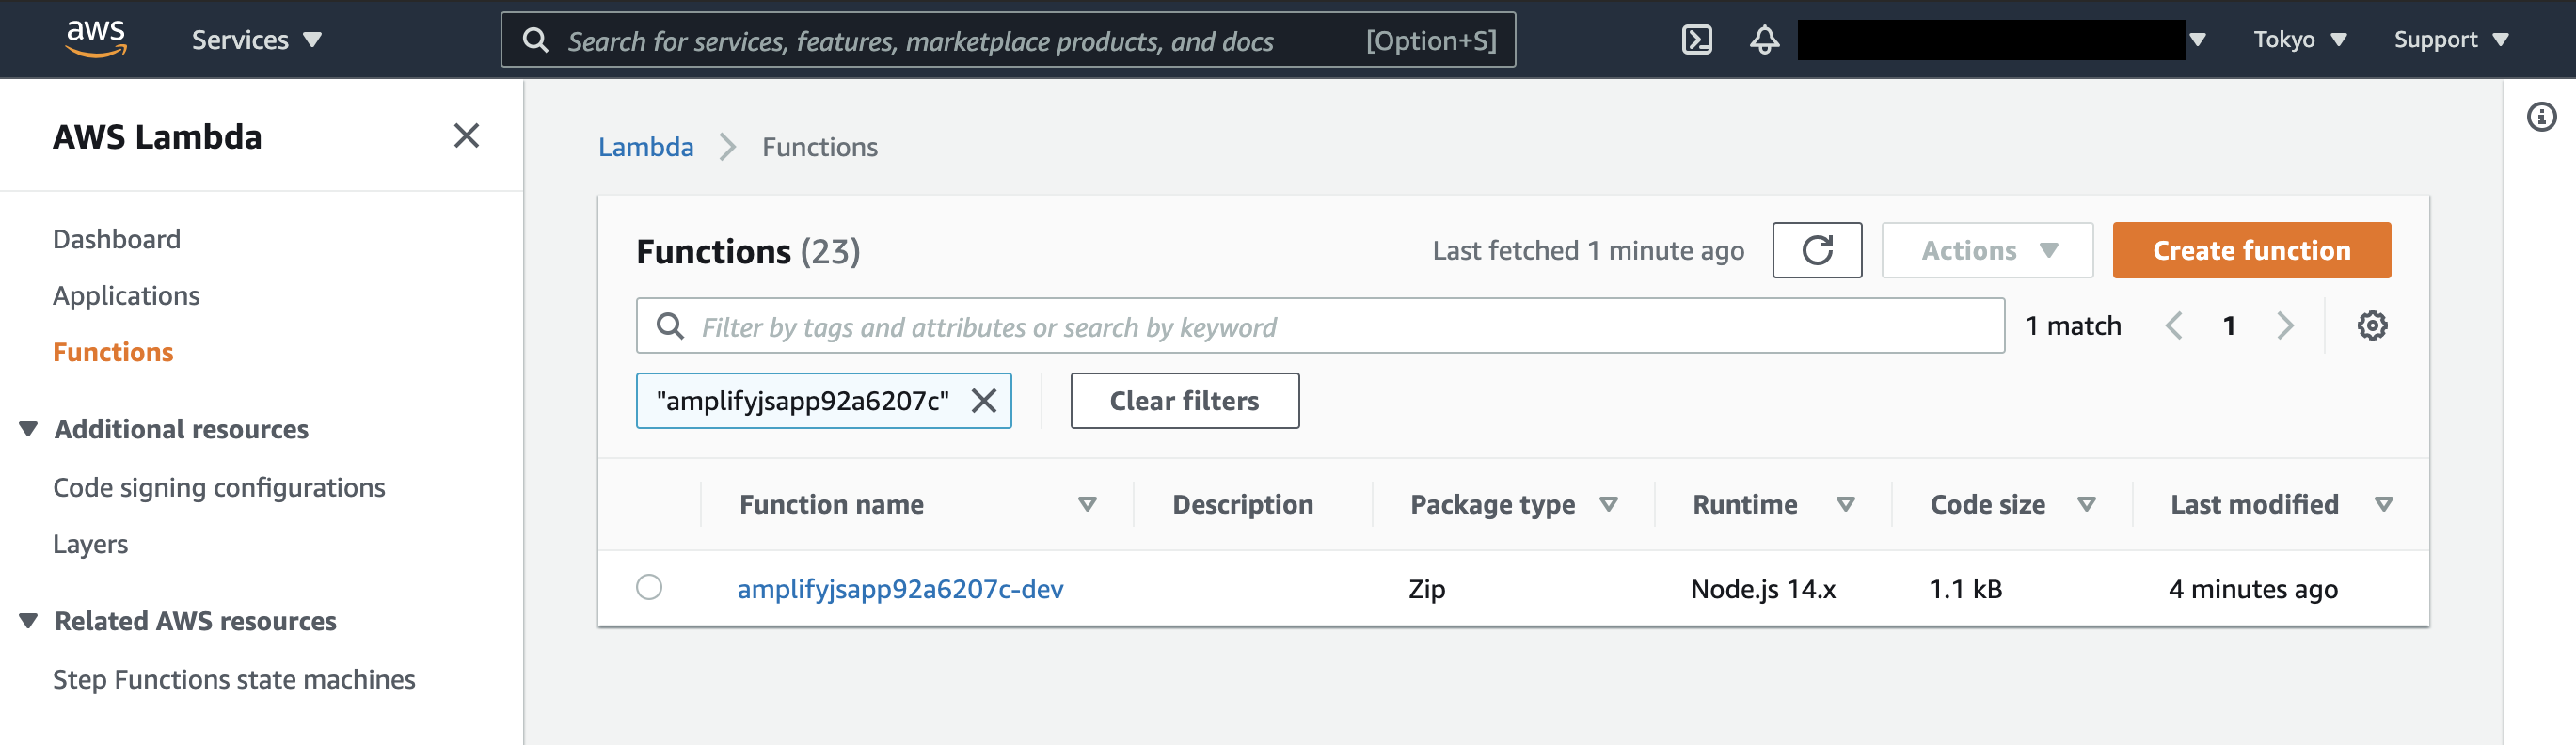
左のメニューのLayersから、作成したlayerも確認できる。
LambdaコンソールからLambda関数を開いてCode -> Testで実行できる(パラメータは使用していないので何でもいい)が、まだエラーになる。RDSがあるVPCにアクセスするための権限がないためだ。
Lambda関数にVPCアクセス権限を追加
Lambda関数の Configuration -> Permissions と開いて、RoleをクリックするとIAMのコンソールが開く。
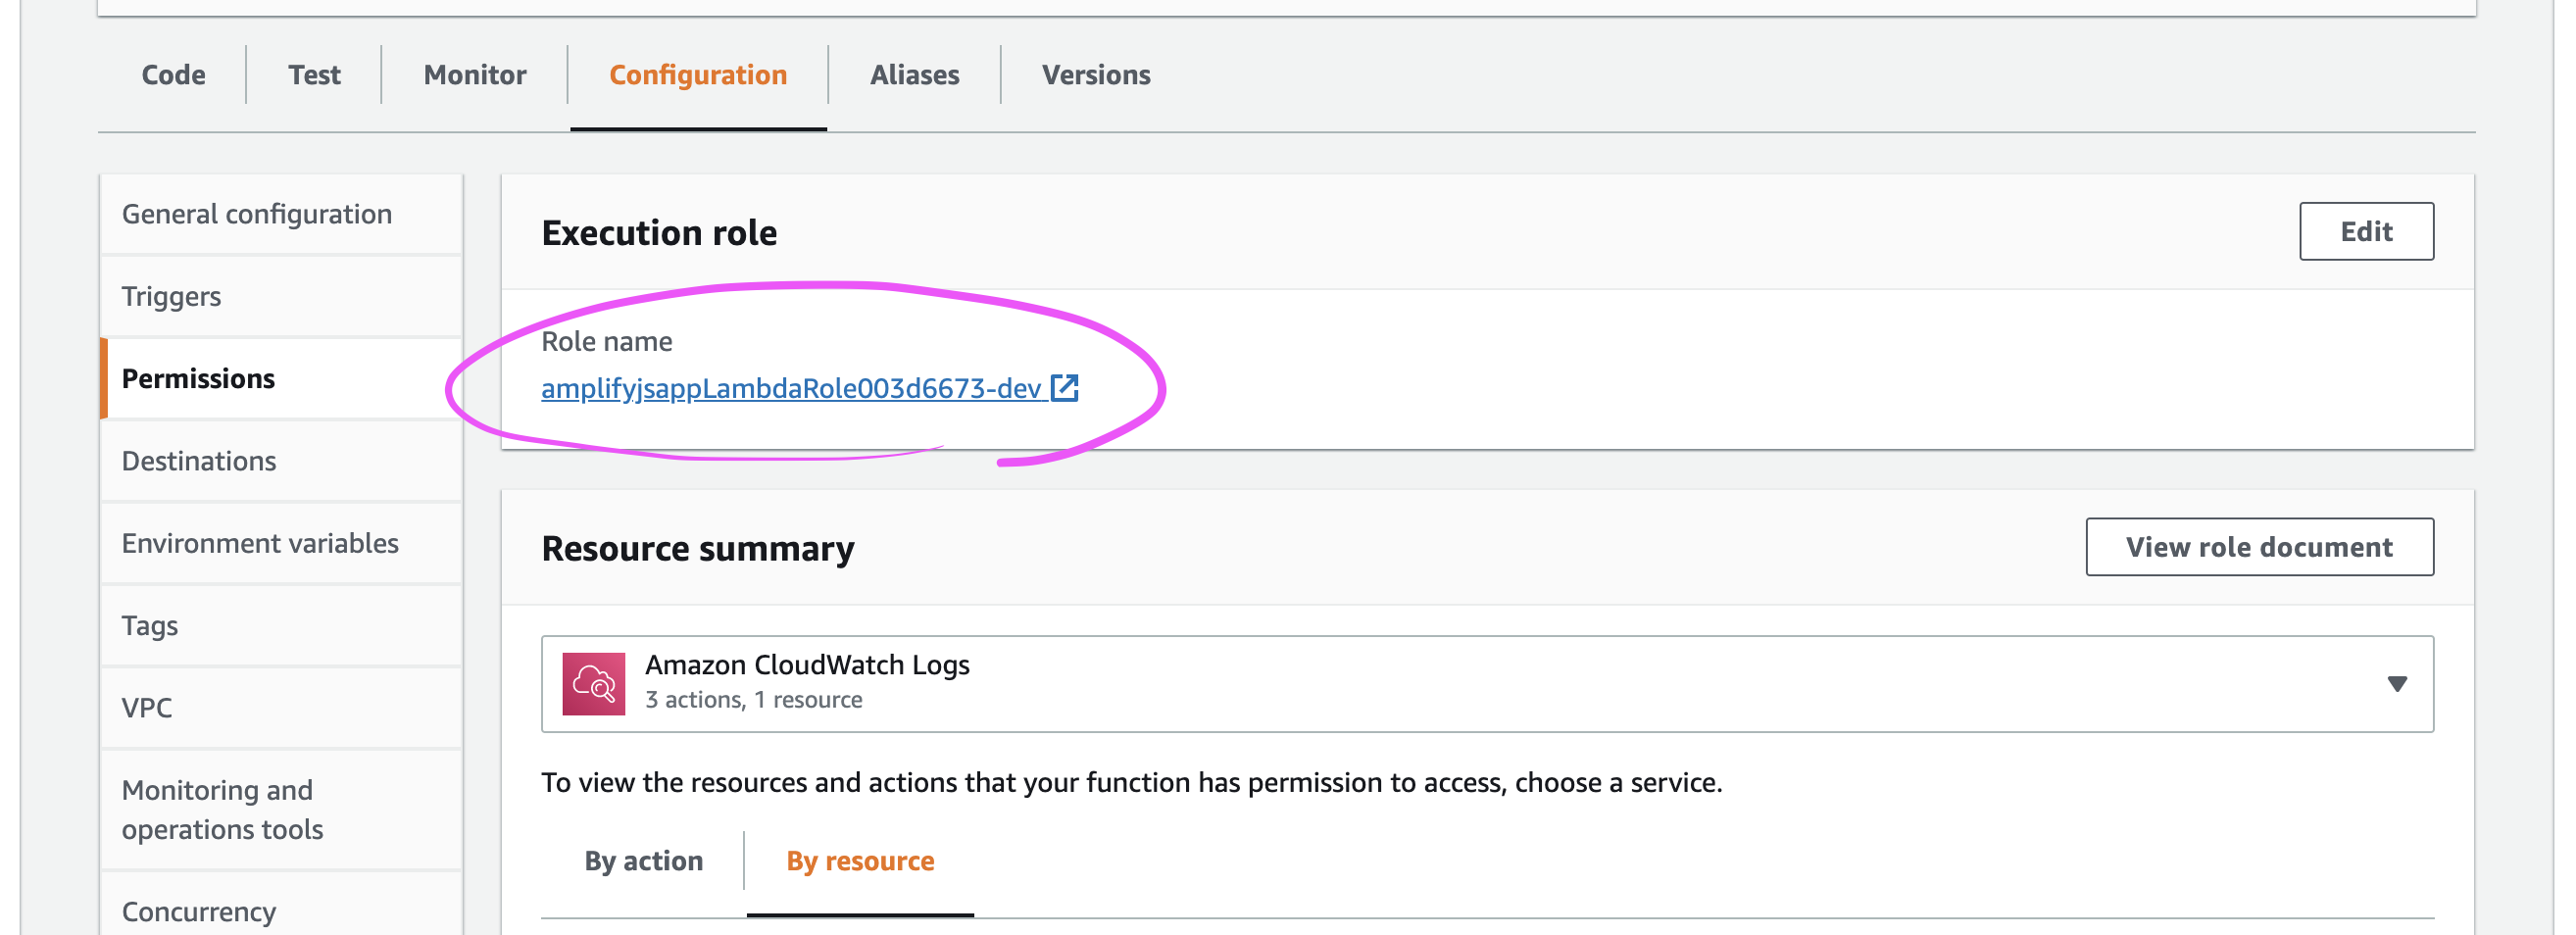
開いたIAMのRolesのPermissionsタブで「Attach policies」をクリックして AWSLambdaVPCAccessExecutionRole ポリシーを追加する。
Lambda関数のページに戻ってリロードすると、Resource summaryのドロップダウンで表示される権限が増えているはずだ。
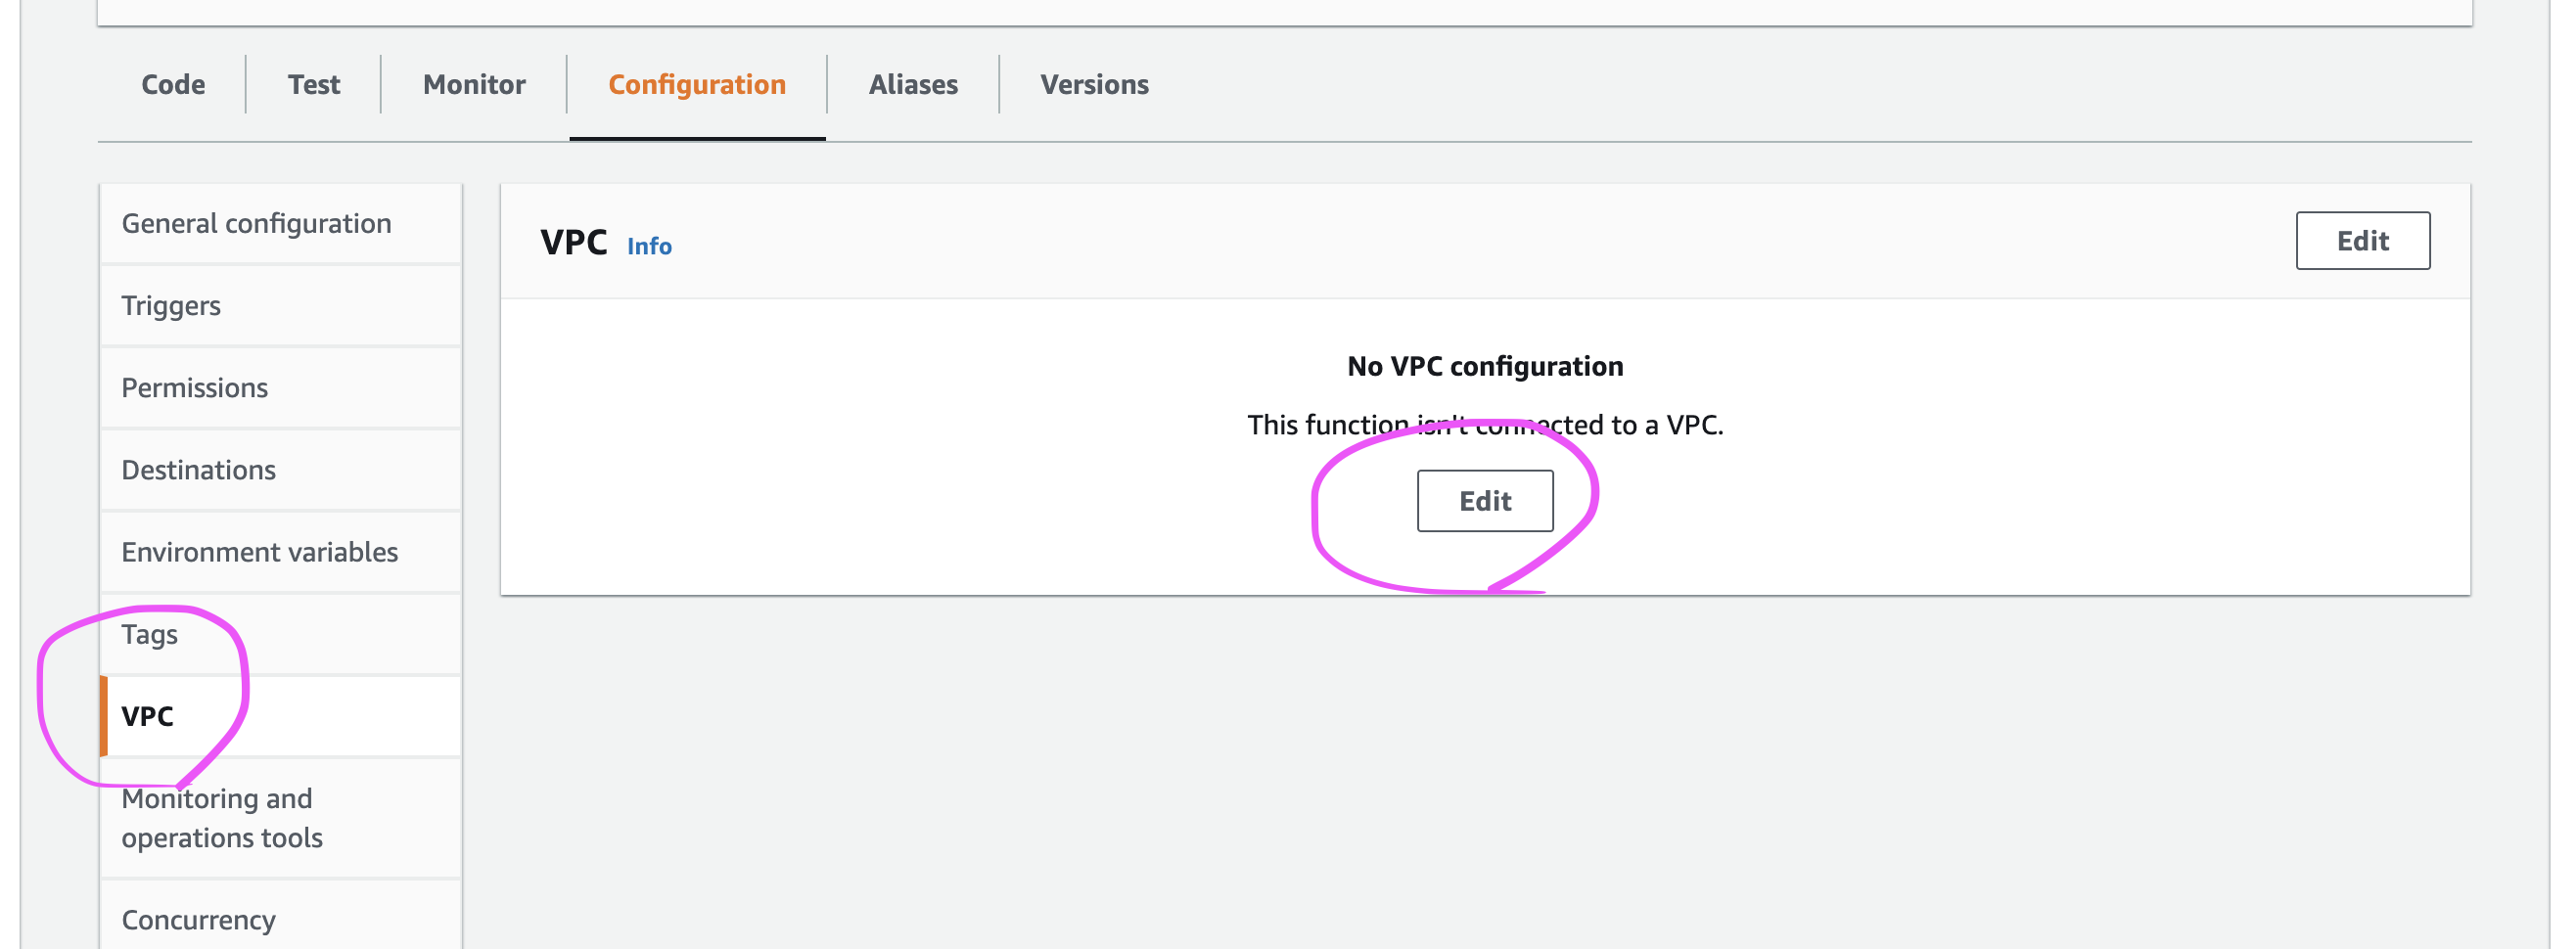
VPCアクセスを設定する
左のメニューのVPCから開いてEditで追加する。
そして、接続したいRDSがあるVPCを選択。
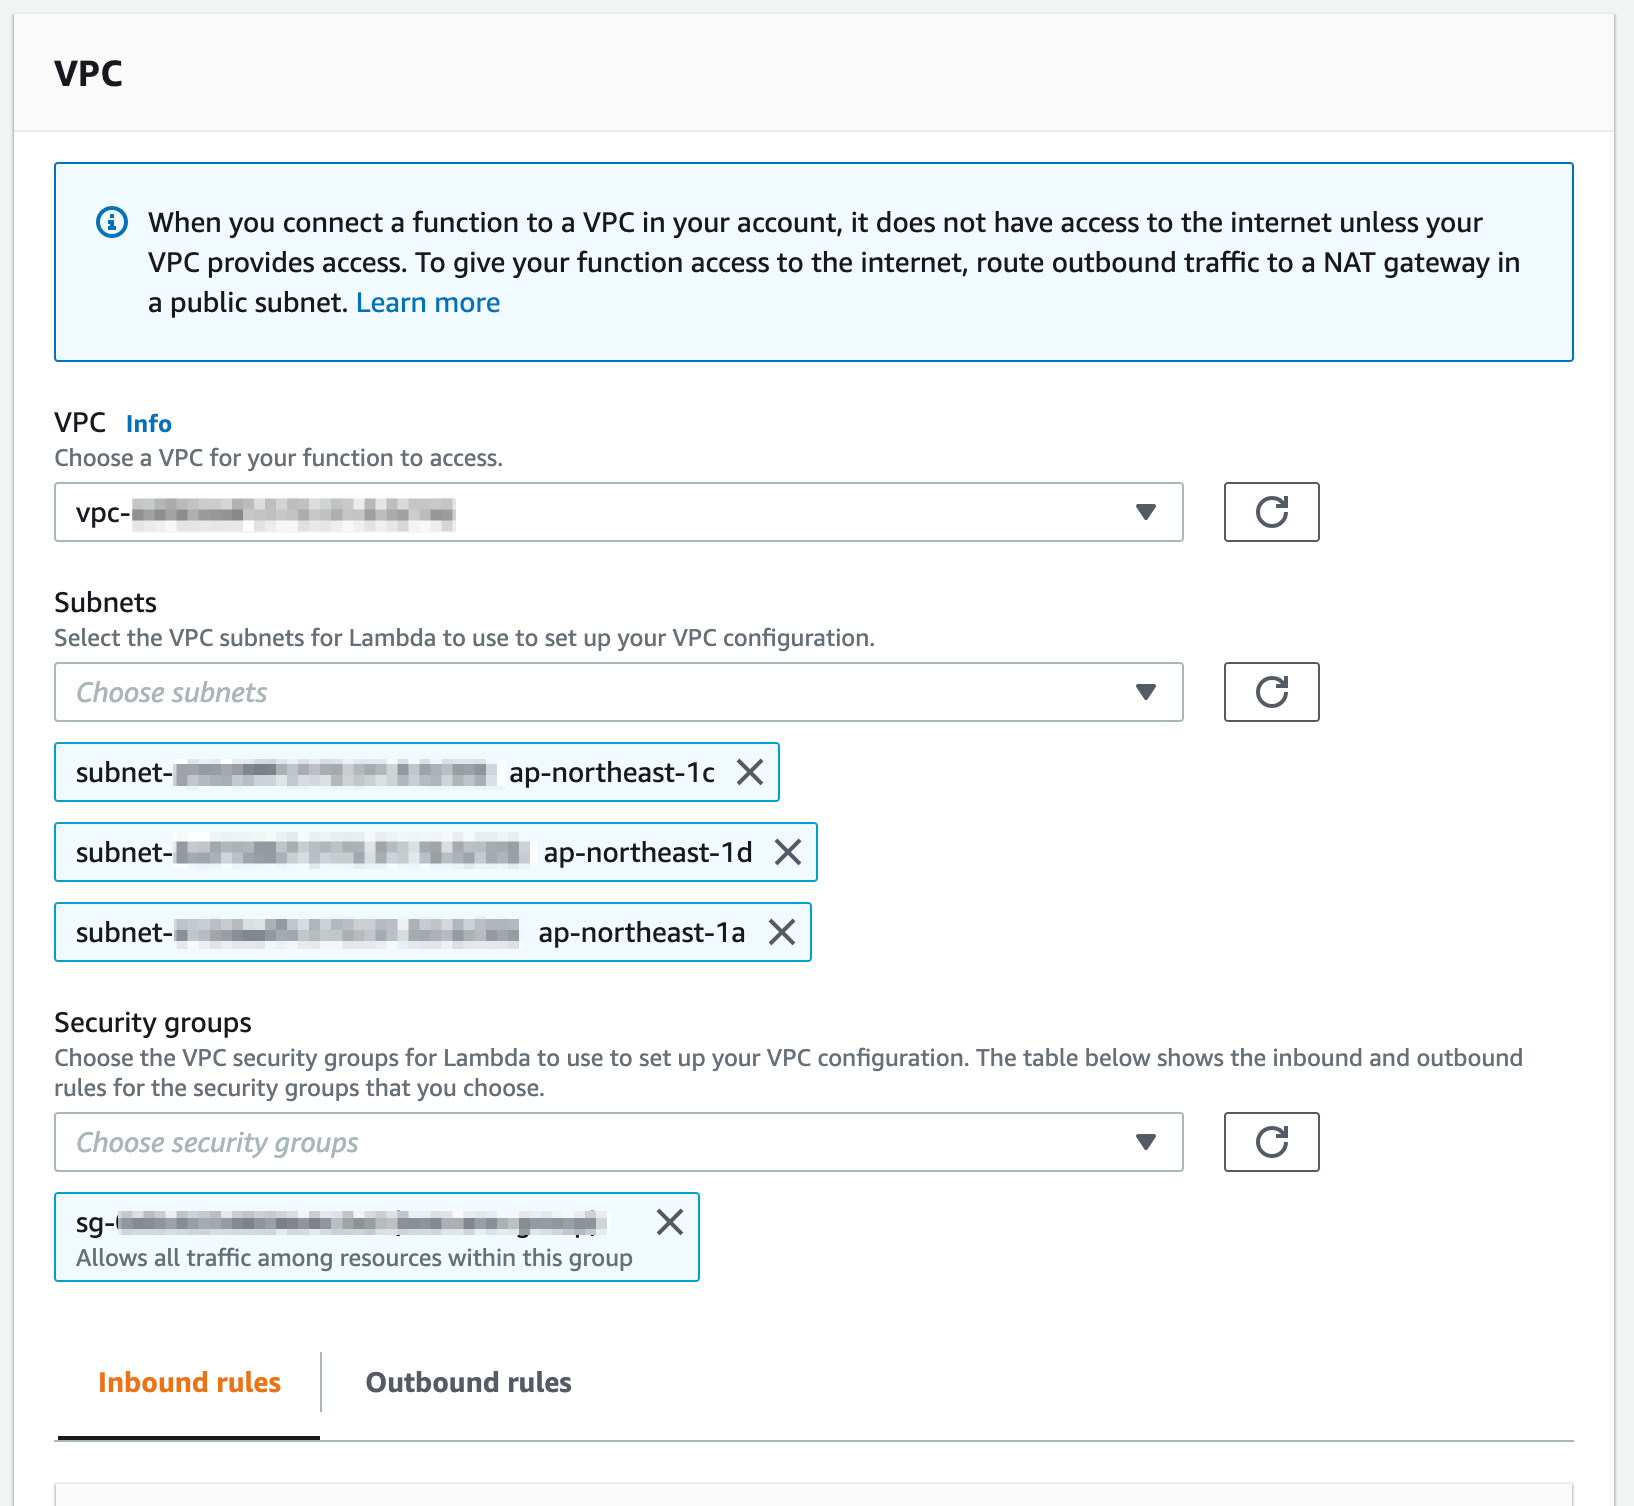
SubnetsはよくわからんのでRDSと同じものを設定。
Security groupsはRDSにアクセスできるものを設定。(RDSがデフォルトのままdefaultセキュリティグループで特に変更していなければ同じdefaultセキュリティグループでアクセスできるはず。)
Saveボタンを押して設定反映。反映完了まで1分くらいかかる。
ここで、Lambda関数のコンソールでTestボタンを押すと、DBからデータが読み込めるようになっている。
2021/07/31追記
上記のようにコンソールで作成したものが amplify pull してもローカルのAmplifyの管理ファイルに落ちてこなかったので、別途環境を作成するときに再度手動での実施が必要になってしまう。これを防ぐために、Amplifyが生成してコミットするCloudFormationのファイル amplify/backend/function/myFunction/myFunction-cloudformation-template.json にVPCアクセス権限とVPCアクセスの設定を追加しておくと安心だ。ただし、環境によって異なるVPCを使用する場合は環境ごとに変更する必要がある。おそらくパラメータにして環境ごとに自動で切り替わるようにはできると思うが、まだできていない。
"Resources": {
  "LambdaFunction": {
    "Type": "AWS::Lambda::Function",
    "Metadata": {
      "aws:asset:path": "./src",
      "aws:asset:property": "Code"
    },
    "Properties": {
      ...
      "VpcConfig": { // これ追加
        "SecurityGroupIds": [
          "sg-xxxxxxxxxxxxxxxxx"
        ],
        "SubnetIds": [
          "subnet-xxxxxxxx",
          "subnet-yyyyyyyy",
          "subnet-zzzzzzzz"
        ]
      },
      ...
    },
  },
  "LambdaExecutionRole": {
    "Type": "AWS::IAM::Role",
    "Properties": {
      ...
      "ManagedPolicyArns": [ // ここ追加
        "arn:aws:iam::aws:policy/service-role/AWSLambdaVPCAccessExecutionRole"
      ],
      ...
    }
  },
  ...
},
GraphQL APIを作成する
プロジェクトルートに戻って `` を実行してGraphQLのAPIを定義する。
MacBook-Pro.local:amplify-js-app% amplify add api
? Please select from one of the below mentioned services: GraphQL
? Provide API name: amplifyjsapp
? Choose the default authorization type for the API API key # ①
? Enter a description for the API key: amplifyjsapp
? After how many days from now the API key should expire (1-365): 7
? Do you want to configure advanced settings for the GraphQL API No, I am done.
? Do you have an annotated GraphQL schema? No
? Choose a schema template: Single object with fields (e.g., “Todo” with ID, name, description) # ②
...
① 認証はとりあえず一番手間のかからないAPI keyを使用する。値はAmplifyが設定ファイルに書き込んで勝手に使ってくれるので気にしなくて良い。
② とりあえずTodoテンプレートで作成したが、下記で書き換える。
amplify-js-app/amplify/backend/api/amplifyjsapp/schema.graphql にschemaの定義ファイルができるので、ここにLambdaを使用するリゾルバを定義する。
type Query {
  queryRds(query: String): String @function(name: "amplifyjsapp92a6207c-${env}")
}
そして、amplify pushで環境に反映する。
MacBook-Pro.local:amplify-js-app% amplify push
✔ Successfully pulled backend environment dev from the cloud.

Current Environment: dev

| Category | Resource name             | Operation | Provider plugin   |
| -------- | ------------------------- | --------- | ----------------- |
| Api      | amplifyjsapp              | Create    | awscloudformation |
| Function | amplifyjsapp92a6207c      | Update    | awscloudformation |
| Function | amplifyjsapplayer9da0e99d | No Change | awscloudformation |
? Are you sure you want to continue? Yes

GraphQL schema compiled successfully.

Edit your schema at /Users/kanji/development/aws/amplify-js-app/amplify/backend/api/amplifyjsapp/schema.graphql or place .graphql files in a directory at /Users/kanji/development/aws/amplify-js-app/amplify/backend/api/amplifyjsapp/schema
? Do you want to generate code for your newly created GraphQL API Yes
? Choose the code generation language target javascript
? Enter the file name pattern of graphql queries, mutations and subscriptions src/graphql/**/*.js
? Do you want to generate/update all possible GraphQL operations - queries, mutations and subscriptions Yes
? Enter maximum statement depth [increase from default if your schema is deeply nested] 2
⠹ Updating resources in the cloud. This may take a few minutes...
...
✔ Generated GraphQL operations successfully and saved at src/graphql
✔ All resources are updated in the cloud

GraphQL endpoint: https://xxxxxxxxxxxxxxxxxxxxx.appsync-api.ap-northeast-1.amazonaws.com/graphql
GraphQL API KEY: xxxxxxxxxxxxxxxxxxxxxxxxxxxxxx
API KEYはAmplifyが自動的にアプリに適用してくれるので気にしなくて良い。
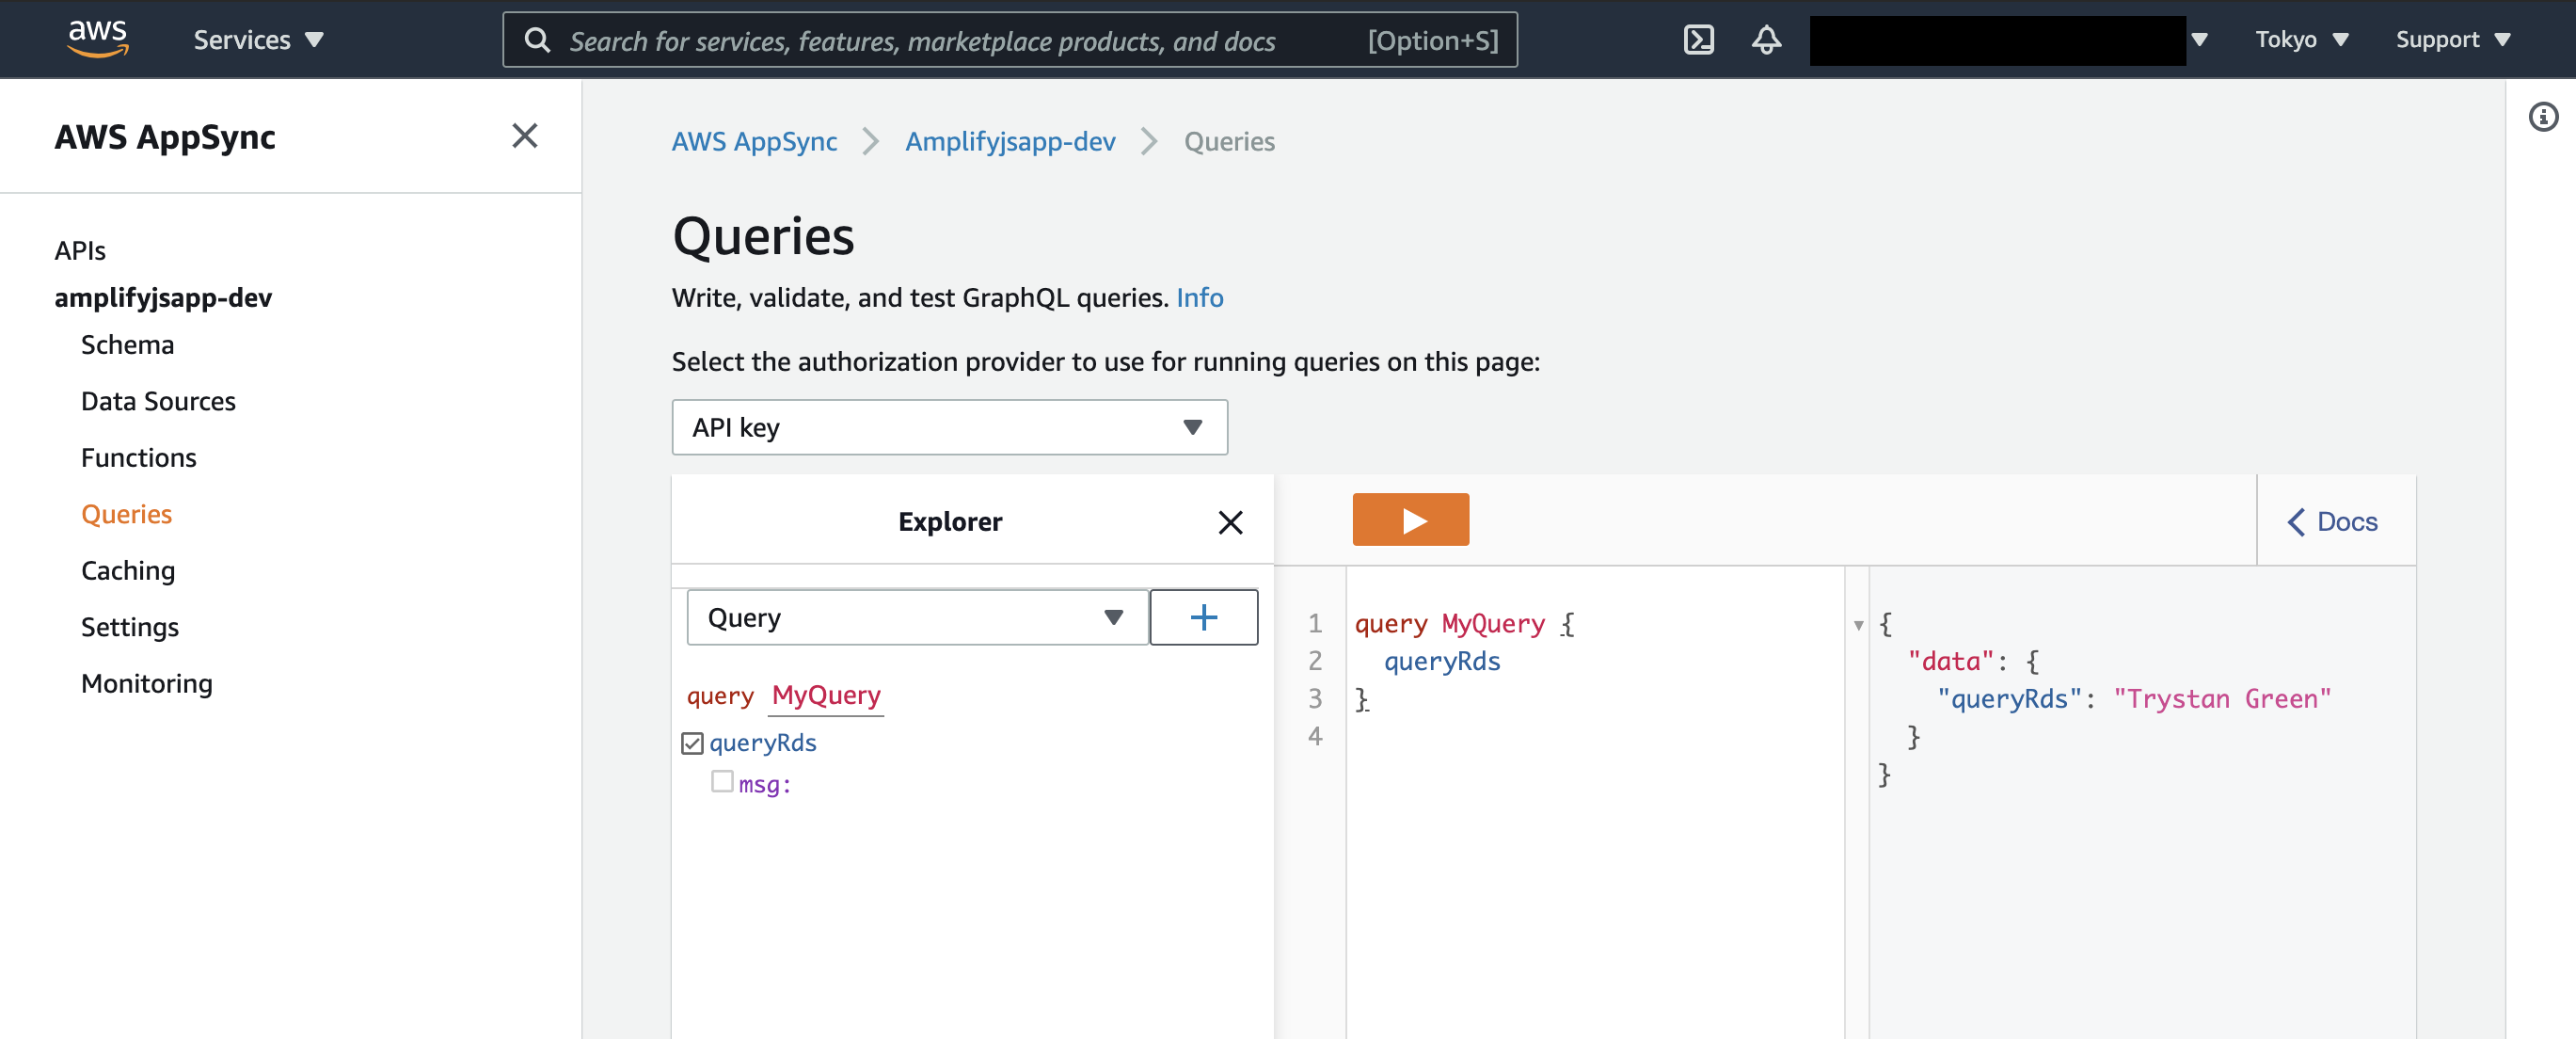
今度はAWS AppSyncのコンソールでGraphQLのクエリを実行できるので試してみる。RDSからデータが取れているはずだ。
LambdaでGraphQLからのパラメータを使用する
上記のqueryRdsでqueryを渡すようにしているので、Lambdaのコードでそれを使用するように変更する。
...
exports.handler = async (event) => {
  ...
  const [rows, fields] = await connection.execute(event.arguments.query)
  ...
}
フロントエンドアプリからGraphQL APIを呼び出す
まず、npm i aws-amplifyで必要になるパッケージをインストール。
次に、src/app.jsにフロントエンドアプリのコードを記述し、そこからGraphQL APIにアクセスする。
import Amplify, { API, graphqlOperation } from "aws-amplify";

import awsconfig from "./aws-exports";
import { queryRds } from "./graphql/queries";

Amplify.configure(awsconfig);

const button = document.getElementById("my_button");

button.addEventListener("click", (evt) => {
    API.graphql(graphqlOperation(queryRds, { query: 'select * from internal_users' }))
        .then((evt) => {
            console.log(evt.data.queryRds)
        });
});
これでようやく、フロントエンドアプリからGraphQLでRDSのデータへアクセスできた。
RDS proxyを導入する
このままだと、LambdaがRDSにリクエスト単位でコネクションを作ってしまうのですぐに上限に達してしまいエラーになる。
そこでRDS proxyを使用する。これがコネクションプールの役割を果たしてくれる。
シークレットを作成
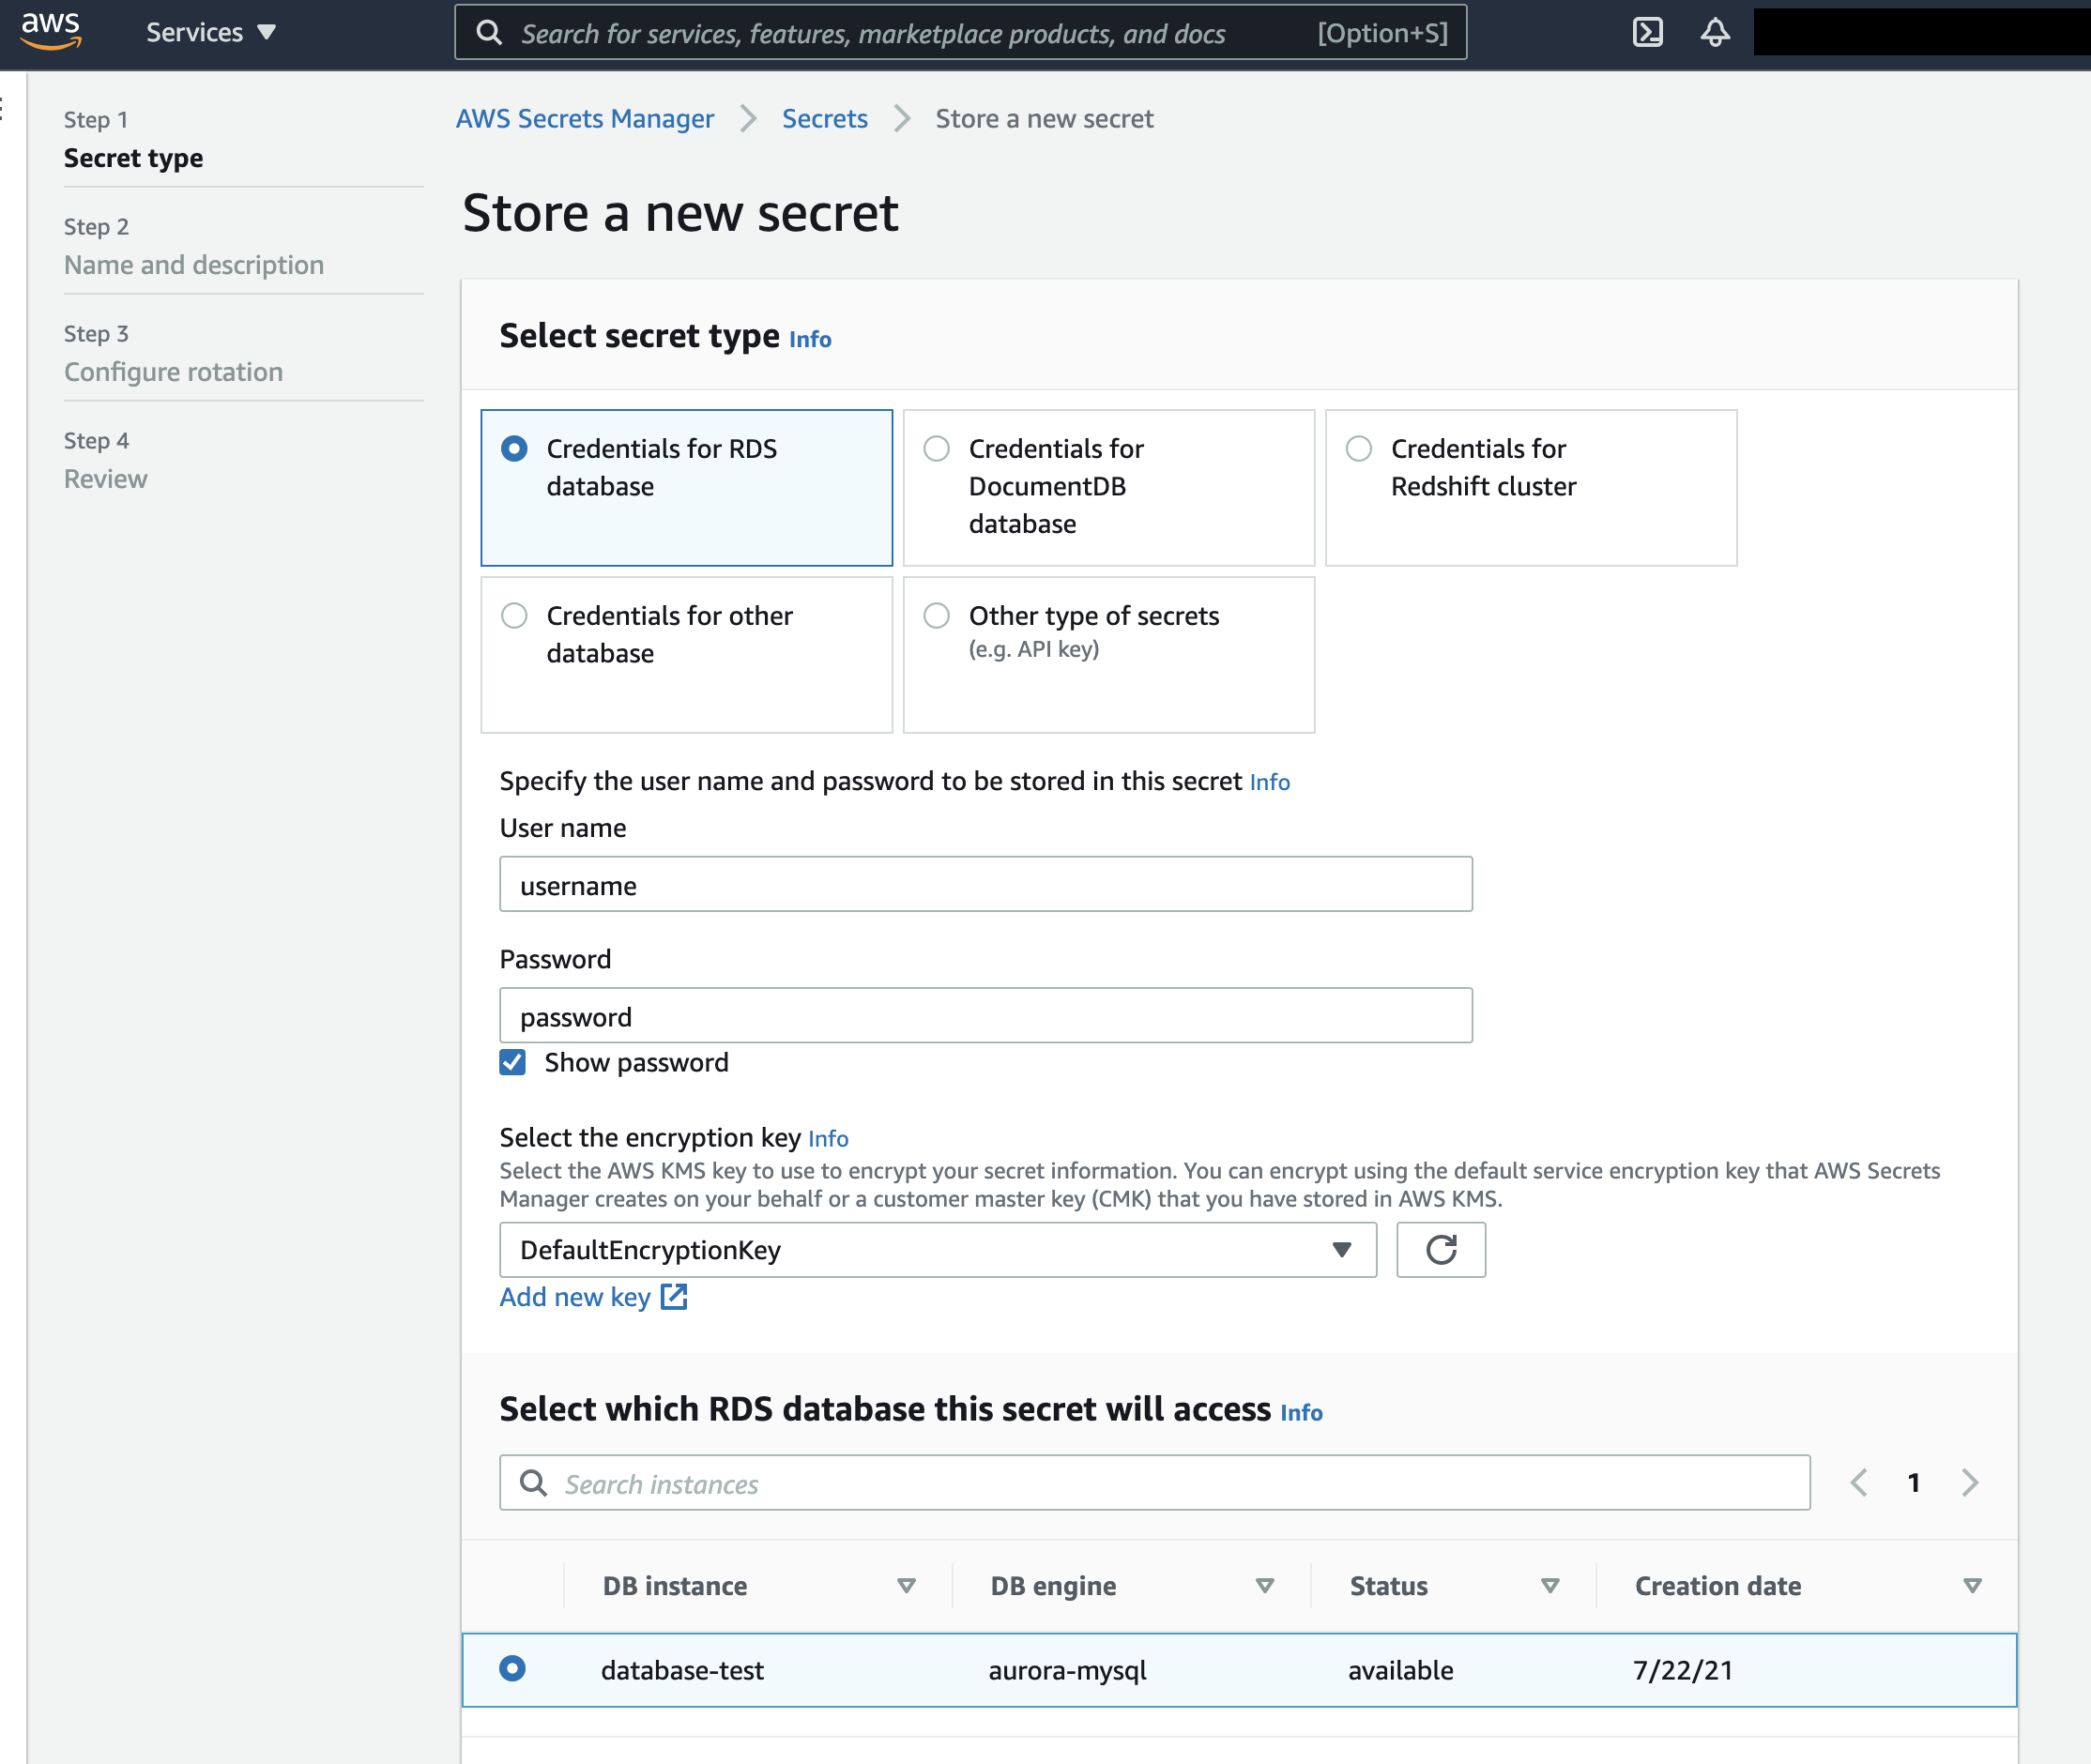
まず、RDS proxyがRDSにアクセスするためのDBクレデンシャルをAWS Secrets Managerで作成する。
Auroraの場合は「Credentials for RDS database」を選択してuser nameとpasswordを入れ、DBを選択してNextで次へ行ってシークレット名を入力し、他はデフォルトのままで進む。
作成できたシークレットのARNをメモしておく。
シークレットを使用するポリシーを作成
次にIAMコンソールのCreate PolicyでJSONタブを開き、下記JSONを貼り付ける。参考ドキュメント
{
    "Version": "2012-10-17",
    "Statement": [
        {
            "Sid": "VisualEditor0",
            "Effect": "Allow",
            "Action": [
                "secretsmanager:GetSecretValue",
                "secretsmanager:GetResourcePolicy",
                "secretsmanager:DescribeSecret",
                "secretsmanager:ListSecretVersionIds"
            ],
            "Resource": [
                "arn:aws:secretsmanager:{region}:{account_id}:{secret_name}"
            ]
        },
        {
            "Sid": "VisualEditor1",
            "Effect": "Allow",
            "Action": "kms:Decrypt",
            "Resource": "arn:aws:kms:{region}:{account_id}:key/{key_id}",
            "Condition": {
                "StringEquals": {
                    "kms:ViaService": "secretsmanager.{region}.amazonaws.com"
                }
            }
        }
    ]
}
上の"Resource"は先にメモったシークレットのARNを入れる。
{account_id}と{region}は適宜置き換え。{key_id}はKMSのコンソールで確認できる "aws/secretsmanager" のKey IDに置き換える。
シークレットを使用するロールを作成
更にIAMコンソール で作成したポリシーを適用したRoleを作成する。
- AWS service -> RDS -> "RDS - Add Role to Database" -> Next:Permissions
- Select permission policyで、上で作成したポリシーを選択
- 名前をつけて保存
- ロールの Trust relationship タブから Edit trust relationship をクリックしてTrust policyを下記に変更する。
{
  "Version": "2012-10-17",
  "Statement": [
    {
      "Sid": "",
      "Effect": "Allow",
      "Principal": {
        "Service": "rds.amazonaws.com"
      },
      "Action": "sts:AssumeRole"
    }
  ]
}
RDS proxyを作成する
Lambda関数のコンソールに戻って、Configurationタブの左のサイドメニューからDatabase proxiesの画面を開いて、Add database proxyをクリック。
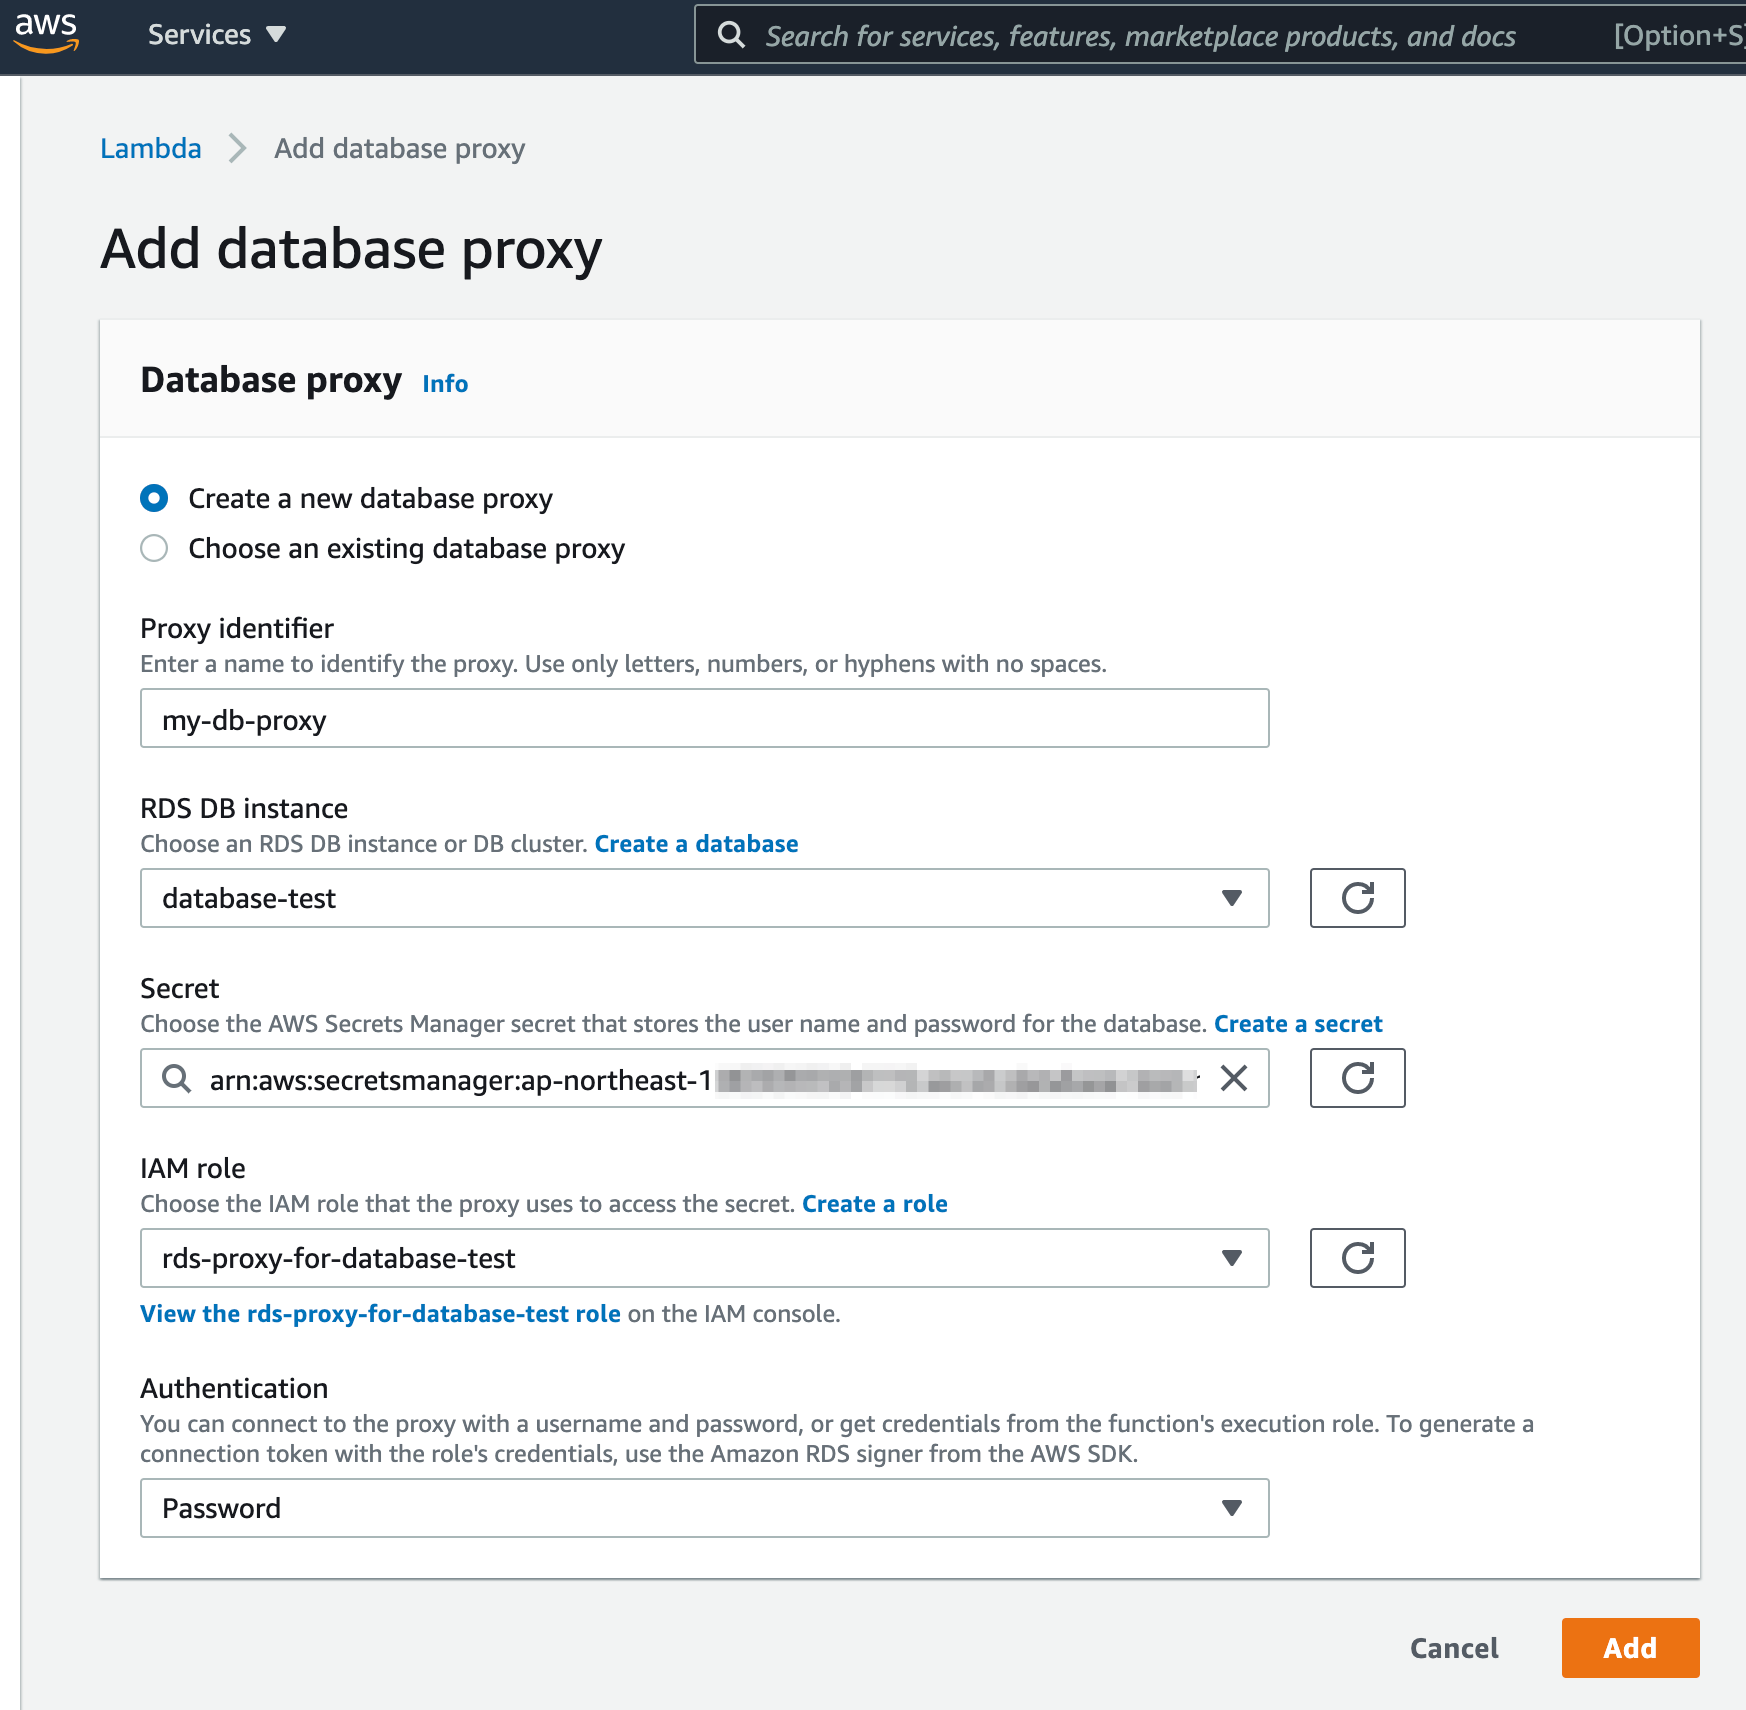
SecretやIAM roleに上で作成したものを指定して、Add。
2021/07/31追記
Lambdaコンソール側で設定したものはローカルのコミットしていないものをコミットしてから amplify pull でダウンロードすると
amplify/backend/function/myFunction/myFunction-cloudformation-template.json に下記の様にPolicyが追加されると思う。コミットしておけば、再構築の際に手動でやる必要がない。
"Resources": {
  ...
  "RdsProxyAccessPolicy": { // これ追加
    "DependsOn": [
      "LambdaExecutionRole"
    ],
    "Type": "AWS::IAM::Policy",
    "Properties": {
      "PolicyName": "rds-proxy-access-policy",
      "Roles": [
        {
          "Ref": "LambdaExecutionRole"
        }
      ],
      "PolicyDocument": {
        "Version": "2012-10-17",
        "Statement": [
          {
            "Effect": "Allow",
            "Action": "rds-db:connect",
            "Resource": "arn:aws:rds-db:ap-northeast-1:xxxxxxxxxxx:dbuser:prx-yyyyyyyyyyyyyyy/*"
          }
        ]
      }
    }
  },
},
RDS proxyを使用する
Lambda関数のRDS proxyの画面に作成したRDS proxyの詳細画面へのリンクが表示されるので開く。
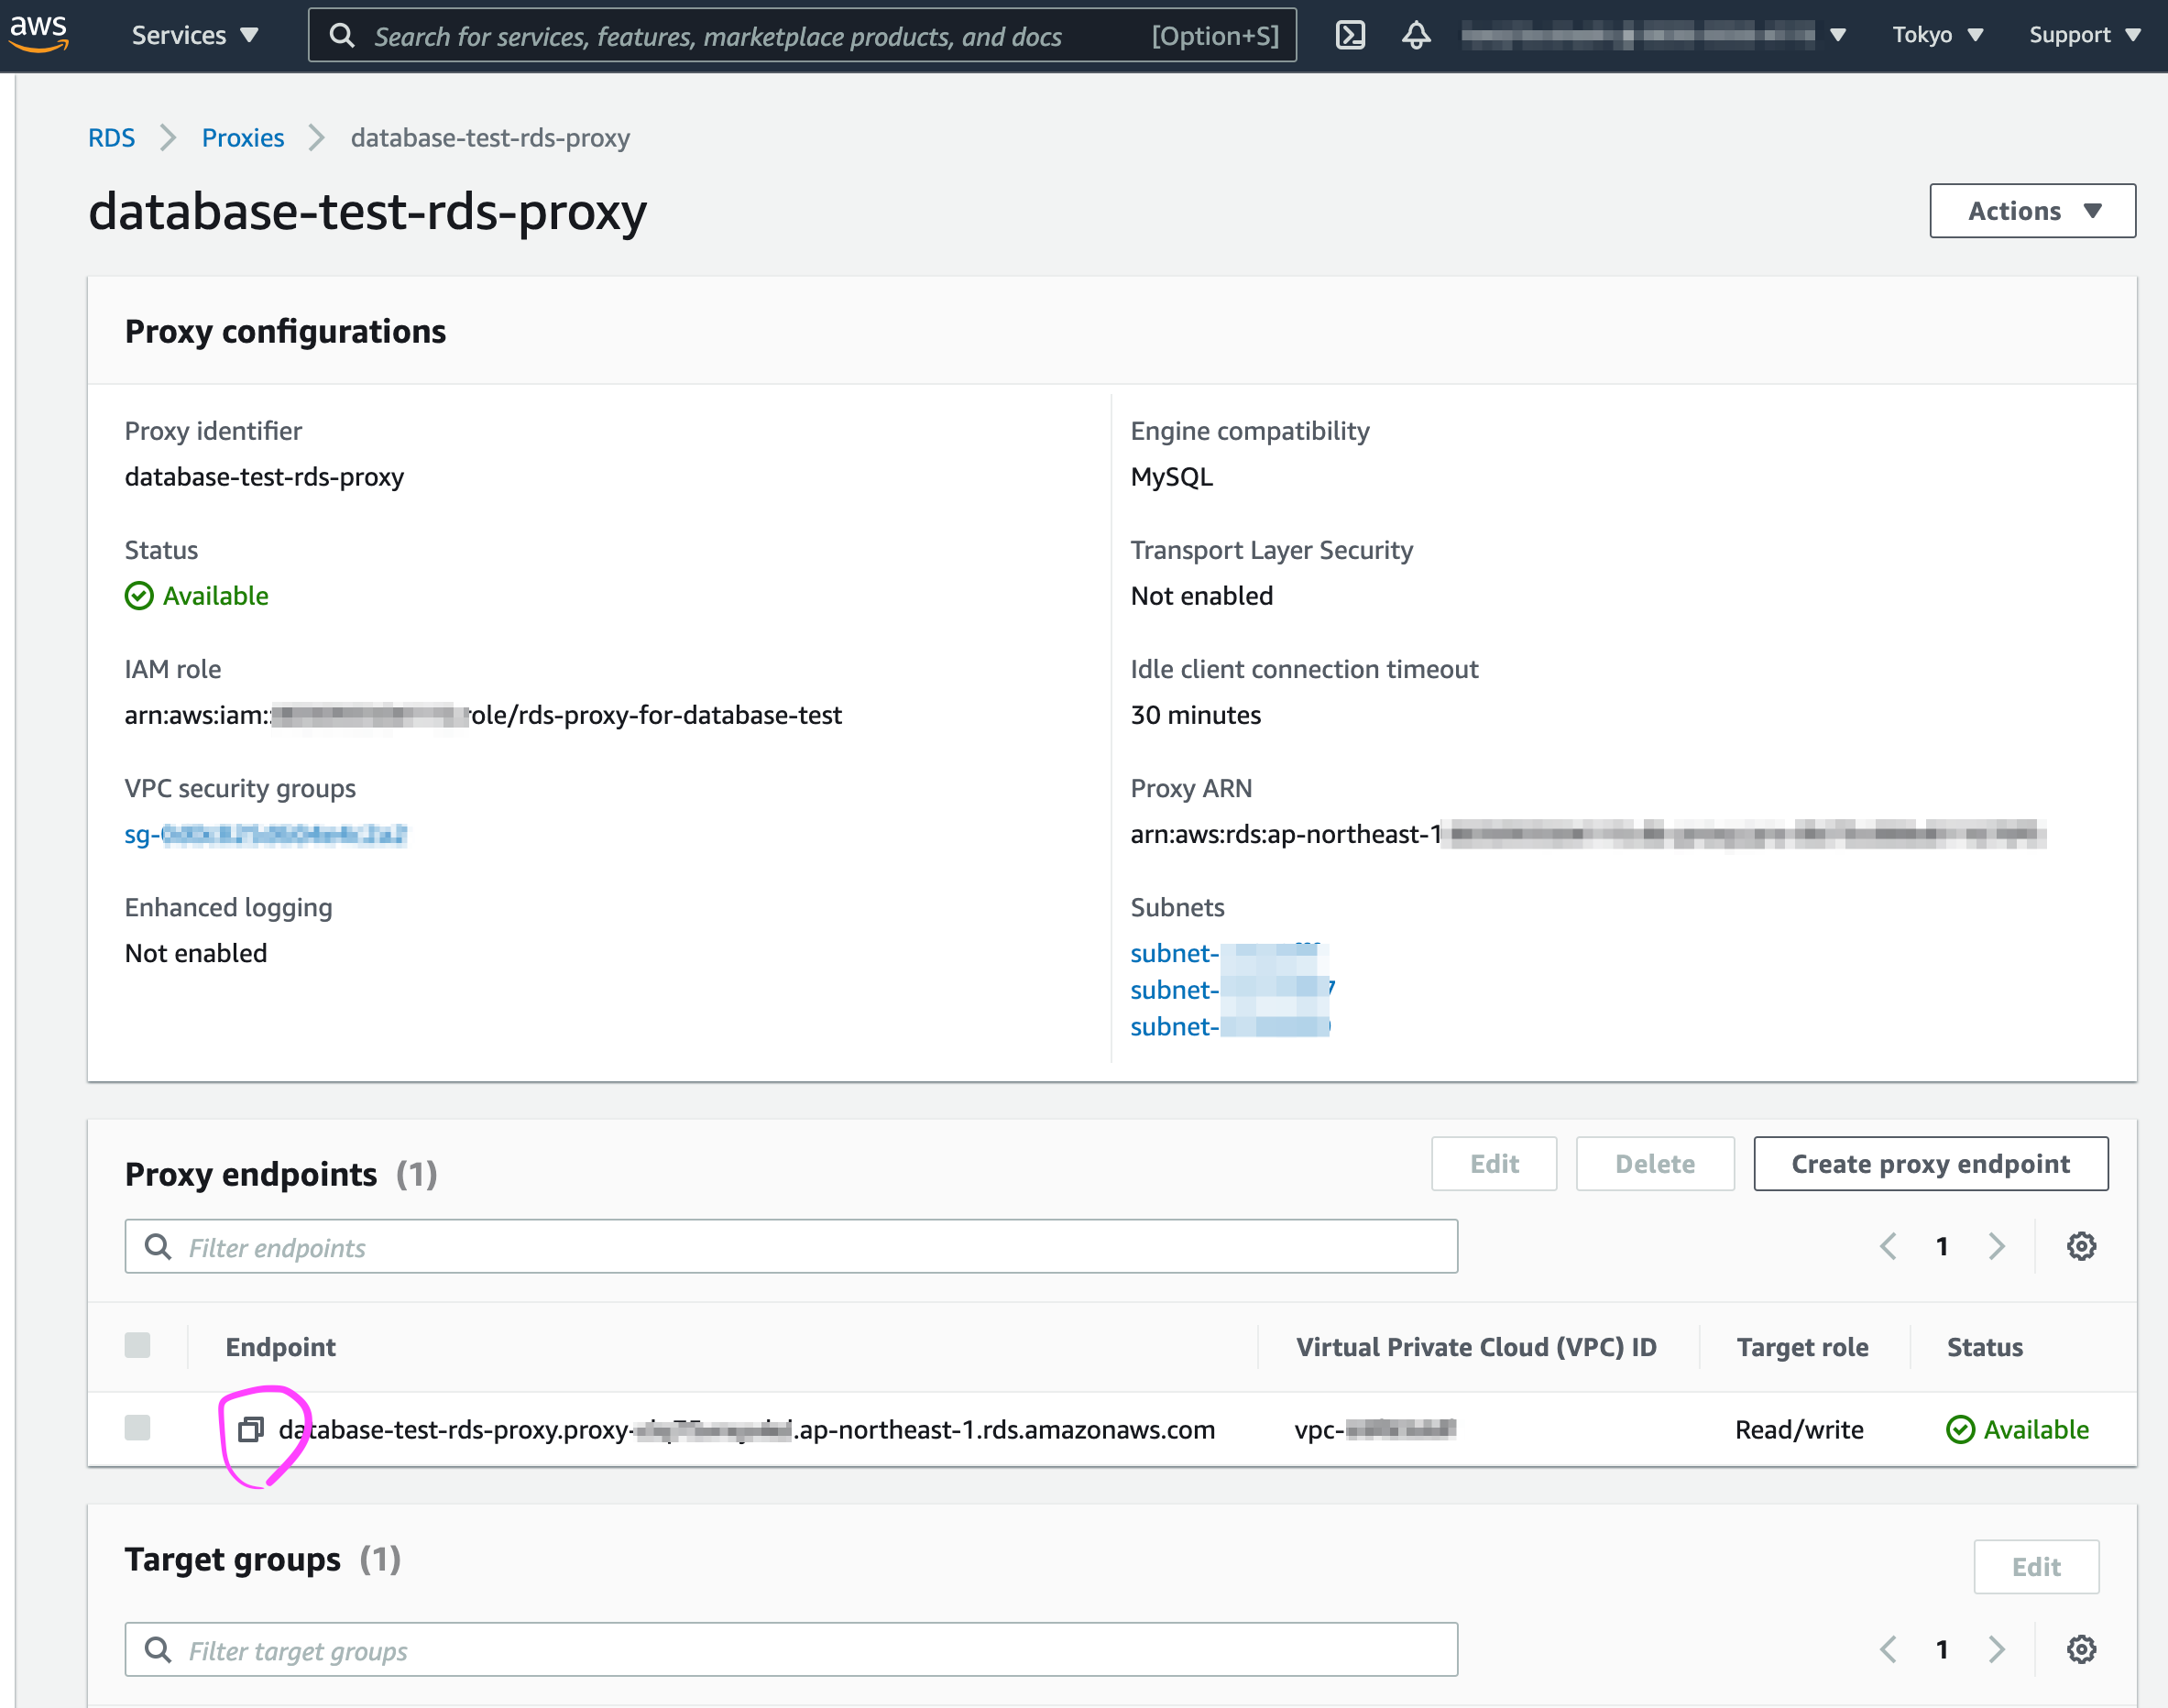
Endpointのホスト名をコピーする。
Lambda関数のページに戻り環境変数のdb_hostをコピーしたRDS proxyのホスト名に変更する。
これでLambdaからのRDSアクセスがRDS proxy経由になり下記が完成した。
JS app -> GraphQL -> Lambda (JS) -> RDS proxy -> RDS
以上、お疲れさまでした。