smtp4dev とは
smtp4devは、開発用にSMTPサーバーをエミュレートしてくれるダミーサーバーです。
参考記事
TLS通信でメールを送信する
smtp4devをインストール後の初期設定ではTLS通信が無効となっていて、TLS通信で動作確認を行う場合は、いくつか手順を踏む必要がありました。
今回は、その手順について共有します。
動作環境
- smtp4dev version 3.1.3-ci20211206101
- Windows11
- メール送信のクライアントには MailKit を利用した .NET6.0 コンソールアプリケーションを利用しました。(下記サンプルコードを参照)
サンプルコード
参考までに、サンプルコードの作成手順を載せておきます。
※ 手順は、Visual Studio Code と、.NET6.0のSDKがインストールされているこを前提としています。
※ "C:¥myproject"配下にプロジェクトフォルダ"SmtpTest"を作成するのもとします。
- SmtpTestフォルダを作成して移動
PS C:\myproject> mkdir SmtpTest

    Directory: C:\myproject

Mode                 LastWriteTime         Length Name
----                 -------------         ------ ----
d----          2022/02/15    19:43                SmtpTest

PS C:\myproject> cd .\SmtpTest\
- dotnetコマンドでコンソールアプリを作成
PS C:\myproject\SmtpTest> dotnet new console
テンプレート "コンソール アプリ" が正常に作成されました。

作成後の操作を処理しています...
C:\myproject\SmtpTest\SmtpTest.csproj で ' dotnet restore ' を実行しています...
  復元対象のプロジェクトを決定しています...
  C:\myproject\SmtpTest\SmtpTest.csproj を復元しました (57 ms)。
正常に復元されました。
- NuGetパッケージMailKitをインストール
PS C:\myproject\SmtpTest> dotnet add package MailKit
  復元対象のプロジェクトを決定しています...
  Writing C:\Users\hogehoge\AppData\Local\Temp\tmp8588.tmp
info : パッケージ 'MailKit' の PackageReference をプロジェクト 'C:\myproject\SmtpTest\SmtpTest.csproj' に追加しています。
info :   GET https://api.nuget.org/v3/registration5-gz-semver2/mailkit/index.json
info :   OK https://api.nuget.org/v3/registration5-gz-semver2/mailkit/index.json 671 ミリ秒
info :   GET https://api.nuget.org/v3/registration5-gz-semver2/mailkit/page/0.1.0/1.2.8.json
info :   OK https://api.nuget.org/v3/registration5-gz-semver2/mailkit/page/0.1.0/1.2.8.json 975 ミリ秒
info :   GET https://api.nuget.org/v3/registration5-gz-semver2/mailkit/page/1.2.9/2.1.2.json
info :   OK https://api.nuget.org/v3/registration5-gz-semver2/mailkit/page/1.2.9/2.1.2.json 628 ミリ秒
info :   GET https://api.nuget.org/v3/registration5-gz-semver2/mailkit/page/2.1.3/3.1.1.json
info :   OK https://api.nuget.org/v3/registration5-gz-semver2/mailkit/page/2.1.3/3.1.1.json 645 ミリ秒
info : C:\myproject\SmtpTest\SmtpTest.csproj のパッケージを復元しています...
info : パッケージ 'MailKit' は、プロジェクト 'C:\myproject\SmtpTest\SmtpTest.csproj' のすべての指定されたフレームワークとの互換性があります。
info : ファイル 'C:\myproject\SmtpTest\SmtpTest.csproj' に追加されたパッケージ 'MailKit' バージョン '3.1.1' の PackageReference。
info : 復元をコミットしています...
info : アセット ファイルをディスクに書き込んでいます。パス: C:\myproject\SmtpTest\obj\project.assets.json
log  : C:\myproject\SmtpTest\SmtpTest.csproj を復元しました (67 ms)。
- Visual Studio Code でフォルダを開く
PS C:\myproject\SmtpTest> code .

- Program.cs を下記のコードに書き換える
using MimeKit;
using MailKit.Net.Smtp;

var message = new MimeMessage()
{
    Subject = "テストメールのタイトル",
    Body = new TextPart(MimeKit.Text.TextFormat.Plain)
    {
        Text = "テストメールの本文"
    }
};
message.From.Add(new MailboxAddress("送信太郎","taro@example.com"));
message.To.Add(new MailboxAddress("受信次郎","jiro@example.com"));

using var smtpClient = new SmtpClient();
await smtpClient.ConnectAsync("localhost", 25);
await smtpClient.AuthenticateAsync("testUser","dummy-pass");
await smtpClient.SendAsync(message);
await smtpClient.DisconnectAsync(true);
- dotnet run で実行
PS C:\myproject\SmtpTest> dotnet run
smtp4devの設定
smtp4devを起動すると、「%AppData%\smtp4dev」フォルダにユーザー毎の設定ファイルapplication.jsonが作成されます。

一旦smtp4devを終了して、このファイルを開きます。
以下の2項目を下記の様に設定します。
- HostName: "localhost"
- TlsMode: "StartTls"
{
  "ServerOptions": {
    "Port": 25,
    "AllowRemoteConnections": true,
    "Database": "database.db",
    "NumberOfMessagesToKeep": 100,
    "NumberOfSessionsToKeep": 100,
    "BasePath": "/",
    "TlsMode": "StartTls",
    "TlsCertificate": "",
    "TlsCertificatePrivateKey": "",
    "HostName": "localhost",
    "ImapPort": 143,
    "RecreateDb": false
  },
  "RelayOptions": {
    "IsEnabled": false,
    "SmtpServer": "",
    "SmtpPort": 25,
    "TlsMode": 1,
    "AutomaticEmails": [
      ""
    ],
    "SenderAddress": "",
    "Login": "",
    "Password": ""
  }
}
ファイルを保存後、smtp4devを再び起動します。
この状態でメールの送信を実行してみると、下記のようなエラーが表示され送信に失敗します。
Unhandled exception. MailKit.Security.SslHandshakeException: An error occurred while attempting to establish an SSL or TLS connection.

The server's SSL certificate could not be validated for the following reasons:
? The server certificate has the following errors:
  ? 証明書チェーンは処理されましたが、信頼プロバイダーが信頼していないルート証明書で強制終了しました。

 ---> System.Security.Authentication.AuthenticationException: The remote certificate was rejected by the provided RemoteCertificateValidationCallback.
   at System.Net.Security.SslStream.SendAuthResetSignal(ProtocolToken message, ExceptionDispatchInfo exception)
   at System.Net.Security.SslStream.CompleteHandshake(SslAuthenticationOptions sslAuthenticationOptions)
   at System.Net.Security.SslStream.ForceAuthenticationAsync[TIOAdapter](TIOAdapter adapter, Boolean receiveFirst, Byte[] reAuthenticationData, Boolean isApm)
   at MailKit.Net.Smtp.SmtpClient.ConnectAsync(String host, Int32 port, SecureSocketOptions options, Boolean doAsync, CancellationToken cancellationToken)
   --- End of inner exception stack trace ---
   at MailKit.Net.Smtp.SmtpClient.ConnectAsync(String host, Int32 port, SecureSocketOptions options, Boolean doAsync, CancellationToken cancellationToken)
   at Program.<Main>$(String[] args) in C:\myproject\MailTest\Program.cs:line 17
   at Program.<Main>(String[] args)
PS C:\myproject\MailTest>
smtp4devは、TLSで通信を行う際に自己証明書を自動生成し、それを使用しているのですが、クライアント側(ここではMailKitのSmtpClient)が自己証明書を受け付けないために、このエラーが発生しているものと考えれます。
この問題は、開発用PCに自己証明書をインストールすることで解決します。
自己証明書のインストール
先ほどのappsettings.jsonが作成されたフォルダ「%AppData%\smtp4dev」をもう一度見てみると、公開証明書のファイル「selfsigned-certificate.cer」が追加されているのが分かります。

このファイルをダブルクリックしてインストールを行います。
-
「証明書のインストール...」をクリック

-
「現在のユーザー」を選択して「次へ」

-
「証明書をすべて次のストアに配置する」を選択し、「参照...」から「信頼されたルート証明機関」を選択。「次へ」

-
「完了」をクリック
動作確認
これで、もう一度送信してみます。
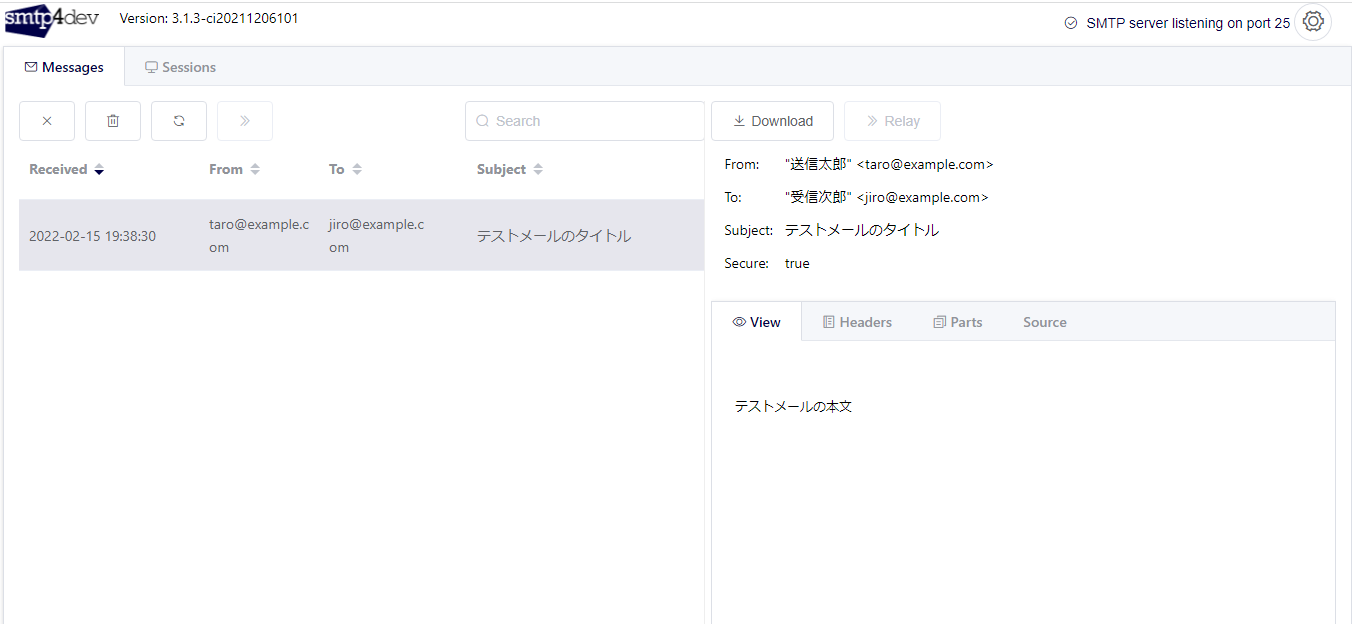
「https:localhost:5001」にアクセスし、メールが届いていればOKです。