※本記事は下記のエントリから始まる連載記事となります。
.NET5.0/C#9.0でオートシェイプ風図形描画ライブラリを作ろう!(Chapter0)
Chapter2 ドラッグ操作で図形を動かしてみよう
今回は、マウス操作で図形を動かす処理を追加してみます。
ソースコード
Capter0からCapter2までの内容は下記ブランチにて実装されています。実装の詳細はこちらをご確認ください。
https://github.com/pierre3/CoreShape/tree/blog/chapter0-2
IShapeに当たり判定と移動処理を追加しよう
ドラッグ操作を行うには、次の2つの処理が必要になります。
- マウスポインタが図形の上に乗っているかの判定(当たり判定)処理
- ドラッグ時の移動処理
まずはIShapeにこの2つの処理を追加しましょう。
基本的な動作は下記の通り。
-
HitTest(): マウスポインタの座標を受け取り、図形の上に乗っていればTrueを返す -
Drag():現在のマウスポインタの座標と1フレーム前のマウスポインタの座標を受け取り、その差分だけ図形を移動する
public interface IShape
{
    void Draw(IGraphics g);
    bool HitTest(Point p);
    void Drag(Point oldPointer, Point currentPointer);
}
RectangleShapeの実装
HitTest メソッド
図形内部の判定と輪郭の判定を個別に行い、塗りつぶしなしの場合は輪郭周辺にマウスがある場合のみTrueを返すようにします。
public virtual bool HitTest(Point p)
{
    if (shape.Stroke is not null)
    {
        //上辺との当たり判定
        if (p.X >= shape.Bounds.Left && p.X <= shape.Bounds.Right
            && p.Y >= shape.Bounds.Top - 2 && p.Y <= shape.Bounds.Top + 2)
        {
            return true;
        }
        //下辺との当たり判定
        if (p.X >= shape.Bounds.Left && p.X <= shape.Bounds.Right
            && p.Y >= shape.Bounds.Bottom - 2 && p.Y <= shape.Bounds.Bottom + 2)
        {
            return true;
        }
        //左辺との当たり判定
        if (p.Y >= shape.Bounds.Top && p.Y <= shape.Bounds.Bottom
            && p.X >= shape.Bounds.Left - 2 && p.X <= shape.Bounds.Left + 2)
        {
            return true;
        }
        //右辺との当たり判定
        if (p.Y >= shape.Bounds.Top && p.Y <= shape.Bounds.Bottom
            && p.X >= shape.Bounds.Right - 2 && p.X <= shape.Bounds.Right + 2)
        {
            return true;
        }
    }
    if (shape.Fill is not null)
    {
        //図形内部の当たり判定
        if (shape.Bounds.Left <= p.X && p.X <= shape.Bounds.Right
            && shape.Bounds.Top <= p.Y && p.Y <= shape.Bounds.Bottom)
        {
            return true;
        }
    }
    return false;
}
Drag メソッド
マウスポインタのX,Y座標の差分だけBoundsのLocationを移動します。
public virtual void Drag(Point oldPointer, Point currentPointer)
{
    var (dx, dy) = (currentPointer.X - oldPointer.X, currentPointer.Y - oldPointer.Y);
    Bounds = new Rectangle(Bounds.Left + dx, Bounds.Top + dy, Bounds.Size.Width, Bounds.Size.Height);
}
OvalShapeの実装
HitTest メソッド
ついでに楕円の当たり判定も実装してみます。
楕円の方程式 x^2/a^2 + y^2/b^2 = 1 から楕円の内部判定を行います。
左辺が1以下なら楕円の内部、1より大きければ楕円の外となります。
(※ 楕円の中心が原点(0,0)にあり、aは原点からX軸と楕円の交点までの距離、bは原点からY軸と楕円の交点までの距離とした場合)
下記では、方程式の左辺にあたる部分をローカル関数で計算するようにしています。
また、輪郭の判定では一回り小さい楕円と一回り大きい楕円の間を輪郭とみなすようにしています。
public ovarride bool HitTest(Point p)
{
    static double Discriminant(float x, float y, float xr, float yr) => (x * x) / (xr * xr) + (y * y) / (yr * yr);
    var xr = Bounds.Size.Width / 2;
    var yr = Bounds.Size.Height / 2;
    var x = p.X - Bounds.Left - xr;
    var y = p.Y - Bounds.Top - yr;
    if (Stroke is not null)
    {
        if (Discriminant(x, y, xr + 2, yr + 2) <= 1
            && Discriminant(x, y, xr - 2, yr - 2) >= 1)
        {
            return true;
        }
    }
    if (Fill is not null)
    {
        return Discriminant(x, y, xr, yr) < 1;
    }
    return false;
}
Dragメソッド
DragメソッドはRectangleShapeでの実装がそのまま利用できるのでここでの実装は不要です。
SampleWPFにドラッグ操作を追加しよう
続いてSampleWPFプロジェクトの処理を変更しドラッグ操作ができるようにします。
- Mainwindow.xaml でSKElementに MouseMoveイベントを追加します
<Window x:Class="SampleWPF.MainWindow"
        xmlns="http://schemas.microsoft.com/winfx/2006/xaml/presentation"
        xmlns:x="http://schemas.microsoft.com/winfx/2006/xaml"
        xmlns:d="http://schemas.microsoft.com/expression/blend/2008"
        xmlns:mc="http://schemas.openxmlformats.org/markup-compatibility/2006"
        xmlns:skiaSharp="clr-namespace:SkiaSharp.Views.WPF;assembly=SkiaSharp.Views.WPF"
        xmlns:local="clr-namespace:SampleWPF"
        mc:Ignorable="d"
        Title="MainWindow" Height="450" Width="800">
    <Grid>
        <skiaSharp:SKElement x:Name="skElement"
                             PaintSurface="sKElement_PaintSurface"
                             MouseMove="sKElement_MouseMove"/>
    </Grid>
</Window>
- 描画する図形のインスタンスをshapesフィールドにIShapeの配列として作成しておきます。
- MouseMoveのイベントハンドラで以下の処理を行います。
-
IShapeの配列を回して当たり判定をおこなう - ヒットしたらマウスカーソルを十字矢印に変更し、ヒットした図形を
activeShapeフィールドに入れておく - マウスの左ボタンが押されていて
activeShapeがnullでない場合、activeShape.Drag()メソッドを実行する
-
処理の詳細は下記ソースコードとそのコメントを参照ください。
public partial class MainWindow : Window
{
    public MainWindow()
    {
        InitializeComponent();
    }

    //描画する図形をListに定義
    private IList<IShape> shapes = new[]{
        new OvalShape(new CoreShape.Rectangle(100, 100, 200, 150))
        {
            Stroke = new Stroke(CoreShape.Color.Red, 2),
            //Fill = new Fill(CoreShape.Color.LightSkyBlue)
        },
        new RectangleShape(new CoreShape.Rectangle(350, 100, 100, 150))
        {
            Stroke = new Stroke(CoreShape.Color.Black, 2),
            Fill = new Fill(CoreShape.Color.LightPink)
        },
    };
    //処理の対象となる図形
    private IShape? activeShape;
    //1フレーム前のマウス座標
    private CoreShape.Point oldPoint;

    //描画イベント
    private void sKElement_PaintSurface(object sender, SKPaintSurfaceEventArgs e)
    {
        var g = new SkiaGraphics(e.Surface.Canvas);
        g.ClearCanvas(CoreShape.Color.Ivory);
        foreach (var shape in shapes)
        {
            shape.Draw(g);
        }
    }

    //マウス移動イベント
    private void sKElement_MouseMove(object sender, MouseEventArgs e)
    {
        //マウスポインタの座標を取得
        var p = e.GetPosition(skElement);
        var currentPoint = new CoreShape.Point((float)p.X, (float)p.Y);

        if (e.LeftButton == MouseButtonState.Pressed)
        {
            //左ボタン押下中、activeShapeがあればドラッグ処理を実行して描画更新
            if (activeShape is null)
            { return; }
            activeShape.Drag(oldPoint, currentPoint);
            skElement.InvalidateVisual();
        }
        else
        {
            //カーソルとactiveShapeを一旦初期化
            Cursor = Cursors.Arrow;
            activeShape = null;
            //当たり判定
            foreach (var shape in shapes)
            {
                if (shape.HitTest(currentPoint))
                {
                    //ヒットしたら十字矢印のカーソルに変更。ヒットした図形オブジェクトをactiveShapeに入れてループを抜ける
                    Cursor = Cursors.SizeAll;
                    activeShape = shape;
                    break;
                }
            }
        }
        //1フレーム前のポインタを更新
        oldPoint = currentPoint;
    }
}
動作確認
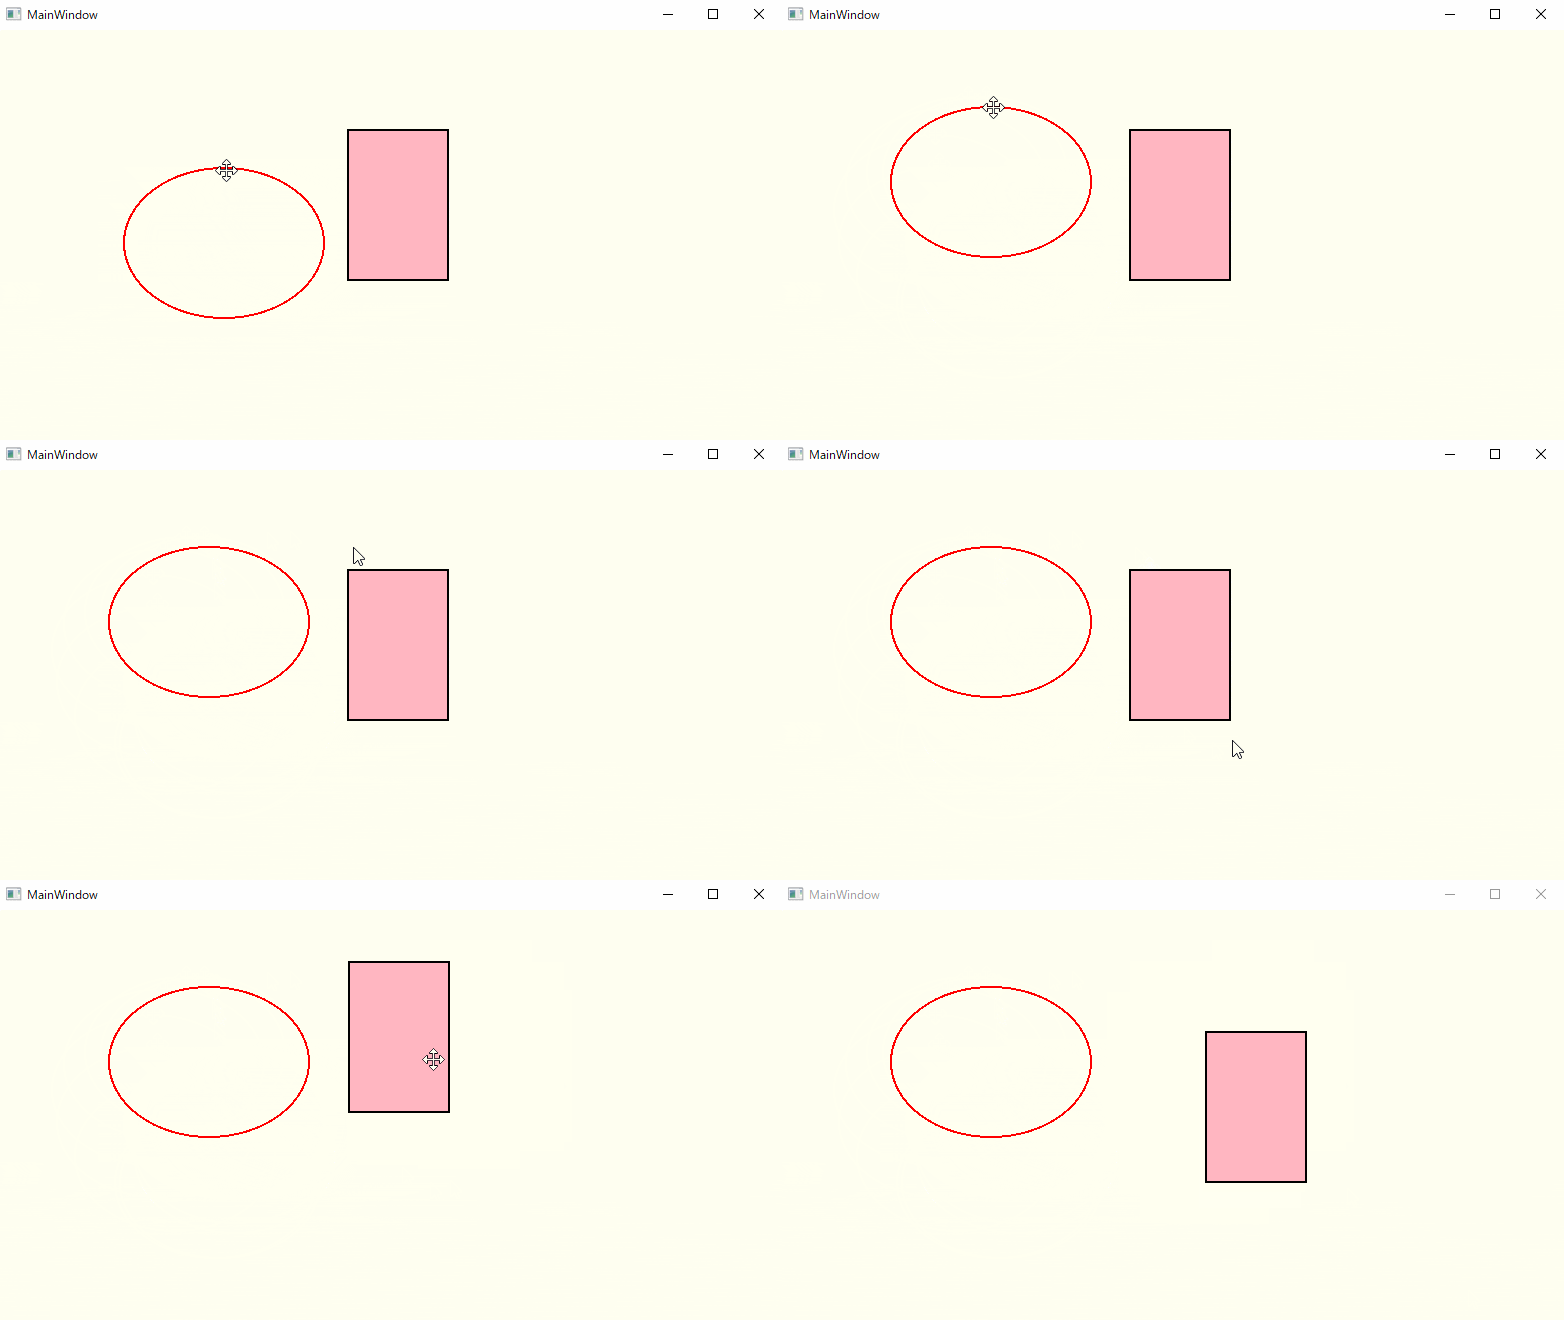
楕円は輪郭のみ、矩形(四角形)は輪郭+内部の塗りつぶしで表示しています。
うん、いい感じに動いています!
## 当たり判定の処理を差し替え可能にしよう
PathとRegionを利用した当たり判定
ここまで当たり判定の処理は自力で実装してきましたが、もう少し複雑な図形を扱ったり、図形の回転が入ったりした場合自力で実装するのはちょっと厳しいですね。
実は今回扱っているSkiaSharpのようなグラフィックエンジンには、ある点が図形領域内に入っているかを判定する仕組みが備わっています。
その仕組みを利用するためのオブジェクトがPathとRegionです。
正確に説明するのは難しいのですが、PathとRegionはおおよそ以下のようなものだと理解しています(間違っていたらコメントください!)
- Path:直線、曲線、楕円、矩形などの図形を組み合わせて表現するためのクラス(描画手順のようなもの)。Regionに変換可能(単一の図形のみを含めても良い)
- Region:Pathとそれを囲む四角形のグラフィック領域を表す。Pathを実際に描画した場合の描画面のピクセルを表す
(Path=ベクタ画像のデータ、Region=ラスタ画像のデータ)
下記はPathとRegionを利用した楕円のHitTestの実装例です。
public bool HitTest(Point p)
{
    //テスト用
    var ovalShape = new OvalShape(new Rectangle(100,100,200,150))
    {
        Stroke = new Stroke(Color.black,2),
        Fill = null
    }

    //作成したPathに楕円を追加
    using var path = new SKPath();
    path.AddOval(ovalShape.Bounds);

    //描画スタイルを指定するSKPaintを作成
    using var paint = new SKPaint()
        .SetStroke(ovalShape.Stroke)
        .SetFill(ovalShape.Fill)
        .SetPaintStyle(ovalShape.Stroke, ovalShape.Fill);

    //PathにSKPaintの設定(色、輪郭の太さなど)を反映する
    using var fillPath = paint.GetFillPath(path);
    //PathをRegionに変換
    using var region = new SKRegion(fillPath);
    //RegionのContaintsメソッドで領域の内部か否かの判定を行う
    return region.Contains((int)p.X, (int)p.Y);
}
SKPaintのGetFillPathを実施することで塗りつぶしの有無や輪郭の太さなどの設定をPathに反映させます。
StrategyパターンによるHitTestの処理方式のカスタマイズ
ではこの処理をOvalShapeのHitTestメソッドに実装してみたいと思います。
しかし、この処理はSkiaSharpのSKPath、SKRegionに依存してしまっているため、CoreShape側のクラスに直接実装することはできません。
そこで今回はStrategyパターンを用いてHitTestの処理方式を切り替え可能としてみましょう。
IHitTestStrategy<TShape>インターフェース
以下のようなインターフェースを定義します。
ポインタ座標とIShapeのオブジェクトを引数に取る HitTestメソッドを持ちます。
引数のshapeの型はIShapeインターフェースそのものではなく、ジェネリクスで具体的な型を指定するようにしています。
public interface IHitTestStrategy<in TShape> where TShape : IShape
{
    bool HitTest(Point p, TShape shape);
}
RectangleHitTestStrategy クラス
ここからは、RectangleShapeの処理を例に実装を進めていきたいと思います
まずは、既存のRectangleShapeで実装したHitTestの処理をRectangleHitTestStrategyとして切り出します。
public class RectangleHitTestStrategy : IHitTestStrategy<RectangleShape>
{
    public bool HitTest(Point p, RectangleShape shape)
    {
        if (shape.Stroke is not null)
        {
            if (p.X >= shape.Bounds.Left && p.X <= shape.Bounds.Right
                && p.Y >= shape.Bounds.Top - 2 && p.Y <= shape.Bounds.Top + 2)
            {
                return true;
            }
            //中略...
        }
        if (shape.Fill is not null)
        {
            if (shape.Bounds.Left <= p.X && p.X <= shape.Bounds.Right
                && shape.Bounds.Top <= p.Y && p.Y <= shape.Bounds.Bottom)
            {
                return true;
            }
        }
        return false;
    }
}
次に RectangleShapeにHitTestStrategyプロパティを実装します。
- コンストラクタは、規定で
RectangleHitTestStragegyを設定するものと、引数でIHitTestStrategy<RectangleShape>を指定するものの2種類を用意します。 -
RectangleShapeのHitTest()メソッド内では、HitTestStrategyのHitTest()メソッドを実行するのみとなります。
public class RectangleShape : IShape
{
    protected IHitTestStrategy<RectangleShape> HitTestStrategy { get; set; }

    public RectangleShape(Rectangle bounds)
    {
        Bounds = bounds;
        HitTestStrategy = new RectangleHitTestStrategy();
    }

    public RectangleShape(Rectangle bounds, IHitTestStrategy<RectangleShape> hitTestStrategy)
    {
        Bounds = bounds;
        HitTestStrategy = hitTestStrategy;
    }

    public virtual bool HitTest(Point p)
    {
        return HitTestStrategy.HitTest(p, this);
    }
}
OvalShapeについても同様に実装を変更しておきます。
SKRegionOvalHitTestStrategy クラス
それでは、先ほど「Regionを利用した楕円の当たり判定の処理」を実装したHitTestStrategyを実装します。
CoreShape.Extensions.SkiaSharp プロジェクトにSKRegionOvalHitTestStrategyクラスを作成します。
(輪郭の幅が細いと操作しずらいので、4ピクセル以上となるように調整する処理が追加されています。)
public class SKRegionOvalHitTestStrategy : IHitTestStrategy<RectangleShape>
{
    public bool HitTest(Point p, RectangleShape shape)
    {
        var stroke = shape.Stroke;
        //輪郭の幅が4未満の場合は4に拡張して判定
        if (stroke is not null && stroke.Width < 4)
        {
            stroke = new Stroke(color: stroke.Color, width: 4);
        }
        using var path = new SKPath();
        path.AddOval(shape.Bounds.ToSk());

        using var paint = new SKPaint()
            .SetStroke(stroke)
            .SetFill(shape.Fill)
            .SetPaintStyle(stroke, shape.Fill);
        using var fillPath = paint.GetFillPath(path);
        using var region = new SKRegion(fillPath);
        return region.Contains((int)p.X, (int)p.Y);
    }
}
Regionを使った当たり判定に変更する
これで必要なものは一通りそろいました。
あとはOvalShape生成時にコンストラクタにSKRegionOvalHitTestStrategyのインスタンスを渡してあげるだけです。
public partial class MainWindow : Window
{
    private IList<IShape> shapes = new[]{
        //Regionを使った当たり判定を使用するように指定
        new OvalShape(new CoreShape.Rectangle(100, 100, 200, 150), new SKRegionOvalHitTestStrategy())
        {
            Stroke = new Stroke(CoreShape.Color.Red, 2),
            Fill = new Fill(CoreShape.Color.LightSkyBlue)
        },
        new RectangleShape(new CoreShape.Rectangle(350, 100, 100, 150))
        {
            Stroke = new Stroke(CoreShape.Color.Black, 2),
            Fill = new Fill(CoreShape.Color.LightPink)
        }
};
以上、OvalShapeの当たり判定差し替え部分をクラス図にすると、下記のようになります。
既定では、OvalHitTestStragegyが設定されていますが、IHitTestStrategy<RectangleShape>インターフェースを実装したクラスのインスタンスをコンストラクタに渡すことでHitTestの処理を別のものに差し替えることができます。
次回
次回は
です。

