ここで実現したいこと
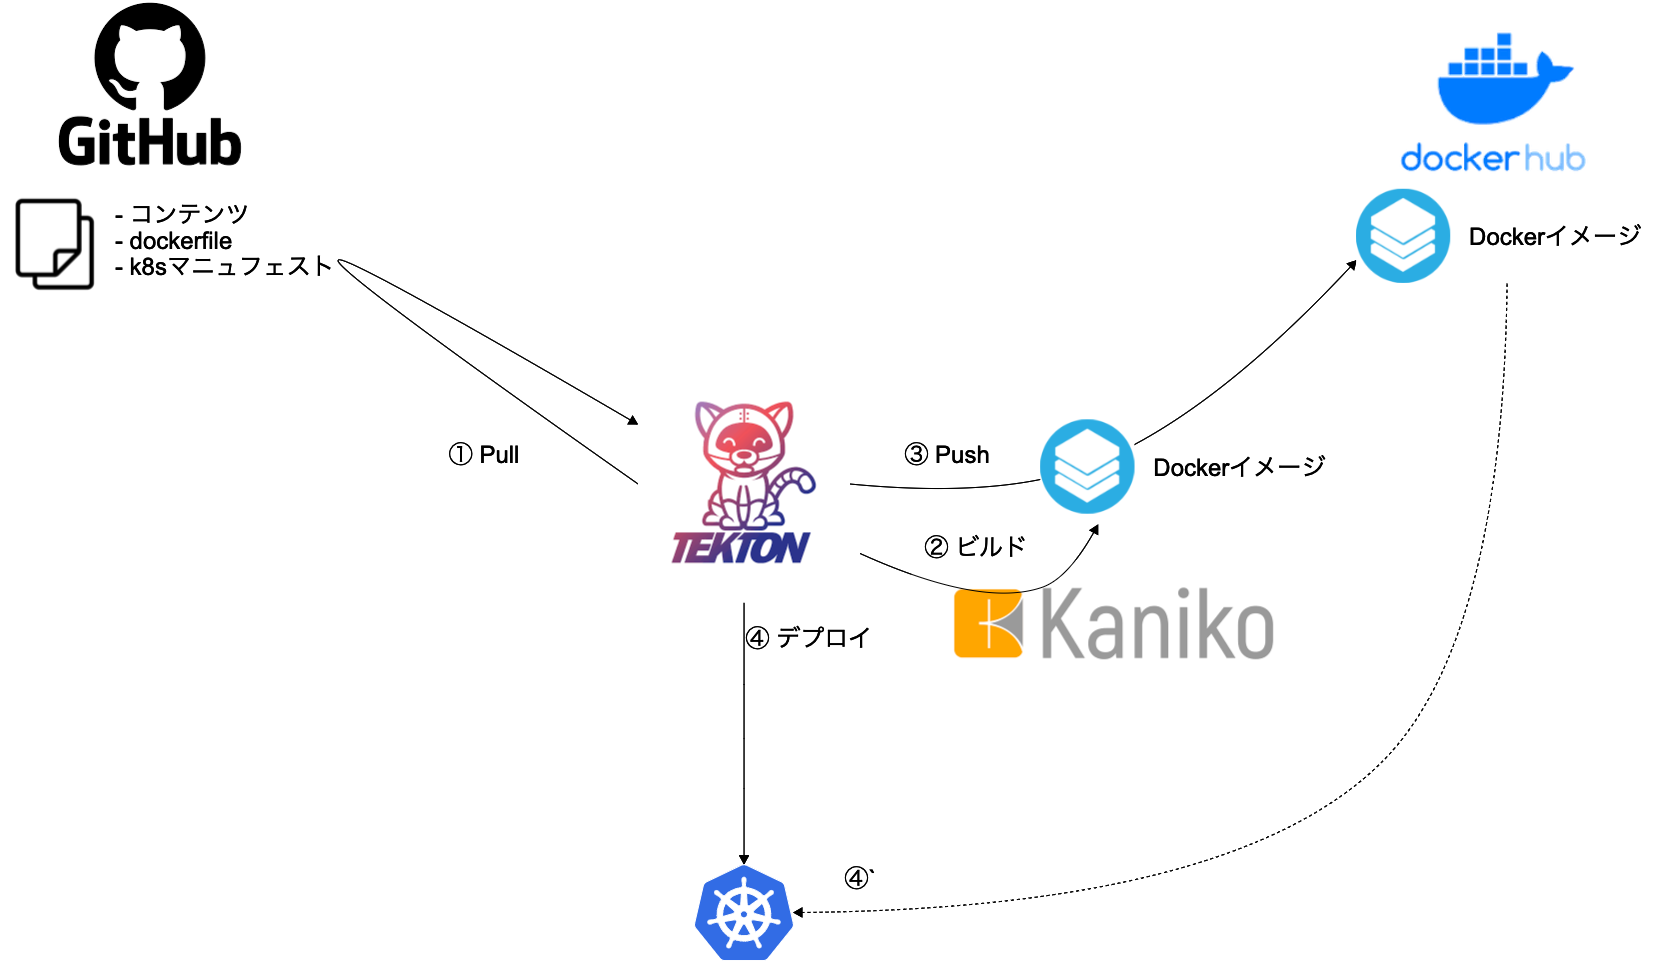
GitHubにプッシュされたデータを元にイメージをビルドしてDockerHubレジストリに登録する。
レジストリに登録したイメージのタグを元に、Podを更新デプロイする。
GitHubのコミットをトリガーに自動化することもできるが、長くなりすぎるので、別の機会にする。
ここではDeliveryおよびDeployは単純に自分自身のクラスター環境にイメージを展開することにとどめる。
Tektonでデプロイも可能だが、現状、あまり機能が充実してない。ArgoCDなど他のツールに任せるのがよさそう。
DeliveryおよびDeployについても、別の機会で深掘りしたい。
構成イメージ
minikubeで環境構築
著者の環境
macOS Big Sur v11.6.2
minikube v1.25.1
tkn v0.22.0
k9s v0.25.8
tknは、TektonのCLIツール。動作上、必須ではないが、Tekton上でのステータスやリソースの確認に利用。
https://github.com/tektoncd/cli
k9sも同じく必須ではない。
ローカル環境の構築
minikube起動
minikube start
Docker Desktopのk8sでも可能だが、minikube + hyperkitが端末リソース使用が減らせるみたいな記事を読んだので、今回はこの構成を採る。
TektonでCI/CD実行
準備
Gitリポジトリ
適当に公式nginxイメージを利用したWebサーバーを作ってみた。
デプロイ用にk8sのマニュフェストも作っておく。以下のような構成。
$ tree
.
├── Dockerfile
├── README.md
├── default.conf
├── k8s_manifest
│   └── deploy.yaml
├── nginx.conf
└── src
    └── index.html
マニュフェストの中に、イメージをタグ付きで指定していることが、今回のキモとなる。
コンテンツ更新時、このタグを更新すると、以降のCI/CDのデリバリフェーズにおいて、kubectl applyはテンプレートに変更が入ったと認識して、イメージの差し替えデプロイが発生する。
apiVersion: apps/v1
kind: Deployment
metadata:
  name: test-nginx
  labels:
    app: nginx
spec:
  selector:
    matchLabels:
      app: nginx
  replicas: 1
  strategy:
    type: RollingUpdate
    rollingUpdate:
      maxSurge: 0
      maxUnavailable: 1
  template:
    metadata:
      labels:
        app: nginx
    spec:
      containers:
      - name: nginx
        image: <DockerHubアカウント>/<DockerHubリポジトリ>:<タグ>
        ports:
        - containerPort: 80
---
apiVersion: v1
kind: Service
metadata:
  name: test-service
  labels:
    app: nginx
spec:
  type: LoadBalancer
  ports:
    - port: 80
      protocol: TCP
      targetPort: 80
  selector:
    app: nginx
Tektonのデプロイ
kubectl apply --filename https://storage.googleapis.com/tekton-releases/pipeline/latest/release.yaml
Dockerのクレデンシャルをsecretに登録
ここでは、regcredという名前のsecretに登録する。
後述の手順同様、Yamlファイルにしておいて管理することも可能。その場合は、間違って公開リポジトリに置かないよう注意!
kubectl create secret docker-registry regcred  \
--docker-server=<your-registry-server>  \
--docker-username=<your-name>  \
--docker-password=<your-pword>  \
--docker-email=<your-email>
Tektonリソースファイルの登録
以下のリソースファイルを作成し、登録していく。
- サービスアカウント
- クラスターロール
- クラスターロールバインディング
- パイプラインリソース
- タスク
- パイプライン
- パイプラインラン
ファイルをまとめて先に作成して、まとめてapplyしてもいいが、Helmやソートプラグイン、あるいはファイル名にプレフィックスを付けるなど、依存関係を意識して順番通りにapplyするようにする必要がある。
サービスアカウントの登録
予め登録しておいたsecretを使って、サービスアカウントを登録する。
apiVersion: v1
kind: ServiceAccount
metadata:
  name: docker-registry-sa
secrets:
  - name: regcred
デプロイも行えるよう、ロールの登録とバインドもしておく。
apiVersion: rbac.authorization.k8s.io/v1
kind: ClusterRole
metadata:
  name: deploy-role
rules:
- apiGroups: ["apps"]
  resources: ["deployments"]
  verbs: ["*"]
- apiGroups: [""]
  resources: ["services"]
  verbs: ["*"]
apiVersion: rbac.authorization.k8s.io/v1
kind: ClusterRoleBinding
metadata:
  name: deploy-role-binding
subjects:
- kind: ServiceAccount
  name: docker-registry-sa
  namespace: default
roleRef:
  kind: ClusterRole
  name: deploy-role
  apiGroup: rbac.authorization.k8s.io
パイプラインリソースの登録
以下のパイプラインリソースを登録する。
<>の中は、自分のリソースを指定。
GitHubリポジトリ
apiVersion: tekton.dev/v1alpha1
kind: PipelineResource
metadata:
  name: git-resource
spec:
  type: git
  params:
    - name: revision
      value: main
    - name: url
      value: https://github.com/<GitHubアカウント>/<GitHubリポジトリ>
apiVersion: tekton.dev/v1alpha1
kind: PipelineResource
metadata:
  name: image-resource
spec:
  type: image
  params:
    - name: url
      value: <DockerHubアカウント>/<DockerHubリポジトリ>
タスクの登録
リソースを利用したタスクを登録しておく。
Gitリポジトリから取得したデータを元に、Dockerイメージをビルド、プッシュするタスク。
イメージのビルドは、Kanikoに委譲する。
以前はTektonタスクでコマンドを実行する場合、commaand:で単発のコマンドを指定する必要があった。
script:では、このようにパイプラインの利用など、よりフレキシブルになった。
Kanikoは執筆現在、通常のイメージではscriptの実行ができなかったため、debugイメージを利用している。
scriptを使って、マニュフェストに記述されたバージョン情報を、DockerHubのタグ情報に指定するようにしている。
apiVersion: tekton.dev/v1beta1
kind: Task
metadata:
  name: build-docker-image-from-git
spec:
  params:
    - name: pathToDockerFile
      type: string
      description: The path to the dockerfile to build
      default: $(resources.inputs.docker-source.path)/Dockerfile
    - name: pathToContext
      type: string
      description: |
        The build context used by Kaniko
        (https://github.com/GoogleContainerTools/kaniko#kaniko-build-contexts)
      default: $(resources.inputs.docker-source.path)
  resources:
    inputs:
      - name: docker-source
        type: git
    outputs:
      - name: builtImage
        type: image
  results:
    - name: manifest-tag
      description: The tag value of manufest.
  steps:
    - name: get-tag
      image: mikefarah/yq:4.20.2
      script: |
        yq ".spec.template.spec.containers[0].image" $(params.pathToContext)/k8s_manifest/deploy.yaml | \
        awk -F':' '{print $2}' | \
        tee $(results.manifest-tag.path)
    - name: build-and-push
#      image: gcr.io/kaniko-project/executor:latest  # for command -> script
      image: gcr.io/kaniko-project/executor:debug
      # specifying DOCKER_CONFIG is required to allow kaniko to detect docker credential
      env:
        - name: "DOCKER_CONFIG"
          value: "/tekton/home/.docker/"
        - name: "IMAGE_DESTINATION"
          value: $(resources.outputs.builtImage.url)
      script: |
        #!/busybox/sh
        set -xe
        IMAGE_TAG=`cat $(results.manifest-tag.path)`
        echo "0: "$IMAGE_TAG
        echo "1: "$IMAGE_DESTINATION
        IMAGE_DESTINATION="${IMAGE_DESTINATION}:${IMAGE_TAG}"
        echo "2: "$IMAGE_DESTINATION
        /kaniko/executor --dockerfile=$(params.pathToDockerFile) \
        --destination=$IMAGE_DESTINATION \
        --context=$(params.pathToContext) \
        --build-arg=BASE=alpine:3
↑でビルドしたイメージをもとに、デプロイするタスク。
apiVersion: tekton.dev/v1beta1
kind: Task
metadata:
  name: deploy-using-kubectl
spec:
  params:
    - name: path
      type: string
      description: Path to the manifest to apply
  resources:
    inputs:
      - name: source
        type: git
      - name: image
        type: image
  steps:
    - name: test-cat-deploy
      image: lachlanevenson/k8s-kubectl
      command: ["cat"]
      args:
        - "$(params.path)"
    - name: run-kubectl
      image: lachlanevenson/k8s-kubectl
      command: ["kubectl"]
      args:
        - "apply"
        - "-f"
        - "$(params.path)"
パイプラインの登録
タスクを呼び出すパイプラインを登録する。
apiVersion: tekton.dev/v1beta1
kind: Pipeline
metadata:
  name: pipeline-build-deploy
spec:
  resources:
    - name: docker-source
      type: git
    - name: builtImage
      type: image
  tasks:
    - name: build-image
      taskRef:
        name: build-docker-image-from-git
      params:
        - name: pathToDockerFile
          value: Dockerfile
        - name: pathToContext
          value: /workspace/docker-source
      resources:
        inputs:
          - name: docker-source
            resource: docker-source
        outputs:
          - name: builtImage
            resource: builtImage
    - name: deploy-image
      taskRef:
        name: deploy-using-kubectl
      resources:
        inputs:
          - name: source
            resource: docker-source
          - name: image
            resource: builtImage
            from:
              - build-image
      params:
        - name: path
          value: /workspace/source/k8s_manifest/deploy.yaml
パイプラインの実行
↑のパイプラインのRunを登録。
apiVersion: tekton.dev/v1beta1
kind: PipelineRun
metadata:
  name: pipeline-build-deploy-run
spec:
  serviceAccountName: docker-registry-sa
  pipelineRef:
    name: pipeline-build-deploy
  resources:
    - name: docker-source
      resourceRef:
        name: git-resource
    - name: builtImage
      resourceRef:
        name: image-resource
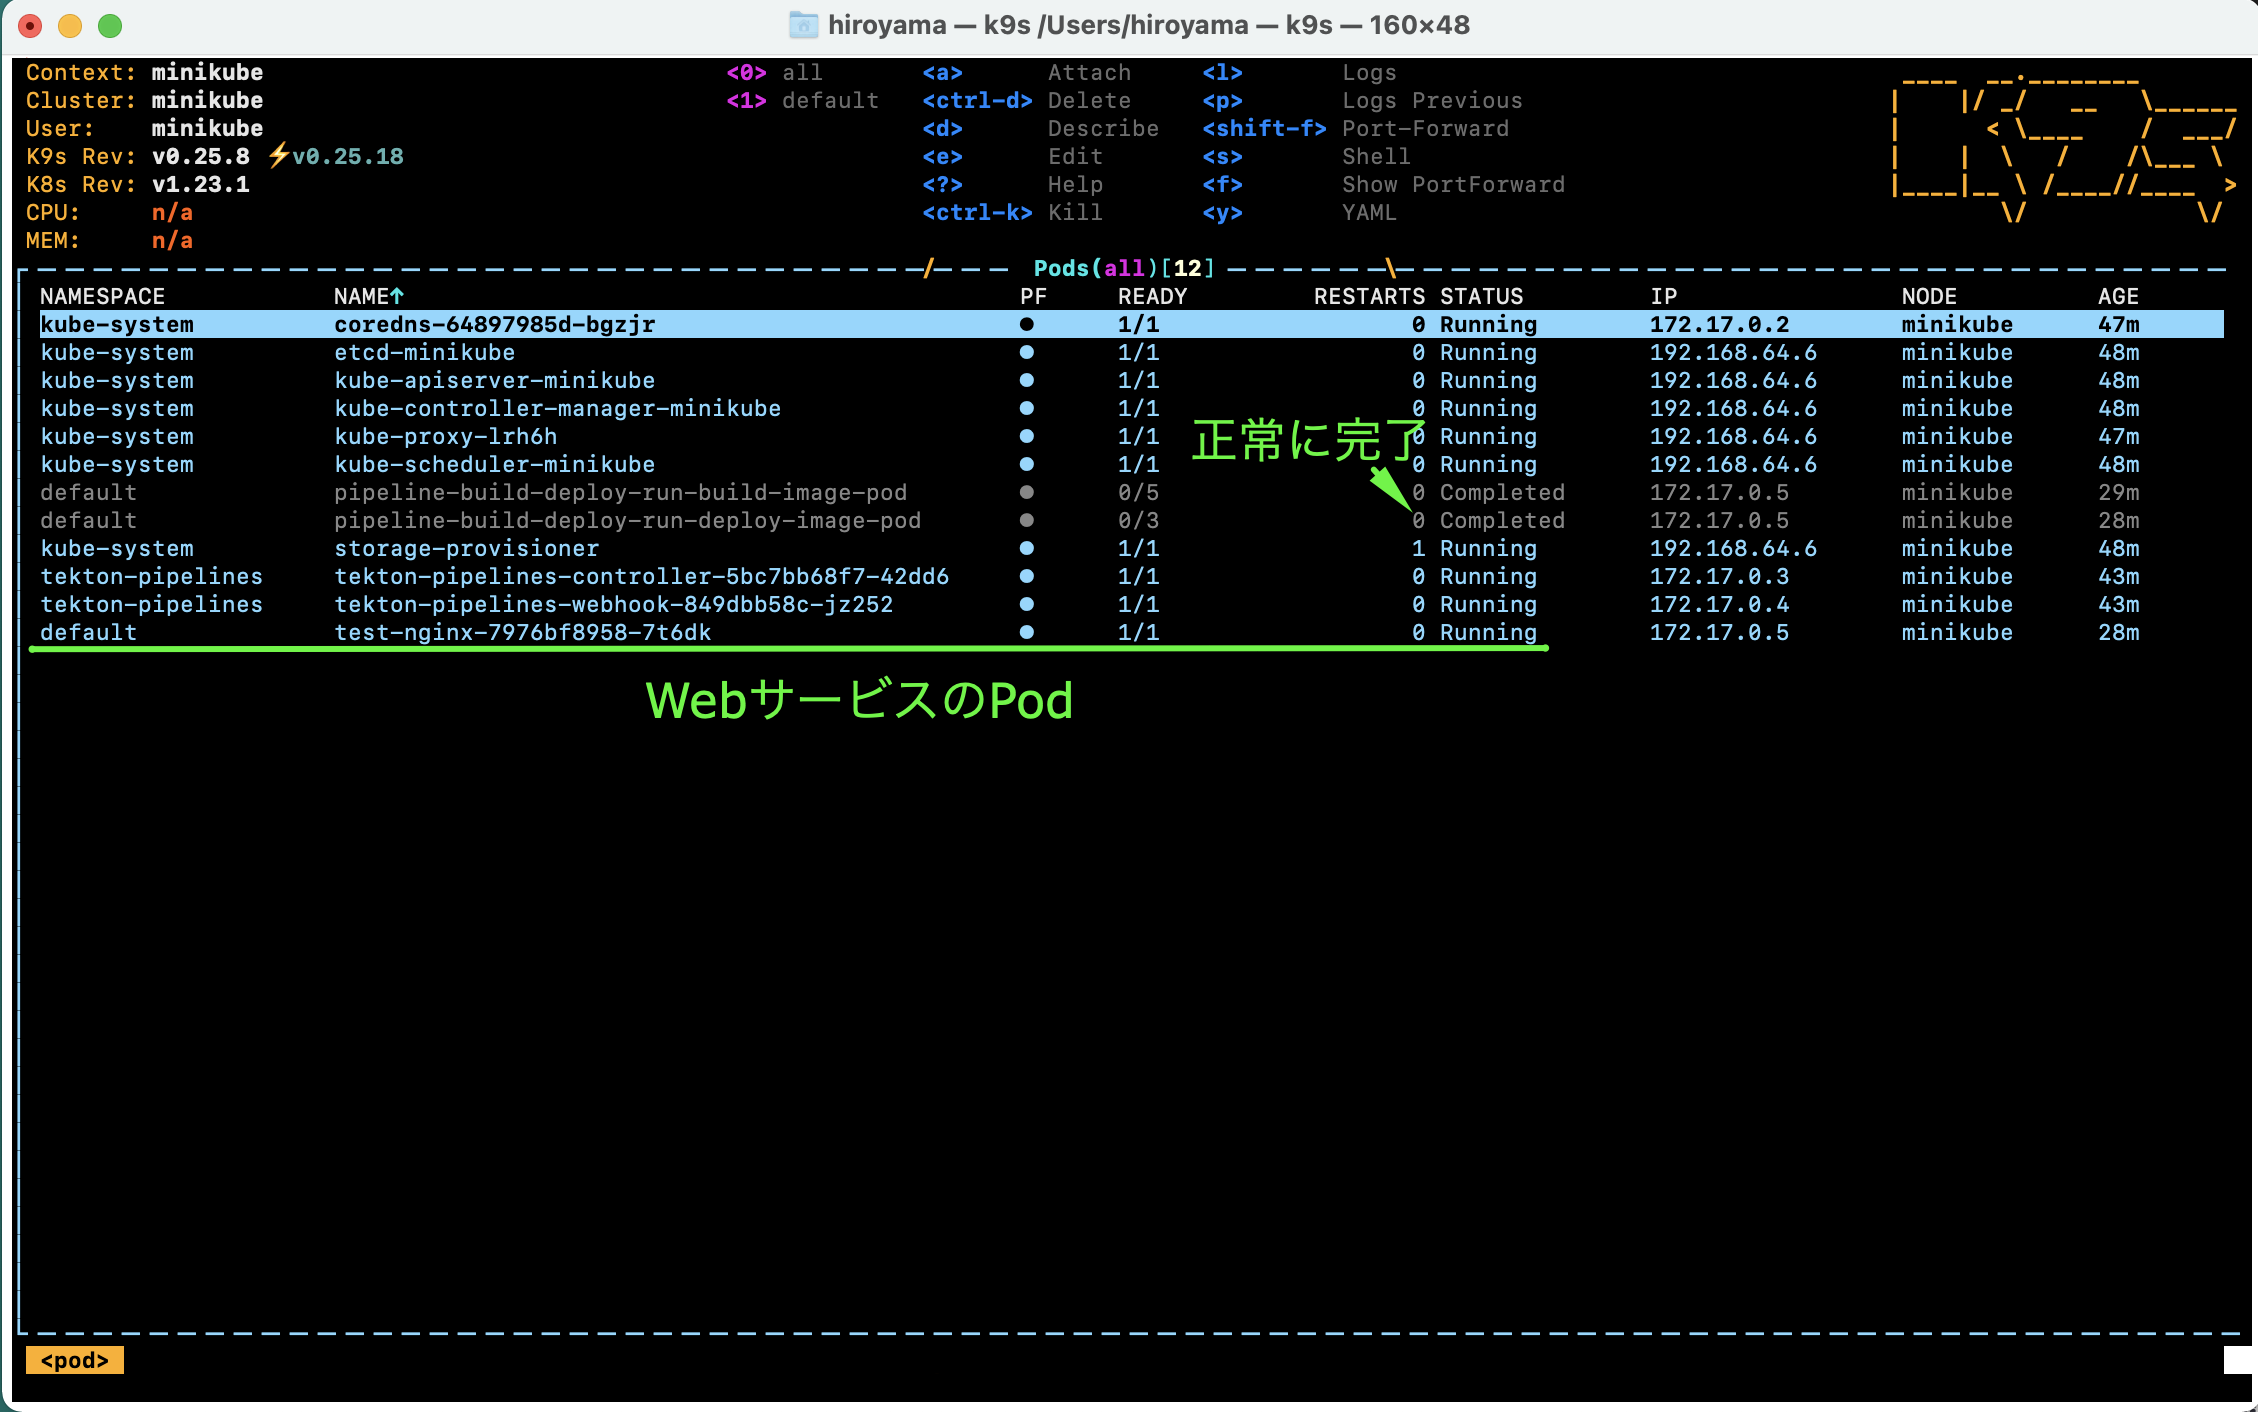
ここまでで問題なければ、パイプラインが流れて、テスト用のWebサービスが起動していることが確認できる。

実際にCurlでアクセスしてみることも可能。ただし、minikubeの場合、別のターミナルでminikube tunnelをしないと、IPが割り当てられず、pendingのままになる。
> kubectl get services
NAME           TYPE           CLUSTER-IP      EXTERNAL-IP   PORT(S)        AGE
kubernetes     ClusterIP      10.96.0.1       <none>        443/TCP        50m
test-service   LoadBalancer   10.110.42.206   <pending>     80:32711/TCP   30m
> kubectl get services
NAME           TYPE           CLUSTER-IP      EXTERNAL-IP     PORT(S)        AGE
kubernetes     ClusterIP      10.96.0.1       <none>          443/TCP        56m
test-service   LoadBalancer   10.110.42.206   10.110.42.206   80:32711/TCP   36m
> curl 10.110.42.206

<!DOCTYPE html>
<html lang="en">
<head>
    <meta charset="UTF-8">
    <meta name="viewport" content="width=device-width, initial-scale=1.0">
    <meta http-equiv="X-UA-Compatible" content="ie=edge">
    <title>Hello World - Nginx Docker</title>
    <style>
        h1{
            font-weight:lighter;
            font-family: Arial, Helvetica, sans-serif;
        }
    </style>
</head>
<body>

    <h1>
        Hello World! v.001
    </h1>

</body>
</html>
CI/CDのシミュレーション
コンテンツ更新
内容とマニュフェストを更新して、リポジトリ更新する。
こんな感じ。
> git diff
diff --git a/k8s_manifest/deploy.yaml b/k8s_manifest/deploy.yaml
index 22ff6c1..86cc26b 100644
--- a/k8s_manifest/deploy.yaml
+++ b/k8s_manifest/deploy.yaml
@@ -21,7 +21,7 @@ spec:
     spec:
       containers:
       - name: nginx
-        image: pict3/test-web:0.01
+        image: pict3/test-web:0.02
         ports:
         - containerPort: 80
 ---
diff --git a/src/index.html b/src/index.html
index f5b5880..bda38de 100644
--- a/src/index.html
+++ b/src/index.html
@@ -16,7 +16,7 @@
 <body>

     <h1>
-        Hello World! v.001
+        Hello World! v.002
     </h1>

 </body>
パイプラインを走らせる
今回は、トリガーを使わずに自前で叩く。
一度、PipelineRunを消して再度applyするか、強制リプレイス。
> kubectl replace --force --filename ./pipelineRun-build-deploy.yaml
pipelinerun.tekton.dev "pipeline-build-deploy-run" deleted
pipelinerun.tekton.dev/pipeline-build-deploy-run replaced
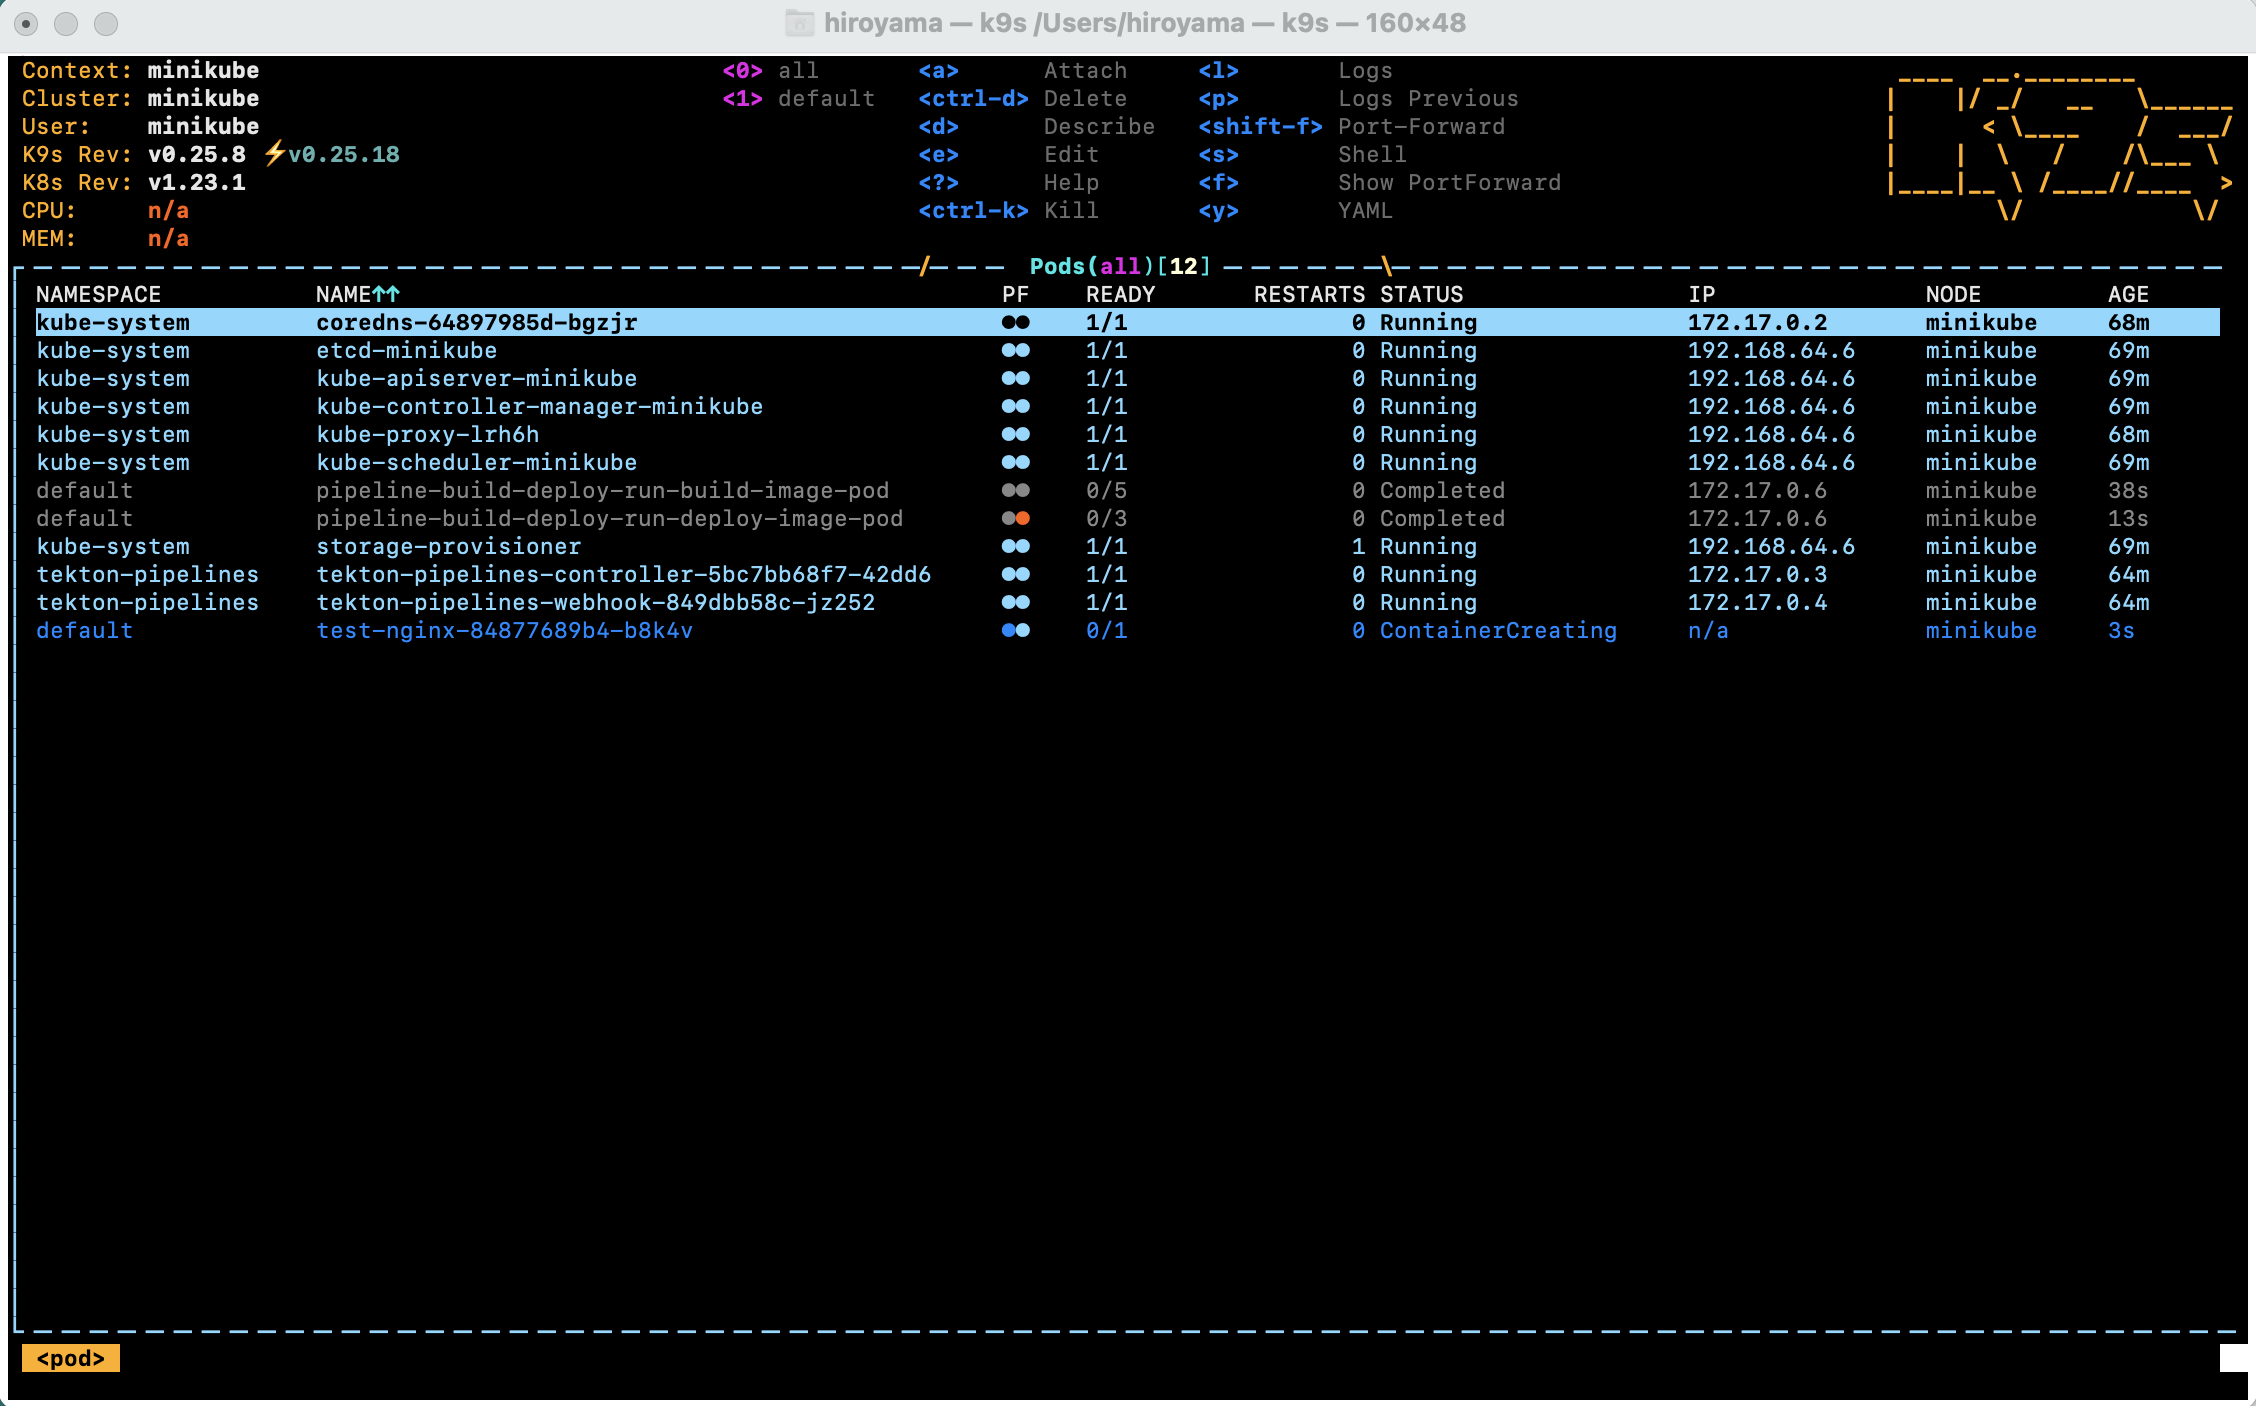
更新中
再度、サービスへアクセス
コンテンツが更新された(=新しいイメージを元に、Podが置き換えられた)ことが確認できる。
> curl 10.110.42.206

<!DOCTYPE html>
<html lang="en">
<head>
    <meta charset="UTF-8">
    <meta name="viewport" content="width=device-width, initial-scale=1.0">
    <meta http-equiv="X-UA-Compatible" content="ie=edge">
    <title>Hello World - Nginx Docker</title>
    <style>
        h1{
            font-weight:lighter;
            font-family: Arial, Helvetica, sans-serif;
        }
    </style>
</head>
<body>

    <h1>
        Hello World! v.002
    </h1>

</body>
</html>
トラブルシューティング
tekton-pipelineが機能しない
tekton-pipelinesネームスペースのPodsのステータスを確認する。
Tektonインストールに失敗している可能性などがある。
パイプラインが動かない
tknコマンドで、Tektonのリソースが正しく作成できているかを確認する。
以下は、適当な順番でapplyしたため、依存関係のあるリソースが未作成のまま、後続をapplyした状態での解析。
> tkn pipelinerun describe pipeline-build-deploy-run -o yaml
...
status:
  completionTime: "2022-02-27T07:06:15Z"
  conditions:
  - lastTransitionTime: "2022-02-27T07:06:15Z"
    message: 'Pipeline default/pipeline-build-deploy can''t be Run; it contains Tasks
      that don''t exist: Couldn''t retrieve Task "build-docker-image-from-git": tasks.tekton.dev
      "build-docker-image-from-git" not found'
    reason: CouldntGetTask
    status: "False"
...
パイプラインは動いたが、エラーが発生
Podのログを確認する。Step単位で確認可能。
まとめ
そこまで難易度が高くなく、CI/CD環境が構築できた。(CI/CDというには少し弱いが)
ここで実装した内容について、DockerHubのAutomated Buildsを使えばいいのでは?とか、AWSのCode BuildやGoogle CloudのCloud Buildに寄せればいいんじゃなかろうかという意見もあるかもしれない。たしかに、特定環境で特殊な要件がなければ、CI/CD環境構築の手間を割愛できるマネージドサービスを選択した方がいいことも多い。
ただ、自前の環境は自由度が高いことと、一度はこのように自前で構築してみることで、マネージドサービスに対する理解も上がる気がしている。
リポジトリ
とくに需要はないかもだが、一応、以下に公開しておく。
パイプラインリソースなどは適当に変えて利用ください。
Tekton環境:
https://github.com/pict3/my-tekton
サンプルWeb:
https://github.com/pict3/test-docker-nginx
参考・参照

