bootstrap-tooltip を使う時、必ず js で初期化メソッド呼び出しをしないといけないのが面倒。
しかも Aurelia のように bind ありきだとすんごく面倒。
なので、簡単に bootstrap-tooltip を使うために Custom Attributes を使って部品化してみた。
対象読者
Aurelia で bootstrap-tooltip を楽に使いたい人。
公式ドキュメントの この辺 を読んですんなり理解できる人には要らないかも。
環境
- OS X El Capitan 10.11.6
- npm v8.7.0
- aurelia-skeleton-navigation-webpack 1.1.2
- Bootstrap v3.3.7 (上記 skeleton に入っていたやつ)
Aurelia の Setup with Webpack をやってみる で作った初期環境が前提。
bootstrap-tooltip とは
公式ドキュメント: https://getbootstrap.com/docs/3.3/javascript/#tooltips
Inspired by the excellent jQuery.tipsy plugin written by Jason Frame; Tooltips are an updated version, which don't rely on images, use CSS3 for animations, and data-attributes for local title storage.
CSS3 を使って、画像に依存しないオシャレなツールチップなんですって。
公式の Example だとこんな感じで動く。
なんで Aurelia だと面倒なの?
これを Aurelia で使いたいんだけれども、実は面倒だったりする。
その理由をざっくりまとめると、以下の二つ。
- 動的に生成される要素が面倒
- ツールチップに表示される内容を動的にするのが面倒
動的に生成される要素が面倒
普通に bootstrap-tooltip を使うだけなら、以下のように書けば動く。
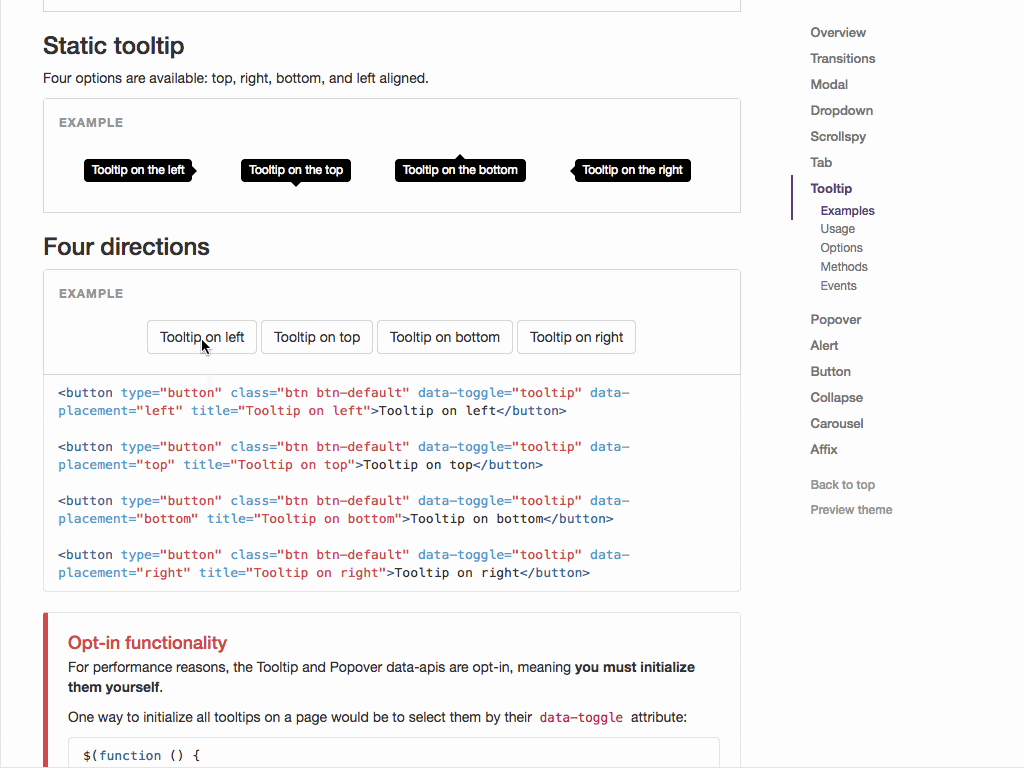
<button type="button" class="btn btn-default" data-toggle="tooltip" title="つーるちっぷ">Tooltip</button>
export class First {
  attached() {
    $('[data-toggle="tooltip"]').tooltip();
  }
}
これで問題になるのが、要素が動的に生成される場合。
以下のように if.bind が使われていて、ボタンクリックで動的に生成される場合、 attached() の動作後に要素が生成されるため、ちゃんと初期化されない問題がある。
<p>
<button type="button" class="btn btn-default" click.delegate="isExistButton = true">View</button>
</p>
<p if.bind="isExistButton">
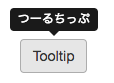
<button type="button" class="btn btn-default" data-toggle="tooltip" title="つーるちっぷ">Tooltip</button>
</p>
export class First {
  isExistButton = false;

  attached() {
    $('[data-toggle="tooltip"]').tooltip();
  }
}

ツールチップに表示される内容を動的にするのが面倒
ならば、ということで、以下のように document に対して書けば動く。
<p>
  <button type="button" class="btn btn-default" click.delegate="isExistButton = true">View</button>
</p>

<p if.bind="isExistButton">
  <button type="button" class="btn btn-default" data-toggle="tooltip" title="つーるちっぷ">Tooltip</button>
</p>
export class Second {
  isExistButton = false;

  attached() {
    $(document).tooltip({
      selector: '[data-toggle="tooltip"]',
    });
  }
}
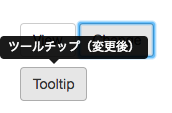
これで問題になるのが、ツールチップの表示内容を動的にしようとした場合。
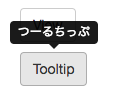
動的なんでしょ? と以下のように bind してみても、全く動的にならず、表示時の内容のままである。
<p>
  <button type="button" class="btn btn-default" click.delegate="isExistButton = true">View</button>
  <button type="button" class="btn btn-default" click.delegate="tooltipContent = 'ツールチップ(変更後)'">Change</button>
</p>

<p if.bind="isExistButton">
  <button type="button" class="btn btn-default" data-toggle="tooltip" title="${tooltipContent}">Tooltip</button>
</p>
export class Second {
  isExistButton = false;
  tooltipContent = 'つーるちっぷ(変更前)';

  attached() {
    $(document).tooltip({
      selector: '[data-toggle="tooltip"]',
    });
  }
}
bootstrap-tooltip の表示内容を変更する場合、普通に bind するだけではダメで、値の変更に伴って再度設定しなければならないらしい。
だから以下のようにやれば良し。
<p>
  <button type="button" class="btn btn-default" click.delegate="isExistButton = true">View</button>
  <button type="button" class="btn btn-default" click.delegate="changeTooltipContent()">Change</button>
</p>

<p if.bind="isExistButton">
  <button type="button" class="btn btn-default" data-toggle="tooltip" title="${tooltipContent}">Tooltip</button>
</p>
export class Second {
  isExistButton = false;
  tooltipContent = 'つーるちっぷ(変更前)';

  attached() {
    $(document).tooltip({
      selector: '[data-toggle="tooltip"]',
    });
  }

  changeTooltipContent() {
    this.tooltipContent = 'ツールチップ(変更後)';
    $('[data-toggle="tooltip"]').data('bs.tooltip', false);
    $('[data-toggle="tooltip"]').tooltip({title: this.tooltipContent});
  }
}
ただ、これが一箇所ならまだしも、ツールチップを複数箇所に使いたい場合は、その箇所の数だけ書かなくちゃいけない。
しかも、今回はボタンクリックを契機に要素生成・表示内容変更をしているが、別の契機にするならそれに合わせて書かないといけないツラミもある。
面倒すぎて使えるわけもないので、今回はこれをどうにかしてみた。
やってみる
公式ドキュメント: http://aurelia.io/hub.html#/doc/article/aurelia/templating/latest/templating-custom-attributes/
この Templating: Custom Attributes を使って、再利用性を高めようと思う。
調べたら Bootstrap tool tips not supported に書いてある内容でかなり良い感じで出来るっぽいので、これをちょいアレンジ。
というわけで、いきなり結論コード。
import {bindable, customAttribute, inject} from 'aurelia-framework';

@inject(Element)
@customAttribute('bootstrap-tooltip')
export class BootstrapTooltip {
  $element;
  @bindable({ primaryProperty: true }) title;
  @bindable placement = 'top';

  constructor(element) {
    this.$element = $(element);
  }

  bind() {
    this.$element.attr('data-toggle', 'tooltip');
    this.$element.tooltip(this.options);
  }

  unbind() {
    this.$element.tooltip('dispose');
  }

  titleChanged() {
    this.$element.data('bs.tooltip', false);
    this.$element.tooltip(this.options);
  }

  get options() {
    return {
      title: this.title,
      placement: this.placement,
    };
  }
}
<require from="./bootstrap-tooltip"></require>

<p>
  <button type="button" class="btn btn-default" click.delegate="isExistButton = true">View</button>
  <button type="button" class="btn btn-default" click.delegate="tooltipContent = 'ツールチップ(変更後)'">Change</button>
</p>

<p if.bind="isExistButton">
  <button type="button" class="btn btn-default" bootstrap-tooltip.bind="tooltipContent">Tooltip 1</button>
  <button type="button" class="btn btn-default" bootstrap-tooltip="title.bind: tooltipContent;">Tooltip 2</button>
</p>
export class Result {
  tooltipContent = 'つーるちっぷ(変更前)';
  isExistButton = false;
}
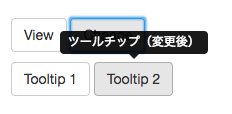
これで、ようやく個別 js に不毛な処理を書かなくて良くなった。
必要なのは、最初の require と、ツールチップを使いたい箇所に bootstrap-tooltip アトリビュートを入れて、必要なものを bind するだけ。
以降、各節の Custom Attribute ならではっぽいところについて、コメントしていきます。
要素の inject
@inject(Element)
export class BootstrapTooltip {
  constructor(element) {
    this.$element = $(element);
  }
}
これを書くことによって、コンストラクタで Custom Attribute を設定した要素を受け取ることができる。
bootstrap-tooltip を使うにあたって、要素を保持しておくと便利なので inject している。
独自指定の名称
@customAttribute('bootstrap-tooltip')
export class BootstrapTooltip {
}
custom Attribute は、本来 ${Name}CustomAttribute のクラス名でなければならないが、 @customAttribute を使うことによってクラス名に関係なく指定することができる。
今回は素直に BootstrapTooltipCustomAttribute としても良かったが、まあ何となく。
プロパティの変更イベント
titleChanged() {
  this.$element.data('bs.tooltip', false);
  this.$element.tooltip(this.options);
}
${propertyName}Changed(newValue, oldValue) というメソッドを定義することで、値が変更された時のイベントを検知できる。
今回は、ツールチップの内容(title)が動的に変更された時に追従させる必要があるので、そのための利用。
テンプレートの呼び出し処理
<require from="./bootstrap-tooltip"></require>

<p if.bind="isExistButton">
  <button type="button" class="btn btn-default" bootstrap-tooltip.bind="tooltipContent">Tooltip 1</button>
  <button type="button" class="btn btn-default" bootstrap-tooltip="title.bind: tooltipContent;">Tooltip 2</button>
</p>
<require> で使用するための準備を行い、各 botton でそれぞれ使用している。
今回は title を primaryProperty としているので bootstrap-tooltip.bind="tooltipContent" という書き方もできるし、その下のようにプロパティ名を指定した書き方もできる。
おわりに
これでかなり汎用的に bootstrap-tooltip を使いまわせるようになるので、やって良かった。
bootstrap-tooltip 以外にも汎用性がありそうなので、なるべく楽に書くための仕組みとして Custom Attribute は有効だと思う。