Introduction
In this article I will discuss about how we can use vuex in a nutshell. So before we get our hand dirty we should talk a little bit about flux design pattern.
Flux
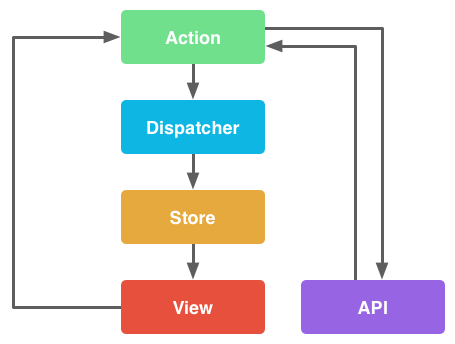
Flux is known as the concept of Unidirectional data flow. It is developed by Facebook while they are working with React. This Vuex pattern will illustrate on how flux work in Vue.js.
Typically, Flux has some individual components as listed below:
- Action : Helper method that facilitate passing the data to dispatcher.
- Dispatcher : Receives actions and broadcast payload to registered callback.
- Stores : Containers for application state & logic that have callback registered to the dispatcher.
- Controller Views : React component that grab the state from Stores and pass it down via props to child components.
Vuex
- Create new Vue.js project
We will use vue cli for creating new project. In case you don't have vue cli install, please enter this command in your terminal
npm install -g @vue/cli
To create new vue project we have to enter this command:
vue create my-project
It will ask some questions for the project configuration setting. So just choose what ever you like such as test framework and so on.
- Create a new view component call Counter.vue and add this following code:
<template>
    <figure>
        <button @click="decrement">-</button>
        <span>{{ $store.state.count }}</span>
        <button @click="increment">+</button>
    </figure>
</template>

<script>
export default {
    name: 'Counter',
    methods: {

        // component method handling increment store dispatch action
        increment: function (event) {
            this.$store.dispatch('increment')
        },

        // component method handing decrement store dispatch action
        decrement: function (event) {
            this.$store.dispatch('decrement')
        }

    }
}
</script>

<style>
    span {
        padding: 0 10px;
    }
</style>
- In store.js add this following code:
import Vue from 'vue'
import Vuex from 'vuex'

Vue.use(Vuex)

export default new Vuex.Store({
  state: {
    count: 0
  },
  mutations: {

    INCREMENT (state) {
      state.count++
    },

    DECREMENT (state) {
      state.count--
    }

  },
  actions: {

    increment ({ commit }) {
      commit('INCREMENT')
    },

    decrement ({ commit }) {
      commit('DECREMENT')
    }

  }
})
- Now in router.js update home route to match with Counter view component
   {
      path: '/',
      name: 'counter',
      component: () => import('./views/Counter.vue')
    }
Basically we have two actions in our store which are increment and decrement each action send signal to mutations and mutate the state value.
In Counter.vue we bind the value from the state with the respective UI component. That's what we call Controller View in flux.
So this is a short demonstration on how we can use vuex in Vue.js. If you have any further concern or suggestion please email me (phanithken@gmail.com) or leave the comment down bellow. I will try to answer.
And I also put all the sample into Github which you can check it out here
Thank you! Have a nice day :)
