目的
AWS環境にFTPサーバ、接続するクライアントのEC2インスタンスを作成し、実際にFTPコマンドを実行して検証してみた内容を残しておきます。
前提条件
- FTPサーバのEC2インスタンスは以下で作成
- プラットフォーム:RHEL9.0
- インスタンスタイプ:t2-micro
- 直接yumコマンドで直接vsftpd(Very Secure FTP Daemon)をインストール
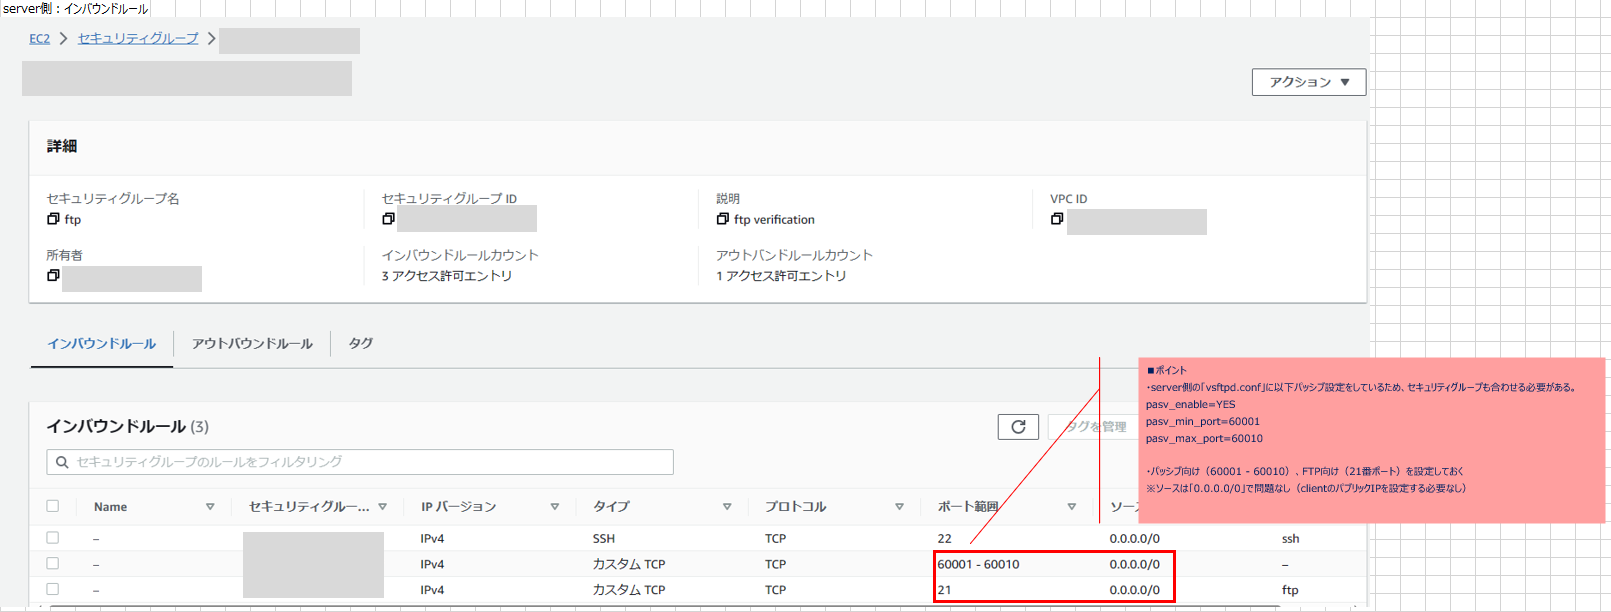
- ElasticIPを割り当てる ※ポイント
- 後述する「etc/vsftpd/vsftpd.conf」のパッシブモードの設定 ※ポイント
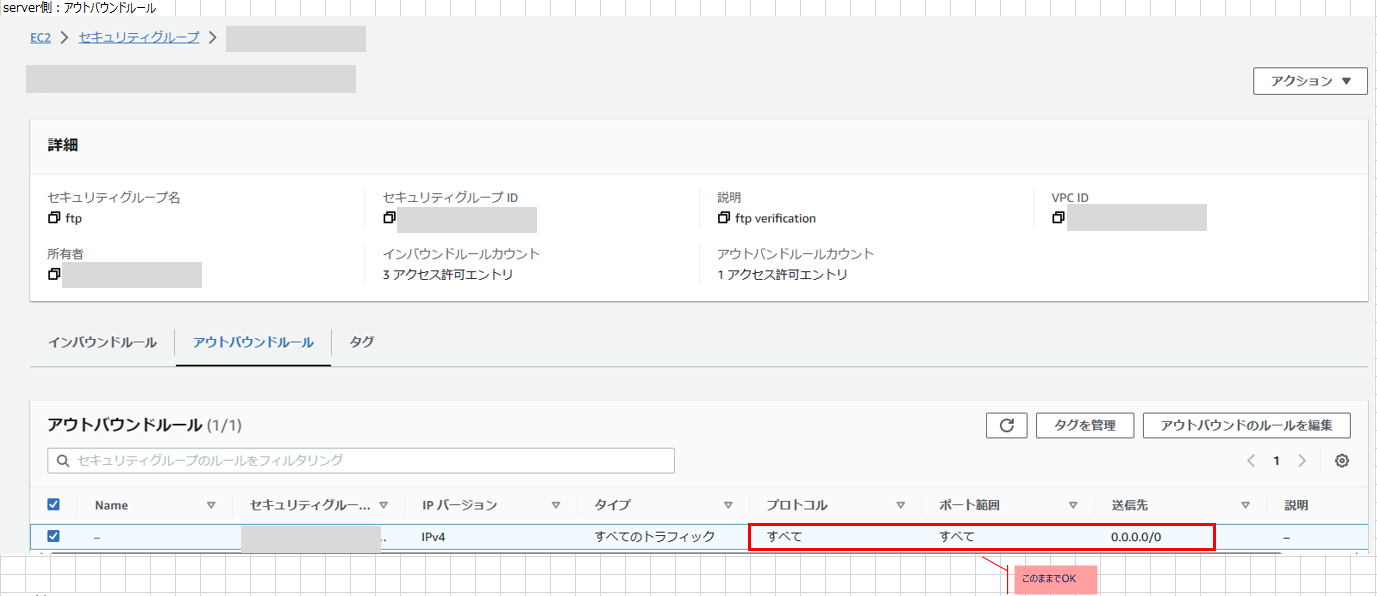
- セキュリティグループの設定は※1を参照
- FTPクライアントのEC2インスタンスは以下で作成
- プラットフォーム:RHEL9.0
- インスタンスタイプ:t2-micro
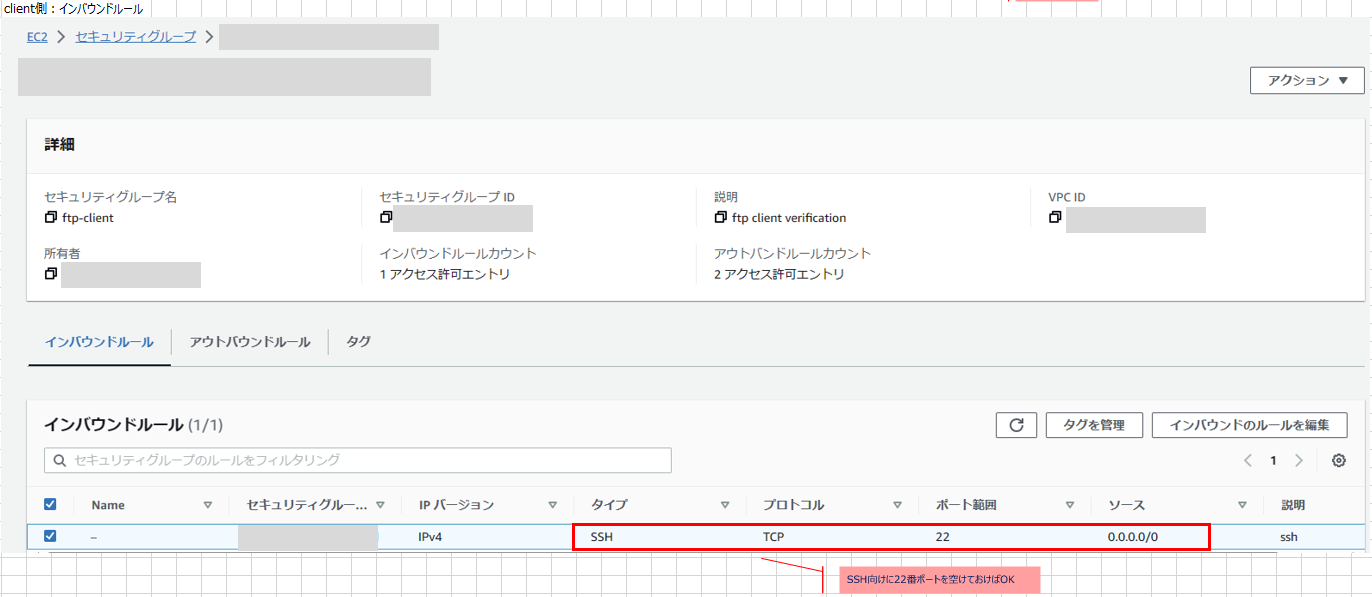
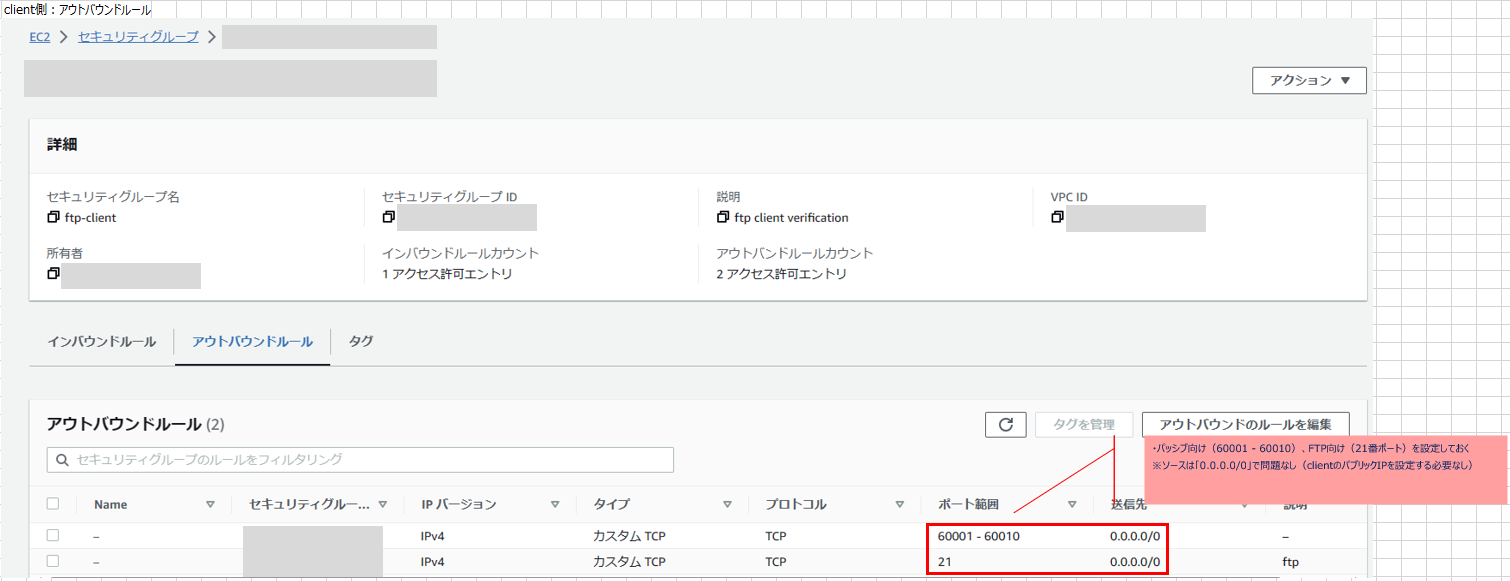
- セキュリティグループの設定は※2を参照
記載範囲
FTPクライアント側からFTPサーバに接続し、FTPコマンドを実行するところまでを記載します。
(実行コマンド+ログを記載しているので、コマンド実行後にうまくいったかご参考になればと思います)
試すにあたり、以下サイトを参考にさせて頂きました。
【AWS】閉域網のEC2にFTPサーバーを構築
EC2(Linux)でFTPサーバ構築
① ftpコマンドについて詳しくまとめました 【Linuxコマンド集】
FTPサーバ:vsftpdをインストール
sudo yum install -y vsftpd
実行ログ(★部分が実行コマンド)
[ec2-user@ip-xxx-xx-xx-xxx ~]$ sudo yum install -y vsftpd ★
Updating Subscription Management repositories.
Unable to read consumer identity

This system is not registered with an entitlement server. You can use subscription-manager to register.

Last metadata expiration check: 0:04:37 ago on Sat 21 Oct 2023 12:57:14 AM UTC.
Dependencies resolved.
================================================================================
 Package     Arch        Version          Repository                       Size
================================================================================
Installing:
 vsftpd      x86_64      3.0.5-4.el9      rhel-9-appstream-rhui-rpms      172 k

Transaction Summary
================================================================================
Install  1 Package

Total download size: 172 k
Installed size: 347 k
Downloading Packages:
vsftpd-3.0.5-4.el9.x86_64.rpm                   2.4 MB/s | 172 kB     00:00
--------------------------------------------------------------------------------
Total                                           1.6 MB/s | 172 kB     00:00
Running transaction check
Transaction check succeeded.
Running transaction test
Transaction test succeeded.
Running transaction
  Preparing        :                                                        1/1
  Installing       : vsftpd-3.0.5-4.el9.x86_64                              1/1
  Running scriptlet: vsftpd-3.0.5-4.el9.x86_64                              1/1
  Verifying        : vsftpd-3.0.5-4.el9.x86_64                              1/1
Installed products updated.

Installed:
  vsftpd-3.0.5-4.el9.x86_64

Complete!
FTPサーバ:vsftpdサービス起動および自動起動されるように設定
#vsftpdサービス起動および自動起動されるように設定
sudo systemctl enable vsftpd
sudo systemctl start vsftpd
#vsftpdサービスのステータス確認
sudo systemctl status vsftpd
実行ログ(★部分が実行コマンド)
#vsftpdサービス起動および自動起動されるように設定
[ec2-user@ip-xxx-xx-xx-xxx ~]$ sudo systemctl enable vsftpd ★
Created symlink /etc/systemd/system/multi-user.target.wants/vsftpd.service → /usr/lib/systemd/system/vsftpd.service.
[ec2-user@ip-xxx-xx-xx-xxx ~]$ sudo systemctl start vsftpd ★

#vsftpdサービスのステータス確認
[ec2-user@ip-xxx-xx-xx-xxx ~]$ sudo systemctl status vsftpd ★
● vsftpd.service - Vsftpd ftp daemon
     Loaded: loaded (/usr/lib/systemd/system/vsftpd.service; enabled; preset: disabled)
     Active: active (running) since Sat 2023-10-21 01:04:27 UTC; 17s ago
    Process: 13706 ExecStart=/usr/sbin/vsftpd /etc/vsftpd/vsftpd.conf (code=exited, status=0/SUCCESS)
   Main PID: 13707 (vsftpd)
      Tasks: 1 (limit: 4421)
     Memory: 712.0K
        CPU: 3ms
     CGroup: /system.slice/vsftpd.service
             mq13707 /usr/sbin/vsftpd /etc/vsftpd/vsftpd.conf

Oct 21 01:04:27 ip-xxx-xx-xx-xxx.ap-northeast-1.compute.internal systemd[1]: Starting Vsftpd ftp daemon...
Oct 21 01:04:27 ip-xxx-xx-xx-xxx.ap-northeast-1.compute.internal systemd[1]: Started Vsftpd ftp daemon.
FTPサーバ:ユーザを作成
sudo useradd ftp-user
sudo passwd ftp-user
実行ログ(★部分が実行コマンド)
[ec2-user@ip-xxx-xx-xx-xxx ~]$ sudo useradd ftp-user ★
[ec2-user@ip-xxx-xx-xx-xxx ~]$ sudo passwd ftp-user ★
Changing password for user ftp-user.
New password: ★パスワードを入力
FTPサーバ:「/home/ftp-user」の権限を変更(ftp_userを所有権を変更)
sudo chown ftp-user:ftp-user -R /home/ftp-user/
FTPサーバ:ftp_userを「vsftpd user_list」に追加し、"-a"フラグを使用してファイルに追加
sudo echo "ftp-user" | sudo tee -a /etc/vsftpd/user_list
FTPサーバ:vsftpdサービスを再起動
systemctl restart vsftpd
FTPサーバ:/etc/vsftpd/vsftpd.confを編集
主に設定に反映した内容をピックアップすると、以下となります。
listen_port=21
pam_service_name=vsftpd
userlist_enable=YES
userlist_deny=NO
userlist_file=/etc/vsftpd/user_list
pasv_enable=YES
pasv_min_port=60001      ★上述※1のポート番号の設定と同じ
pasv_max_port=60010      ★上述※1のポート番号の設定と同じ
pasv_addr_resolve=NO           ★YESにしているサイトもあったが、ここは「NO」に設定し、次のpasv_addressにFTP SEVER側のElasticIPを設定
pasv_address=xx.xxx.xxx.xxx    ★ftp serverのEC2にElasticIPを割り当て
vsftpd.confの設定内容(全体)
# Example config file /etc/vsftpd/vsftpd.conf
#
# The default compiled in settings are fairly paranoid. This sample file
# loosens things up a bit, to make the ftp daemon more usable.
# Please see vsftpd.conf.5 for all compiled in defaults.
#
# READ THIS: This example file is NOT an exhaustive list of vsftpd options.
# Please read the vsftpd.conf.5 manual page to get a full idea of vsftpd's
# capabilities.
#
# Allow anonymous FTP? (Beware - allowed by default if you comment this out).
anonymous_enable=NO
#
# Uncomment this to allow local users to log in.
local_enable=YES
#
# Uncomment this to enable any form of FTP write command.
write_enable=YES
#
# Default umask for local users is 077. You may wish to change this to 022,
# if your users expect that (022 is used by most other ftpd's)
local_umask=022
"/etc/vsftpd/vsftpd.conf" 135L, 5178B
# Example config file /etc/vsftpd/vsftpd.conf
#
# The default compiled in settings are fairly paranoid. This sample file
# loosens things up a bit, to make the ftp daemon more usable.
# Please see vsftpd.conf.5 for all compiled in defaults.
#
# READ THIS: This example file is NOT an exhaustive list of vsftpd options.
# Please read the vsftpd.conf.5 manual page to get a full idea of vsftpd's
# capabilities.
#
# Allow anonymous FTP? (Beware - allowed by default if you comment this out).
anonymous_enable=NO
#
# Uncomment this to allow local users to log in.
local_enable=YES
#
# Uncomment this to enable any form of FTP write command.
write_enable=YES
#
# Default umask for local users is 077. You may wish to change this to 022,
# if your users expect that (022 is used by most other ftpd's)
local_umask=022
#
# Uncomment this to allow the anonymous FTP user to upload files. This only
# has an effect if the above global write enable is activated. Also, you will
# obviously need to create a directory writable by the FTP user.
# When SELinux is enforcing check for SE bool allow_ftpd_anon_write, allow_ftpd_full_access
anon_upload_enable=NO
#
# Uncomment this if you want the anonymous FTP user to be able to create
# new directories.
anon_mkdir_write_enable=NO
#
# Activate directory messages - messages given to remote users when they
# go into a certain directory.
dirmessage_enable=YES
#
# Activate logging of uploads/downloads.
xferlog_enable=YES
#
# Make sure PORT transfer connections originate from port 20 (ftp-data).
connect_from_port_20=NO
#
# If you want, you can arrange for uploaded anonymous files to be owned by
# a different user. Note! Using "root" for uploaded files is not
# recommended!
chown_uploads=YES
#chown_username=whoever
#
# You may override where the log file goes if you like. The default is shown
# below.
#xferlog_file=/var/log/xferlog
#
# If you want, you can have your log file in standard ftpd xferlog format.
# Note that the default log file location is /var/log/xferlog in this case.
xferlog_std_format=YES
#
# You may change the default value for timing out an idle session.
#idle_session_timeout=600
#
# You may change the default value for timing out a data connection.
#data_connection_timeout=120
#
# It is recommended that you define on your system a unique user which the
# ftp server can use as a totally isolated and unprivileged user.
#nopriv_user=ftpsecure
#
# Enable this and the server will recognise asynchronous ABOR requests. Not
# recommended for security (the code is non-trivial). Not enabling it,
# however, may confuse older FTP clients.
#async_abor_enable=YES
#
# By default the server will pretend to allow ASCII mode but in fact ignore
# the request. Turn on the below options to have the server actually do ASCII
# mangling on files when in ASCII mode. The vsftpd.conf(5) man page explains
# the behaviour when these options are disabled.
# Beware that on some FTP servers, ASCII support allows a denial of service
# attack (DoS) via the command "SIZE /big/file" in ASCII mode. vsftpd
# predicted this attack and has always been safe, reporting the size of the
# raw file.
# ASCII mangling is a horrible feature of the protocol.
ascii_upload_enable=YES
ascii_download_enable=YES
#
# You may fully customise the login banner string:
ftpd_banner=Welcome to blah FTP service.
#
# You may specify a file of disallowed anonymous e-mail addresses. Apparently
# useful for combatting certain DoS attacks.
#deny_email_enable=YES
# (default follows)
#banned_email_file=/etc/vsftpd/banned_emails
#
# You may specify an explicit list of local users to chroot() to their home
# directory. If chroot_local_user is YES, then this list becomes a list of
# users to NOT chroot().
# (Warning! chroot'ing can be very dangerous. If using chroot, make sure that
# the user does not have write access to the top level directory within the
# chroot)
chroot_local_user=YES
chroot_list_enable=YES
# (default follows)
chroot_list_file=/etc/vsftpd/chroot_list
#
# You may activate the "-R" option to the builtin ls. This is disabled by
# default to avoid remote users being able to cause excessive I/O on large
# sites. However, some broken FTP clients such as "ncftp" and "mirror" assume
# the presence of the "-R" option, so there is a strong case for enabling it.
#ls_recurse_enable=YES
#
# When "listen" directive is enabled, vsftpd runs in standalone mode and
# listens on IPv4 sockets. This directive cannot be used in conjunction
# with the listen_ipv6 directive.
# Example config file /etc/vsftpd/vsftpd.conf
#
# The default compiled in settings are fairly paranoid. This sample file
# loosens things up a bit, to make the ftp daemon more usable.
# Please see vsftpd.conf.5 for all compiled in defaults.
#
# READ THIS: This example file is NOT an exhaustive list of vsftpd options.
# Please read the vsftpd.conf.5 manual page to get a full idea of vsftpd's
# capabilities.
#
# Allow anonymous FTP? (Beware - allowed by default if you comment this out).
anonymous_enable=NO
#
# Uncomment this to allow local users to log in.
local_enable=YES
#
# Uncomment this to enable any form of FTP write command.
write_enable=YES
#
# Default umask for local users is 077. You may wish to change this to 022,
# if your users expect that (022 is used by most other ftpd's)
local_umask=022
#
# Uncomment this to allow the anonymous FTP user to upload files. This only
# has an effect if the above global write enable is activated. Also, you will
# obviously need to create a directory writable by the FTP user.
# When SELinux is enforcing check for SE bool allow_ftpd_anon_write, allow_ftpd_full_access
anon_upload_enable=NO
#
# Uncomment this if you want the anonymous FTP user to be able to create
# new directories.
anon_mkdir_write_enable=NO
#
# Activate directory messages - messages given to remote users when they
# go into a certain directory.
dirmessage_enable=YES
#
# Activate logging of uploads/downloads.
xferlog_enable=YES
#
# Make sure PORT transfer connections originate from port 20 (ftp-data).
connect_from_port_20=NO
#
# If you want, you can arrange for uploaded anonymous files to be owned by
# a different user. Note! Using "root" for uploaded files is not
# recommended!
chown_uploads=YES
#chown_username=whoever
#
# You may override where the log file goes if you like. The default is shown
# below.
#xferlog_file=/var/log/xferlog
#
# If you want, you can have your log file in standard ftpd xferlog format.
# Note that the default log file location is /var/log/xferlog in this case.
xferlog_std_format=YES
#
# You may change the default value for timing out an idle session.
#idle_session_timeout=600
#
# You may change the default value for timing out a data connection.
#data_connection_timeout=120
#
# It is recommended that you define on your system a unique user which the
# ftp server can use as a totally isolated and unprivileged user.
#nopriv_user=ftpsecure
#
# Enable this and the server will recognise asynchronous ABOR requests. Not
# recommended for security (the code is non-trivial). Not enabling it,
# however, may confuse older FTP clients.
#async_abor_enable=YES
#
# By default the server will pretend to allow ASCII mode but in fact ignore
# the request. Turn on the below options to have the server actually do ASCII
# mangling on files when in ASCII mode. The vsftpd.conf(5) man page explains
# the behaviour when these options are disabled.
# Beware that on some FTP servers, ASCII support allows a denial of service
# attack (DoS) via the command "SIZE /big/file" in ASCII mode. vsftpd
# predicted this attack and has always been safe, reporting the size of the
# raw file.
# ASCII mangling is a horrible feature of the protocol.
ascii_upload_enable=YES
ascii_download_enable=YES
#
# You may fully customise the login banner string:
ftpd_banner=Welcome to blah FTP service.
#
# You may specify a file of disallowed anonymous e-mail addresses. Apparently
# useful for combatting certain DoS attacks.
#deny_email_enable=YES
# (default follows)
#banned_email_file=/etc/vsftpd/banned_emails
#
# You may specify an explicit list of local users to chroot() to their home
# directory. If chroot_local_user is YES, then this list becomes a list of
# users to NOT chroot().
# (Warning! chroot'ing can be very dangerous. If using chroot, make sure that
# the user does not have write access to the top level directory within the
# chroot)
chroot_local_user=YES
chroot_list_enable=YES
# (default follows)
chroot_list_file=/etc/vsftpd/chroot_list
allow_writeable_chroot=YES
#
# You may activate the "-R" option to the builtin ls. This is disabled by
# default to avoid remote users being able to cause excessive I/O on large
# sites. However, some broken FTP clients such as "ncftp" and "mirror" assume
# the presence of the "-R" option, so there is a strong case for enabling it.
#ls_recurse_enable=YES
#
# When "listen" directive is enabled, vsftpd runs in standalone mode and
# listens on IPv4 sockets. This directive cannot be used in conjunction
# with the listen_ipv6 directive.
listen=YES
#
# This directive enables listening on IPv6 sockets. By default, listening
# on the IPv6 "any" address (::) will accept connections from both IPv6
# and IPv4 clients. It is not necessary to listen on *both* IPv4 and IPv6
# sockets. If you want that (perhaps because you want to listen on specific
# addresses) then you must run two copies of vsftpd with two configuration
# files.
# Make sure, that one of the listen options is commented !!
listen_ipv6=NO
listen_port=21
pam_service_name=vsftpd
userlist_enable=YES
userlist_deny=NO
userlist_file=/etc/vsftpd/user_list
pasv_enable=YES
pasv_min_port=60001
pasv_max_port=60010
pasv_addr_resolve=NO ★YESにしているサイトもあったが、ここは「NO」に設定し、pasv_addressにFTP SEVER側のElasticIPを設定
pasv_address=xx.xxx.xxx.xxx ★ftp serverのEC2にElasticIPを割り当て
#End
FTPサーバ:vsftpd.conf設定の続き:chroot_list_enable=YESに設定しているので、chroot_listに「ftp-user」を追加
[ec2-user@ip-xxx-xx-xx-xxx ~]$ sudo vi /etc/vsftpd/chroot_list
[ec2-user@ip-xxx-xx-xx-xxx ~]$ cat /etc/vsftpd/chroot_list
ftp-user
FTPクライアント:FTPクライアントをインストール
sudo yum install -y ftp
実行ログ(★部分が実行コマンド)
[ec2-user@ip-xxx-xx-xx-xxx ~]$ sudo yum install -y ftp
Updating Subscription Management repositories.
Unable to read consumer identity

This system is not registered with an entitlement server. You can use subscription-manager to register.

Red Hat Enterprise Linux 9 for x86_64 - AppStream from RHUI (RPMs)                                                        51 MB/s |  25 MB     00:00
Red Hat Enterprise Linux 9 for x86_64 - BaseOS from RHUI (RPMs)                                                           33 MB/s |  14 MB     00:00
Red Hat Enterprise Linux 9 Client Configuration                                                                           29 kB/s | 3.5 kB     00:00
Dependencies resolved.
=========================================================================================================================================================
 Package                     Architecture                   Version                             Repository                                          Size
=========================================================================================================================================================
Installing:
 ftp                         x86_64                         0.17-89.el9                         rhel-9-appstream-rhui-rpms                          64 k

Transaction Summary
=========================================================================================================================================================
Install  1 Package

Total download size: 64 k
Installed size: 112 k
Downloading Packages:
ftp-0.17-89.el9.x86_64.rpm                                                                                               1.2 MB/s |  64 kB     00:00
---------------------------------------------------------------------------------------------------------------------------------------------------------
Total                                                                                                                    759 kB/s |  64 kB     00:00
Running transaction check
Transaction check succeeded.
Running transaction test
Transaction test succeeded.
Running transaction
  Preparing        :                                                                                                                                 1/1
  Installing       : ftp-0.17-89.el9.x86_64                                                                                                          1/1
  Running scriptlet: ftp-0.17-89.el9.x86_64                                                                                                          1/1
  Verifying        : ftp-0.17-89.el9.x86_64                                                                                                          1/1
Installed products updated.

Installed:
  ftp-0.17-89.el9.x86_64

Complete!
FTPクライアント:FTPサーバに接続し、lsコマンドを実行
#ftpモードに切り替え
[ec2-user@ip-xxx-xx-xx-xxx ftp_sample]$ ftp
ftp>
ftp> open xx.xxx.xxx.xxx                                      ←※xx.xxx.xxx.xxx部分はFTPサーバのElasticIP
Connected to xx.xxx.xxx.xxx (xx.xxx.xxx.xxx).
220 Welcome to blah FTP service.
Name (xx.xxx.xxx.xxx:ec2-user): ftp-user                      ←ユーザ名:ftp-userを入力
331 Please specify the password.
Password:                                                     ←パスワードを入力
230 Login successful.
Remote system type is UNIX.
Using binary mode to transfer files.
#FTPサーバ内でlsコマンドを実行
ftp> ls                                                       ←lsコマンド発行
227 Entering Passive Mode (xx,xxx,xxx,xxx,234,103).
150 Here comes the directory listing.
226 Directory send OK.                                        ←lsコマンド(成功)
備忘録
以下にFTPクライアント側からFTPサーバに接続をする際にハマったポイントを記録として残しておきます。
同じように詰まる方(いないかもしれませんが・・・)のご参考までに。。
-
ハマりポイント①:TeraTerm4系でのssh接続時の失敗
Tera Termを用いたEC2へのSSH接続時に「認証に失敗しました。再試行してください」と表示されて失敗する -
ハマりポイント②:FTP接続確認後にパッシブモードのデータ通信に失敗
【AWS】AWSでFTPサーバー立てる時に気をつけるべき2つのこと+α
ec2にてftpでパッシブを使用するときにハマったポイント
AWS上のEC2は自身に割り当てられたEIP(グローバルIPへのアドレス変換)の存在を知らない。
PASVコマンドに対してプライベートIPアドレスを返してしまう。
当然FTPクライアントはプライベートIPアドレスに接続しにいこうとしてしまうため通信できない。


