この記事は
macbook にML用の環境作る際の備忘録
随時更新されます
環境構築手順
Finder
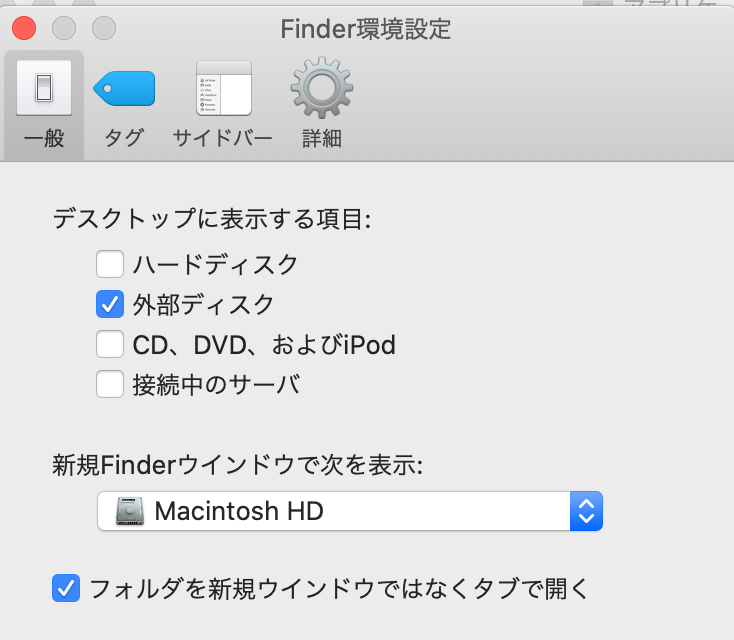
新規Finderウィンドウで次を表示:の表示項目をドライブに変更しておく.
Notionのインストールについて。マルチユーザの場合は、ユーザディレクトリ配下の
Applicationディレクトリに配置する
権限設定
基本的にマルチユーザで使うので権限与えておく.
(これを忘れてよくトラブル)
$ sudo chown -R $(whoami):admin /usr/local/*
$ sudo chmod -R g+w /usr/local/*
Mac を買ったら必ずやっておきたい初期設定 - Qiita
zshを使う
これからのデフォルトはzshになった。
もしまだbashの場合はzshにしておく。
chsh -s /bin/zsh
echo $SHELL
cat /etc/shells
zsh-autosuggestions/INSTALL.md at master · zsh-users/zsh-autosuggestions
git clone https://github.com/zsh-users/zsh-autosuggestions ~/.zsh/zsh-autosuggestions

# .zshrcに追加
source ~/.zsh/zsh-autosuggestions/zsh-autosuggestions.zsh
ターミナル環境
補完にfishと、テーマにstarshipを使います
ただしデフォルトシェルには設定しません.
# terminal
brew install fish
brew install startship
echo 'starship init fish | source' >> ~/.config/fish/config.fish
echo 'alias c="clear"' >> ~/.config/fish/config.fish
その他
# いけてるcat
brew install bat
Python
# 以下fish環境です
fish

# shellはzsh
echo $SHELL
# /bin/zsh

# pyenv
brew install pyenv

# pyenvの初期設定をfish設定ファイルに追加
echo -e 'if command -v pyenv 1>/dev/null 2>&1; then\n  eval "$(pyenv init -)"\nfi' >> ~/.zshrc

# fishをリロード
exec fish

pyenv install 3.7.9
pyenv global 3.7.9
pyenv rehash
pyenv version

which python3
python3 -V
which pip3

# pipenv
pip3 install --upgrade pip
pip3 install pipenv

pipenv install pandas numpy sklearn tqdm seaborn matplotlib japanize-matplotlib
pipenv install --dev autopep8 yapf isort
pipenv install --dev jupyter
pipenv install --dev jupyter_contrib_nbextensions
pipenv install --dev autopep8 yapf isort
pipenv run jupyter contrib nbextension install --user
pipenv run jupyter nbextension enable code_prettify/autopep8
pipenv run jupyter nbextension enable codefolding/main
pipenv run jupyter nbextension enable hide_input_all/main
pipenv run jupyter nbextension enable highlight_selected_word/main
pipenv run jupyter nbextension enable code_prettify/isort
pipenv run jupyter nbextension enable scratchpad/main
pipenv run jupyter nbextension enable table_beautifier/main
pipenv run jupyter nbextension enable zenmode/main
pipenv run jupyter notebook --generate-config -y
echo 'c.NotebookApp.password="sha1:ef7a7482cc53:6ad03768dd7e9ca09cf0e98c1c7238ee923f5917"' > ~/.jupyter/jupyter_notebook_config.py
shellについて
fishをデフォルトシェルにすると色々と面倒がありそう.
デフォルトはzshにしておいて、都度fishを呼び出す方法でやってみる。
zsh
zshの設定ファイルの読み込み順序と使い方Tipsまとめ - Qiita
zshenv > zprofile > zshrc > zloginの順で読まれる
.zshenv
順序からもわかるようにどんな場合でも必ず最初に読み込まれる。
.zprofile
ログインシェルの場合に1度だけ読み込まれる。
.zshrc
ログインシェルとインタラクティブシェルの場合だけ読み込まれる。
とりあえず. zshrcに書いておけば良さそうか.
zsh + fish
.zshrc
echo 'im .zshrc'

export PYENV_ROOT=/usr/local/var/pyenv

if command -v pyenv 1>/dev/null 2>&1; then
  eval "$(pyenv init -)"
fi
.config/fish/config.fish
starship init fish | source


pyenv init - | source

