1. はじめに
複数の打鍵を伴うキー操作をボタン一発で行いたい、しかもそういう操作が16通りもある、そんなとき。
2. 用意するもの
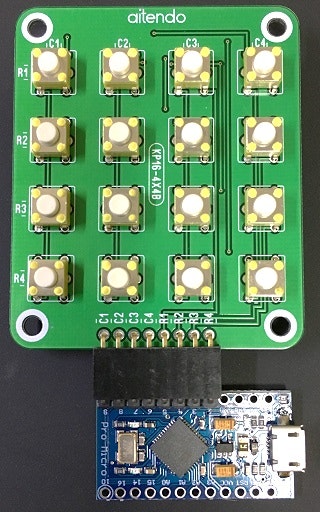
- カラーキーパッドきっと(4x4)[KP16-4X4BC](aitendo)
- Pro Micro(秋葉原のShigezoneさんで販売されている互換機を使用しました)
- L字の1列8ピンのピンヘッダ、ピンソケット
- USBシリアル変換器(必要に応じて)
カラーキーパッドきっと(4x4)[KP16-4X4BC]をPro MicroのDigital Pin#2~#9に接続します(Pro MicroのDigital Pin #2~#9が一列に並んでいるおかげで基板同士を直結できます)。
3. プログラム
- USB HIDキーボード機能に加え、基板にシルク印刷されている座標(R1C1~R4C4)をSerial1に出力します。
- キー入力が連続しないよう500msのディレイを入れています。
- サンプルとしてR1C1のボタンを押すとWindowsのスクリーンロックが発動します。
- 筆者が使用しているArduino IDEはVer 1.6.4です。
Arduino4x4keypad.ino
/***********************************************************************
 * Arduino4x4keypad
 *   2019.11.15 by ka's
 *
 * This program is based on Arduino Leonardo Tools Ver 2.0.3
 *    https://qiita.com/pbjpkas/items/97dbf835b0aab6725e94
 *
 * This program is for use with
 * 1. カラーキーパッドきっと(4x4)[KP16-4X4BC]
 *   http://www.aitendo.com/product/17022
 * 2. Pro Micro
 *    https://www.google.co.jp/search?hl=ja&as_q="pro+micro"
 * 3. FT232RQ USBシリアル変換キット[AE-TTL-232R]
 *    http://akizukidenshi.com/catalog/g/gK-09951/
 *
 ***********************************************************************/
/***********************************************************************
 * Copyright 2019 ka's@pbjpkas
 *
 * Licensed under the Apache License, Version 2.0 (the "License");
 * you may not use this file except in compliance with the License.
 * You may obtain a copy of the License at
 *
 *     http://www.apache.org/licenses/LICENSE-2.0
 *
 * Unless required by applicable law or agreed to in writing, software
 * distributed under the License is distributed on an "AS IS" BASIS,
 * WITHOUT WARRANTIES OR CONDITIONS OF ANY KIND, either express or implied.
 * See the License for the specific language governing permissions and
 * limitations under the License.
 ***********************************************************************/
//#include <Keyboard.h>

// Digital Pinの割当 for Pro Micro
# define KEY_R1             5
# define KEY_R2             4
# define KEY_R3             3
# define KEY_R4             2
# define KEY_C1             9
# define KEY_C2             8
# define KEY_C3             7
# define KEY_C4             6

// ウェイト時間
# define ANTI_CHATTER      50 //  50ms

/***********************************************************************
  関数プロトタイプ宣言
 ***********************************************************************/
// ツール応用例 - Windows Keyboard Shortcut, etc.
void win_screen_lock(void);

// キーパッド
void keypad_init(void);
int  keypad_get_key(void);
void keypad_execute(int keypad_val);

// setup, loop
void setup();
void loop();

/***********************************************************************
  ツール応用例 - Windows Keyboard Shortcut, etc.
 ***********************************************************************/
void win_screen_lock(void)
{
    Keyboard.press(KEY_LEFT_GUI);
    Keyboard.press('l');
    delay(ANTI_CHATTER);
    Keyboard.releaseAll();
}

/***********************************************************************
  キーパッド
 ***********************************************************************/
void keypad_init(void)
{
    pinMode(KEY_R1,      OUTPUT);
    pinMode(KEY_R2,      OUTPUT);
    pinMode(KEY_R3,      OUTPUT);
    pinMode(KEY_R4,      OUTPUT);
    pinMode(KEY_C1,      INPUT_PULLUP);
    pinMode(KEY_C2,      INPUT_PULLUP);
    pinMode(KEY_C3,      INPUT_PULLUP);
    pinMode(KEY_C4,      INPUT_PULLUP);
    digitalWrite(KEY_R1, HIGH);
    digitalWrite(KEY_R2, HIGH);
    digitalWrite(KEY_R3, HIGH);
    digitalWrite(KEY_R4, HIGH);
}

int keypad_get_key(void)
{
    int keypad_val = 0;

    digitalWrite(KEY_R1, 0);
    digitalWrite(KEY_R2, 1);
    digitalWrite(KEY_R3, 1);
    digitalWrite(KEY_R4, 1);
    keypad_val = keypad_val|((digitalRead(KEY_C4)<< 3)|(digitalRead(KEY_C3)<< 2)|(digitalRead(KEY_C2)<< 1)|(digitalRead(KEY_C1)<< 0));

    digitalWrite(KEY_R1, 1);
    digitalWrite(KEY_R2, 0);
    digitalWrite(KEY_R3, 1);
    digitalWrite(KEY_R4, 1);
    keypad_val = keypad_val|((digitalRead(KEY_C4)<< 7)|(digitalRead(KEY_C3)<< 6)|(digitalRead(KEY_C2)<< 5)|(digitalRead(KEY_C1)<< 4));

    digitalWrite(KEY_R1, 1);
    digitalWrite(KEY_R2, 1);
    digitalWrite(KEY_R3, 0);
    digitalWrite(KEY_R4, 1);
    keypad_val = keypad_val|((digitalRead(KEY_C4)<<11)|(digitalRead(KEY_C3)<<10)|(digitalRead(KEY_C2)<< 9)|(digitalRead(KEY_C1)<< 8));

    digitalWrite(KEY_R1, 1);
    digitalWrite(KEY_R2, 1);
    digitalWrite(KEY_R3, 1);
    digitalWrite(KEY_R4, 0);
    keypad_val = keypad_val|((digitalRead(KEY_C4)<<15)|(digitalRead(KEY_C3)<<14)|(digitalRead(KEY_C2)<<13)|(digitalRead(KEY_C1)<<12));

    return ~keypad_val; //押されているキーの値を1にしてreturnする
}

void keypad_execute(int keypad_val)
{
    if (keypad_val & 0x0001)
    {
        Serial1.println("R1C1");
        win_screen_lock();
    }
    if (keypad_val & 0x0002)
    {
        Serial1.println("R1C2");
    }
    if (keypad_val & 0x0004)
    {
        Serial1.println("R1C3");
    }
    if (keypad_val & 0x0008)
    {
        Serial1.println("R1C4");
    }
    if (keypad_val & 0x0010)
    {
        Serial1.println("R2C1");
    }
    if (keypad_val & 0x0020)
    {
        Serial1.println("R2C2");
    }
    if (keypad_val & 0x0040)
    {
        Serial1.println("R2C3");
    }
    if (keypad_val & 0x0080)
    {
        Serial1.println("R2C4");
    }
    if (keypad_val & 0x0100)
    {
        Serial1.println("R3C1");
    }
    if (keypad_val & 0x0200)
    {
        Serial1.println("R3C2");
    }
    if (keypad_val & 0x0400)
    {
        Serial1.println("R3C3");
    }
    if (keypad_val & 0x0800)
    {
        Serial1.println("R3C4");
    }
    if (keypad_val & 0x1000)
    {
        Serial1.println("R4C1");
    }
    if (keypad_val & 0x2000)
    {
        Serial1.println("R4C2");
    }
    if (keypad_val & 0x4000)
    {
        Serial1.println("R4C3");
    }
    if (keypad_val & 0x8000)
    {
        Serial1.println("R4C4");
    }
}

/***********************************************************************
  setup, loop
 ***********************************************************************/
void setup()
{
    Keyboard.begin();
    Serial1.begin(115200);

    keypad_init();
}

void loop()
{
    int keypad_val;
    keypad_val = keypad_get_key();

    if (keypad_val & 0xffff)
    {
        keypad_execute(keypad_val);
        delay(500);
    }
}
4. Arduino Leonardoで多目的ツールの製作との差分
Arduino Leonardoで多目的ツールの製作で作った3x3キーパッドとの差分は以下になります。
- ピンアサイン(3x3→4x4)
- 入力ポートのプルアップをマイコンで行う(INPUT_PULLUP)
- keypad_get_key()の戻り値のビットマスクを0x01ff→0xffff
- Serial1の通信速度を115200bpsに変更
5. おわりに
Pro Micro(互換機)とaitendoのキーパッドキットでお手軽&コンパクトに16ボタンキーボードを作ることができました。これでもう複雑な操作が16通りあってもザクザク行けます。