ROS初心者がこちら記事を読みつつgyro_carを動かしてみた。なんとなく動いたけど中身がどうなってるのか知りたかったので、軽く調べたメモ。
登場するノード
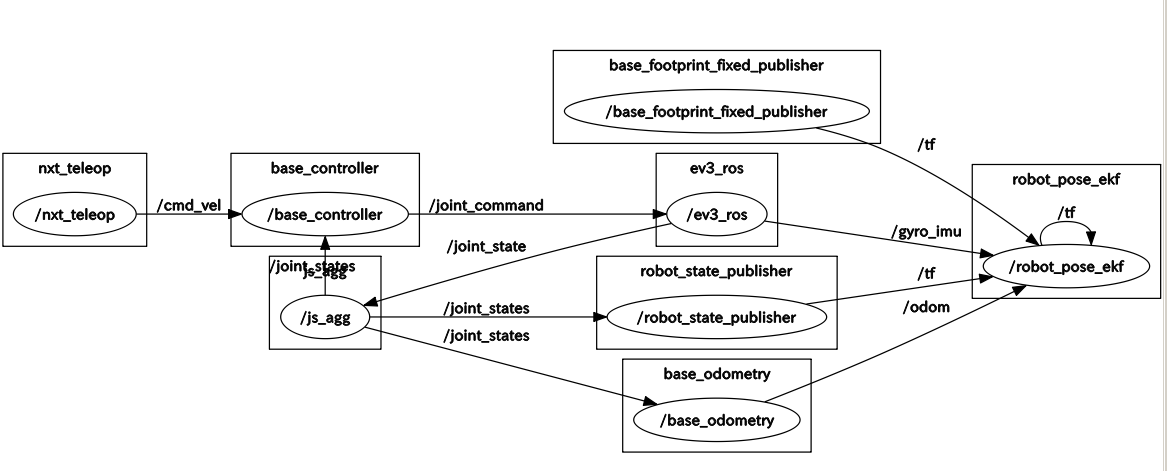
以下の8つ
- nxt_teleop
- base_controller
- ev3_ros
- js_agg
- robot_pose_ekf
- base_footprint_fixed_publisher
- robot_state_publisher
- base_odometry
各ノードの役割
※使ってなさそうなノードは調べてません
nxt_teleop
C++で書かれている(他のノードはpython)
キーボードの入力を拾って矢印キーが入力された場合に前進後退、旋回の指定値を/cmd_velに書き込む。0.15秒おきに/cmd_velの初期化が走っている。
/cmd_velの構造は以下のようになっている。使っているのはlinear:xとangular:zのみで、-1,0,1のいずれかの値をとる。
linear:
  x: 0.0
  y: 0.0
  z: 0.0
angular:
  x: 0.0
  y: 0.0
  z: 0.0
base_controller
nxt_teleopの入力(/cmd_vel)とEV3のモータの状態(/joint_stats)から次のモータの出力値を/joint_commandに書き込む。
/joint_commandの構造は以下のようになっている。左右それぞれのモータ出力値が出ている
name: l_wheel_joint
effort: 19.7664285714
---
name: r_wheel_joint
effort: 19.7664285714
ev3_ros
gyro_carの本体。メインループがあり、rpycを使ってEV3とコネクトしている。
/joint_controllerからの出力値を読み、値を補正してmortorを駆動させている。
モータの状態を/joint_stateに、超音波センサの値を/ultrasonic_sensor、ジャイロセンサの値を/gyro, /gyro_imuに書き込んでいるが、/joint_state,/gyro_imu以外は使われていない。
モータやセンサの構成情報などはev3_robot_gyro_carの方に設定がある。
/joint_stateの構造は以下のようになっている。
header:
  seq: 9122
  stamp:
    secs: 1446688086
    nsecs: 660684108
  frame_id: ''
name: ['l_wheel_joint']
position: [5.654866776461628]
velocity: [1.0]
effort: [0.0]
js_agg
ev3_rosからのモータフィードバック(/joint_state)をバリデーションし、base_controllerが読める形式に繋げて/joint_statesに書き込んでいる。
バリデーションの内容はnameの数とposition,velocity,effortのデータ数が一致しているかを見ている程度。
/joint_statesの構造は以下のようになっている。
header:
  seq: 18539
  stamp:
    secs: 1446695836
    nsecs: 102682113
  frame_id: ''
name: ['l_wheel_joint', 'r_wheel_joint']
position: [8.377580409572781, 31.747539093776854]
velocity: [1.0, 1.0]
effort: [0.0, 0.0]
その他のノード
値を読んだり書いたりしているが、ev3_rosに影響していないので読んでいない。
将来的にrobot_pose_ekfで倒立制御をしたりするのかな?
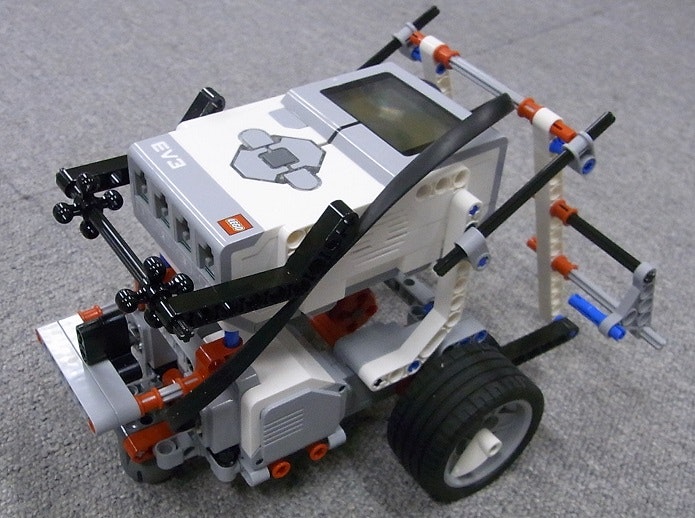
参考にしてモーター2つのロボを動かしてみた
ev3_robot_gyro_carを参考に、必要なノードのみでロボを動かしてみた
構成
- (モーター+車輪) * 2
- 倒立制御をしないため、本体をささえるためのベアリング1
ノード構成
ev3_robot_gyro_carを参考に必要なパッケージだけを抜き出し。ロボの設定を変更するだけで動作した。


