参考サイト様
let's プログラミング
https://www.javadrive.jp/servlet/auth/
環境
eclipse2019-9
tomcat9
書いた動機
学んだことを忘れないためのメモ書きです。
ほぼ上記参考サイト様の通りで動きましたが、自分の環境に合わせてちょこちょこ変更したので、変更部分を書いておきます。
Basic認証とは
簡易的な認証方法。
Webサイトを開くとポップアップが表示され、ログインIDとパスワードを要求されます。
IDもパスワードも暗号化されずに送信されるため、セキュリティ的にはだいぶ弱いらしい。
一度ログインするとブラウザを閉じるまでログイン状態が保持されます。
用意するファイル
- servlet
- web.xml
- auth.xml
- tomcat-users.xml
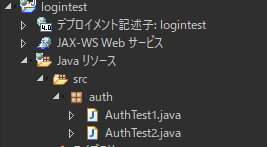
servletの作成
まずはservletを作っていきます。
AuthTest1.java
package auth;
import java.io.IOException;
import java.io.PrintWriter;

import javax.servlet.ServletException;
import javax.servlet.annotation.WebServlet;
import javax.servlet.http.HttpServlet;
import javax.servlet.http.HttpServletRequest;
import javax.servlet.http.HttpServletResponse;

// 参考サイト様との変更箇所。アノテーションを加えました。
@WebServlet("/AuthTest1")
public class AuthTest1 extends HttpServlet {

    public void doGet(HttpServletRequest request, HttpServletResponse response)
        throws IOException, ServletException{

        response.setContentType("text/html; charset=Shift_JIS");
        PrintWriter out = response.getWriter();

        out.println("<html>");
        out.println("<head>");
        out.println("<title>ユーザー認証テスト</title>");
        out.println("</head>");
        out.println("<body>");

        out.println("<p>テストページ1</p>");

        // 参考サイト様との変更箇所。URLを変更。
        out.println("<p><a href=\"/logintest/AuthTest2\">テストページ2へ</a></p>");

        out.println("</body>");
        out.println("</html>");
    }
}
AuthTest2.java
package auth;
import java.io.IOException;
import java.io.PrintWriter;

import javax.servlet.ServletException;
import javax.servlet.annotation.WebServlet;
import javax.servlet.http.HttpServlet;
import javax.servlet.http.HttpServletRequest;
import javax.servlet.http.HttpServletResponse;

// 参考サイト様との変更箇所。アノテーションを加えました。
@WebServlet("/AuthTest2")
public class AuthTest2 extends HttpServlet {

    public void doGet(HttpServletRequest request, HttpServletResponse response)
        throws IOException, ServletException{

        response.setContentType("text/html; charset=Shift_JIS");
        PrintWriter out = response.getWriter();

        out.println("<html>");
        out.println("<head>");
        out.println("<title>ユーザー認証テスト</title>");
        out.println("</head>");
        out.println("<body>");

        out.println("<p>テストページ2</p>");

        // 参考サイト様との変更箇所。URLを変更。
        out.println("<p><a href=\"/logintest/AuthTest1\">テストページ1へ</a></p>");

        out.println("</body>");
        out.println("</html>");
    }
}
ファイルの置き場所はauthパッケージの中。
web.xmlの変更
WEB-INF/libディレクトリのweb.xmlを変更します。
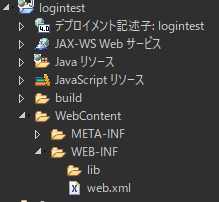
web.xml
<?xml version="1.0" encoding="UTF-8"?>
<web-app xmlns:xsi="http://www.w3.org/2001/XMLSchema-instance" xmlns="http://xmlns.jcp.org/xml/ns/javaee" xsi:schemaLocation="http://xmlns.jcp.org/xml/ns/javaee http://xmlns.jcp.org/xml/ns/javaee/web-app_4_0.xsd" id="WebApp_ID" version="4.0">
  <display-name>logintest</display-name>

<!-- 参考サイト様との変更箇所。アノテーションを使用したので、<servlet>と<servlet-mapping>を消去。 -->
<security-constraint>
    <web-resource-collection>
      <web-resource-name>User Basic Auth</web-resource-name>
      <url-pattern>/*</url-pattern>
    </web-resource-collection>
    <auth-constraint>
      <role-name>sales</role-name>
    </auth-constraint>
  </security-constraint>

  <login-config>
    <auth-method>BASIC</auth-method>
    <realm-name>User Basic Auth</realm-name>
  </login-config>

  <security-role>
    <role-name>sales</role-name>
  </security-role>

</web-app>
auth.xmlを作る
docbase=""にはAuthTest1.javaがあるディレクトリを指定します。
ファイルの置き場所はtomcatをインストールしたディレクトリ。¥Tomcat9¥conf¥Catalina¥localhost¥
auth.xml
<Context path="/auth"
docBase="<?xml version="1.0"?>
<Context docBase="C:\Users\hoge\pleiades-2019-09-java-win-64bit-jre_20191007\pleiades\workspace\logintest\src\auth" path="/auth"> </Context>">
</Context>
tomcat-users.xmlの変更
EclipseプロジェクトのSevers内にあるtomcat-users.xmlを変更します。
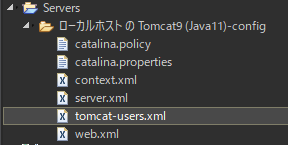
tomcat-users.xml
<!-- 参考サイト様との変更箇所。デフォルトで設定されていたroleはすべて削除しました。謎のエラーが出たので。 -->
<tomcat-users>
  <role rolename="sales"/>
  <role rolename="staff"/>
  <user username="yamada" password="yamada" roles="sales"/>
  <user username="katou" password="katou" roles="staff"/>
</tomcat-users>
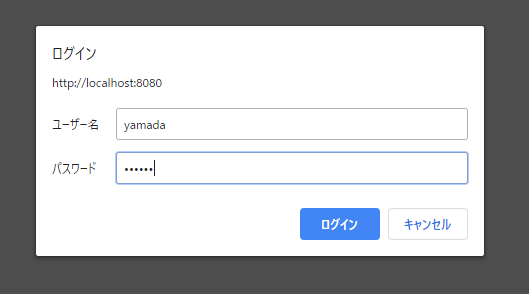
試してみる
下記の画面が出たら
ユーザー名:yamada
パスワード:yamada
を入力してログインできたら成功!
ブラウザを閉じるまでログイン状態が保持されます。
下記はroleを設定していないのでログインできません。
ユーザー名:katou
パスワード:katou
以上です。
お疲れ様でした。